1. P
Sensor Magnet
O
D
H
Do
bat
wi
su
(1)
(2)
(3)
main body and the magnet.
(
4)
main body and the magnet.
(5)
magnet is 10MM.
(6)
Sensor drops, it will send a report to the
(7)
(8)
(9)
Ⅰ. GE
LE
Latch
Z-button T
-1℃ 0%
0~℃
Ra
Ra
90
92
Ra
Ra
Ma
Ma
Ab
Ab
Po
2. S
Two A
St
St
Z-
Mo
Ab
on b
Wor
St
Ⅱ.IN
(1)
such that
each other
should separate
Ma
(2) Screw the bidirec
door or window frame
a screwdrive
NOTE:
Doo
or near meta
metal ob
away from water and oth
2.
1.
(4)
mag
Ⅲ. Z-
Door/Window
network
and/or
network
of
(1) Insert the
(2) Set the
(see Z-W
(3) T
(4) If the
and then k
and then turn
TIP
If you
device that
in a
controller
Ⅳ. RE
T
(1) In
(2) Set th
(se
(3) Triple cl
off wit
you nee
Ⅴ. RE
Reset
Z-W
T
Press
changed
reset
Ⅵ. AS
Ass
suc
Doo
Gr
lev
Gr
TIP
1.
2.
be
th
Ⅶ. WAK
Wak
Available 0-2678400
Default 0
Defining a
notification command
update par
Wak
command, in
up by
NOTE:
1 minu
Doo
com
Suc
Ⅷ. LO
Door
when Z-Bu
of the Door/W
the Door/
Door
settin
confi
(3)
adhere
NOTE:
Wip
Sen
redu
(5) Press the latc
sen
Availab10-50 (10
Defaul 20
Parameter size: 1[by
0 –
1 –
Default sett0
Parameter size: 1 [byte]
Parameter No.1
Door
magn
0 –Send
Send
1 –Send
Send
Defaul0
Parameter size: 1[by
Parameter No.3
This param
eter define
Included as a
Included as
(1) Insert
(2) Set
(see
(3) Pr
(4) If
and then
and then
NOTE:
Use this
primary contr
Ⅸ. AD
Parameter No.1
Door
asso
This
subject
(1)
(2)
interf
Ⅹ.FCC NOTICE USA)
1 Funktion und V
Der T liefert Informationen an das Hausautomations-
system, ob eine T
Das Gerät besteht aus einem Magnetsensor
weglichen T
dem Hauptgerät, das auf dem fests
werden kann.
2 Allgemeine Sicherheitshinweise
• Lesen Sie Bedienungsanleitung vor Inbetriebnahme des
Gerätes vollständig durch.
• Betreiben Sie den T nur in trock
räumen. V
sowie Sonnen- oder andere W
• V
laden, nicht kurzschließen, nicht auseinander nehmen
plosionsgefahr! Erschöpe Ba
Gerät entfernen. Keine gebraucht
zusammen verwenden.
• Betreiben Sie das Gerät nicht weiter
liche Beschädigungen aufweist.
Hauptgerät Magnetsensor
LED
Kurzanleitung
T 2
Kontakt zur Erf
Fenstern
3 Technische Dat
Gerät T
Artikel-Nr 0000/9518
EAN 4019588095182
Stromversor 2x 1,5 V Alkaline, AAA, Klasse III
Stromverbrauch Betrieb
Standby
60 mA
30 µA
Baerielaufzeit T
Sendefrequenz 868,42 MHz
Funkreichweite ≤ 100 m (Freifläche)
≤ 30 m (In Gebäuden)
Schutzklasse IP20
Abmessung Hauptgerät
Magnet
75 x 28 x 18 mm
75 x 12 x 18 mm
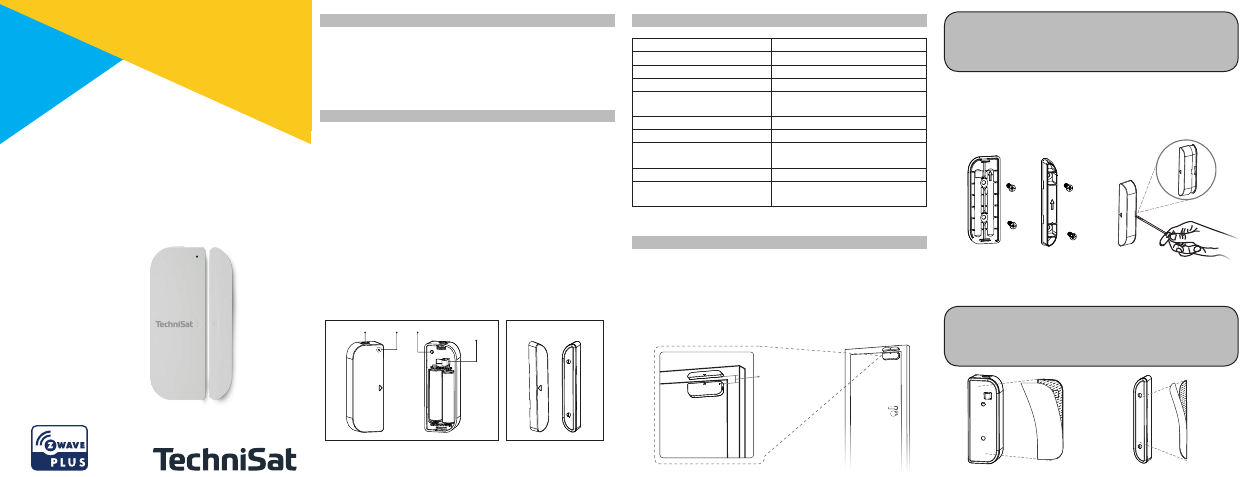
4 Montage
(1) Montieren Sie Hauptgerät und Magnetsensor s
Einkerbungen auf den Gehäusen sich gegenüberliegen. Der
parallele Luspalt zwischen Hauptgerät und Magnetsens
maximal 10 mm betragen. Die Alarmbedingung tri ein, wenn
der Abstand zwischen Magnetsensor und Hauptgerät mehr als
ca. 30 mm beträgt.
Max. 10 mm
!
Bei Montage des Hauptgerätes auf einem Metallrahmen
oder in der Nähe eines Metallkörpers (Heizk
leitungen, usw
reduziert.
(2) Entferne Sie die Montageplae vom Haupt
die V
plae und den Magnetsensor an W
rahmen. Önen Sie die Abdeckung des Magnetsensors mit ein
Schraubenzieher
Verriegelung
(3) Befestigen Sie Montageplae und Magnetsensor mit
beiliegendem doppelseitigem Klebeband an W
Fensterrahmen.
!
Reinigen Sie die Oberflächen auf welche Sie den T
kontakt 2 montieren. S
verringern die Hakra des doppelseitigen Klebebandes.
Lerntaste Sabotage
Kontakt