K G I
S:3 x 1 m
8
1
W
I
I
T
c
d
r
F F
1
2
3
4
5
6
7
8
9
1
11
1
2
3
4
5
6
7
8
9
1
1
GE
It i
be
Re
IN
1. R
ad
2. P
2)
BATT
1. O
fi
2. Install / replace with 3x “AAA” size batteries in the compartment.
It is recommended that only alkaline batteries are used.
3. Replace the battery compartment cover (10) at the back of the
unit.
4.
batteries.
B
1
2
3
4
5
6
7
t
8
c
9
o
1
c
11
SETTI
The wea
or the
1. The doubl
above se
the disp
to chang
level un
feet)
infor
2. Pres
above se
3. Pres
curre
for the wea
area.
Figur
4.Pres
INTERPRETING THE WEA
1. The weather station requires at least 24 hours to acclimatise to
local weather conditions. The weather station will process and
analyse the weather patterns of the past 24 hours in order to
determine the future weather
may not accurately reflect the actual weather for your immediate
area till 24 hours have elapsed.
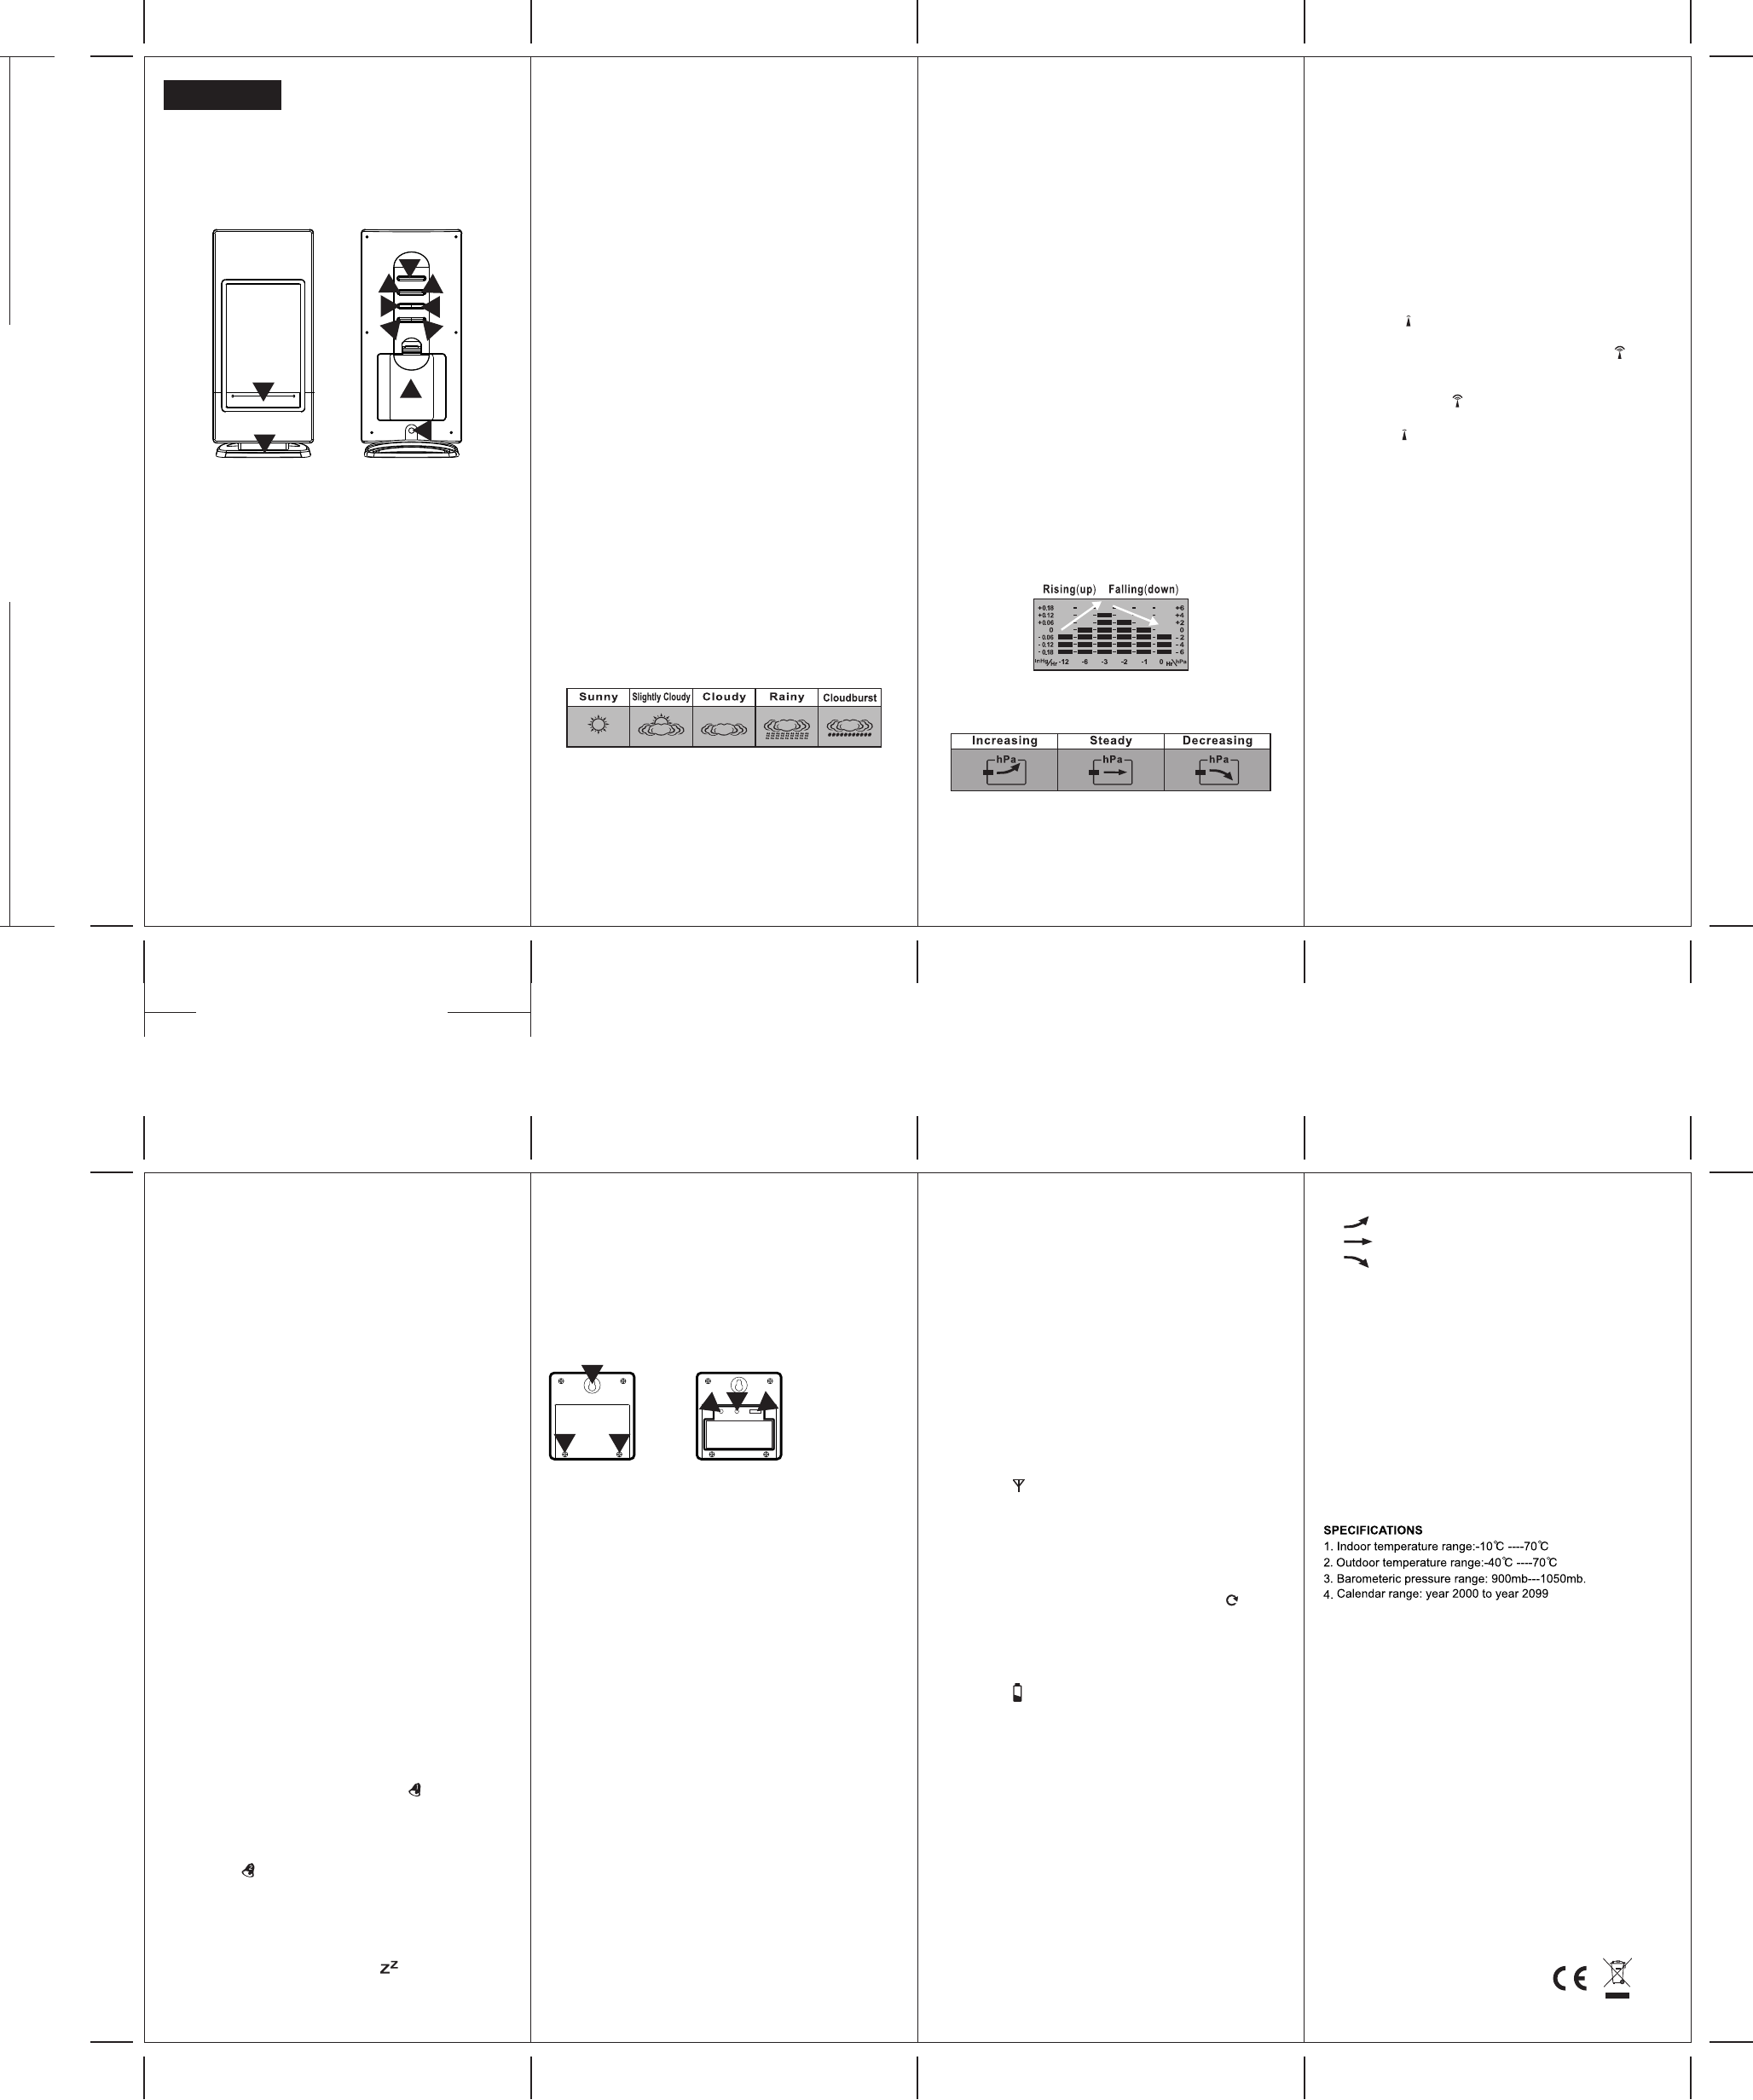
2. The weather station will display the symbols (see figure 3) to
indicate the predicted weather forecast for the next 12 to 24
hours for an area within a radius of approximately 30-50 km.
Note:
1. The weather forecasting is approximately 70% accurate.
The weather forecast is only for reference and only for domestic
use. Do NOT rely on the weather station for a forecast for any
serious matter including but not limited to: personal health, any
business or financial decisions, and/or agricultural planning.
certainly NOT
2. The weather forecast does not display the current weather
displays future weather situation.
ADJUS
1. Pre
2. Pre
betw
merc
3. Pre
4. Pre
betw
5. Pre
6. Pre
unit
7. Pre
sea l
8. Pre
curr
for t
BAROMETER:
The unit takes approximately 24 hours to process and analyse the
recorded barometric pressure data. Prior to 24 hours, the pressure
trend and weather forecasts may not reflect actual weather
forecast for your area.
READING
Recorded
displayed
Note: It
trend
location.
a
pressure
and
for
F
B
TO RECALL
The barometric pressure reading is recorded in hourly intervals
and can be recalled and displayed for the previous 12 hours.
Press “History” button (5) repeatedly to view pressure recorded
for the past hours. “-1 HR ” indicates the pressure of the previous
hour
before the current pressure reading returns.
TO SYNCHRONISE CLOCK WITH RCC:
1. Where available, the clock will automatically synchronise with
the radio control towers at the following time: 02:03, 03:03,
04:03, 05:03.
2. User may also manually synchronise the clock by following the
instructions below
3. Hold down the “- / RCC” button (8) for approximately 3 seconds
until symbol is flashing.
4. When this signal is flashing, the clock is attempting to
synchronise with the radio control tower
when a strong signal is received and the clock will synchronise
with the radio control tower
minutes. The symbol will stop flashing and will be displayed
once the signal is received and is in synchronisation.
5. The symbol will not be displayed if the clock is not able to
synchronise within this period of time. User may manually
synchronise again at a later time or
attempts to synchronise at the above mentioned times.
6. Please note all other clock / weather station settings cease to
function when the clock is in RCC synchronisation mode. Wait
until the clock is no longer attempting to synchronise or it is
synchronising to set other clock and weather station function.
7. If the alarm goes off during synchronisation mode, RCC
synchronisation will cease immediately
instructions again to set synchronisation.
RCC Z
Thi
use
the
Thi
you
1. Pr
2. Pr
3. Pr
4. Pr
T
1. Hold down the “ALM SET ” button (3) for approximately 3
seconds until the display is flashing.
2. Press “+ / C / F” button (4) or “- / RCC” button (8) to change the
hour setting.
3. Press “ALM SET ” button (3again. Press “+ / C / F” button (4) or
“- / RCC” button (8) to change the minute setting.
4. Press “ALM SET ” button (3) again. Press “+ / C / F” button (4)
or “- / RCC” button (8) to change the year setting.
5. Press “ALM SET ” button (3) again. Press “+ / C / F” button (4)
or “- / RCC” button (8) to select between the 'month / date' and
'date/ month' setting.
6. Press “ALM SET ” button (3) again. Press “+ / C / F” button (4)
or “- / RCC” button (8) to change the month setting.
7. Press “ALM SET ” button (3) again. Press “+ / C / F” button (4)
or “- / RCC” button (8) to change the date setting.
8. Press “ALM SET ” button (3) again. Press “+ / C / F” button (4)
or “- / RCC” button (8) to select between 'am / pm' and '24-hour
time' clock setting.
9. Press “ALM SET ” button (3) again to change language setting.
10. ENG for English - GE for German - IT for Italian - FR for
French - NE for Dutch - ES for Spanish - DA for Danish.
1ALM SET ” button (3) again to confirm settings. Display
will no longer flash.
TO SEE
1. Press “MODE ” button (6) once and alarm time 1 will be shown
as indicated by
2. Press “MODE ” button (6) again and alarm time 2 will be shown
as indicated by
3. Press “MODE ” button (6) again and the current time will be
shown.
TO SET
1. Press “MODE ” button (6) once and alarm time 1 will be shown
as indicated by
2. Press and hold “ALM SET ” button (3) for approximately 3
seconds until
3. Press “- / RCC” button (8) to change the hour setting.
4. Press “ALM SET ” button (3) again.
5. Press “+ / C / F” button (4) or “- / RCC” button (8) to change the
minute setting.
6. Press “ALM SET ” button (3) again.
7. When ALM SET ' button (3)
to turn ON and OFF the alarm. The symbol will be shown
when the alarm is on.
8. Press “Mode” button (6) again and alarm time 2 will be shown.
T
“Mode” button (6) again to see current time.
9. The symbol will be shown when alarm
10. The alarm will sound for 120 seconds when the preset alarm
time is reached. Press any button at the back of the clock to
de-activate the alarm. The clock will automatically enter
snooze mode if the alarm is not de-activated.
1
to enter 'snooze' mode. The symbol will flash when the
clock is on 'snooze' mode. The alarm will sound again in 5
minutes. Press any button at the back of the clock to
de-activate the alarm.
12. Please note that alarm time setting ceases to function when
the clock is in RCC synchronisation mode. W
synchronisation has ended before setting the alarm time.
R
F F
1
2
3
4
5
1
2 2
4
3
5
CONFIGURING THE THERMOMETER:
The weather station is equipped to synchronise up to 3 remote
temperature sensors. One remote temperature sensor is included.
Additional remote temperature sensors are available for purchase
separately
sensors.
BA
1. Open battery compartment at the back of the unit by removing
the two small screws (RTS 2) with a Philips head screwdriver
(see figure 4)
2. Install / replace with 2x “AAA” size batteries in the compartment.
It is recommended that only alkaline batteries are used. Do not
use rechargeable batteries.
3. The weather station is capable of receiving up to 3 different
channels. Select the channel number (1, 2, or 3) by sliding the
“Channel 1 2 3” switch (RTS 5). If you only have 1 remote
temperature sensor
4. Press the “reset” button (RTS 4) once and the red light will flash
once.
5. Replace the battery compartment cover at the back of the unit
by tightening the two screws (RTS 2).
INST
1. Place the remote temperature sensor at a desired place by
mounting the unit on a screw (screw not included) using the
hole for hanging (RTS 1).
a flat horizontal surface.
2. The unit can be placed indoor or outdoor
proof. Do not submerge unit in water
water for prolonged periods.
or snow on unit.
unit from the exterior location in extreme or harsh weather
conditions, including but not limited to hurricane, typhoon, and
cyclones seasons. Do not place the unit in area of high winds.
3. Do not place the remote temperature sensor more than 30
meters (98 feet) from the receiving weather station unit. The
remote temperature sensor is more effective if there are no
obstructions and interference between the remote temperature
sensor and the weather station. The remote temperature sensor
might have to be closer than 30 meters if the weather station is
not able to receive signals. This may be due to obstructions
and or interference. The user might need to experiment with
various locations to get the best reception.
4. If there is a change in power source in the main unit (i.e. from
batteries to
(RTS 3) on the remote temperature sensors to reconfigure
remote temperature sensors. See figure 5.
CONFIGURING WEA
REMOTE TEMPERA
1. Follow the above instructions to set up remote temperature
sensor
2. Press “Channel” button (7) on weather station for 3 seconds.
The symbol will flash. This will reset all temperature
memories.
3. The weather station will begin scanning for signals for channel 1.
As soo
will be displayed. The weather station will automatically scan for
other channels. It will scan each channel for approximately 3
seconds before skipping to the next channel.
4. Once all your channels are received by the unit, press “Channel”
button (7) once to confirm the channel. The symbol will no
longer be displayed.
5. The weather station will receive a new signal automatically
every 30 seconds to update the remote temperature.
6. Press “Channel” button (7) on weather station repeatedly to
select between channel 1, channel 2, and channel 3.
7. The symbol will be displayed on the weather station unit if any
of the remote temperature sensor's batteries need replacing.
T
Press “Max / Min” button (4) to display maximum recorded
temperature, minimum recorded temperature and current
temperature. “max” indicates maximum temperature. “min”
indicates minimum temperature
T
1. The “IN” temperature displays the indoor temperature. It is the
temperature of the actual location of the weather station.
2. The “OUT” temperature displays the temperature of the remote
temperature sensors.
3. Press “Channel” button (7) on weather station repeatedly to
display the temperature of channel 1, channel 2, and channel 3.
C
P
t
T
1
2
3
W
1. Do not subject the unit to excessive force, shock, dust,
temperature or humidity
2. Do not immerse the unit in water
3. Dispose the complete unit when the internal battery is no longer
charging or when the unit is no longer displaying the
temperature and / or humidity
4. Do not remove any screws.
5. Do not dispose this unit in a fire. IT MA
6. Keep unit away from small children. The unit or parts of the unit
might be a choking hazard.
7. Never attempt to recharge the batteries by any other methods.
8. Dispose the unit legally and environmentally
9. Recycle when possible.