Vehicle fe
Antara
Quick Reference Guide
Refer to Owner’s M
Illustrations
Oper
Depending o
and access
vehicle may diff
KTA 2719-2 January 2013
*KTA-2719-2*
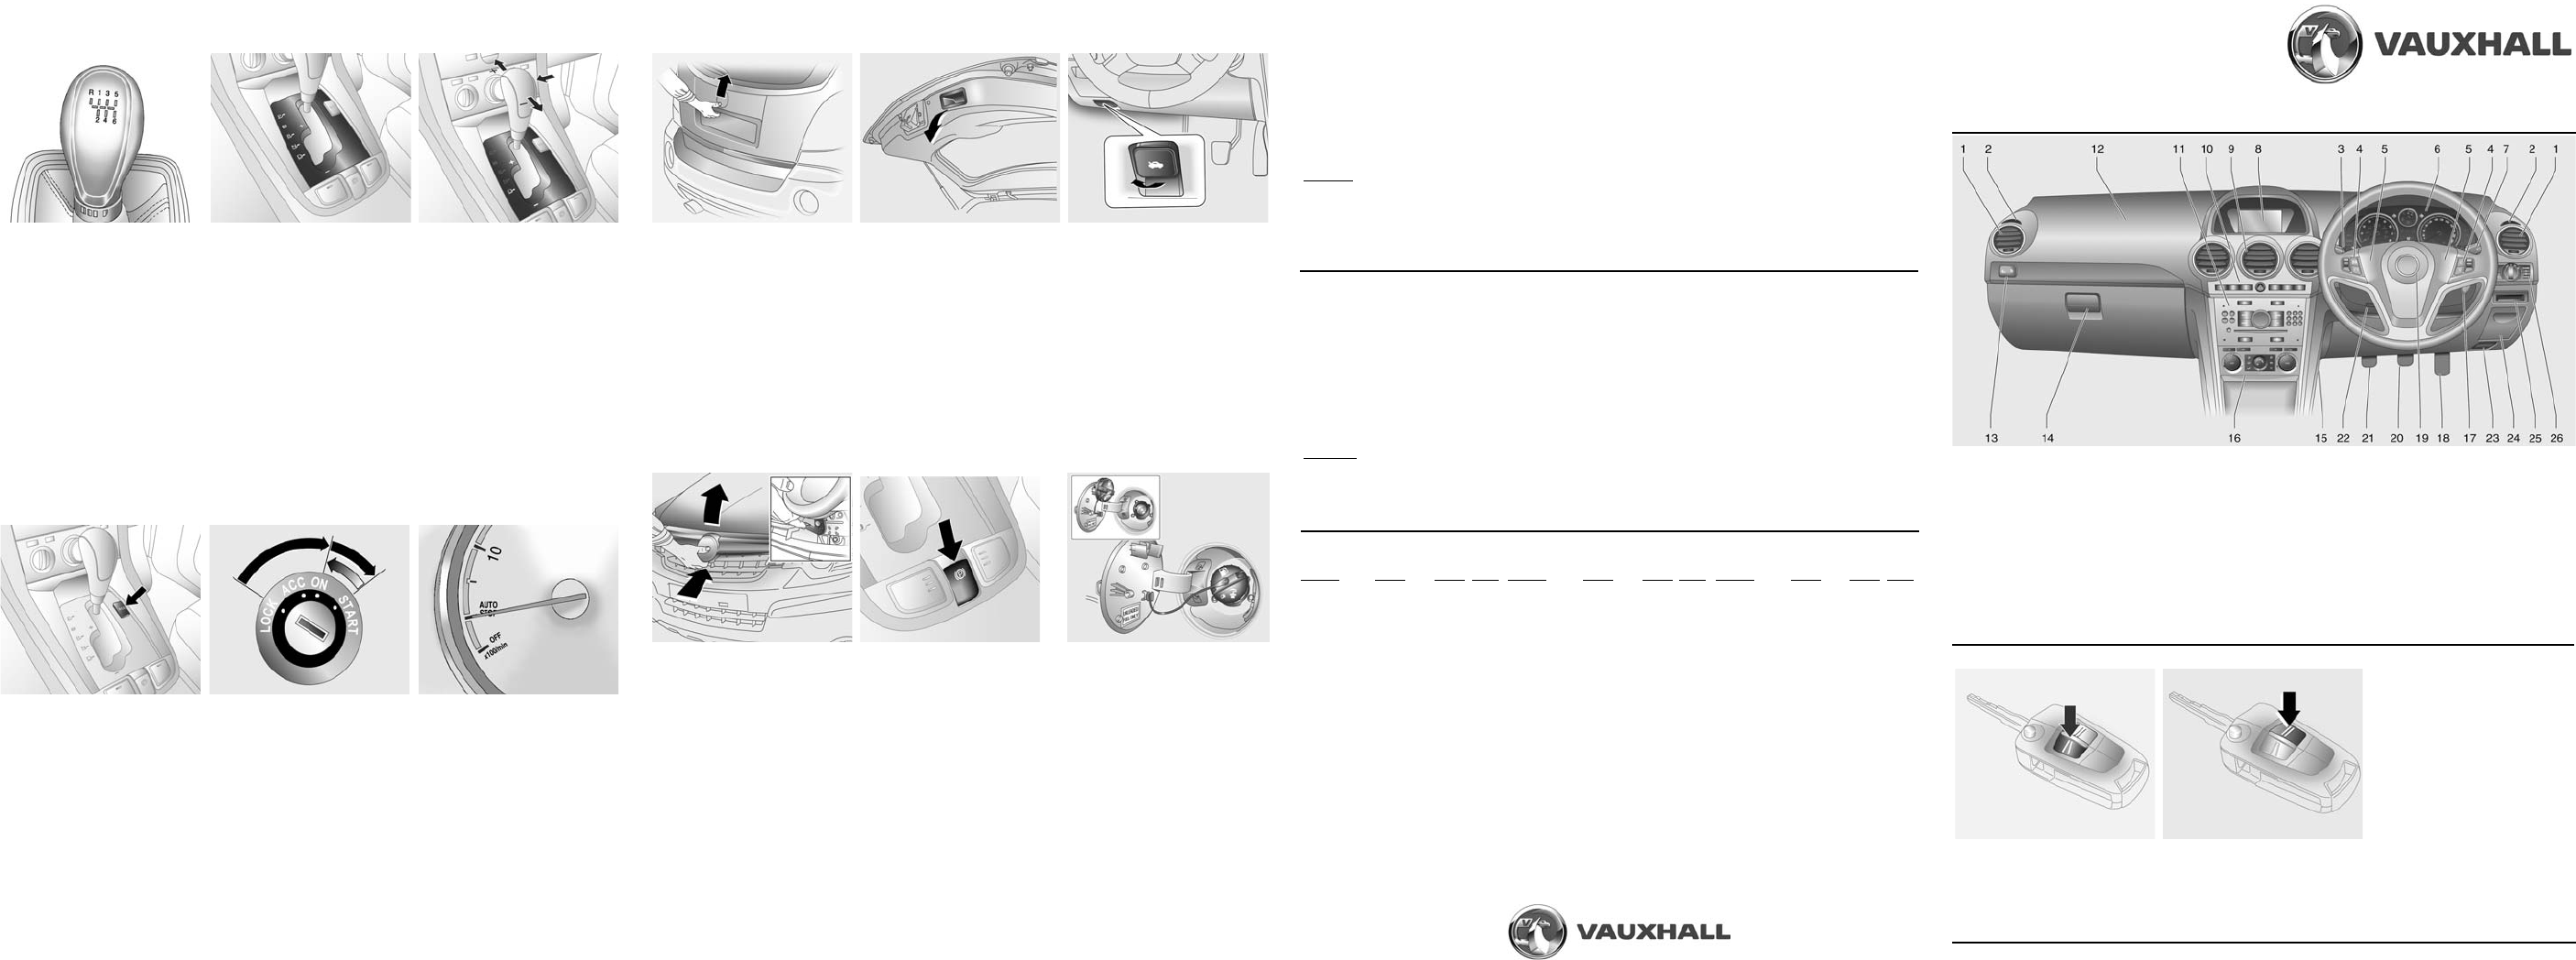
Vehicle features Vehicle features
Unlocking:
Press button q .
The doors, loadcompartment and
fuel filler
Open the doors by pulling the
handles.
Locking:
Close doors, load compartment,
fuel filler flap,
sunroof.
Press buttp.
The doors, lo
fuel filler
Press button p twice within
3 seconds to activate anti-theft
alarm system and d
doors.
Do not deadlock doo
people in the
cannot be unlocked from the
inside.
To lock from inside the passenger
compartment, close all doors and
press left part of switch
m in
driver’s do
part of switch
m.
Electronic imm
Activated automatically when key
is removed fr
1. Side
2. Fixed air vents
3. Turn signals, low/high beam,
headlight flash, exit li
parking lig
4. Steering wh
trip computer
5. Horn
6. Instrume
7. Wiper and washer system
8. Info-Display, ch
tyre pressu
system, trip comput
9. Centre air vents
10. Hazard warning flashe
stop-start system eco button,
Electronic Sta
Descent Contro
anti-theft alarm system LE
folding ex
11. Infotainment sy
12. Front passenger airbag
13. Front passenger airbag sys
status LED’
seat belt control
14. Glovebox
15. Fuse bo
16. Climate control s
17. Ignition s
steering wheel l
18. Accelerator
19. Driver airbag
20. Brake pedal
21. Clutch pedal
22. Steering w
23. Bonnet re
24. Coin stor
25. Card hold
26. Light switch
Manual tran
R =R
With the vehicle s
3 seconds af
pedal and engage th
If the gear does not engage
lever to neutral,
pedal and depress aga
repeat gear selectio
Do not grind the cl
unnecessarily.
When operat
pedal fully.
a foot rest.
Automatic transmission,
Automati
P =P
R = Reverse
N =N
D =D
Selector leve
out of P or N when ignition is on
and foot brake is applie
To engage P or R , push release
button on selector lever. Never shift
to P or R when vehicle is moving.
Engine can only be started with
lever in posiP or N. Depress
foot brake or apply electri
parking brake befo
The selected modeP, R, N
or D is
shown in the transmission di
Automatic transm
Manual mode:
Move selector lever
position D to the left.
+ = Shift to higher gear
- = Shift to lower gear
Tip selector lever in
direction. It then returns to the
centre position.
If a higher gear is selected when
vehicle speed is
gear is selected when veh
is too high, the shift is not executed.
The selected gear1 - 6 in manual
mode are sho
transmissio
Automatic tr
Fuel economy mode:
In automatic mode, press
s
button; cons
illuminates in
cluster.
Fuel economy mode
transmission to ada
patterns and adapts certai
electronic system
improving the vehicl
economy.
Do not use fuel
whilst towing, e.g.
Starting
Turn key to position ACC
Move steering whe
release steeri
Manual transmiss
with brake and clutch peda
depressed
Automatic transmission in P or N
with brake pedal depressed
Do not accelerate
Diesel enginesON
for prehea
indicator ! to exting
Turn key to START and release
Before restarting or to switch
engine off, t key back to
position LOCK .
Stop-start system:
When condition
switches off the
and reduce e
vehicle is at a low spe
standstill, e.g. at traffic lights or in a
traffic jam. It starts the engine as
soon as the clutch is depressed.
To activate an Autostop:
Depress clutch pedal
Shift to neutr
Release th
The needleAUTOSTOP in
the tachometer.
To restart engine, depress clutc
pedal again.
Opening the bonn
To open bonnet,
release leve
/ located below
instrument pane
The bonnet will th
and will parti
release lever
Do not pull re
vehicle is moving.
Unlocking and o
tailgate:
Press button q on remote control
to unlock tailgate together with the
doors. To unloc from inside
passenger comp
right part
switch
m in driver’s
To open tailgate, operate button
above number pl
tailgate.
With engineng, tailgate will
only unlock when el
brake is applied or automatic
transmission is in position P.
Closing an
Use the interior handl
underside o
when closing. Clo
pushing
securely.
Press button p on remote control
to lock tailgate together with the
doors.
To lock tailgate from inside the
passenger
part of central locking switc
m in
the driver
To open completely, locate safety
catch found sli
on underside of bo
upwards and l
The bonnet is
automatically.
If the bonnet is opened during an
Autostop, the engine will
restarted automatically for safety
reasons.
To close
and allow it to fall into the catch
under its ow
the bonnet is en
Electrical p
Pull switch J , parking brake
operates automatically with
adequate force. For maximum
force, e.g. when parking with trailer
attached or on inclines, pull switch
J twice.
The parking brake can always be
activated, even if
Before leaving th
parking brake status.
To release, swi
brake pe
switch J .
Drive away function
Selecting a gear or engagi
gear (automatic transmission) and
then depressin
pedal releas
brake.
Refuelling:
Before re
and any external heate
combustion chambers
mobile phon
located at left rear side of vehicle.
The fuel fill
opened if the vehicl
Push fuel fill
Unscrew filler cap
and retain cap in the bracket on
the fuel fill
overflo
Petrol engine
that complies with EN 228 or
E DIN 51626-
Diesel engi
complies with EN 59
Fuel tank capacity - 65 litres.
Vehicle secu
Winter tyres:
Winter tyres impro
Tyres of size 215/7
Tyre pressure:
Check tyre pressureys and prior to any long jo
checked when cold. This al
Use the valve cap key (l filler flap) to makwing the valve cap
Tyre pressure data refers to cold tyres. It applie
Always inflate
The ECO tyre pres
Warning:
Incorrect tyre pressureveon
If tyre pressure
separation and even to tyre b
Tyre pressure (psi
Setting up to full load
Engine
Tyres Front Re
A24 XF 215/70 R16
1)
,3 3
235/65 R17,
235/55 R18,
235/50 R19
A30 XF 215/70 R16
1)
,3 3
235/65 R17,
235/55 R18,
235/50 R19
A22 DM 215/70 R16
1)
,3 3
235/65 R17,
235/55 R18,
235/50 R19
A22 DMH 2
1)
,3 3
235/65 R17,
235/55 R18,
235/50 R19
All Temporary spare 6 60
Tyre pres
ECO setting up to full load
Engine
Tyres Front Rear
A24 XF 215/70 R16
1)
,3 3
235/65 R17,
235/55 R18,
235/50 R19
A30 XF 215/70 R16
1)
,3 3
235/65 R17,
235/55 R18,
235/50 R19
A22 DM 215/70 R16
1)
,3 3
235/65 R17,
235/55 R18,
235/50 R19
A22 DMH 215/7
1)
,3 3
235/65 R17,
235/55 R18,
235/50 R19
All Temp
2)
- -
1)
Spare whee
2)
Temporary s
with
Tyre pressure
Setting for tra
Engine
Tyres Front Rear
A24 XF 215/70 R16
1)
,3 4
235/65 R17,
235/55 R18,
235/50 R19
A30 XF 215/70 R16
1)
,3 4
235/65 R17,
235/55 R18,
235/50 R19
A22 DM 215/70 R16
1)
,3 4
235/65 R17,
235/55 R18,
235/50 R19
A22 DMH 215/
1)
,3 4
235/65 R17,
235/55 R18,
235/50 R19
All Temporary spare 60 60
Engine oil:
When the ignition
S will illumina S
illuminates conti
However, check engsis, to prevent da
correct s
Check the oil with veh
least 5 minutesclean, insert to s
Caution:
It is the owner
Insert dipstick to stop on handle and make half a turn.
When engineMIN mark on the dipstick, top up engine oil.
We recommend the use of the same grade of engine oil that was used at the last oil
The engine oil lemust not exceed the MAX mark on the dipstick.