Vehicle fe Vehicle features
Vehicle features
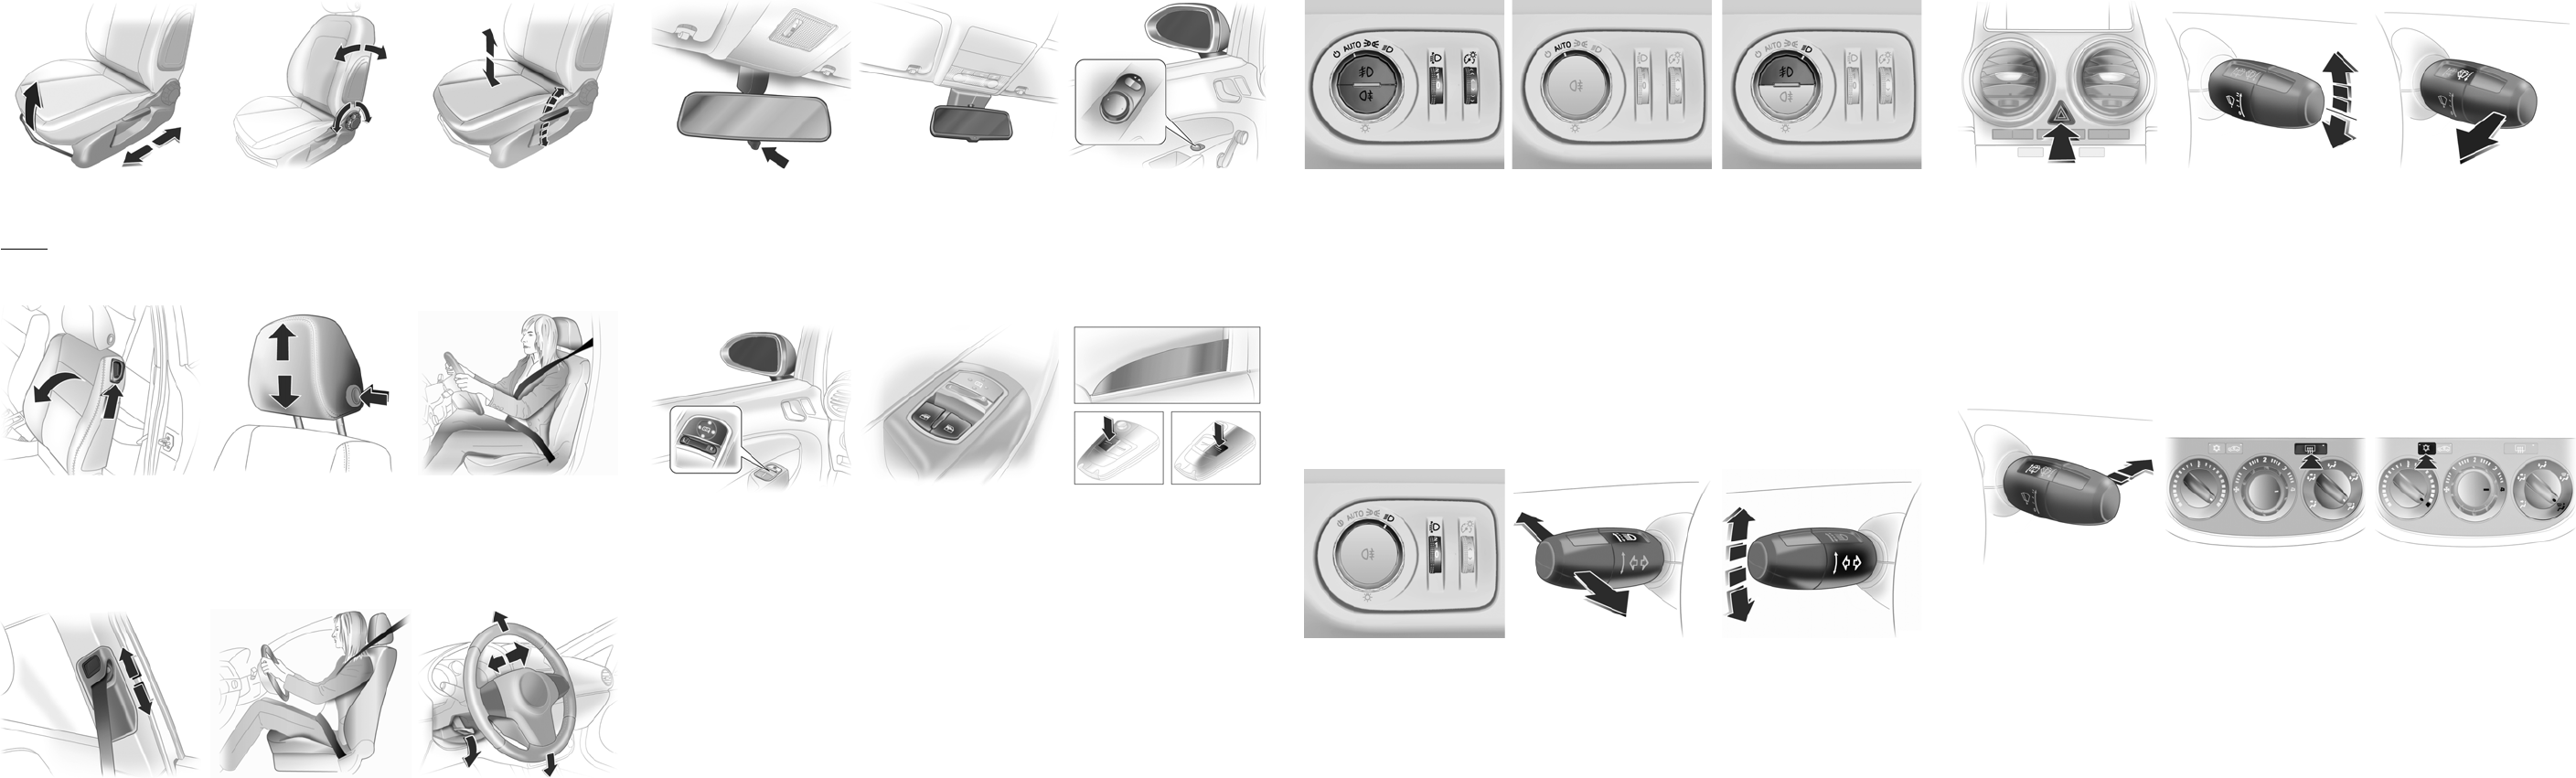
Longitudinal
Pull handle
handle. Ensure the backrest
engages.
Danger:
Do not sit nearer than 25 cm from
the steering wheel,
airbag deployment.
Seat backrests:
Turn handwhee
seat when adjusting.
Do not angle the backrest too far
back. We recommend a maximum
rake of appro
o
.
Seat heig
Lever pumping motion
up = seat higher
down = seat lower
Seat folding
Lift release le
forwards. Lo
and backrest engage
position. Slid
Do not operate handwheel
adjust backrest rake with backrest
in folded po
Head restraint adju
Press the rel
height and eng
The upper edge of the he
restraint should be at up
level.
Seat belt:
Withdraw seat belt from retractor,
guide it untwisacross
and insert latch
Tension l
driving by pullin
To release be
belt buckle.
Seat belt height adju
1. Pull belt out slightly.
2. Pre
3. Adjust height and engage.
Adjust the height so that the belt
lies across the shou
lie across the throat or upper arm.
Seat position:
Sit with buttocks as far back
against backrest as poss
Adjust distance be
pedals so that
angled when depres
Slide front passenger seat as
back as possible.
Steering whe
Unlock lever,
then engage l
fully locked
Do not adjust s
vehicle is statio
wheel lock has
Interior mirror:
Swivel mirr
To reduce dazzle,
on the underside of the mirror
housing.
Automatic anti
mirror:
Dazzle from followin
night is automatically reduced if
the vehicle isuipped with an
automatic anti-dazzle interior
mirror.
The lever wil
underside of
Electrical ex
(Vehicle
operation)
Select the rele exter
with the switch.
Use the control to adjust the mirror.
Operating windows from outside:
Depending on the equ
the windows
remotely from outside the vehicle
Press button q or p
control until a
opened or cl
Electrical exter
(Vehicles wit
operation)
Select the relevant exterior mirror
by pressing left (L) or right (R) on
the switch.
Use the control to adjust the mirror.
Power windows:
With the ignition on, power
windows are operated via th
switches in the
Press switch = O
Pull switch = Close window
In vehicles with auto
and closing
again to stop w
If the window glass encounter
resistance during automati
closing, it is imm
and opened
If the windows are operated
repeatedly at short intervals,
window operation
disable
Light switch:
m = Activation or deactivation
of automatic light control
(switch returns to AUTO )
AUTO = Automatic li
Headlights
on and off automatically
8 = Sidelights
9 = Headlights
Press switch:
> = Front fog lights
r = Rear fog light
q = Headlight range
adjustment
A = Instrumen
Automatic ligh
When th
active and the engine is runn
the system switches be
daytime runni
headlights, depend
lighting cond
Daytime runn
Increases vis
during dayliil li
illuminated.
Automatic low beam activati
During poor externa
conditio
automatically.
Tunnel detectio
When a tunnelentered, the low
beam switches on automatically.
Front fog ligh
Operated with the
> button.
Light switch in posAUTO:
switching on f
switch low beam on automatically.
Rear fog light:
Operated with the
r button.
Rear fog light can
on when both the ignition and lo
beam or sidelights (with front fog
lights) are switched
Light switch in posAUTO:
switching on
switch low beam on automatically.
Vehicle rear
when towing.
Headligq:
Adapt headlight range to the
vehicle load to preven
other road us
Turn thumb wheel
q until the
required setting is shown in the
odometer disp
Front seats occupie = 0
All seats occupied = 1
All seats occupied an
load compartment laden = 2
Driver’s sea
load compartment laden = 3
Headlight f
low beam:
Headlight flash = Pull
towards
steering whee
High bea = Push l
forwards
Low beam = Push l
forwards
again or pull
towards
steering wheel
Turn and la
Lever up = Right turn signal
Lever down = Left turn signal
If the lever is moved past the
resistance point, the turn signal is
switched on co
steering wheel is moved back the
turn signal is automatically
deactivated.
For three flashes
changing la
resistance is
Move lever to resistance point and
hold for long
Switch the turn sig
by moving the lever slig
Hazard warnin
Operated with the
¨ button.
In the event of an accident wher
the airbags
hazard warnin
activated automatically.
Windscreen wi
& =F
% =S
$ = T
or automatic wiping with
rain sensor
§ =O
For a single wipe when the
windscreen wiper
lever down.
Do not use if th
frozen.
Switch off in car washes.
Windscreen
Pull lever. Washe
onto the windsen and the wiper
wipes
On vehicles fitted with a rain
sensor, keep the sens
from dust, di
the washer system r
Rear window wiper/washer:
Push lever forwards
window wiper wipes in
interval mode.
Switch off by pushin
forwards again
Do not use if the r
frozen.
Switch off in car wa
If the leve
fluid is sprayed o
window.
Rear window wiper co
automatically when th
wiper is switch
gear is engaged
The vehicle
activate or deactivate this function.
Refer to O
Heated rear win
exterior mirror
The heating is op
pressing th
Ü button.
Heating work
running and is switc
automatically after a short time.
Depending o
comes on automatically during
driving when
filter is bein
Demisting and defrosting the
windows:
Set air distribution to l
Set temperature control to the
warmest level
Set fan speed to the highest level
Switch cooling n on
Switch heated rear window Ü
on
Open side air ven
them towards the door windows
For simult
foot well,
position J