529304
1
Zoom out
Zoom in
Vorherige Seite
1/2
Nächste Seite
Vehicle features
Vivaro
Quick Reference Guide
Refer to Owner’s Manual for detailed information.
Illustrations may depict left-hand drive vehicles.
Operation is similar for right-hand drive vehicles.
Depending on the model variant, special equipment
and accessories, the scope of equipment on your
vehicle may differ from the descriptions in this guide.
TS 1691-A-13 / KTA 2709-3 July 2012
*KTA-2709-3*
Vehicle features Vehicle features
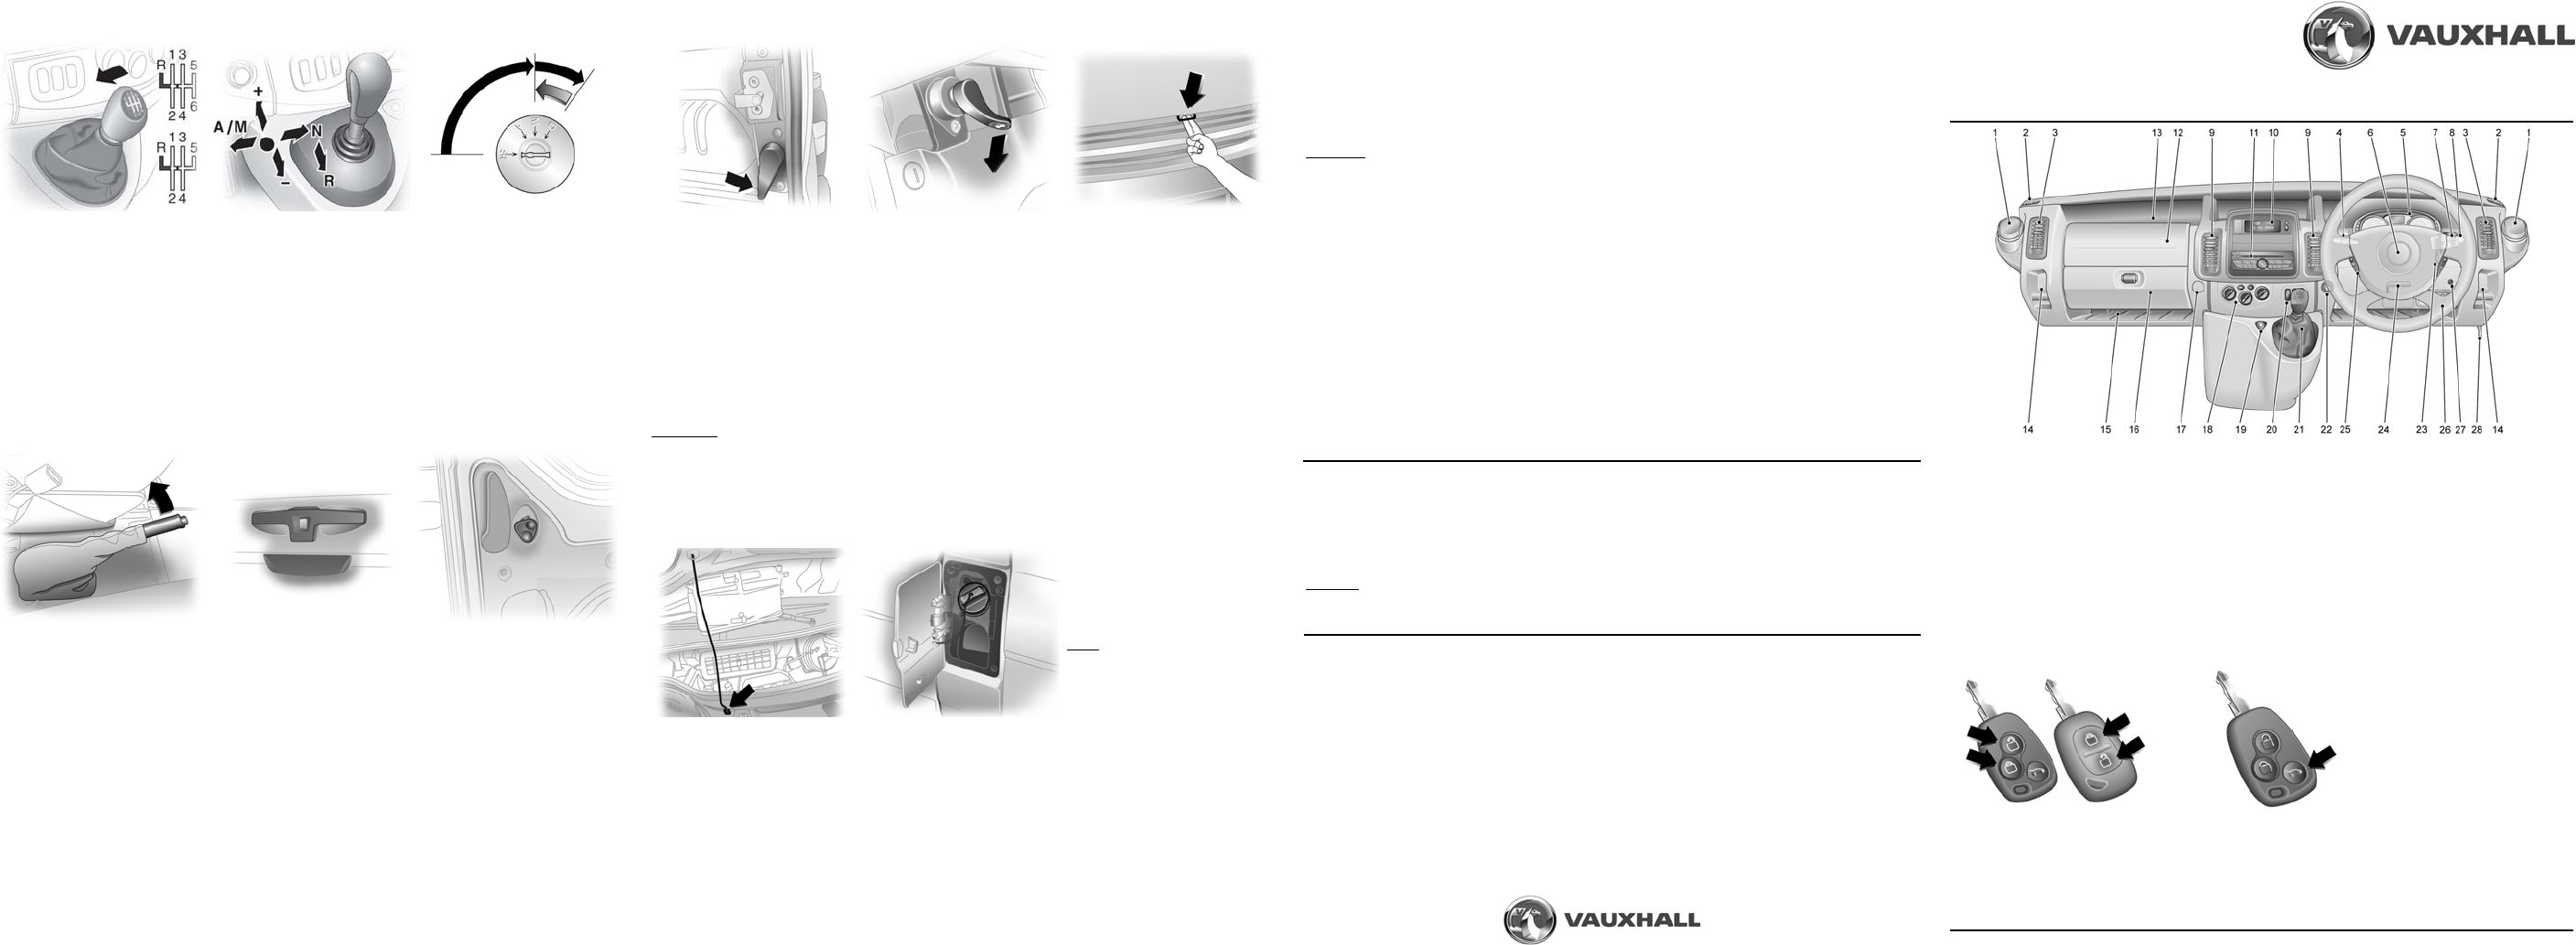
Unlocking and locking the vehicle:
Press button
c (or press and hold)
to unlock entire vehicle.
Press button
e to lock vehicle.
Alternatively, turn key in driver’s
door lock to lock/unlock.
With 3-button remote control, load
compartment (and sliding side
doors) are locked and unlocked
independently of the front doors by
pressing buttonG.
Anti-theft alarm system:
Pressing button
e once locks the
vehicle and also activates the
anti-theft alarm system.
Deadlocking the vehicle:
Pressing button
e twice deadlocks
front doors, sliding side doors and
the load compartment.
All doors and the load
compartment must be closed or the
systems cannot be activated. The
systems are deactivated when the
vehicle is unlocked with button
c.
Electronic immobiliser:
Activated when key is left in
ignition switch with engine turned
off and when key is removed.
1. Ashtray, cupholders, fuse box
2. Fixed air vents
3. Side air vents
4. High and low beam,
headlight flash, sidelights,
turn signals, fog lights
5. Instruments, Driver Info Centre
6. Horn, driver airbag
7. Steering column controls
8. Front and rear wiper / washer,
trip computer
9. Centre air vents
10. Information display
11. Tachograph
12. Front passenger airbag
13. Storage compartment
14. Coin tray
15. Storage tray
16. Glovebox
17. Utility hook
18. Climate control system
19. Hazard warning flashers
20. Cruise control / speed limiter,
central locking system,
MTA Winter and Laden mode,
Heated rear window / mirrors
21. Gear selector lever
22. Power outlet / cigarette lighter
23. Ignition switch with steering
wheel lock
24. Steering wheel adjustment
25. Cruise control
26. Parking assist,
headlight range adjustment,
Electronic Stability Programme
27. Auxiliary heater
28. Bonnet release lever
Manual transmission:
Reverse: With vehicle stationary,
wait 3 seconds after depressing
clutch pedal, pull up collar on
selector lever and engage gear.
If gear does not engage, set lever
to neutral, release clutch pedal and
depress again; then repeat gear
selection.
Do not grind the clutch
unnecessarily.
When operating, depress clutch
pedal completely. Do not use the
pedal as a foot rest.
Manual transmission automated
(MTA):
N =Neutral
o =Centre position
- = Shift to a lower gear
+ = Shift to a higher gear
A/M = Switch between Automatic
and Manual mode
R =Reverse
Move the selector lever to the
appropriate position as far as it will
go and release. Selector lever
returns to centre position.
The current gear/mode is shown in
the transmission display.
Starting the engine:
Turn key to position A
Move steering wheel slightly to
release steering wheel lock
Manual transmission:
operate clutch
Manual transmission automated
(MTA): operate brake;
transmission automatically
shifts to N
Do not accelerate
Diesel engines: turn key to
position M for preheating and
wait for ! to extinguish
Turn key to D and release
Parking brake:
Always apply firmly without
operating release button and
apply as firmly as possible on uphill
or downhill slopes.
To release, pull lever up slightly,
press release button and lower
lever fully.
To reduce the operating forces,
depress the foot brake at the same
time.
Tailgate opening and closing:
After unlocking with remote control
button
c, press tailgate button and
lift tailgate to the fully open
position.
The tailgate can be also opened
from inside the vehicle by pushing
down the tailgate interior release.
Close tailgate using the interior
strap.
Ensure tailgate is fully closed.
Side doors:
Ensure the side door is fully closed
and secure before driving the
vehicle.
The door can be locked from inside
the vehicle with the interior lock
switch.
Pull the safety catch to open the
bonnet.
Rear doors:
To open the left-hand rear door,
pull the outside handle.
The door is opened from inside the
vehicle by pulling the interior
handle.
The right-hand rear door is
released using the lever.
The doors are retained in the 90º
position by locking stays. To open
the doors to 180º or further, pull
the door release handles and
swing open to the desired position.
Important:
Ensure extended opening doors
are secured when fully opened.
Opened doors may slam closed
due to the force of the wind!
Always close the right-hand door
before the left-hand door.
Opening the bonnet:
Pull release lever below the
instrument panel and return it to its
original position.
Secure the bonnet in the upright
position using the support rod
located at the front of the engine
compartment.
Before closing bonnet, press
support rod into its holder. Lower
bonnet and allow it to drop into its
catch. Check bonnet is engaged.
Refuelling:
Before refuelling, switch off engine
and any external heaters with
combustion chambers (identified
by a sticker on the fuel filler flap).
Switch off any mobile phones.
The fuel tank filler neck with
bayonet cap is located on the
left-hand side of the vehicle.
The fuel filler flap can only be
opened if the vehicle is unlocked.
To unlock and open the fuel filler
cap, insert key and turn
anticlockwise.
When refuelling is complete,
replace the filler cap and turn key
clockwise as far as it will go.
Wipe off any overflowing fuel
immediately.
Note:
To ensure the fuel level is displayed
correctly, the ignition must be
switched off before refuelling.
Avoid minor fuel top-ups (e.g. less
than 5 litres) to ensure accurate
readings.
Petrol engines - use unleaded
petrol fuel meeting specifications
of
DIN EN 228.
Diesel engines - use diesel fuel
meeting specifications of
DINEN590.
Fuel tank capacity - 92 litres.
Vehicle security
Tyre pressure:
Check tyre pressures, including the spare, every 14 days and prior to any long journey; tyres should be
checked when cold. The tyre pressures shown below apply for summer and winter tyres.
The tyre pressure data refers to cold tyres. It applies to summer and winter tyres.
Always inflate the spare tyre to the value specified for full load.
Incorrect tyre pressures will impair safety, vehicle handling, comfort and fuel economy and increase tyre wear.
Warning:
If the pressure is too low, this can result in considerable tyre warm-up and internal damage, leading to tread
separation and even to tyre blow-out at high speeds.
Tyre pressure (psi / bar / kPa)
For full load
Engine Tyres Front Rear
All 195/65 R16 C 49 / 3.4 / 340 54 / 3.7 / 370
195/75 R16 C 55 / 3.8 / 380 61 / 4.2 / 420
205/65 R16 C 55 / 3.8 / 380 61 / 4.2 / 420
215/65 R16 C 45 / 3.1 / 310 49 / 3.4 / 340
Engine oil:
Check the engine oil level manually on a regular basis to prevent damage to the engine.
Ensure that the correct specification of oil is used.
Check with the vehicle on a level surface. Engine must be at operating temperature and switched off for at
least 10 minutes.
Pull out the dipstick, wipe it clean, insert it to the stop on the handle, pull out and read the engine oil level.
Important
:
It is the owner’s responsibility to maintain the correct level of an appropriate quality oil in the engine.
Do not allow the engine oil level to drop below the minimum level!
Engine oil quality:
For engine lubrication, use engine oil which meets the following specification:
All petrol and diesel engines = dexos 2
Dexos 2 is the newest engine oil quality that provides optimum protection for petrol and diesel engines. If it is
unavailable, engines oils of other listed qualities must be used.
Alternative qualities if dexos 2 is not available:
Petrol engines = GM-LL-A-025
Diesel engines = GM-LL-B-025
Alternative qualities if GM-LL-A-025 / GM-LL-B-025 are not available:
Petrol engines = ACEA A3 / B3
Diesel engines without diesel particle filter = ACEA A3 / B4
Diesel engines with diesel particle filter = ACEA C3
1

Brauchen Sie Hilfe? Stellen Sie Ihre Frage.

Forenregeln

Missbrauch melden von Frage und/oder Antwort

Libble nimmt den Missbrauch seiner Dienste sehr ernst. Wir setzen uns dafür ein, derartige Missbrauchsfälle gemäß den Gesetzen Ihres Heimatlandes zu behandeln. Wenn Sie eine Meldung übermitteln, überprüfen wir Ihre Informationen und ergreifen entsprechende Maßnahmen. Wir melden uns nur dann wieder bei Ihnen, wenn wir weitere Einzelheiten wissen müssen oder weitere Informationen für Sie haben.

Art des Missbrauchs:

Zum Beispiel antisemitische Inhalte, rassistische Inhalte oder Material, das zu einer Gewalttat führen könnte.

Beispielsweise eine Kreditkartennummer, persönliche Identifikationsnummer oder unveröffentlichte Privatadresse. Beachten Sie, dass E-Mail-Adressen und der vollständige Name nicht als private Informationen angesehen werden.

Forenregeln

Um zu sinnvolle Fragen zu kommen halten Sie sich bitte an folgende Spielregeln:

Neu registrieren

Registrieren auf E - Mails für Vauxhall Vivaro 2012 wenn:


Sie erhalten eine E-Mail, um sich für eine oder beide Optionen anzumelden.


Andere Handbücher von Vauxhall Vivaro 2012

Vauxhall Vivaro 2012 Zusatzinformation - Englisch - 99 seiten

Vauxhall Vivaro 2012 Bedienungsanleitung - Englisch - 167 seiten


Das Handbuch wird per E-Mail gesendet. Überprüfen Sie ihre E-Mail.

Wenn Sie innerhalb von 15 Minuten keine E-Mail mit dem Handbuch erhalten haben, kann es sein, dass Sie eine falsche E-Mail-Adresse eingegeben haben oder dass Ihr ISP eine maximale Größe eingestellt hat, um E-Mails zu erhalten, die kleiner als die Größe des Handbuchs sind.

Ihre Frage wurde zu diesem Forum hinzugefügt

Möchten Sie eine E-Mail erhalten, wenn neue Antworten und Fragen veröffentlicht werden? Geben Sie bitte Ihre Email-Adresse ein.


Info