Fr Baby
Channels 13
LCD 5’’ Colour L
(IPS 1280x720 pixels
Nominal effective range Actual operating range may
at the time of use.
Po Baby
Par
Par
Specifications ar
© 202
All rights reserved. 12/22. RM5766HD_UK_EN_QSG
T
RM57
5
P
Quick start
Direct mode
Y
which allows
It is NOT
Y
strength if
are far
factors, such as internal
them. Router to
connect the units via your home Wi-Fi
network to impro
between
Wi-Fi Router
Y
in Rout
streaming
enhanced connection. R
is the r
connectivity
Router uses your home Wi-Fi
network t
It supports liv
the parent.
If
remo
download and install MyVT
Baby mobile app.
app,
syst
allowing
Download app for section in
• When both paren
quality
Local access
Local access, for
start up quick view
and setup stage.
Over
Conne
Y
packaging in the ev
How P
For
MyVT mobile app
Network Wi-Fi
Wi-Fi router 2.4GHz 802.11 b/
Internet c 1.5 Mbps @ 720p or 2.5 Mbps @1080p upload
bandwidth per bab
Requir
Main
Menu Options
Night light
• T
• Select a night ligh
• Adjust nigh
• Set a night
Melodies and soothing sounds
• Select play
one of
soothing sounds.
• Y
stop playing aft
minutes, or
• Adjust bab
Alerts - Sound, motion and temper
• Select the sound and mo
sensitivity le
• T
detection alerts.
• Select maximum and minimum
temperatur
• T
• Set the temper
Par
• Adjust par
brightness.
• Ad
• Adjust N
• T
Baby
• T
• T
• Adjust bab
General settings
• Connect
• Connect mobile phone.
• Reset
• Softwar
Baby unit o
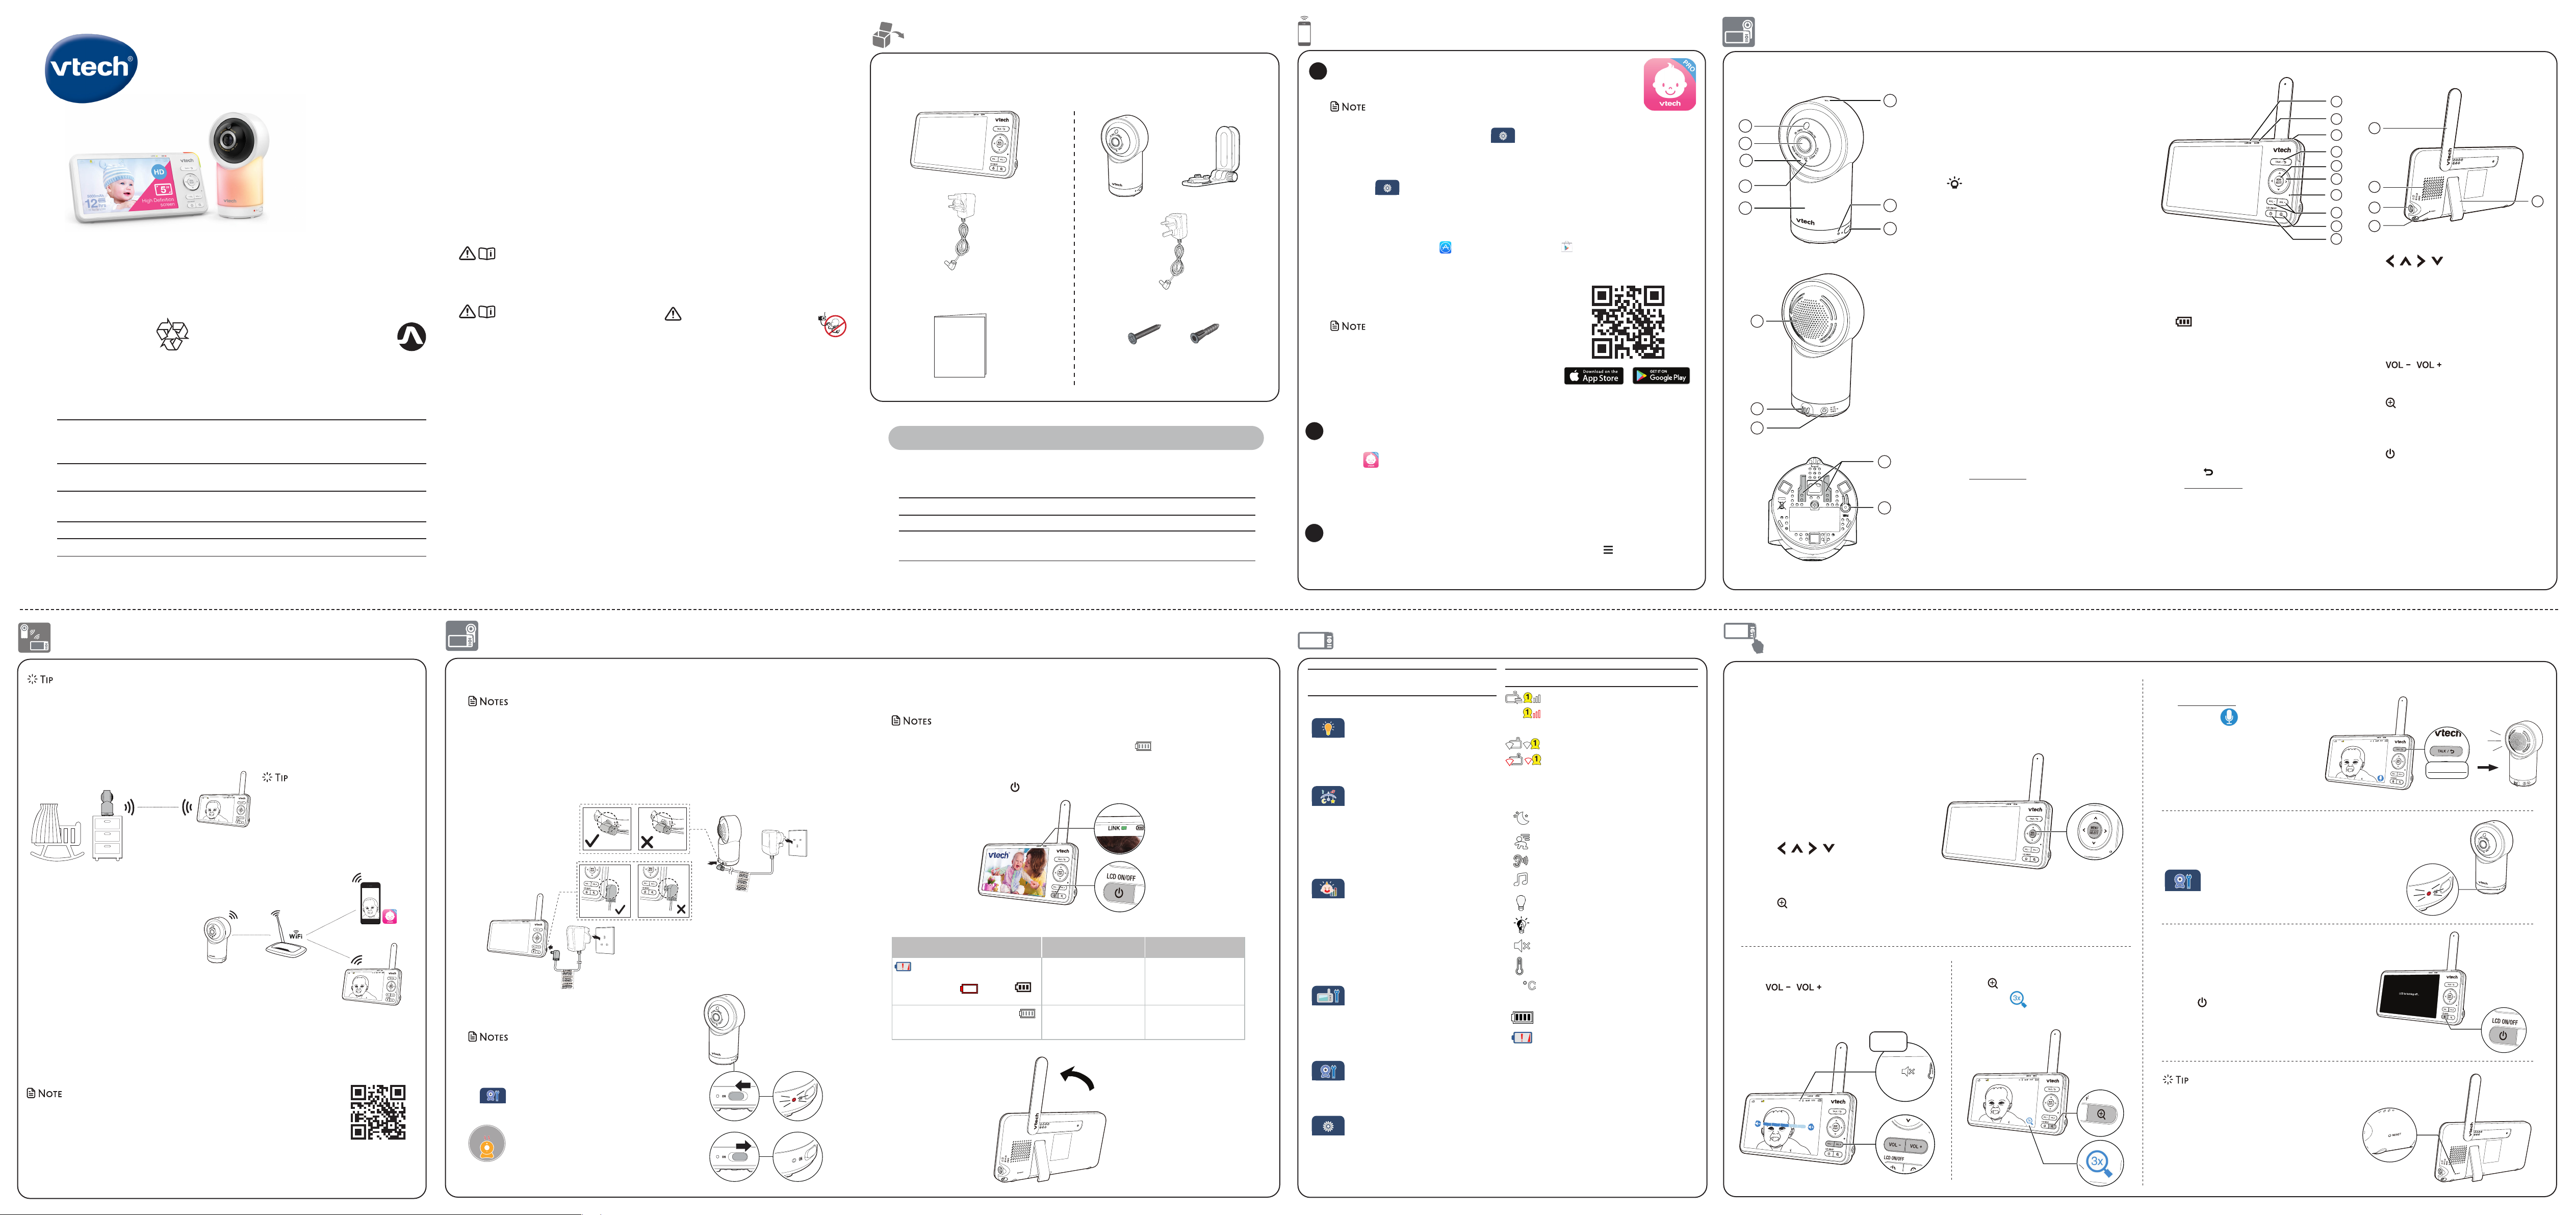
1Light sen
2Camera lens
3Infrared L
• Allow
4Microphone
5Night Light
6 Night Light Co
• Go to Night Light section t
7LED indicat
• Red is steadily
connecting t
• Green is steadily
connected in
• Red flashing slowly
direct mode.
• Green flashes slowly
in Wi-Fi r
8ON/OFF
• Po
9Speaker
10 T
11 Power j
12 Wall
13 PA
• The p
alrea.
• Reset
1. Press and hold P ke
beep sound.
2. Release the P key
P key
another
3. The baby
when the reset comple
baby
7
8
4
6
5
2
1
3
9
10
11
12
13
Connect the bab
• The r
• Use only
• Make sur
outlet.
• Connect the pow
designed to hold the
under-the-table, or
• Make sur
Charge the paren
The parent
monitor
• Befor
parent .
• The standby
The parent
screen appears. Power to t
The battery
Ba Ba Action
ale
unit s
becomes empty , with t
LED light fl
The b
charge and may be used
for only a short time.
Charge
without
interruption
(about 30
minutes).
The battery icon becomes solid . The battery is fully
charged.
To keep the battery
charged, connect it to AC
power when in use.
Slide the switch to ON to pow
• When powering up,
It
• The status LED is set
keep the LED on, prMENU , then go to
> Status LED and
NOTE:
Camera lens and surface ma
warm during normal operation.
WARM
P
1LINK LED light
• On when
baby
• Flashes when the link to the baby
is lost.
2 LED light
• On when
AC po
• Flashes when
low
33- level sound indica
• Green: low
the baby
• Green and amber: moder
lev
• Green, amber
is detected b
4T
• Press t
• While in a sub-menu, press
5MENU | SELECT
• Press
• While in a menu, press
item, or
6 | | | Arrow keys
• Press to n
right
mai
• Whil
to move the im
rightward
7Microphone
8 |
• Inc
vol.
9 Zoom
• Press
• While in a sub-menu, press
help menu.
10 Power | L
11 Antenna
12 Speaker
13 Po
14 RESET
• For
15 Stand
Mobile access
Connecting Wi-Fi to
enhance local access
2
1
3
4
5
6
7
8
9
10
14
15
13
12
11
The applied nameplate is located a
When using y
always be f
injury
1. Follow
2. Adult setup is r
3. CAUTION: Do no
4. This product is intended as an aid. It
responsible and pr
used as such.
5. This pr
6. Do not use this product
bath, sink, swimming pool or show
7. CA: Use only
risk of e
parent unit
extreme
during use, storage tr
or a hot
can result in an e
high tempera
explosion or
subjected to e
explosion or
of used batt
8. Use only
adaptor
Power ad
Par
VT
Model: VT07EUK05200 (UK)
Baby
VT
Model: VT05EUK05100 (UK)
R
3.7V 5000mAh, 18.5Wh Lithium-ion batt
Zhu
Model: GSP806090-5Ah-3.7V-
9. The power adaptor
vertical or
to hold the plug in place if
the-table or cabine
10. For
should be installed near
accessible.
11. Unplug this pr
Do not use liquid or
cleaning.
12. Do not
adaptors, as this causes a hazar
13. Do not
install this product
crimped.
14. This product should be operated only
source indica
the type of po
electricity supply
15. Do not ov
16. Do not place this product
other unst
17 This product should no
ventilation is no
bottom of
them from ov
by
or rug.
radiator
18. N
the slots because the
or cr
product.
19. T
this product, but
Di
th
may
voltages or
electric shock when the pr
20. Y
the units or mo
21. Periodically e
22. There is a very
electronic devic
telephones, etc. T
product has nev
monitor periodically
the units, and power
it for some time.
23. Children should be supervised to ensure
with the product.
24. The small parts of this monitor
small children. K
25. The product is no
children
or lack of
been given supervision or
appliance by
SAVE THESE INSTRUCTIONS
Cautions
• Use and storbeeen 0o C and
40o C.
• Mishandling batteries can cause burn, fir
hazards.
• Batteries should not be e
bright sunshine or
• Do not expose
sunlight. Do not
• W
have STRANGLED in cor
the reach of
not remo
• Nev
Nev
a towel or
• Other electr
camera unit.
these electronic devic
cellular
personal computers, kitchen applianc
telephones.
Import
Raise the parent unit
antenna for
reception
x 2 x 2
Quick start guide
Basic opera
T
1 Press the TA ke
2. Whe icon d
scre
Y
baby unit
3. When finished talking,
the TA key to hea
again.
T
T
indicator
> Status LED .
Zoom
Press to zoom in or
sequence. indicates that the image
is magnified 3 times.
Adjust speaker
Pr |
speaker
baby
After
W
with yAut
and firmware upda and Download app for in
Use the menu
PrMENU on the par
main menu, choose a menu item, or
setting.
for
as to pla
adjust the bab
While i
• Press | | | to scr
menu options.
• Press SELECT t
• Press T to return to the liv
• Press to go to the Help & info page.
T
Fi connection,
pressing the RESET ke
Insert a pin into RESET hole on the back of
the parent
inside.
T
Y
screen
will still hear sounds fr
• Press | LC on the parent
to turn off the scr
• Press an
the screen on again.
Muted
Press and hold
b
1. Browse the App or the Google Pla .
2. Search for
3. Download and install the MyVT mobile app t
OR
Scan the QR code on
• Make sure
requir
Minimum requirement
The mobile app is compatible
• AndroidTM 6.
• iOS 12 or
a) F
• Before installing the app
Press MENU on , and sConfigure Wi-Fi ”
Wi-Fi c
1 PreMENU when th
2. Go to > Connect Mobile Phone.
3. Scan the Q
device.
Downl
App installation
In y
1 Ta to run the mob
2. W
Gm
folde
your account.
2Set up user
Add camer
3
Follow , then Add Camer
in the mobile app t
Status ic
Direct mode
The parent
connect
Red bars indicat
Router
The parent
connect via the Wi-Fi network.
The red icon on
parent
between the r
the router
Black and whit
activat
Motion det
Sound detection alert is
Melodies or
playing.
Night light
Auto night
activat
Par
T
21 T
White: between 20-;
Orange: higher
Battery
Lo
For
connecting to a
Scan to learn more
on improving
connectivity