Congratulations
on purchasing your new VTech product.
Before using this product, please read
Important safety instructions.
This manual has all the feature operations
and troubleshooting necessary to install and
operate your new VTech product. Please
review this manual thoroughly to ensure
proper installation and operation of this
innovative and feature rich VTech product.
For support, shopping, and everything new at
VTech, visit our website at
www.vtechphones.com.
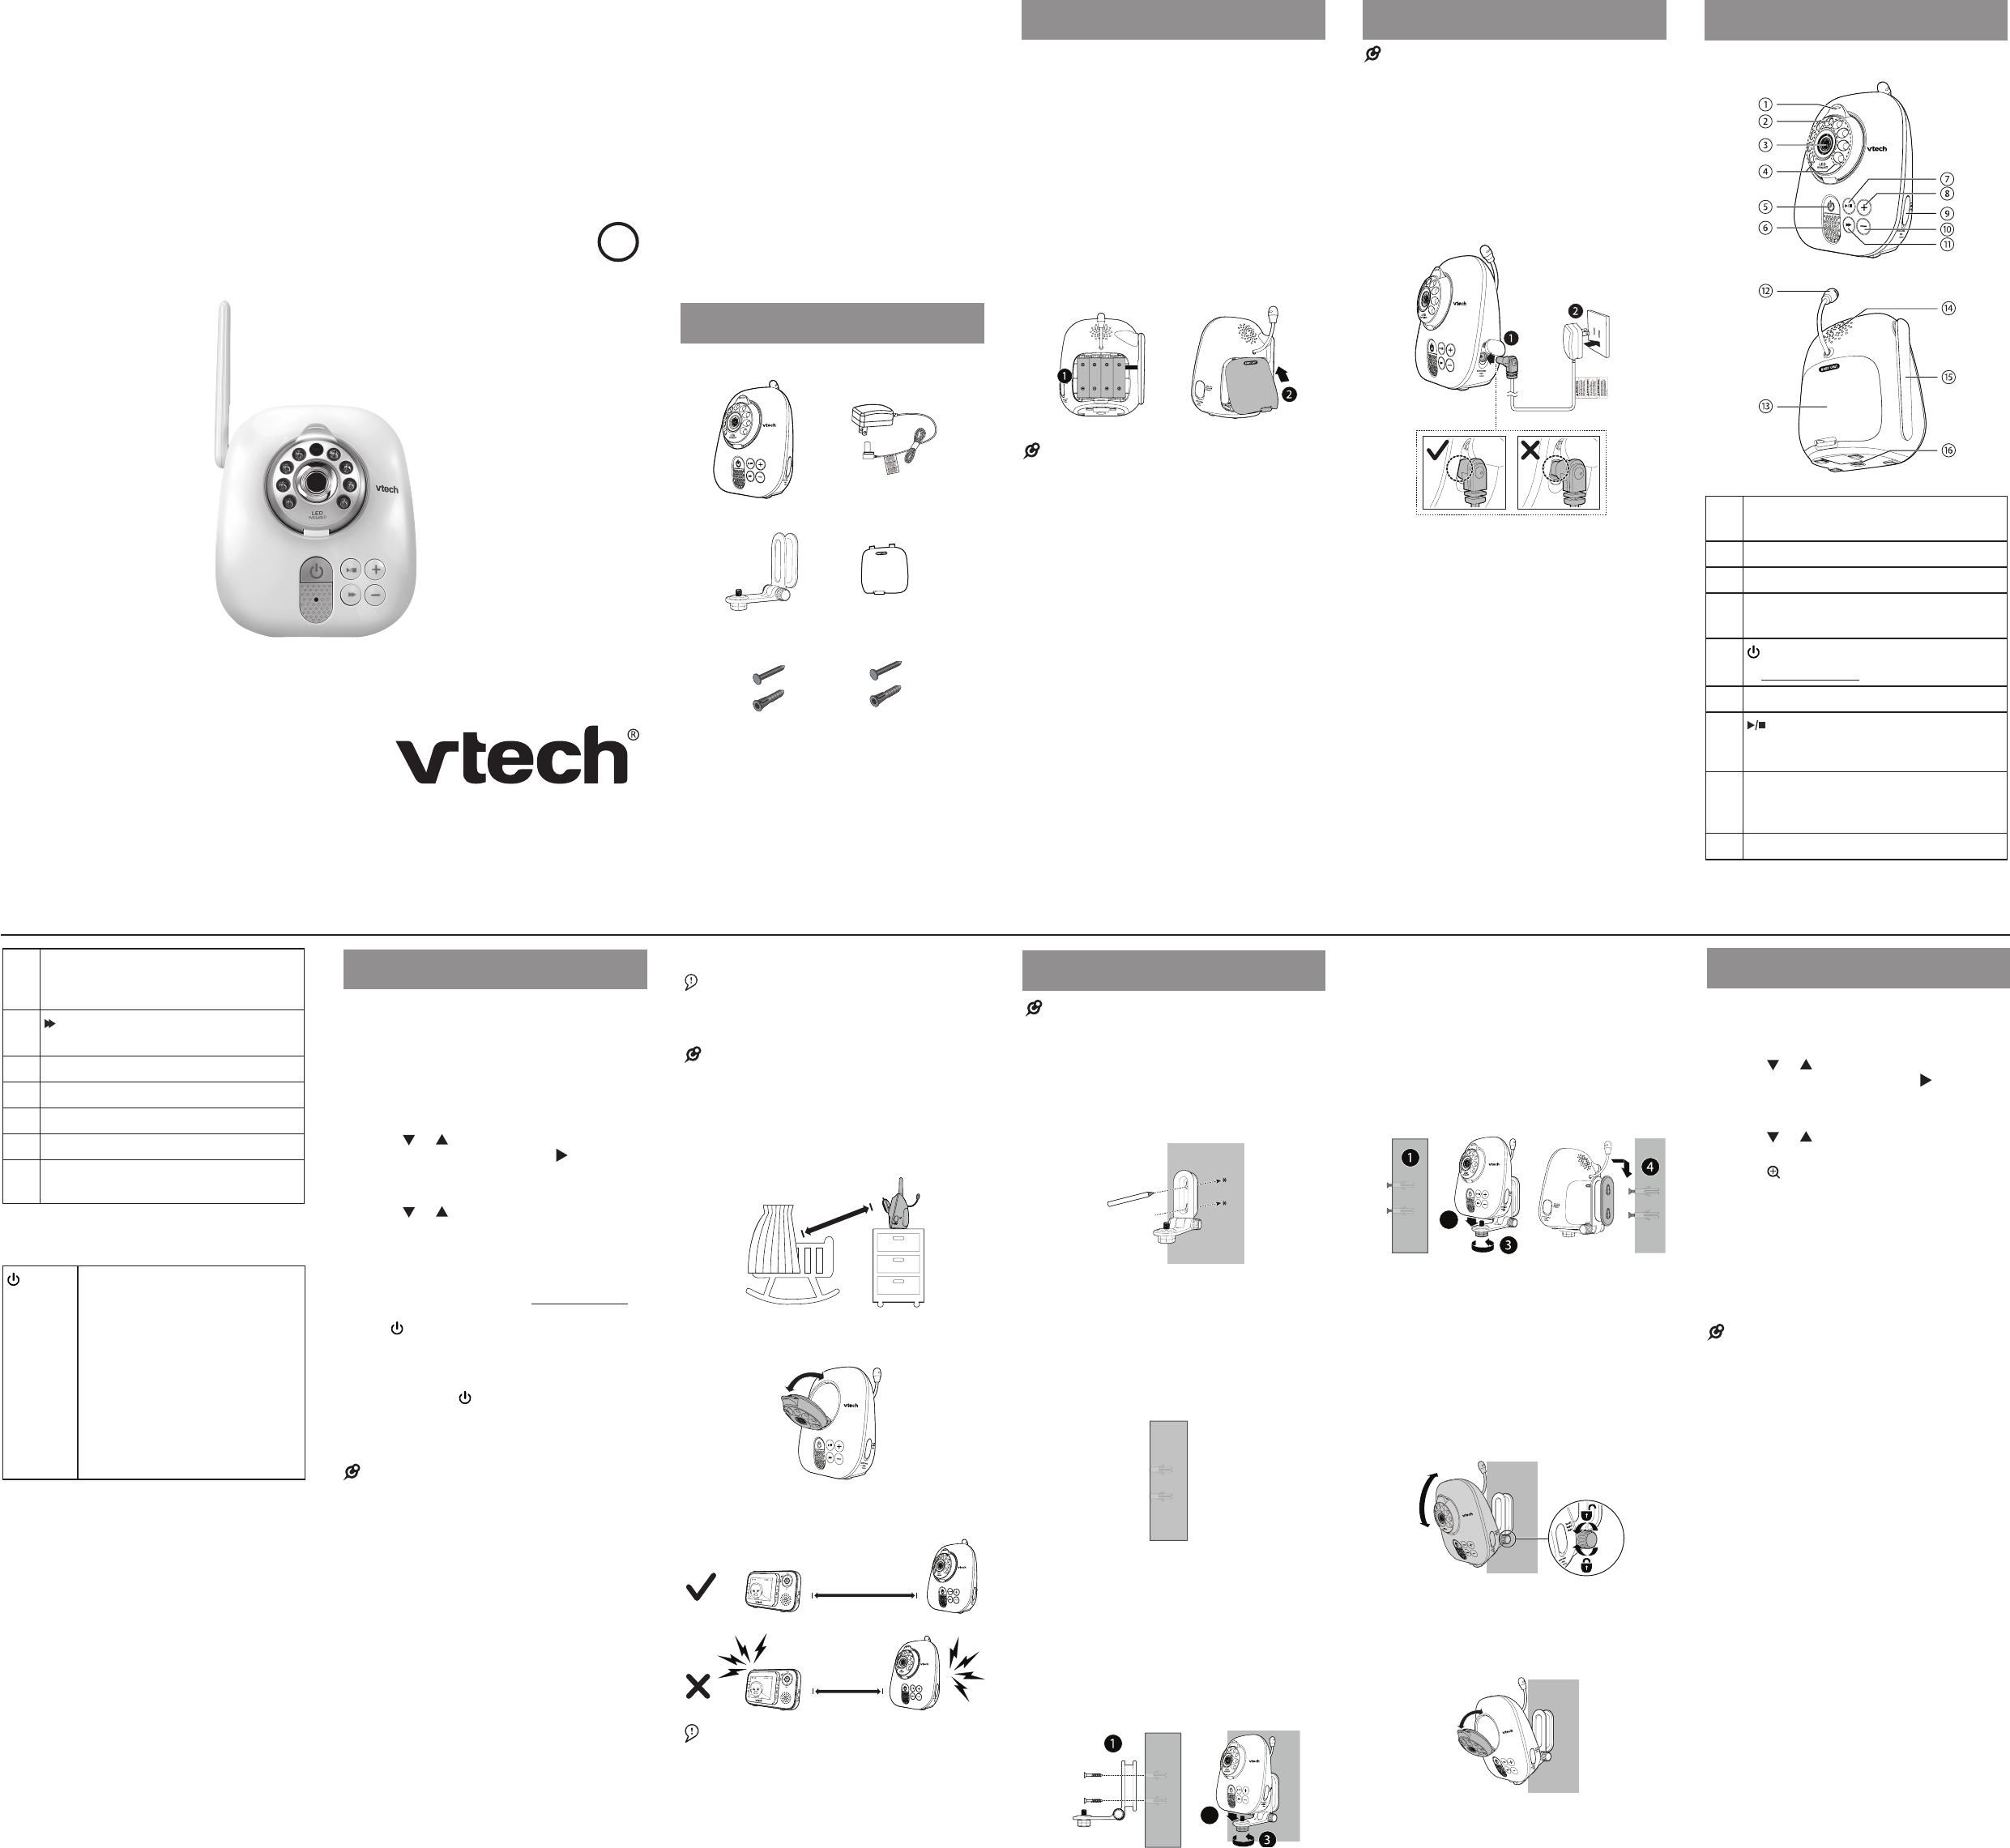
What’s in the box
Install the battery
Inst all the b at ter y
You can power up the baby unit by connecting
it to AC power or to four AA alkaline batteries.
Even if the baby unit is connected to AC
power, we recommend you also install four AA
alkaline batteries. This guarantees continual
operation in case of a power outage.
Install four AA alkaline batteries (not supplied)
into the battery compartment, matching the
polarity markings (+ and -) inside the battery
compartment.
Make sure the ribbon attached inside the
battery compartment is put under the batteries
and the excess ribbon is tucked in properly.
Inst all th e bat ter y as show n below.
Do not mix old and new batteries. Do not mix
alkaline and standard (carbon-zinc) batteries.
The o per atin g tim e for us ing A A ba tte rie s is
sho r t, on ly for a few h our s. If you wa nt to mo nito r
your ba by for a lo ng ti me, we re com men d you
co nne ct you r baby un it to AC power.
If th e baby u nit wi ll not b e use d for a lo ng ti me,
dis co nne ct an d rem ove the ba tte r y to preven t
pos si ble l eakag e.
Y ou c an use r ec harg eab le A A bat ter ies fo r
the b aby un it, b ut th e baby un it ca nno t char ge
rec har gea ble ba tte rie s.
Rep lace t he bat te ry
To replace the bat ter y , gent ly pul l the ri bbo n
and li ft u p to remove the b atter ies, t hen fol low
the s tep above to ins tall t he bat ter y .
•
•
•
•
Connect the baby unit
Use only the power adapters supplied with this
product.
Make sure the electrical outlets are not controlled
by wall switches.
The power adapters are intended to be correctly
oriented in a vertical or floor mount position. The
prongs are not designed to hold the plug in place
if they ar e plugged into a ceiling, under-the-table
or cabinet outlet.
Make sure the parent unit, the baby unit and the
power adapter cords are out of reach of children.
•
•
•
•
Baby unit overview
1
Cam era a ngl e adjus tme nt ta b
Tilt t o adjus t came ra angl e. •
2
Light s ens or
3
Cam era
4
Infr ar ed LE Ds
Bac kup li ght for ni ght vi sion. •
5
On /of f
Press an d hold to t urn on or o ff. •
6
Mic rop hone
7
(Play/stop)
Press to pl ay lullab ies.
Press ag ain to sto p playing lu llab ies.
•
•
8
+ ( V o lume up)
Press to in crea se the l isteni ng
volume.
•
9
Power j ack
1 0
- ( V o lume d own)
Press to d ecrea se the l isten ing
volume.
•
1 1
(Skip)
Press to sk ip to t he nex t lulla by . •
1 2
T emp er atur e se nsor
1 3 Bat te r y comp ar tm ent c over
1 4
Sp eak er
1 5
Ante nna
1 6
Thr ead ed s ocke t (1 /4 in)
For wall mou nt inst allat ion u se. •
Baby u nit light
On /of f
On in r ed whe n the baby u nit is
powere d by batter ies.
On in g reen wh en the b aby
unit i s powered by AC power .
On in o rang e when t he baby
unit i s not paire d to the pa rent
unit .
Flas hes in re d when t he baby
unit b atter y i s low.
Flas hes alte rnatel y in red an d
gree n when t he baby uni t is in
pairi ng mod e.
•
•
•
•
•
Pair ne w baby unit
Each newly purchased baby unit (VM301 )
must be paired to your video and audio
monitor system (VM321 /VM321 -2) b efore use.
Make sure you power on the baby unit and the
parent unit before pairing.
Press MENU when the parent unit is idl e.
Press or to choose P A IR / U NP AI R
CAM, then press SELECT or .
Pr es s S ELEC T ag ain to cho ose Pair new
CAM.
Press or to choose a desired baby unit
slot then press SELECT .
When t he sc reen d ispl ays Pleas e pr ess
bot h [ +] and [-] keys on CAM sid e until
POWER i ndic ator fl ash es Re d and
Gr ee n light, imme diatel y press a nd hol d +
and - for 5 s eco nds o n the new ba by unit.
The lig ht on the n ew baby unit f lash es
red an d green a ltern ately .
When p airin g is suc ces sful, t he sc reen
dis plays the i mage fro m the new ly paire d
baby uni t. The lig ht on t he new baby
unit t urns re d when i t is powere d by AA
bat terie s or turns g reen wh en it is p owered
by AC power .
If pai rin g fail s, th e scre en di sp lays Pai ring
fai le d. T r y t he pa irin g pro ces s aga in.
Any new b aby uni t pair ed to an o cc up ied ba by
uni t slot w ill u npai r the c urre nt un it.
On ly on e baby un it ca n be pa ired at a t ime.
1.
2.
3.
4.
5.
6.
•
•
•
Position the baby unit
Keep the baby unit out of the reach of your baby.
Never place or mount the baby unit inside the
baby’s crib or playpen.
To avoid interference from other electronic
devices, place your baby monitor far away from
devices such as wireless routers, microwaves,
cell phones and computers.
Place t he baby un it more t han 1 meter
(3 feet ) away from your b aby .
Adju st the an gle of t he baby un it cam era to
aim at your ba by .
Place t he parent u nit mo re than 1 m eter
(3 feet ) away from t he baby un it.
The default volume of your p arent u nit is l evel 4.
If you experience high-pitched screeching noise
from your baby monitor whi le po sit ion ing:
Make sure your baby units and parent unit are
more than 1 meter (3 feet) apart, OR
Turn down the volume of your parent unit.
•
•
1.
2.
3.
•
-
-
Check for reception strength and camera angle
before drilling the holes.
Place t he wall mo unt brac ket on a wall a nd
the n use a pe ncil t o mark th e top an d the
bot tom ho les as s hown. Re move the wall
mount b racket an d dril l two h oles i n the
wall (7 / 32 inc h dri ll bit).
If you dr ill the h oles i nto a stud , go to step
3.
-O R-
If you dr ill the h oles i nto an ob jec t other
than a s tud, in ser t th e wall anc hor s into
the h oles. T ap g entl y on the e nds wi th a
hamm er until t he wall a nch ors are fl ush
wit h the wall.
3. Alig n the wa ll mount b racket an d screws
wit h the ho les in t he wall as s hown.
Tig hten the s crew in t he mid dle h ole fir st,
so th at the wall m ount br acket pos iti on is
fixed. Y ou c an tig hten th e other s crew in
the to p hole.
Place t he baby un it on th e wall mou nt
brac ket. Tig hten the s crew into t he
threa ded so cket at th e bot tom to se cure
the ba by unit .
•
1.
2.
-O R-
Inser t t he sc rews into th e hole s and tig hten
the s crews unt il only 1/ 4 i nch o f the sc rews
are expo sed.
Place t he baby un it on th e wall mou nt
brac ket. Tig hten the s crew into t he
threa ded so cket at th e bot tom to se cure
the ba by unit . Alig n the ho les on t he wall
mount b racket wi th th e screws o n the wall,
and sl ide t he wall mo unt brac ket down un til
it lo cks in to plac e.
5. The d efault ang le of t he wall mo unt brac ket
is 9 0 degr ees. Y ou ca n ma ximize your
baby uni t ’ s v iewing a ngle s by tilt ing th e
wall mo unt brac ket. Ho ld the b aby unit ,
and t hen rot ate the kn ob in an tic loc k wise
dire cti on. Thi s will l oose n the jo int of t he
wall mo unt brac ket. Til t your baby uni t
up or d own to adju st to your prefer red
angl e. Then, rot ate the k nob i n clo ck wi se
dire cti on to ti ghten t he joi nt and se cure t he
angl e.
6. Y ou c an al so ma ximize your ba by unit ’s
viewi ng angl es by til ting t he len s. Hol d the
top of t he lid, a nd the n tilt i t up or d own to
adju st to your prefer red ang le.
Make sure you p ower on th e baby unit a nd
the par ent uni t before un pairi ng the b aby unit .
Press MENU wh en the p arent uni t is id le.
Press or to choose P A IR / U NP AI R
CAM, then press SELECT or .
Pr es s S ELEC T ag ain to cho ose Unpa ir
CAM.
Press or to choose a desired baby
unit, then press SELECT .
Press w hen th e scre en dis plays T o
unp air CAM # fro m th e system , pre ss
[zoom] key.
Press SEL EC T when th e scre en dis plays
Pre ss [M ENU /S ELEC T ] key to conf irm.
When u npair ing is s ucc ess ful, the s cree n
dis plays the i mage of t he nex t paired b aby
unit . If the re is no pai red baby un it, t he
scr een di splays N o CAM pair ed .
Mo nito rin g mod e is not a pp lic abl e whe n the re is
onl y one b aby uni t.
Operating range
The operating range of the baby monitor is
up to 30 0 meter s ( 1,000 feet) outdoors or
50 meter s ( 16 0 feet) indoors. The actual
operating range may vary depending on
the environmental conditions and other
interferences such as walls, doors and other
obstructions.
1.
2.
3.
4.
5.
6.
7.
•
BC
User’s manual
VM301
Accessory baby unit
For use with VTech models
VM321/VM321-2
Go to www .vtechphones.com
to register your product for
enhanced warranty support and
the latest VT ech product news.
Before use
Overview
Mount the baby unit
Unpair a baby unit