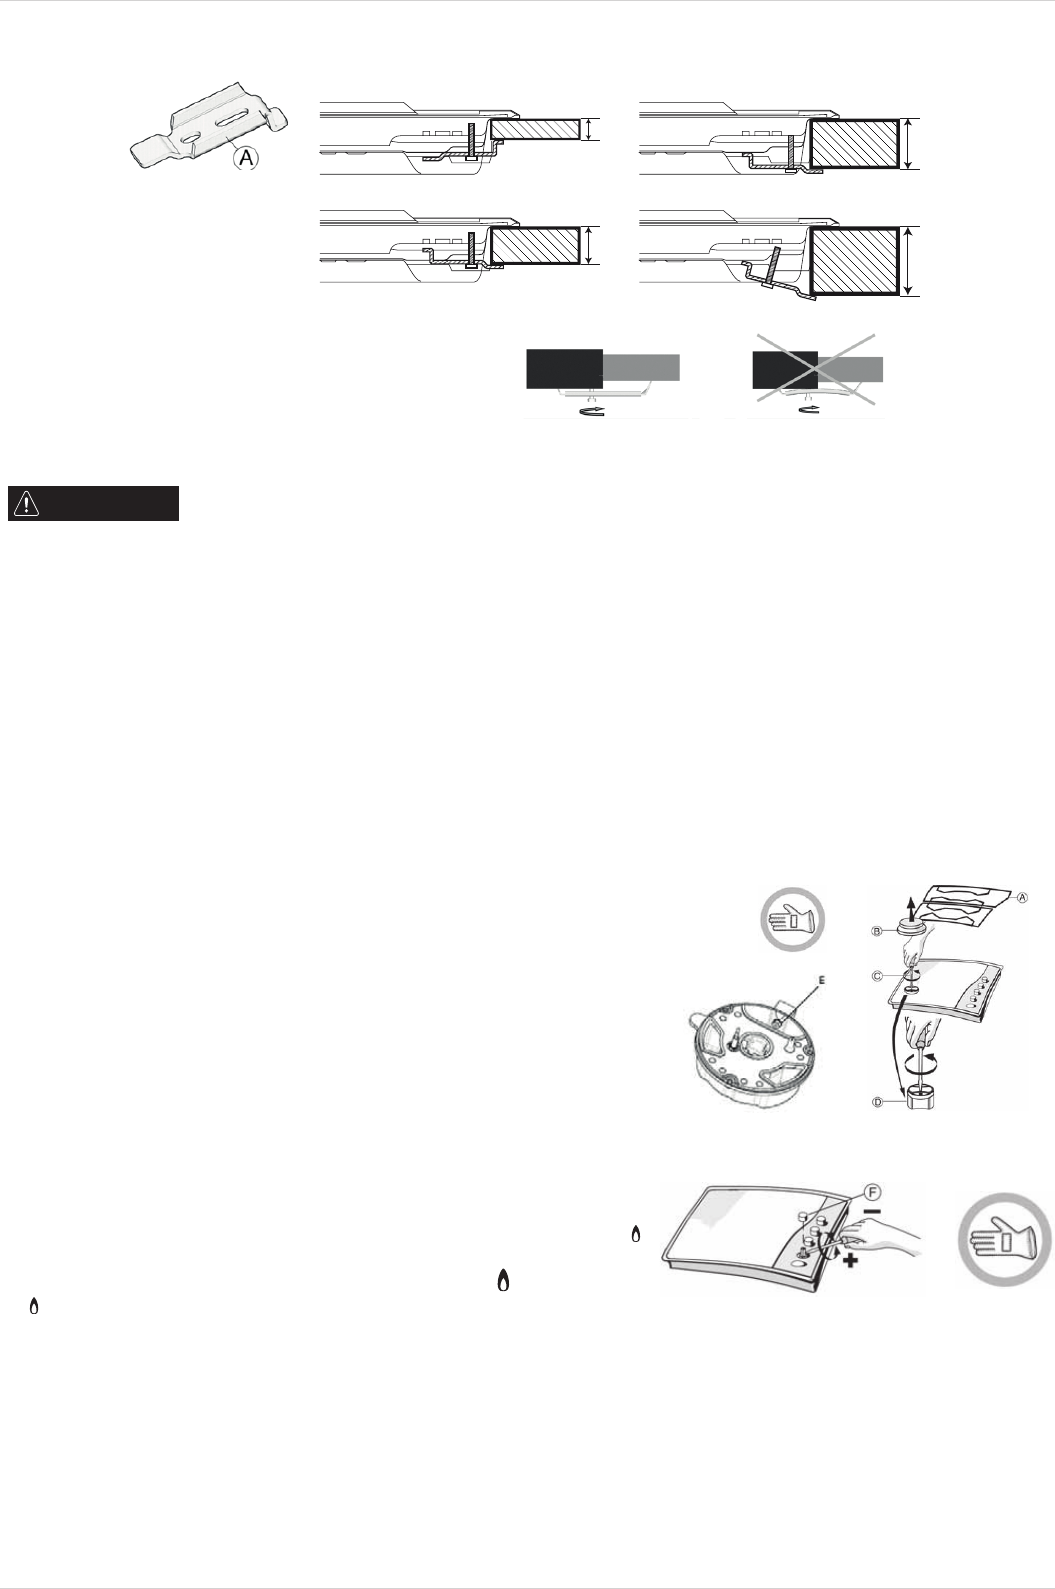
To secure the hob, use the brackets (A) provided with it. Fit the brackets into the relevant bores shown by the arrow and fasten them by means of their screws
in accordance with the thickness of the worktop (see the following gures).
20
30
60
40
Top 20 mmTop 40 mm
Top 30 mmTop 60 mm
NO
ADJUSTMENT TO DIFFERENT TYPES OF GAS
WARNING
This operation must be performed by a qualied technician.
If the appliance is intended to operate with a different gas from the gas type stated on the rating plate and information label on the top of the hob, change the
injectors.
Remove the information label and keep it with the instructions booklet.
Use pressure regulators suitable for the gas pressure indicated in the Instruction:
• the gas injector must be changed by After Sales Service or a qualied technician;
• injector not supplied with the appliance must be ordered from After Sales Service;
• adjust the minimum setting of the taps.
NOTE: when liquid petroleum gas is used (G30/G31), the minimum gas setting screw must be tightened as far as it will go.
IMPORTANT: should you experience difculty in turning the burners knobs, please contact the After Sales Service for the replacement of the burner
tap if found to be faulty.
IMPORTANT: when gas cylinder is adopted, the gas cylinder or gas container must be properly settled (vertical orientation).
REPLACING THE INJECTORS (see the injector table in the Instruction)
• Remove grids (A).
• Extract burners (B).
• Using a socket spanner of the appropriate size unscrew the injector (C), unscrew the injector
to be replaced.
• Replace it with the injector suitable for the new type of gas.
• Re-assemble the injector in (D).
• If you have a multiple crown burner use side spanner to replace the injector (E).
Before installing the hob, remember to afx the gas calibration plate supplied with the injectors in
such a way that it covers the existing information relating to gas calibration.
ADJUSTING MINIMUM GAS SETTING OF TAPS
To ensure that the minimum setting is correctly adjusted, remove the knob and proceed as follows:
• tighten screw to reduce the ame height (-);
• loosen screw to increase the ame height (+).
The adjustment must be performed with the tap in minimum gas setting position (small ame) :
• the primary air of the burners does not need to be adjusted;
• at this stage, light up the burners and turn the knobs from max position to minimum position
to check ame stability.
Upon completion of adjustment, reseal using sealing wax or an equivalent material.
Libble nimmt den Missbrauch seiner Dienste sehr ernst. Wir setzen uns dafür ein, derartige Missbrauchsfälle gemäß den Gesetzen Ihres Heimatlandes zu behandeln. Wenn Sie eine Meldung übermitteln, überprüfen wir Ihre Informationen und ergreifen entsprechende Maßnahmen. Wir melden uns nur dann wieder bei Ihnen, wenn wir weitere Einzelheiten wissen müssen oder weitere Informationen für Sie haben.
Art des Missbrauchs:
Forenregeln
Um zu sinnvolle Fragen zu kommen halten Sie sich bitte an folgende Spielregeln:
Lesen Sie zuerst die Anleitung;
Schauen Sie nach, ob die Frage bereits gestellt wurde;
Stellen Sie die Frage so deutlich wie nur einigermaßen möglich;
Erwähnen Sie was Sie bereits versucht haben um das Problem zu lösen;
Ist Ihr Problem von einem Besucher gelöst dann lassen Sie ihn / sie wissen in diesem Forum;
Falls Sie reagieren möchten, so verwenden Sie bitte das Antworten- Formular;
Da ihre Frage für alle Besucher sichtbar ist, sollten Sie lieber keine persönliche Daten erwähnen.
Neu registrieren
Registrieren auf E - Mails für Whirlpool GOA 9523 wenn:
neue Frage gestellt werden
neue Handbücher vorhanden sind
Sie erhalten eine E-Mail, um sich für eine oder beide Optionen anzumelden.
Das Handbuch wird per E-Mail gesendet. Überprüfen Sie ihre E-Mail.
Wenn Sie innerhalb von 15 Minuten keine E-Mail mit dem Handbuch erhalten haben, kann es sein, dass Sie eine falsche E-Mail-Adresse eingegeben haben oder dass Ihr ISP eine maximale Größe eingestellt hat, um E-Mails zu erhalten, die kleiner als die Größe des Handbuchs sind.
Ihre Frage wurde zu diesem Forum hinzugefügt
Möchten Sie eine E-Mail erhalten, wenn neue Antworten und Fragen veröffentlicht werden? Geben Sie bitte Ihre Email-Adresse ein.