INSTRUCTIONS FOR USE
GB
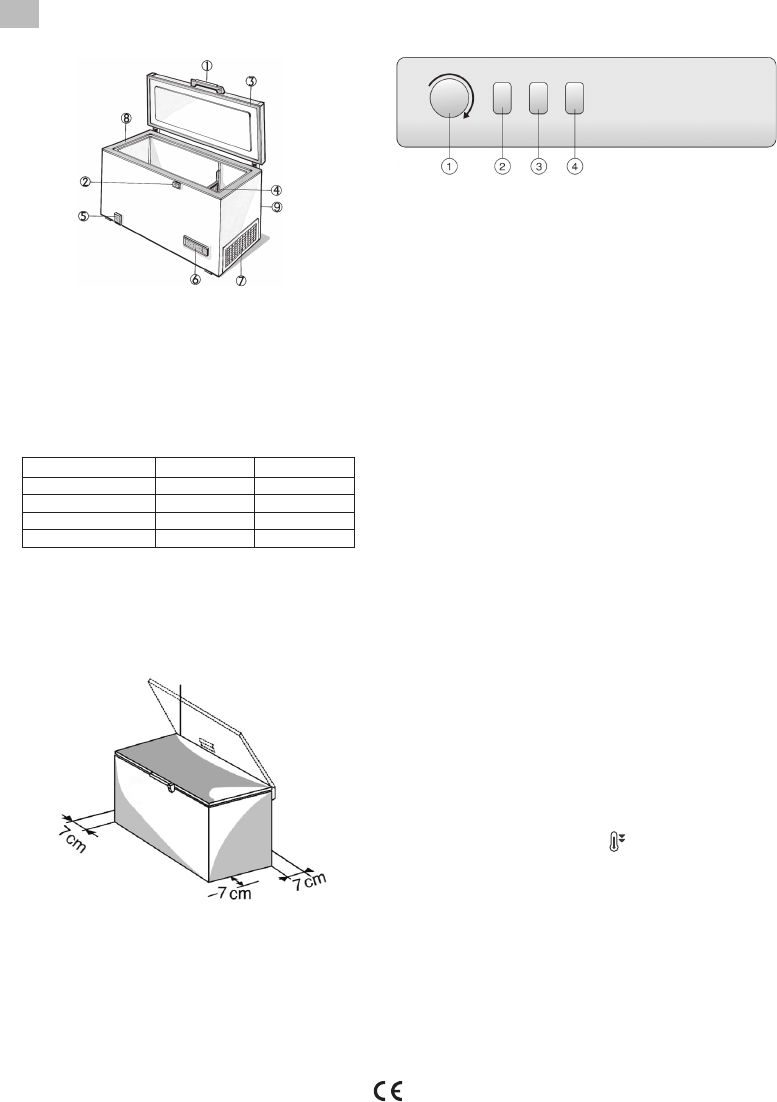
1. Lid handle.
2. Lock (if provided).
3. Seal.
4. Divider (if provided).
5. Defrost water drain plug.
6. Control panel.
7. Side motor cooling grille.
8. Upper edge.
9. Condenser (located at the rear)
INSTALLATION
• Please refer to the chapter "BEFORE USING THE
APPLIANCE".
• Unpack the appliance.
• Remove the 4 protection pieces inserted between
lid and appliance.
• Ensure that the defrosting water drainage plug (if
provided) is correctly positioned (5).
• For best operation of the appliance and in order to
avoid damage when the lid is opened, leave a space of
at least 7 cm from the rear wall and 7 cm at the sides.
• Fit the accessories (if provided).
1. Temperature adjustment thermostat.
2. Red LED (if provided) : Indicates that the appliance
temperature is not sufficiently low.
3. Green LED (if provided): indicates that the appliance is on.
4. Yellow/orange illuminated button (if provided):
activates/deactivates the fast freeze function. It lights up
when the fast freeze function is active.
The exact configuration of the controls may vary
according to the model.
Switching on the appliance
• The appliance is factory set for optimum operation at a
temperature of -18°C.
• Plug in the appliance.
• The green LED lights up (if provided).
• Also the red LED (if provided) will switch on because the
temperature inside the appliance is not yet sufficiently low
for food storage. The red LED will normally switch off
within the first six hours after the appliance is switched on.
• After connecting the appliance to the mains supply and when
the optimal temperature has been reached (this phase takes
about 1 hour during which the lid will not open), ensure that
the fast freeze button is not pressed (the yellow LED, if
provided, is off).
• Place food inside the product only when the red LED (if
provided) has switched off.
• Thanks to the efficient lid seal, the appliance lid will not re-
open easily immediately after closing. Wait a few minutes
before re-opening the lid of the appliance.
Temperature Adjustment
Use the thermostat to select the ideal storage temperature. To
adjust the internal temperature, proceed as follows:
• Turn the thermostat knob to 1 for a storage temperature
that is less cold.
• Turn the thermostat knob to 6 / for a colder storage
temperature.
• For partial loads, or when the load indicator is below the "e"
symbol inside the appliance, it is advisable to move the
thermostat to the lower position (on "e", if present on the
thermostat scale)
CO Big
Climatic Class Amb. T. (°C) Amb. T. (°F)
SN From 10 to 32 From 50 to 90
N From 16 to 32 From 61 to 90
ST From 16 to 38 From 61 to 100
T From 16 to 43 From 61 to 110