Immediately after inserting the batteries, the desired 4
digit security code must be set, simply press the desired 4
digits on the keypad.
Note: After removing the batteries, press number 4 before
installing new ones. The alarm must be re-programmed
with your security code each time the batteries are
removed or replaced.
Installation
1. Place the alarm in the
desired location, preferably
near the front or back door.
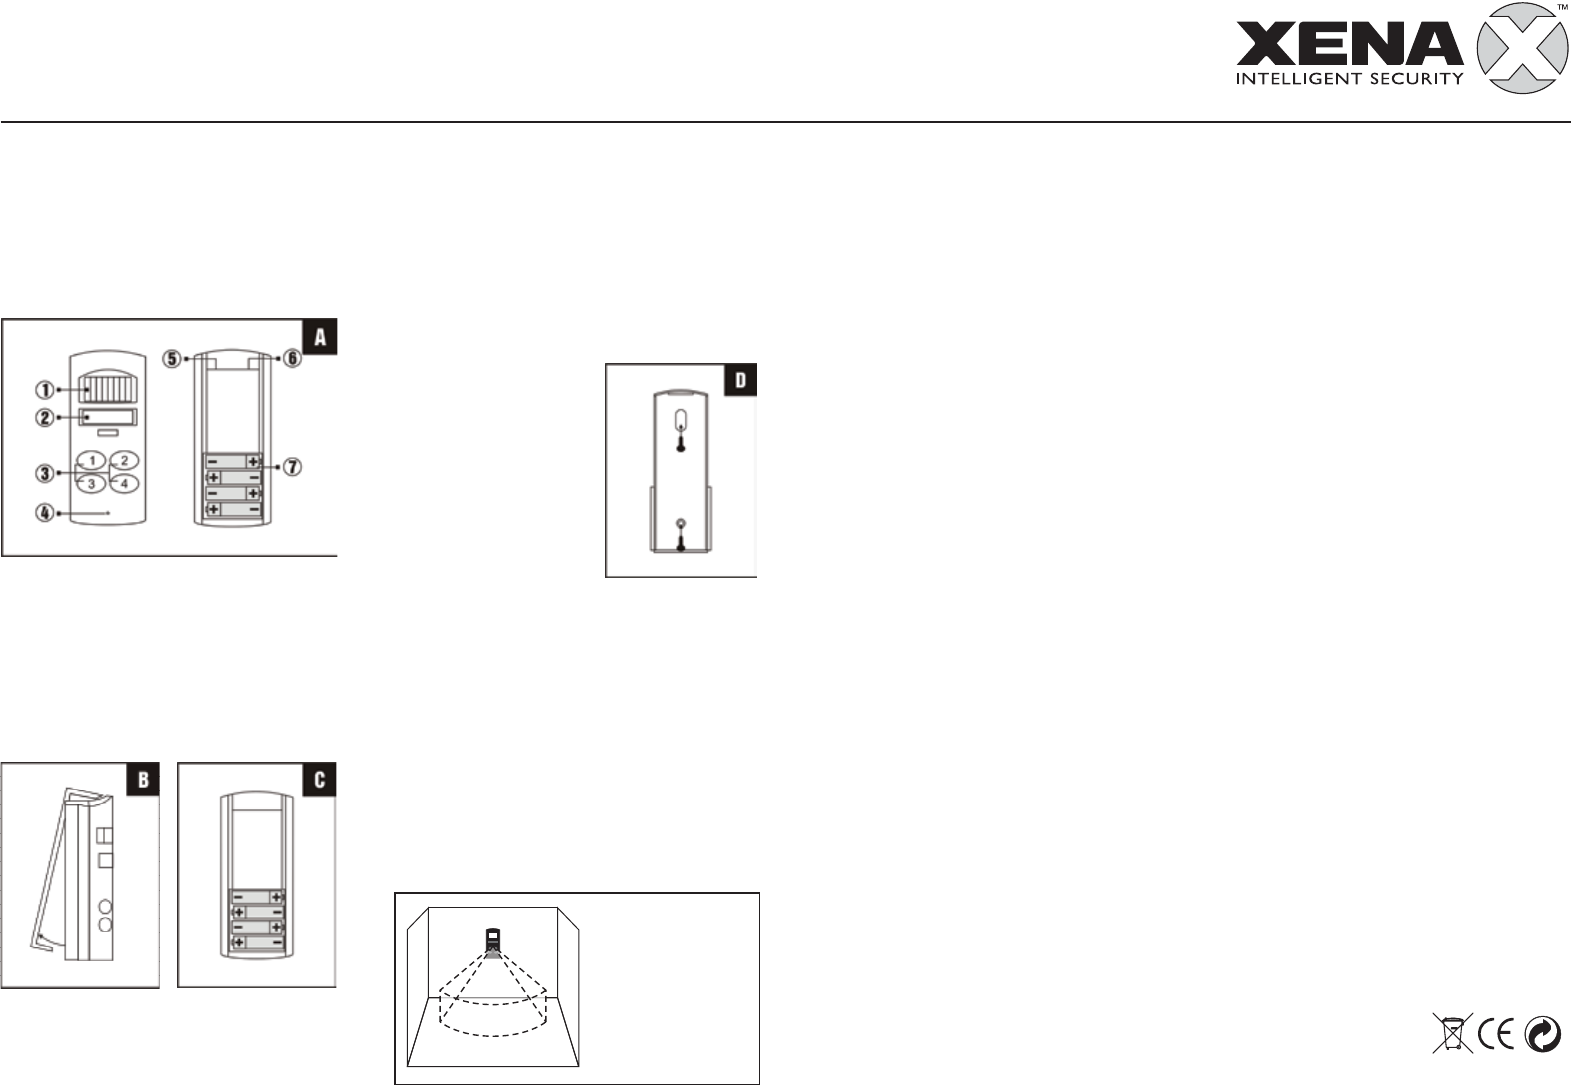
2. Remove the back cover and
fix it to the wall using the
screws and rawplugs
supplied, as shown D.
3. The alarm body can then be
snapped into place on to
the back cover and secured using the screw at the
base.
* Please note that this alarm can also be used free standing.
Operation
Leaving the protected area
Press keypad number 4 and a confirmation tone will
indicate that the alarm is armed. You have 30 seconds in
which to vacate the area. After this time, if motion is
detected then the alarm will sound.
Entering the protected area
Type your 4 digit security code within 10 seconds. This will
disarm the alarm.
Detection Area
External siren socket
This socket can be used to connect the XA301 Remote
Siren to the alarm (not included).
Care and maintenance
To clean the case, simply use a soft slightly damp cloth
with water and wipe dry immediately.
Caution: Never use chemicals to clean the case, as they
may cause damage to the plastic and cause the alarm not
to function.
Troubleshooting
The unit does not sound when the batteries
are installed
Ensure that the batteries are connected correctly according
to the diagram in the battery compartment
The alarm does not arm
Ensure that the back plate of the alarm unit is secure to
hold the batteries in place and that the red light comes on
when the keypad buttons are pressed
The red light on the base of the alarm is on
This is the ‘Battery Low Indicator’. The batteries need
replacing
Battery precautions
When using this product follow these precautions at all times.
• Use only the appropriate size batteries
• Be sure to follow the correct polarity when installing
the batteries as indicated in the battery compartment.
Incorrect polarity may cause damage to the alarm.
• Do not mix different types of battery such as Alkaline
and Carbon-zinc or old batteries with new.
• If the alarm is not used for long periods of time,
remove the batteries to prevent damage or injury from
possible battery leakage.
• Do not recharge batteries not intended to be recharged
as they can overheat and rupture. (Always follow the
manufacturer’s directions.)
www.xenasecurity.com
Controls
1. Motion Sensor
2. Alarm Speaker
3. Keypad
4. Battery Low LED
5. External Siren Socket
6. 4.5V AC Adaptor Socket (AC adaptor not included)
7. Battery Compartment
Battery installation
1. The battery compartment is accessed from the rear
of the alarm unit by removing the screw from the
base and lifting the back cover B.
2. Insert four (4) ‘AA’ size batteries (not included)
following the polarity as shown C. When the last
battery is inserted the alarm will beep very loudly
to indicate that the batteries are installed properly.
3. Replace the back cover and fix with screw.
The Battery Low LED will light when the batteries
need replacing.
*Tested at 25˚C (range may vary
at higher temperature).
110º
061107
Brauchen Sie Hilfe? Stellen Sie Ihre Frage.
Missbrauch melden von Frage und/oder Antwort
Libble nimmt den Missbrauch seiner Dienste sehr ernst. Wir setzen uns dafür ein, derartige Missbrauchsfälle gemäß den Gesetzen Ihres Heimatlandes zu behandeln. Wenn Sie eine Meldung übermitteln, überprüfen wir Ihre Informationen und ergreifen entsprechende Maßnahmen. Wir melden uns nur dann wieder bei Ihnen, wenn wir weitere Einzelheiten wissen müssen oder weitere Informationen für Sie haben.
Art des Missbrauchs:
Forenregeln
Um zu sinnvolle Fragen zu kommen halten Sie sich bitte an folgende Spielregeln:
Lesen Sie zuerst die Anleitung;
Schauen Sie nach, ob die Frage bereits gestellt wurde;
Stellen Sie die Frage so deutlich wie nur einigermaßen möglich;
Erwähnen Sie was Sie bereits versucht haben um das Problem zu lösen;
Ist Ihr Problem von einem Besucher gelöst dann lassen Sie ihn / sie wissen in diesem Forum;
Falls Sie reagieren möchten, so verwenden Sie bitte das Antworten- Formular;
Da ihre Frage für alle Besucher sichtbar ist, sollten Sie lieber keine persönliche Daten erwähnen.
Neu registrieren
Registrieren auf E - Mails für Xena XA101 wenn:
neue Frage gestellt werden
neue Handbücher vorhanden sind
Sie erhalten eine E-Mail, um sich für eine oder beide Optionen anzumelden.
Das Handbuch wird per E-Mail gesendet. Überprüfen Sie ihre E-Mail.
Wenn Sie innerhalb von 15 Minuten keine E-Mail mit dem Handbuch erhalten haben, kann es sein, dass Sie eine falsche E-Mail-Adresse eingegeben haben oder dass Ihr ISP eine maximale Größe eingestellt hat, um E-Mails zu erhalten, die kleiner als die Größe des Handbuchs sind.
Ihre Frage wurde zu diesem Forum hinzugefügt
Möchten Sie eine E-Mail erhalten, wenn neue Antworten und Fragen veröffentlicht werden? Geben Sie bitte Ihre Email-Adresse ein.