8
9
1
SOURCE RECEIVER
9 0
ENT
MEMORY
+10
5
6 8
MUTE
CODE SET
INPUT
TV VOL
1 2 3 4
TV
TV CH
HDMI 1
z
ENTER
VOLUME
STRAIGHT
ON SCREEN
YP
1 2
3
9
5
VOLUME
CROSSOVER/
HIGH CUT
MIN MAX
MIN MAX
Optimización de los ajustes de los alta
(YP
La funció
de los altavoces, mide las distancias desde estos a su posición de escucha y optimiza
automáticamente los ajustes de los altavoces, como el balance de volum
acústicos, de la forma adecuada para l
T
• Los ton
peque
• El volum
• Mantenga la s
• Perman
en un obst
• No c
1.
Pulse
z
(recept
2.
Encienda el
unidad (toma HDMI OUT).
3.
Encienda el altav
puede ajustar la frecuencia de cr
4.
P
escucha y conéct
el panel delanter
Colo
la misma a
trípod
los tornillo
5.
P
del cursor par
pulse ENTER.
La medición c
La medición t
La pantalla derecha aparece en el T
acaba la medición.
• Si aparece a
adverten
de Instru
• Si aparece e
Phase””
6.
Utilice las tec
7.
Utilice las tec
8.
Utilice las tec
V
Para v
9.
Desconecte el micr
No dej
altas tem
Con esto ha finalizado la optimización de los ajustes de los altavoces.
Si aparece
Siga el procedimiento descrit
altavoces.
1
Utilice las teclas del cursor para seleccionar “Result” y pulse ENTER.
2
Compruebe las conexiones de los cables (+/–) del altavoz con problemas.
3
Compruebe las conexiones de los cables (+/–) del altavoz que se han identificado como
“Reverse” en el mensaje de advertencia.
Si el a
Apague la unidad, vuelva a conectar el cable de altavo
proceso de medición Y
Si el a
Dependiendo del tipo de altavoces o el entorno de la sala, pue
incluso si los altavoces están correctamente conectados.
En este caso, ignor
6
.
Español
*
funció
Repr
Aho
Le recomendam
sonido surround producido por la unidad.
1.
Encienda el repr
2.
Pulse HDMI 1 par
3.
Inicie la repr
4.
Pulse v
5.
Pulse
Cuando n
de problem
Esto completa el procedimiento de configuración básica.
Continúe co
1
si la unidad se v
inalámbrica.
Español
Conexión de un enr
Cone
E
describen los tres métodos siguient
Para v
Instrucciones.
A:
Con
acceso
Esta co
acceso) es WE
1.
Mantenga pulsado INFO (WPS) en el panel delant
“Press W
2.
Pulse el bot
Cuando el proceso de co
Si aparece “N
1
o intent
método de conexión.
B:
Con
(iPhone/
*
Antes de continuar
inalámbrico.
1.
Pulse ON SCREEN par
2.
Utilice las tec
3.
Utilice las tec
v
/
w
) para seleccionar
las tec
r
/
s
) para seleccionar
continuación,
4.
Utilice las tec
r
/
s
) y ENTER para activ
y seleccione
5.
Utilice las tec
r
/
s
) y
ENTER para activ
(iOS)”
6.
Conecte el dispositiv
y desactive el b
dispositiv
7.
Utilice las tec
r
/
s
) para
seleccionar
8.
Pulse
Cuando el proceso de co
9
P
C:
Con
1.
Realic1 al 4 de
2.
Utilice las tec
r
/
s
) para seleccionar
pulse ENTER.
3.
Utilice las tec
deseado y seleccione
4.
Utilice las tec
seleccione
5.
Utilice las tec
v
/
w
) para seleccionar
ENTER para iniciar el pr
Cuando el proceso de co
Si aparece “N
1
o intent
método de conexión.
6.
P
Español
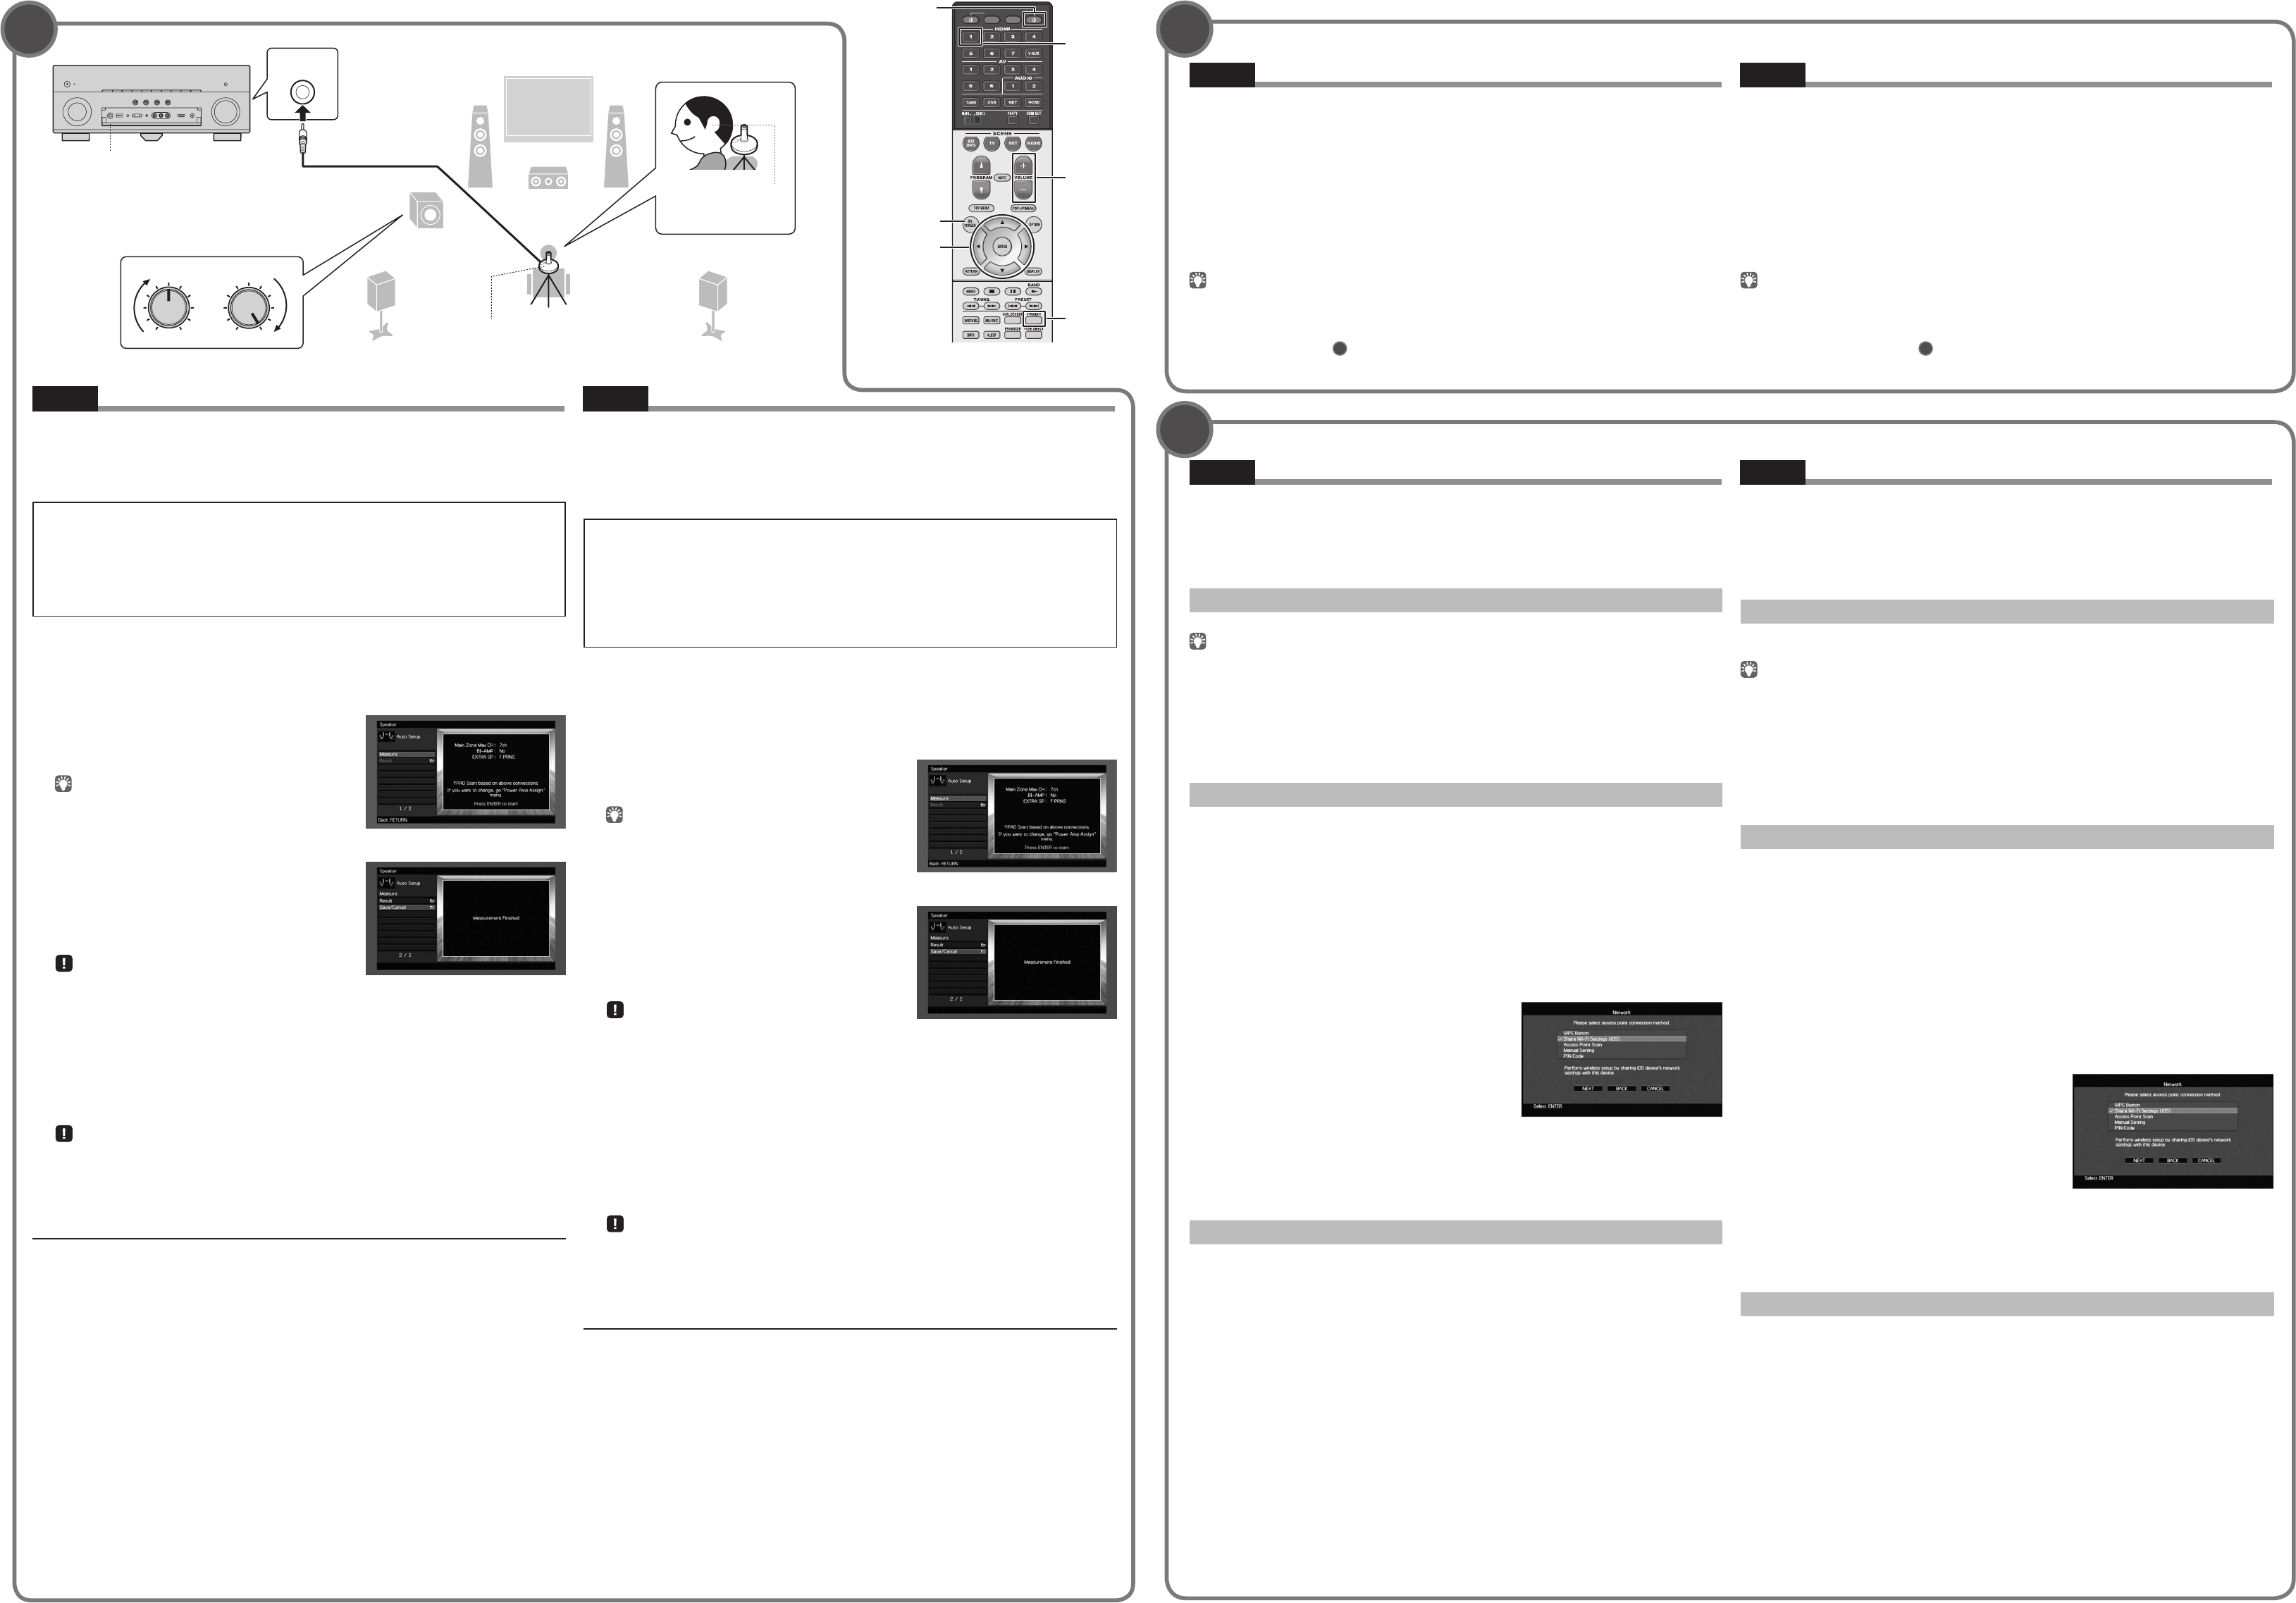
La unidad
T
Micrófono Y
Altura del o
T
(rec
T
cur
(RX-
Presion
la puer
abrir la pue
The u
(RX-
Press the b
doo
YPAO MIC jack
YPAO microphone
(RX-
Ear he
Optimizing the speaker set
The Y
connectio
automatically optimiz
parameters, t
Note the following regar
• T
• T
• Keep the roo
• Stay in a co
bet
• Do no
1.
Pr
z
(receiv
2.
T
OUT jack).
3.
T
is adjustable,
4.
Place the
listening position and connect it t
YP
Place the Y
(
tripod as a m
screws to stabilize the microph
5.
T
ke
The me
It takes about 3 minutes to measure
The right screen appears on the T
measurement finishes.
• If any error me
(
• If the warning m
6.
Use the cursor k
7.
Use the cursor k
8.
Use the cur
For details on Y
9.
Disconnect the
Do no
temperature for an ex
This com
If
Follow the procedure below to check the speaker connections.
1
Use the cursor keys to select “Result” and press ENTER.
2
Check cable connections (+/–) for the problem speaker
3
Check the cable connections (+/–) of the speaker that was identified as being “Reverse” in
the warning message.
If t
T
If t
Depending on the t
the speakers are connected correctly
In this case, ignore the message and proceed to st
6
.
Playing bac
Now let
We r
produced by the unit.
1.
T
2.
Pr
3.
Start playback on the BD/D
4.
Pr
5.
Pr
Whe
in the O
This com
Continue with procedure
1
if the unit will be used with a wireless networ
Connecting a rout
Conn
There are sev
the following three methods.
For details on other c
A:
Set up a wireless connection w
This co
this case, use o
1.
Hold down INFO (WPS) on the fr
“Press W
2.
Push the
When th
If “N
1
or tr
B:
Set up a wireless connection by applying the conne
iPad/i
*
Before pr
1.
Pr
2.
Use the cursor k
3.
Use the cursor k
v
/
w
) to select
(
r
/
s
) to select
4.
Use the cursor k
r
/
s
) and ENTER to c
select
5.
Use the cursor k
r
/
s
) and ENTER
to c
select
6.
Connect the iOS device t
and disable the scr
device.
7.
Use the cursor k
r
/
s
) to select
“NEXT”
8.
T
When th
9
T
C:
Set up a wireless connection by searching a
1.
P1 to 4 of
2.
Use the cur
r
/
s
) to
3.
Use the cursor k
select
4.
Use the cursor k
5.
Use the cursor k
v
/
w
) to select
the connection process.
When th
If “N
1
or tr
6.
T
English
English
English
*
the mo
(rec
Cur