La función Yamaha Parametric room Acoustic Optimizer (YPAO) detecta las conexiones de los altavoces, mide las distancias desde la posición de escucha y
seguidamente optimiza los ajustes de los altavoces, como balance de volumen y parámetros acústicos, de la forma adecuada para la sala.
The Yamaha Parametric room Acoustic Optimizer (YPAO) function detects speaker connections, measures the distances from them to your listening position(s), and
then automatically optimizes the speaker settings, such as volume balance and acoustic parameters, to suit your room.
Tenga en cuenta la siguiente medición relativa a YPAO
• Los tonos de prueba se emiten a alto volumen y pueden sorprender o asustar a los
niños pequeños.
• El volumen del tono de prueba no puede ajustarse.
• Mantenga la sala lo más silenciosa posible.
• Permanezca en una esquina de la sala detrás de la posición de escucha para que
no se convierta en un obstáculo entre los altavoces y el micrófono YPAO.
• No conecte auriculares.
Note the following regarding YPAO measurement
• Test tones are output at high volume and may surprise or frighten small children.
• Test tone volume cannot be adjusted.
• Keep the room as quiet as possible.
• Stay in a corner of the room behind the listening position so that you do not become
an obstacle between speakers and the YPAO microphone.
• Do not connect headphones.
Optimización de los ajustes de los altavoces automáticamente (YPAO)
Optimizing the speaker settings automatically (YPAO)
1
Pulse RECEIVER (z) para encender la
unidad.
2
Encienda el TV y cambie la entrada de TV
para que se muestre el vídeo de la unidad
(toma HDMI OUT).
3
Encienda el altavoz de subgraves y ajuste
su volumen a la mitad. Si se puede ajustar
la frecuencia de cruce, póngala al máximo.
4
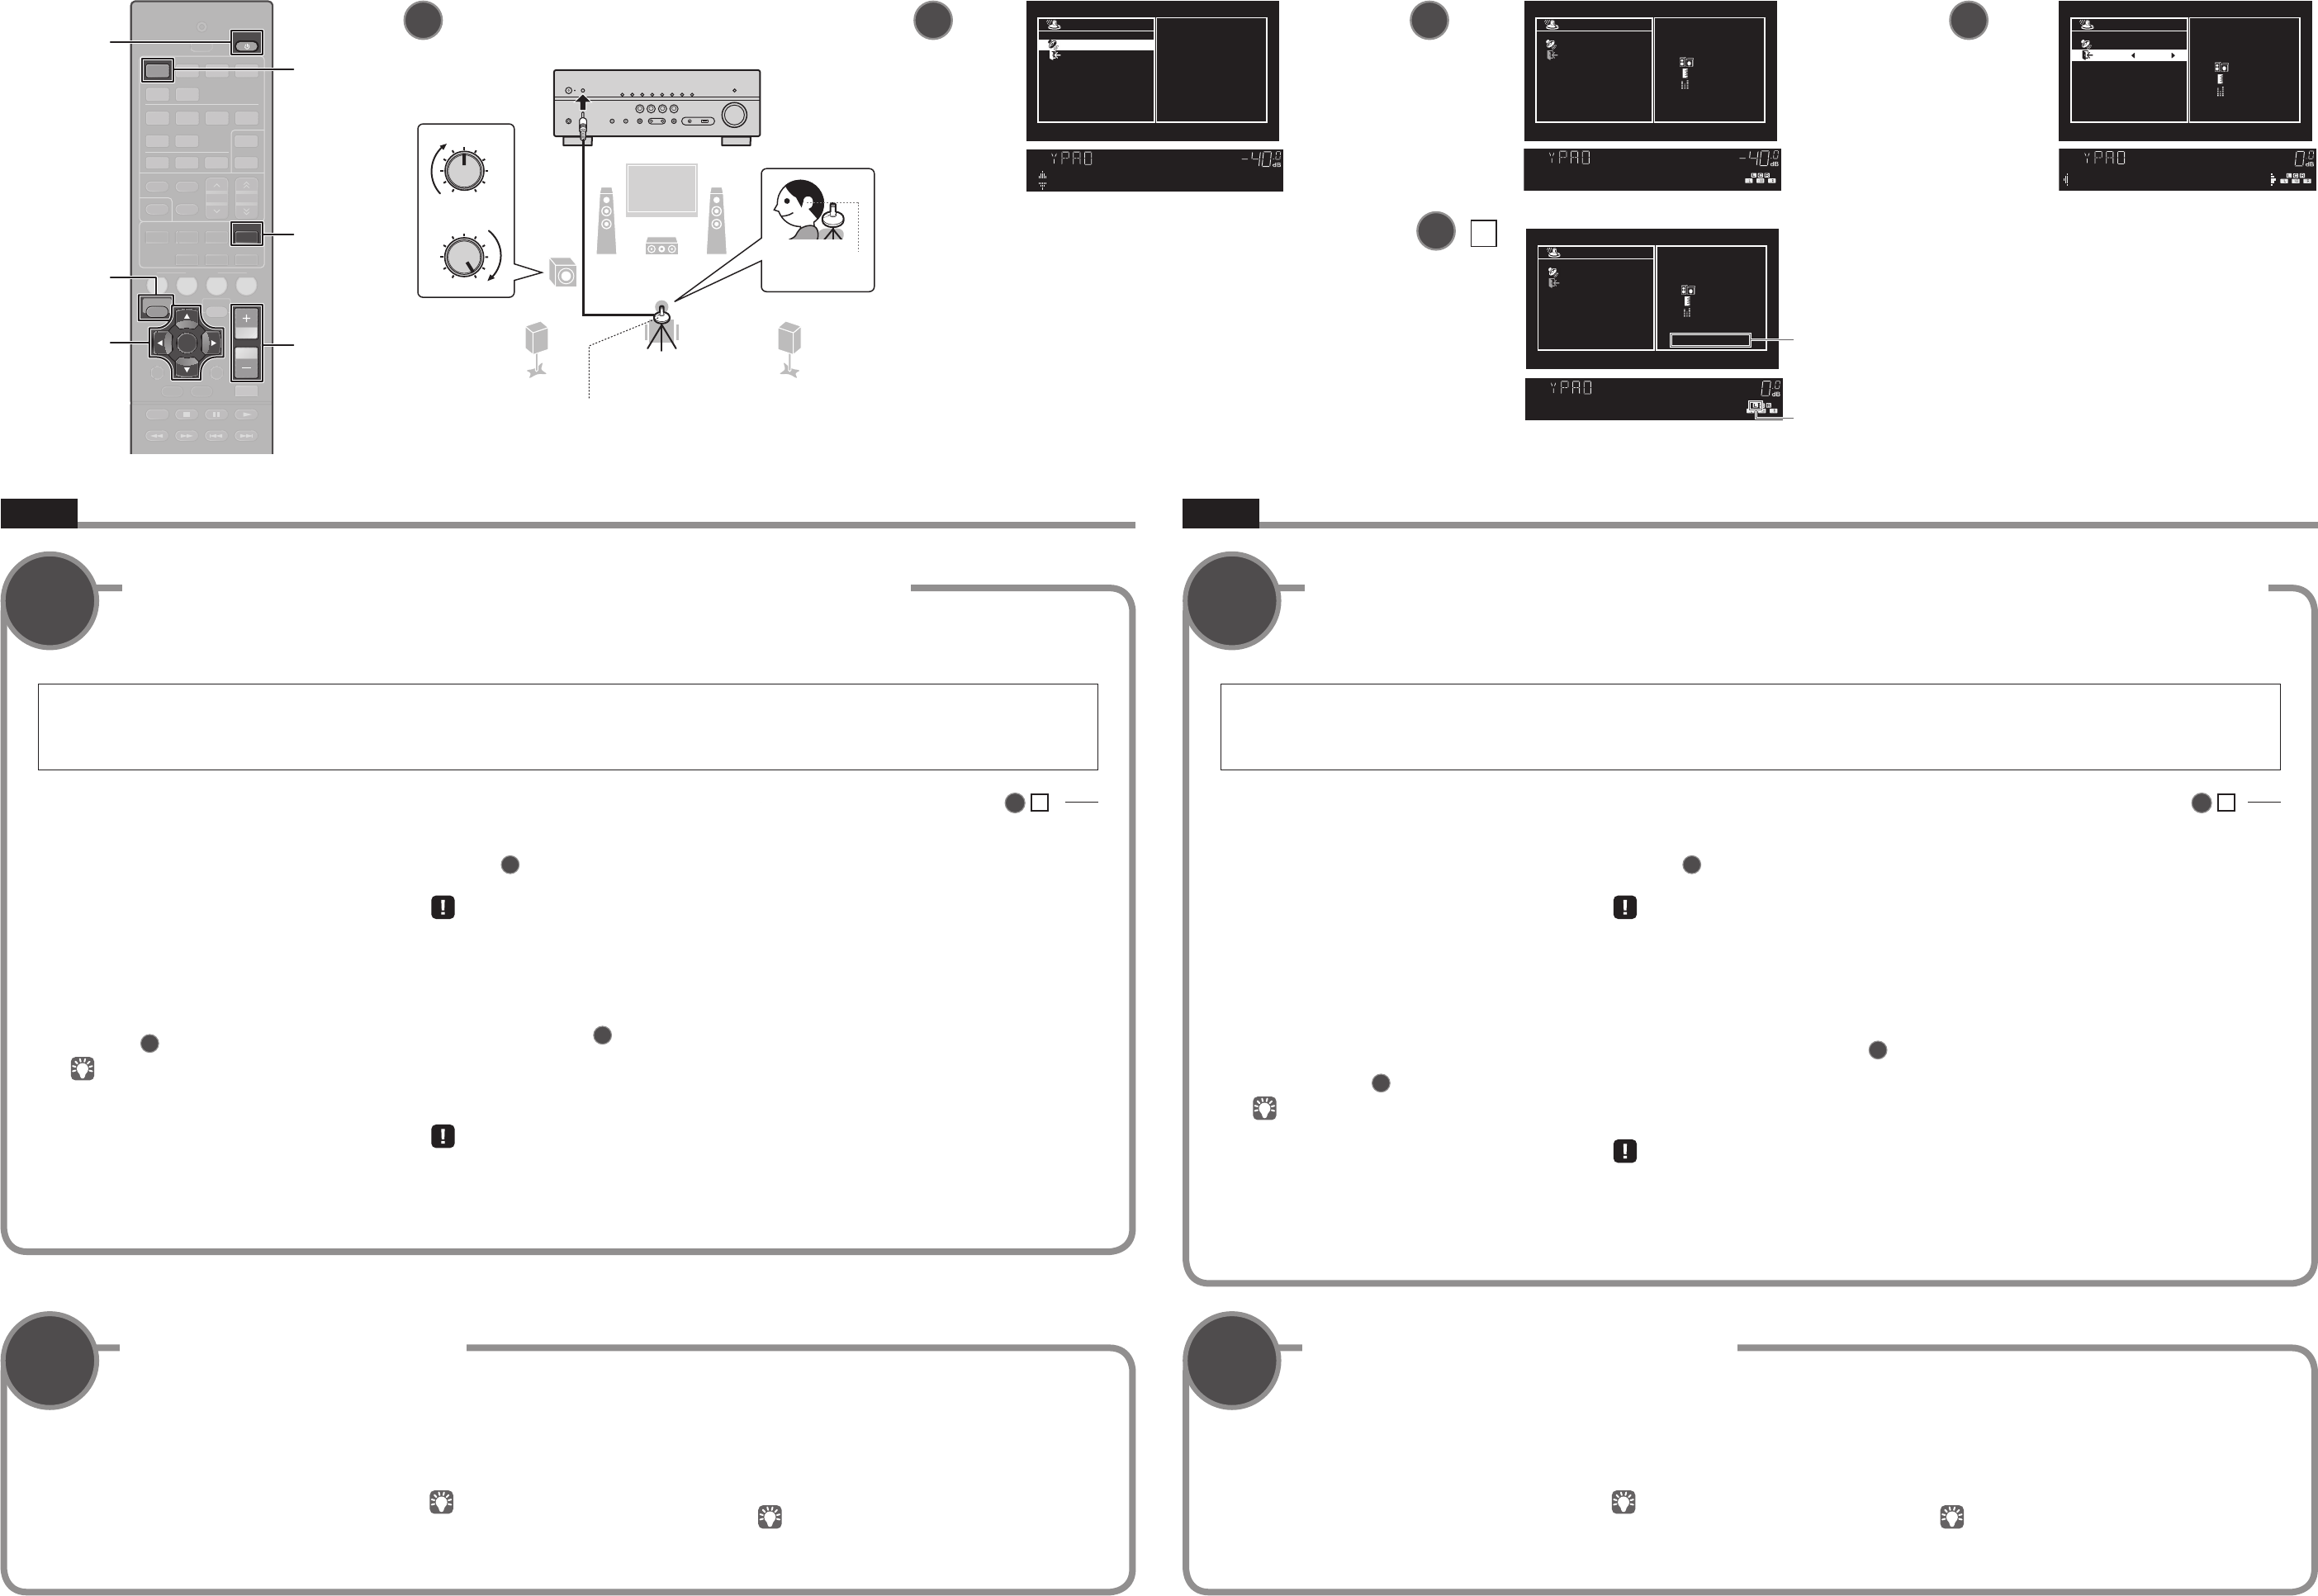
Ponga el micrófono YPAO a la altura
del oído en la posición de escucha y
conéctelo a la toma YPAO MIC en el panel
delantero.
Aparece la pantalla
7
-4.
Ponga el micrófono YPAO en la posición de escucha (a
la misma altura de sus oídos). Se recomienda utilizar un
trípode como soporte para el micrófono. Puede utilizar los
tornillos del trípode para estabilizar el micrófono.
5
Para iniciar la medición, pulse SETUP.
La medición comenzará al cabo de 10 segundos.
La medición tarda unos 3 minutos en realizarse.
La pantalla
7
-5 aparece en el TV cuando acaba
la medición.
• Si aparece un mensaje de error (com E-1) o un mensaje
de advertencia (como W-2), consulte “Mensajes de
error” o “Mensajes de advertencia” en el Manual de
Instrucciones.
• Si aparece el mensaje de advertencia “W-1:Out of
Phase”, consulte “Si aparece “W-1:Out of Phase”.
6
Utilice las teclas de cursor (e/r) para
seleccionar “SAVE” (Save) (pantalla
7
-6)
y pulse ENTER.
7
Desconecte el micrófono YPAO de la
unidad.
No deje el micrófono YPAO en un lugar en el que pueda
estar expuesto a la luz solar directa o a altas temperaturas
durante un periodo prolongado de tiempo.
Con esto ha finalizado la optimización de los ajustes de
los altavoces.
1
Press RECEIVER (z) to turn on the unit.
2
Turn on the TV and switch the TV input to
display video from the unit (HDMI OUT
jack).
3
Turn on the subwoofer and set the volume
to half. If the crossover frequency is
adjustable, set it to maximum.
4
Place the YPAO microphone at your
listening position and connect it to the
YPAO MIC jack on the front panel.
The screen
7
-4 appears.
Place the YPAO microphone at your listening position
(same height as your ears). We recommend the use of
a tripod as a microphone stand. You can use the tripod
screws to stabilize the microphone.
5
To start the measurement, press SETUP.
The measurement will start in 10 seconds.
It takes about 3 minutes to measure.
The screen
7
-5 appears on the TV when the
measurement finishes.
• If any error message (such as E-1) or warning message
(such as W-2) appears, see “Error messages” or
“Warning messages” in the Owner’s Manual.
• If the warning message “W-1:Out of Phase” appears,
see “If “W-1:Out of Phase” appears”.
6
Use the cursor keys (e/r) to select
“SAVE” (Save) (screen
7
-6) and press
ENTER.
7
Disconnect the YPAO microphone from the
unit.
Do not leave the YPAO microphone in a place where it will
be exposed to direct sunlight or high temperature for an
extended period of time.
This completes optimization of the speaker settings.
88
Ahora vamos a reproducir un BD/DVD.
Le recomendamos que reproduzca audio de varios canales (5.1 canales o más) para sentir el sonido surround producido por la unidad.
Now let’s play back a BD/DVD.
We recommend playing back multichannel audio (5.1-channel or more) to feel surround sound produced by the unit.
Reproducción de un BD/DVDPlaying back a BD/DVD
1
Encienda el reproductor BD/DVD.
2
Pulse HDMI 1 para seleccionar “HDMI 1”
como fuente de entrada.
3
Inicie la reproducción en el reproductor
BD/DVD.
4
Pulse varias veces STRAIGHT para
seleccionar “STRAIGHT”.
Cuando está activado el modo “STRAIGHT”
(decodificación directa), cada altavoz produce
directamente la señal de audio de cada canal (sin
procesamiento de campo sonoro).
5
Pulse VOLUME para ajustar el volumen.
Esto completa el procedimiento de configuración básica.
Cuando no se oye el sonido surround o un determinado altavoz
no emite sonido, consulte “Resolución de problemas” en el
Manual de Instrucciones.
1
Turn on the BD/DVD player.
2
Press HDMI 1 to select “HDMI 1” as the
input source.
3
Start playback on the BD/DVD player.
4
Press STRAIGHT repeatedly to select
“STRAIGHT”.
When “STRAIGHT” (straight decode) is enabled, each
speaker produces each channel audio signal directly
(without sound field processing).
5
Press VOLUME to adjust the volume.
This completes the basic setup procedure.
When surround sound is not heard, or no sound is output from a
specific speaker, see “Troubleshooting” in the Owner’s Manual.
Siga el procedimiento descrito a continuación para
comprobar las conexiones del altavoz.
1
El indicador del altavoz en el visor delantero
parpadeará si existe un altavoz con problema.
2
Compruebe las conexiones de los cables (+/-) del
altavoz con problemas.
Si el altavoz está mal conectado:
Apague la unidad, vuelva a conectar el cable del altavoz
y luego realice la medición YPAO de nuevo.
Si el altavoz está bien conectado:
Dependiendo del tipo de altavoces o el entorno de
la sala, puede aparecer este mensaje, incluso si los
altavoces están correctamente conectados.
En este caso, ignore el mensaje y continúe con el paso 6.
Follow the procedure below to check the speaker
connections.
1
The speaker indicator in the front display will blink for
a problem speaker.
2
Check cable connections (+/-) for the problem
speaker.
If the speaker is connected incorrectly:
Turn off the unit, reconnect the speaker cable, and then
try YPAO measurement again.
If the speaker is connected correctly:
Depending on the type of speakers or room environment,
this message may appear even if the speakers are
connected correctly.
In this case, ignore the message and proceed to step 6.
Libble nimmt den Missbrauch seiner Dienste sehr ernst. Wir setzen uns dafür ein, derartige Missbrauchsfälle gemäß den Gesetzen Ihres Heimatlandes zu behandeln. Wenn Sie eine Meldung übermitteln, überprüfen wir Ihre Informationen und ergreifen entsprechende Maßnahmen. Wir melden uns nur dann wieder bei Ihnen, wenn wir weitere Einzelheiten wissen müssen oder weitere Informationen für Sie haben.
Art des Missbrauchs:
Forenregeln
Um zu sinnvolle Fragen zu kommen halten Sie sich bitte an folgende Spielregeln:
Lesen Sie zuerst die Anleitung;
Schauen Sie nach, ob die Frage bereits gestellt wurde;
Stellen Sie die Frage so deutlich wie nur einigermaßen möglich;
Erwähnen Sie was Sie bereits versucht haben um das Problem zu lösen;
Ist Ihr Problem von einem Besucher gelöst dann lassen Sie ihn / sie wissen in diesem Forum;
Falls Sie reagieren möchten, so verwenden Sie bitte das Antworten- Formular;
Da ihre Frage für alle Besucher sichtbar ist, sollten Sie lieber keine persönliche Daten erwähnen.
Neu registrieren
Registrieren auf E - Mails für Yamaha RX-V477T wenn:
neue Frage gestellt werden
neue Handbücher vorhanden sind
Sie erhalten eine E-Mail, um sich für eine oder beide Optionen anzumelden.
Das Handbuch wird per E-Mail gesendet. Überprüfen Sie ihre E-Mail.
Wenn Sie innerhalb von 15 Minuten keine E-Mail mit dem Handbuch erhalten haben, kann es sein, dass Sie eine falsche E-Mail-Adresse eingegeben haben oder dass Ihr ISP eine maximale Größe eingestellt hat, um E-Mails zu erhalten, die kleiner als die Größe des Handbuchs sind.
Ihre Frage wurde zu diesem Forum hinzugefügt
Möchten Sie eine E-Mail erhalten, wenn neue Antworten und Fragen veröffentlicht werden? Geben Sie bitte Ihre Email-Adresse ein.