538929
27
Zoom out
Zoom in
Vorherige Seite
1/28
Nächste Seite
27GW41-004_v02
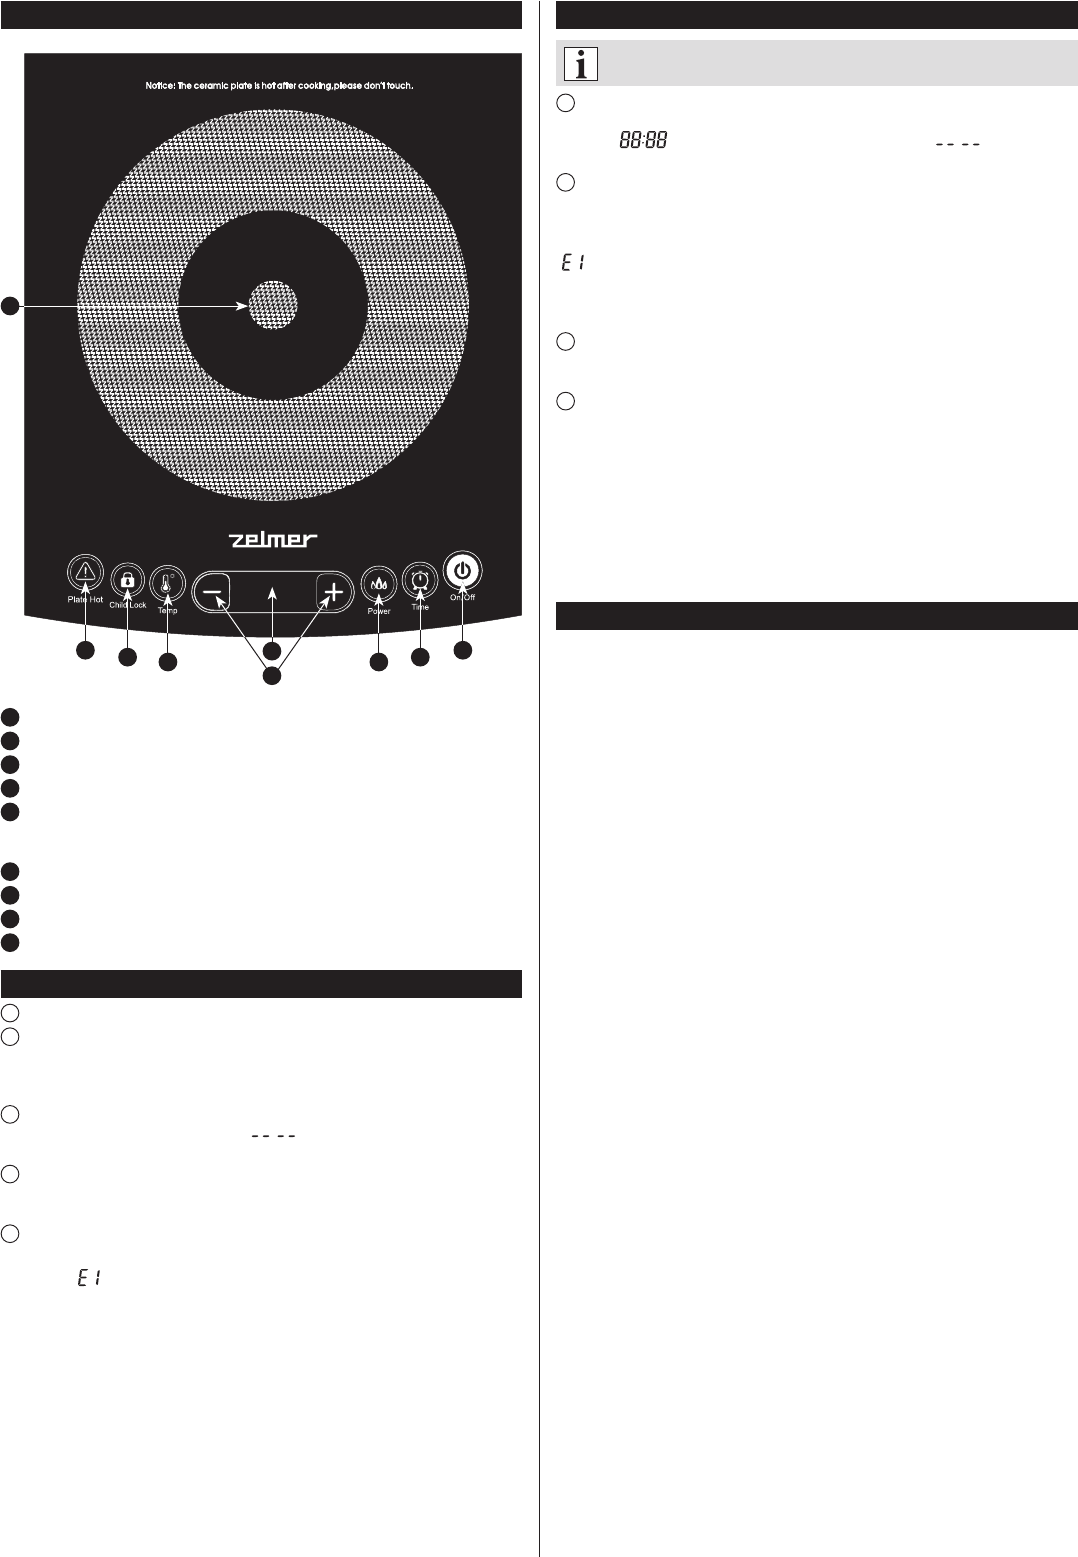
Appliance controls and indicators
1
Hob plate
2
Plate Hot indicator
3
Child Lock button
4
Temp. selection button
5
LED display showing the level of power (100, 300, 600, 800, 1000, 1400, 1700, 2000)
or temperature (60, 120, 140, 160, 180, 200, 220, 240) or appliance working time
(00:00 – 23:59)
6
+/– buttons for setting the level of power, temperature or time
7
Power selection button
8
Time selection button
9
ON/OFF button
Connecting to the electricity supply
1
Place a suitable pan on the hob plate.
2
After plugging the induction hob in you will hear a single warning sound. At the same
time, all function indicator lamps and heat power lamps will light for a period of about
1 second, and then they will go out. The “ON/OFF” indicator lamp will ash. The “ON/OFF”
button is the only operable button, the remaining buttons are inoperable.
3
When the appliance is plugged in, press the “ON/OFF” button. You will hear a single
warning sound and the display will read ”. The electric fan is turned off, which
means that the appliance is in the standby mode.
4
Within one minute after pressing the “ON/OFF” button you can select the desired
function. The selected function will be highlighted on the display. If no function has been
selected within one minute, the appliance will be automatically turned off.
5
If, after selecting the desired function, no pan has been placed on the hob plate,
a warning beep will sound.
The symbol “ ”. will appear on the display. The function indicator lamp will light steadily
while the heat power lamps will ash. If, within one minute, there is still no pan on the hob
plate, the appliance will be automatically turned off. If, within one minute, a pan is placed
on the hob plate, the appliance will check whether the pan is suitable for induction cooking
and after three seconds it will start to perform the cooking function set earlier.
Operation
For each function described below, always use a pan suitable for induction
cooking. The pan base diameter should be 12-24 cm.
1
Place the pan with food centrally onto the ceramic plate of the induction hob. After
plugging the appliance in all indicator lamps will light for a second and the four-digit display
will show ”, and then it will start to ash with the code ”. The “ON/OFF”
indicator lamp ashes, which means that the induction hob has not been turned on yet.
2
If, within 1 minute after pressing the “ON/OFF” button for the rst time, either the
“Power” or “Temp” button is pressed, the appliance will check whether there is a pan on
the hob plate.
In the case there is no pan on the hob plate, a warning sound will be heard and the code
will appear on the display; the induction hob will automatically exit the selected
mode after 1 minute in the case there is no pan on the hob plate, and then it will go in the
standby mode. In the case a pan has been placed on the hob plate within 1 minute, the
induction hob will automatically start working.
3
Turn off the induction hob when you have nished cooking by pressing the “ON/OFF”
button. After turning the induction hob off and waiting until the fan stops operating, the
appliance can be disconnected from the electricity supply.
4
When using the induction hob, observe the following guidelines:
The temperature maintenance mode can only be used with one of the following eight
“Temp” settings: 60°C, 120°C, 140°C, 160°C, 180°C, 200°C, 220°C and 240°C.
In the temperature maintenance mode the nominal values may differ from the actual
values depending on the cookware shape and material.
Pans made of stainless steel type 202 with multiple bottoms are standard cookware to
be used with this induction hob. Depending on cookware selection different levels of
heating capacity are achieved.
The power can be set to one of the 8 levels: 100 W, 300 W, 600 W, 800 W, 1000 W,
1400 W, 1700 W and 2000 W. The maximum power is achieved in the “Power” mode.
Instructions for particular functions
Power selection mode (“Power”)
After pressing the “Power” button you can select the desired power level, which will be
conrmed by lighting the corresponding indicator lamp.
The default power is set to 800 W. The selected value is shown on the display during the
operation of the induction hob. The power can be set to one of the 8 levels: 100 W, 300 W,
600 W, 800 W, 1000 W, 1400 W, 1700 W and 2000 W. In order to increase the power level,
press the “+” button, to decrease the setting, press “–”.
Plate hot indicator (“Plate Hot ”)
When the temperature exceeds 60°C or the hob induction system is turned off, the “Plate
Hot” indicator will light.
“Child Lock”
In the induction hob working mode (after one of the available functions: ,”Temp”, ”Power”
or ”Time” has been selected), press the “Child Lock” button for 2 seconds, until the
corresponding indicator lamp will light.
After turning this mode on, the induction hob will not react to touching (except for “ON/OFF”
and “Child Lock” buttons. In order to turn the protection off, press the “Child Lock” button
again for 2 seconds, until the corresponding indicator lamp will go out.
Temperature selection mode (“Temp”)
After pressing the “Temp” button, you can select the desired temperature level, which will
be conrmed by lighting the corresponding indicator lamp.
The default temperature is set to 160°C. The selected value is shown on the display during
the operation of the induction hob. The temperature can be set to one of the following
levels: 60°C, 120°C, 140°C, 160°C, 180°C, 200°C, 220°C and 240°C.
Use the “+” and “–” buttons to select the desired temperature value. When you reach
the maximum temperature setting, the “+” button will be disabled. Then, you can only
decrease the temperature setting by pressing the “–” button. When you reach the minimum
temperature setting, the “–” button will be disabled. The highest possible temperature
setting is 240°C, and the power will be automatically adjusted along with the change in
temperature setting.
Countdown mode (“Time”)
After selecting the “Time” mode (countdown) in the “Power” or “Temp” mode, the mode
indicator lamp will start ashing. Select the time period after which the induction hob will
be automatically turned off.
The default setting is 15 minutes (00:15). When the hour digits start ashing, press the “+”
or “–” button to select a value from 0-23; then within 5 seconds after the “Time” button has
been pressed, the minute digits will light while the hour digits will stop ashing.
Each single press of the “+” or “–” button will respectively increase or decrease the set
countdown time by one minute. The minute range is from 00-59. After pressing the “+” or
button for more than 2 seconds, the minute setting will increase or decrease more quickly
without the sound signal.
If the “+” or “–” button has not been pressed within 5 seconds, the countdown setting will be
completed. The mode indicator lamp will stop ashing, and the set time will appear on the
display (the maximum value is 23 hours 59 minutes – 23:59). After nishing the countdown
the multiple sound signal will be heard, the mode indicator lamp will start ashing, and the
fan will continue to operate for a while and then it will be turned off. The mode indicator
lamp will be turned off along with the induction hob.
1
5
6
4 7
3 8
2 9
27

Brauchen Sie Hilfe? Stellen Sie Ihre Frage.

Forenregeln

Missbrauch melden von Frage und/oder Antwort

Libble nimmt den Missbrauch seiner Dienste sehr ernst. Wir setzen uns dafür ein, derartige Missbrauchsfälle gemäß den Gesetzen Ihres Heimatlandes zu behandeln. Wenn Sie eine Meldung übermitteln, überprüfen wir Ihre Informationen und ergreifen entsprechende Maßnahmen. Wir melden uns nur dann wieder bei Ihnen, wenn wir weitere Einzelheiten wissen müssen oder weitere Informationen für Sie haben.

Art des Missbrauchs:

Zum Beispiel antisemitische Inhalte, rassistische Inhalte oder Material, das zu einer Gewalttat führen könnte.

Beispielsweise eine Kreditkartennummer, persönliche Identifikationsnummer oder unveröffentlichte Privatadresse. Beachten Sie, dass E-Mail-Adressen und der vollständige Name nicht als private Informationen angesehen werden.

Forenregeln

Um zu sinnvolle Fragen zu kommen halten Sie sich bitte an folgende Spielregeln:

Neu registrieren

Registrieren auf E - Mails für Zelmer 41Z012 wenn:


Sie erhalten eine E-Mail, um sich für eine oder beide Optionen anzumelden.


Andere Handbücher von Zelmer 41Z012

Zelmer 41Z012 Bedienungsanleitung - Englisch, Polnisch - 52 seiten


Das Handbuch wird per E-Mail gesendet. Überprüfen Sie ihre E-Mail.

Wenn Sie innerhalb von 15 Minuten keine E-Mail mit dem Handbuch erhalten haben, kann es sein, dass Sie eine falsche E-Mail-Adresse eingegeben haben oder dass Ihr ISP eine maximale Größe eingestellt hat, um E-Mails zu erhalten, die kleiner als die Größe des Handbuchs sind.

Ihre Frage wurde zu diesem Forum hinzugefügt

Möchten Sie eine E-Mail erhalten, wenn neue Antworten und Fragen veröffentlicht werden? Geben Sie bitte Ihre Email-Adresse ein.


Info