Copying or reproduction of this document in whole or in part without permission is prohibited.
Thank you very much for purchasing the ZOOM .
The
has the following features.
• High quality mic that connects with iPhones, iPods and iPads
This stereo microphone can be connected to an iPhone (5 or later), iPod touch (5th
generation), iPad (4th generation), iPad Air or iPad mini and used with an application that
supports mic input to record high-quality audio.
Note: In this manual, we refer to all of these devices as “the connected device” or “the iOS device.”
• X/Y mic format allows adjustment of the recording angle
The X/Y mic format uses two crossed unidirectional mics and allows you to record audio
sources in a targeted field as a stereo image that has depth. You can set the recording
angle to 90° or 120° by turning the mics.
• High-performance app for use with the mic
Download the free application from the App Store and use it with the to, for
example, set the recording format, edit audio files and apply various effects.
• Audio monitoring without latency (only when using the ZOOM
app)
Using latency-free direct monitoring, the audio input through the can be output
directly from the stereo mini jack without passing through the connected iOS device.
• Recording level can be adjusted directly from the
The dial on the can be used to adjust the recording level.
• Usable even with devices in cases
Byremoving the included case adjuster, you canconnect this mic to a device evenwhen
it isin a case.
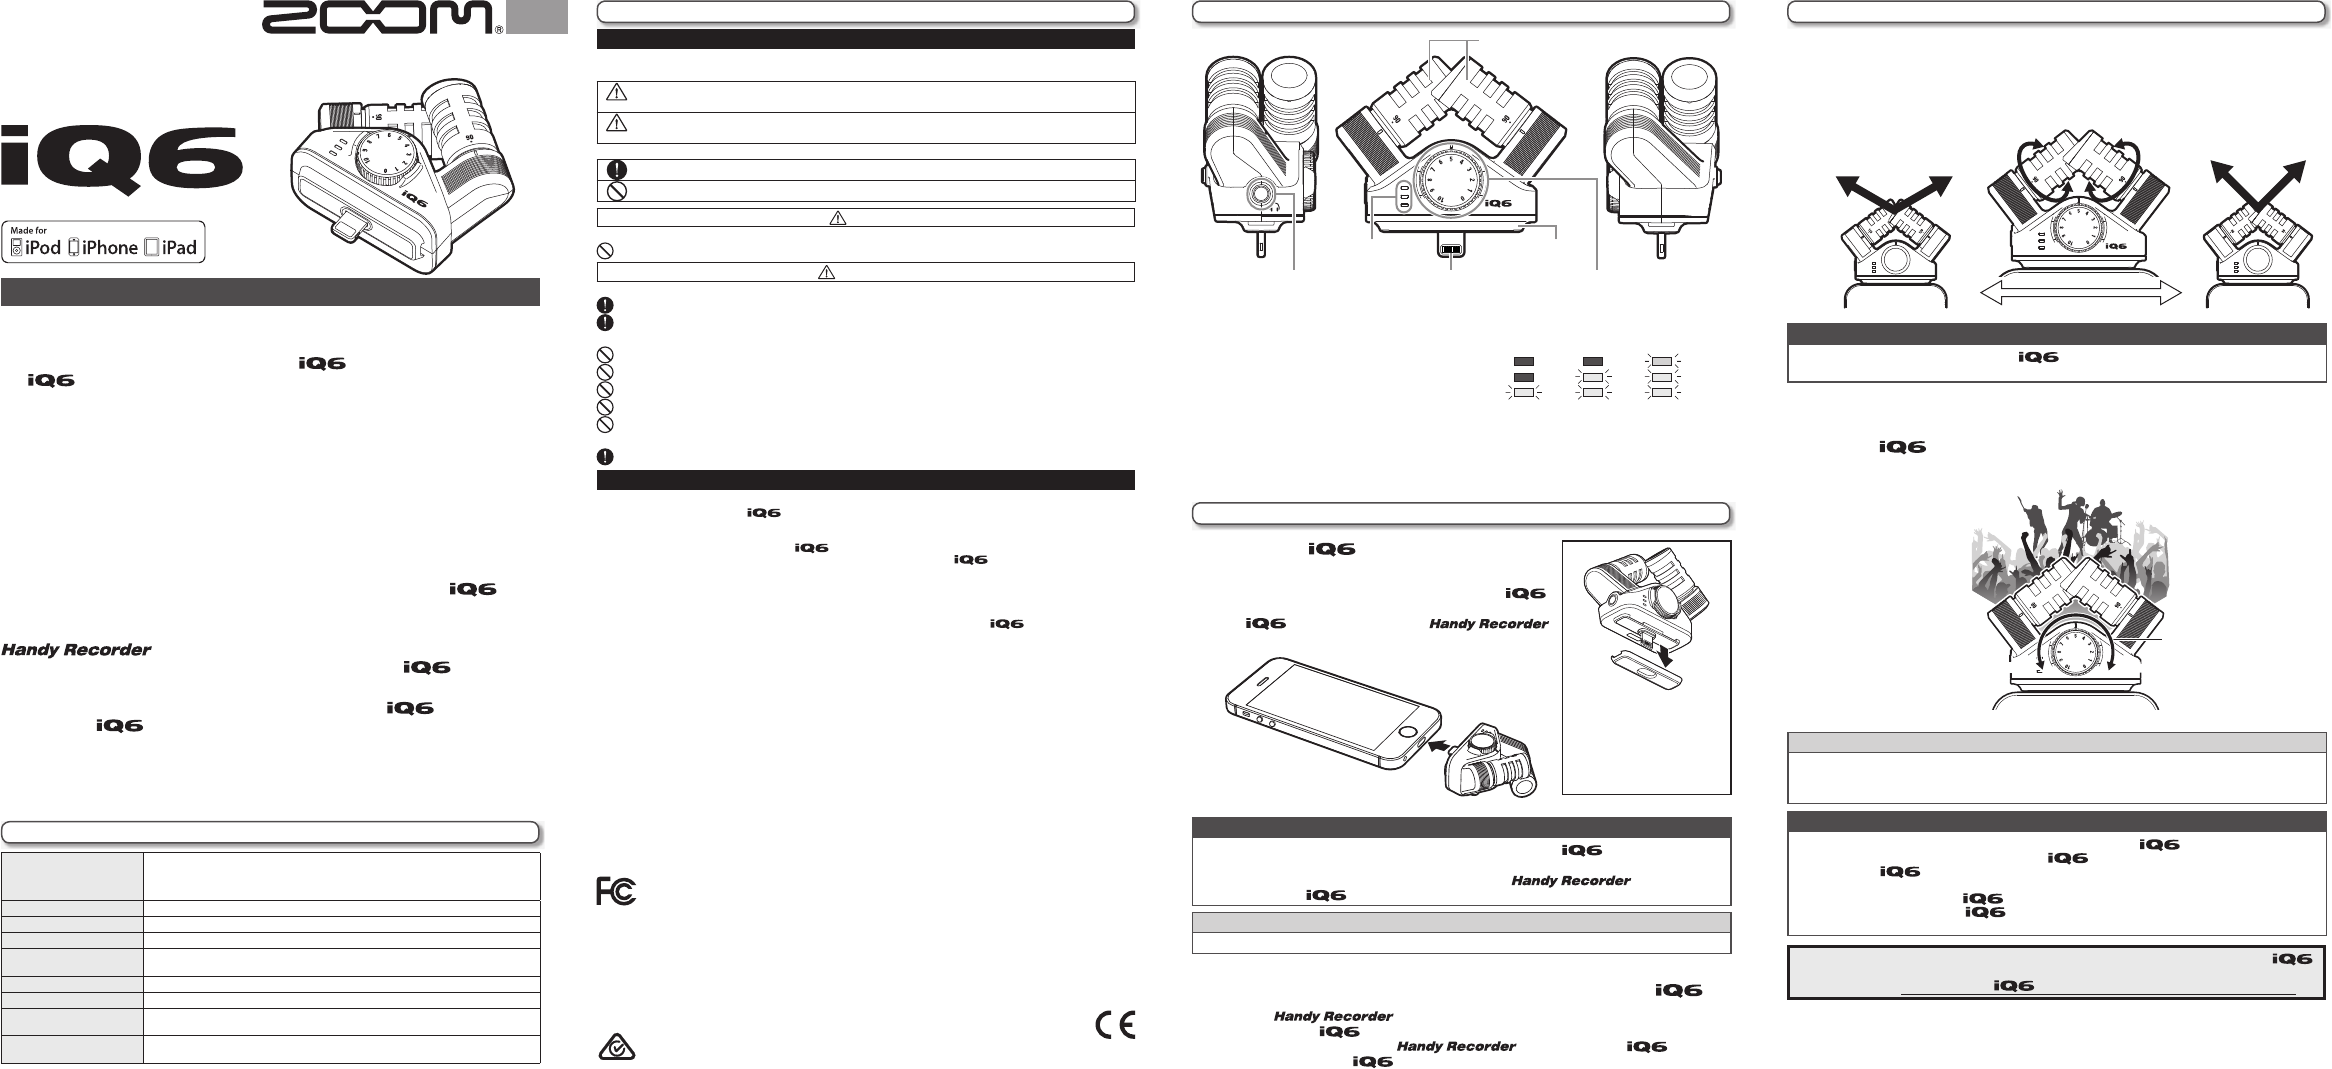
Stereo mini jackLightning connector
X/Y stereo mic
MIC GAIN knob
Level indicatorCase adjuster
120°
90°
Recording level
LowHigh
• Remove the case adjuster if
the case of the device prevents
the Lightning connectorfrom
connecting completely.
• Somecasesmight prevent
connection even when the
case adjuster is removed.
If the connected device sends or receives data wirelessly while recording with the ,
noise could occur in the recording. Using the phone function of the iPhone will also cause
recording to stop. When using the , put the connected device into Airplane Mode.
• iPad, iPhone, iPod and iPod touch are trademarks of Apple Inc., registered in the U.S. and other countries. iPad Air,
iPad mini, and Lightning are trademarks of Apple Inc.
Brauchen Sie Hilfe? Stellen Sie Ihre Frage.
Missbrauch melden von Frage und/oder Antwort
Libble nimmt den Missbrauch seiner Dienste sehr ernst. Wir setzen uns dafür ein, derartige Missbrauchsfälle gemäß den Gesetzen Ihres Heimatlandes zu behandeln. Wenn Sie eine Meldung übermitteln, überprüfen wir Ihre Informationen und ergreifen entsprechende Maßnahmen. Wir melden uns nur dann wieder bei Ihnen, wenn wir weitere Einzelheiten wissen müssen oder weitere Informationen für Sie haben.
Art des Missbrauchs:
Forenregeln
Um zu sinnvolle Fragen zu kommen halten Sie sich bitte an folgende Spielregeln:
Lesen Sie zuerst die Anleitung;
Schauen Sie nach, ob die Frage bereits gestellt wurde;
Stellen Sie die Frage so deutlich wie nur einigermaßen möglich;
Erwähnen Sie was Sie bereits versucht haben um das Problem zu lösen;
Ist Ihr Problem von einem Besucher gelöst dann lassen Sie ihn / sie wissen in diesem Forum;
Falls Sie reagieren möchten, so verwenden Sie bitte das Antworten- Formular;
Da ihre Frage für alle Besucher sichtbar ist, sollten Sie lieber keine persönliche Daten erwähnen.
Neu registrieren
Registrieren auf E - Mails für Zoom iQ6 wenn:
neue Frage gestellt werden
neue Handbücher vorhanden sind
Sie erhalten eine E-Mail, um sich für eine oder beide Optionen anzumelden.
Das Handbuch wird per E-Mail gesendet. Überprüfen Sie ihre E-Mail.
Wenn Sie innerhalb von 15 Minuten keine E-Mail mit dem Handbuch erhalten haben, kann es sein, dass Sie eine falsche E-Mail-Adresse eingegeben haben oder dass Ihr ISP eine maximale Größe eingestellt hat, um E-Mails zu erhalten, die kleiner als die Größe des Handbuchs sind.
Ihre Frage wurde zu diesem Forum hinzugefügt
Möchten Sie eine E-Mail erhalten, wenn neue Antworten und Fragen veröffentlicht werden? Geben Sie bitte Ihre Email-Adresse ein.