792422
1
Zoom out
Zoom in
Vorherige Seite
1/2
Nächste Seite
POWER
15 V D C
INPUT
2d/2A
OUTPUT
MINIJACK
INPUT
1d
STANDARD
OPTICAL
DIGITAL
HEADPHONE
OR
SUBWOOFER
MINIJACK
OPTICAL
/ANALOG
Volume
These appropriately named buttons control the volume.
Power
The Power button switches the ZVOX speaker from STANDBY
to On. Note: The ZVOX speaker enters STANDBY if it is silent for
approximately 30 minutes. It will turn back on when the TV sends
it a signal (optical input 1), or when you use the ZVOX remote to
control power or volume.
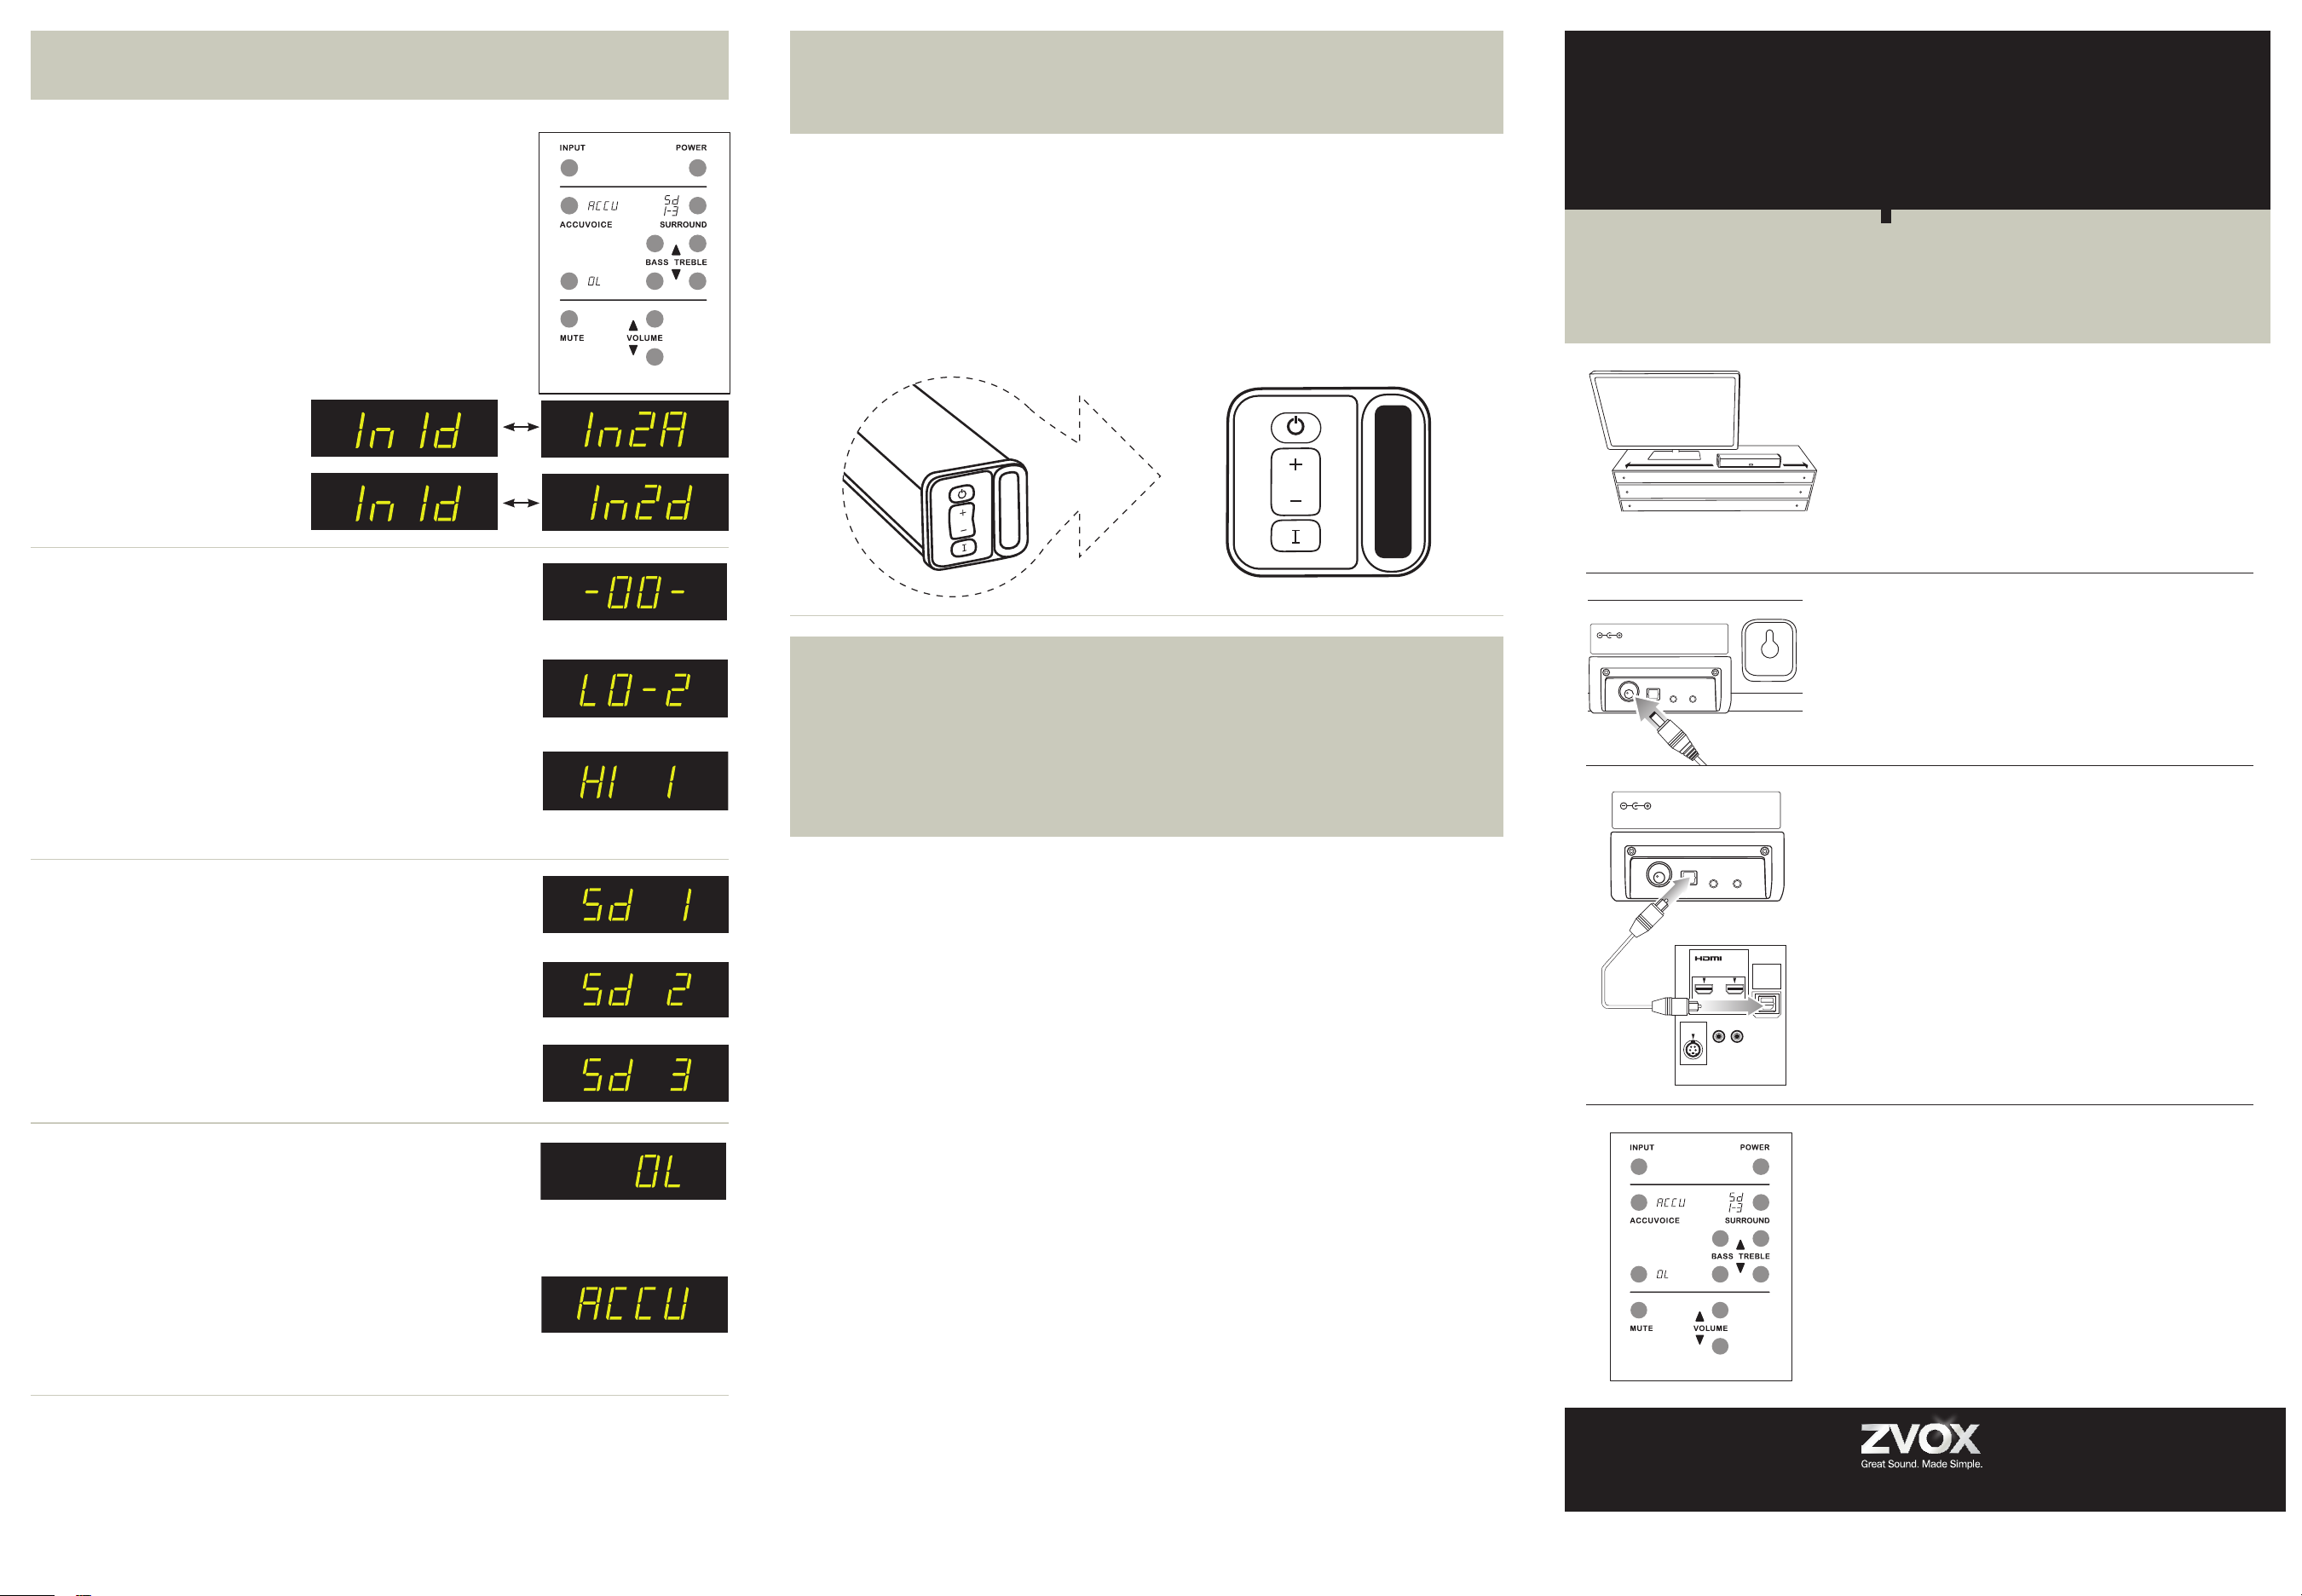
Input Selection
Press the INPUT button on the ZVOX remote to select between the
speaker’s two inputs.
The choices will be
Input 1d—optical digital
Input 2a—analog
—OR—
Input 1d—optical digital
Input 2d—optical digital
Mute
Press this button to mute the ZVOX speaker. When MUTE function is
active, the display will show a blinking -00- for 20 seconds.
Bass and Treble
The Bass control has a range of -6 to 4. The Treble control has a range
of -4 to 4. After you set up the ZVOX speaker, experiment with different
level settings to nd one you like.
Surround Settings
There are three SURROUND levels:
Surround One (“Sd 1”) has low virtual surround effect and strong
vocals. Use this setting if vocal clarity is important to you.
Surround Two (“Sd 2”) has moderate virtual surround effect
and moderate vocals. Most people prefer this setting for most
program material.
Surround Three (“Sd 3”) has strong virtual surround effect
and moderate vocals. Many people prefer this setting when
watching movies.
STILL NEED ASSISTANCE? If your TV is not the same as the descriptions in this
guide, don’t hesitate to send an inquiry to info@zvoxaudio.com or call ZVOX Audio
at (866) 367-9869. Please provide your TV brand and model number. A ZVOX
Audio representative should be available (Eastern Time Zone) 9:30 AM to 7:30
PM Monday through Friday and 10:30 AM to 5:30 PM on Saturday. For further
information about additional options, please refer to the ZVOX Audio website,
www.zvoxaudio.com.
1 Place The ZVOX Speaker
NOTE: The ZVOX AccuVoice TV Speaker is often
referred to as the "ZVOX speaker" in this User Manual.
You can place the speaker anywhere in front of your TV.
It can also be placed on any level surface near the TV –
above, below or to the left or right. It doesn’t have to be
centered in front of the TV, as long as it is facing the people
watching the TV. The speaker also has keyhole openings on
the back that allow "on wall" placement.
2 Connect Power Cord to Speaker
Connect the power cord to the power jack on the back of
the speaker.
Then connect the AC plug into an AC power receptacle.
Don't turn it on just yet.
3 Connect the Optical Signal Cable
Most TVs have an optical digital output jack (sometimes
called “Toslink”) on the back. Connect one end of the
supplied optical cable to this optical jack. Connect the other
end of the optical cable to the optical jack on the ZVOX
AccuVoiceTV speaker.
NOTE 1: The optical plug and jack are not square. Position the
optical plug so it matches the orientation of the optical jack, then
push the plug into the jack. You should hear and feel a "click" when
the plug is correctly inserted into the optical jack.
NOTE 2: If your TV does not have an optical connector, you can also
connect the the ZVOX speaker using an analog signal cable (also
supplied). See instructions later in this manual.
4 Turn down your TV’s sound and
turn on the AccuVoice TV Speaker
Tune your TV to a program. Then use the TV remote to turn
down the sound from your TV all the way.
Using the ZVOX speaker remote control, press the POWER
button to turn on the ZVOX speaker. You should be able to
hear the TV sound from the ZVOX speaker. Use the volume
buttons on the ZVOX speaker’s remote control to adjust the
sound to a good level. You are done!
If you don't hear sound, press the INPUT button on the
ZVOX speaker remote to conrm it is set to the optical audio
input (InId on the display).
End Panel Controls on
the AccuVoice TV Speaker
Button Functions on the ZVOX Remote Control
Bass set at -2
Treble set at 1
Mute
MUTE VOLUME INPUT
MUTE VOLUME INPUT
MUTE VOLUME INPUT
MUTE VOLUME INPUT
MUTE VOLUME INPUT
MUTE VOLUME INPUT
MUTE VOLUME INPUT
MUTE VOLUME INPUT
Remote Control Button Layout.
www.zvoxaudio.com | info@zvoxaudio.com | (866) 367-9869
A
B
C
Output Leveling
When you press the Output Leveling button on the remote control
and see "OL", Output Leveling is on. Output Leveling prevents
large swings in volume. It also reduces volume differences between
cable or satellite channels. OL works along with the three Surround
settings. Press the Output Leveling button again to turn off Output
Leveling ("noOL" appears on the ZVOX speaker).
Accuvoice
Press this button to dramatically increase the clarity of most voices.
Pressing Accuvoice overrides the current Surround setting.
A second button press returns the speaker to the last-used
Surround setting (Sd 1, Sd 2, Sd 3).
To the original purchaser of a ZVOX system in the
U.S., ZVOX warrants the system to be free of
defects in material and workmanship for a period of
one (1) year from date of purchase. To make a
warranty claim with ZVOX Audio, a Return Authori-
zation must be obtained from ZVOX Audio and the
system should be shipped to the address provided.
The repair of a ZVOX product must be done by a
ZVOX approved facility. With respect to defects
ZVOX will, at its option, repair any defect in the
product or replace the product at no charge to the
original purchaser for parts or labor. If ZVOX elects
to replace a system, the replacement system will be
equivalent to the condition of the ZVOX system as
received for service. This ZVOX warranty applies to a
ZVOX system purchased in the USA and used by a
customer in the USA ZVOX cannot provide service
to an owner of a ZVOX system outside the USA This
warranty does not extend to any defect, malfunction,
physical damage or failure caused by misuses,
abuse, accident, faulty hookup, improper electrical
source, defective associated equipment or use of
the system with equipment for which it is not
intended. The only acceptable method of establish-
ing warranty status is a copy of the original proof of
purchase indicating customer’s name and purchase
date. The warranty period starts from the date of
purchase of the product. The owner of the ZVOX
product should rst contact the ZVOX retailer that
sold the ZVOX system to inquire about warranty
service. If the dealer does not provide service for
ZVOX products, please contact ZVOX directly at
info@zvoxaudio.com or (866) 367-9869 to obtain a
Repair Authorization number and return instructions.
A Repair Authorization from ZVOX does not include
the cost of shipping the ZVOX system to ZVOX. The
Repair Authorization number should be included
inside the carton. The Repair Authorization number
should be marked on the return shipping label on
the outside of the carton. Shipping carton and
packing materials: The correct ZVOX carton and
cushions must be used to ship your unit to ZVOX.
We advise you to keep your system’s shipping
carton and all the corner and side cushions. This
1-year limited warranty does not cover the cost of a
replacement shipping carton and set of packing
materials. A replacement shipping carton and
cushion set can be purchased from ZVOX if you
elect to discard the original carton and packing. The
ZVOX system owner is responsible for shipping
charges to ZVOX Audio using the shipping method
of their choice. ZVOX is not responsible for physical
damage sustained by a product in shipment back to
ZVOX Audio, or during shipment back to the ZVOX
system owner, regardless of the nature of the Return
Authorization. ZVOX Audio suggests using a shipper
that provides you a tracking number. Once the repair
has been performed, ZVOX will then ship the unit
back to the customer with no charge for shipping. A
ZVOX system owner outside the United States of
America should contact the ZVOX retailer in the
country where they purchased the ZVOX system to
inquire about warranty service. You may then be
referred to the authorized ZVOX distributor in that
country. This is the sole and express warranty. This
warranty is in lieu of all other warranties, expressed
or implied, of merchantability, tness for purpose or
otherwise. In no event shall ZVOX Audio LLC be
liable for incidental or consequential damages or
have any liability with respect to defects other than
the obligations set forth as stated. Except as
provided herein, ZVOX Audio LLC shall have no
liability or responsibility to the purchaser or any other
person or entity with respect to any liability, loss or
damage caused directly or indirectly by use of the
product, including, but not limited to, any incidental
or consequential damages.
Warranty
Controlling the AccuVoice TV Speaker With Another Remote
The AccuVoice TV speaker can learn to respond to your preferred TV remote for Volume, Mute and
Power. Visit www.zvoxaudio.com to read or download instructions for this feature. To see a short
video of the teaching process, watch on line at
https://vimeo.com/40727112
The supplied ZVOX remote will always control the speaker and provide a full range of adjustments.
POWER
15 V DC
INPUT
2d/2A
OUTPUT
MINIJACK
INPUT
1d
STANDARD
OPTICAL
DIGITAL
HEADPHONE
OR
SUBWOOFER
MINIJACK
OPTICAL
/ANALOG
DIGITAL
AUDIO
OUT
HDMI 1 HDMI 2
VIDEO
On the viewer’s right end of the ZVOX speaker are four buttons.
A) POWER button:
This button turns the ZVOX speaker “ON” if it is in Standby. If this button is pressed briey while the
ZVOX speaker is “ON”, it will mute and unmute the sound. To turn off the ZVOX speaker, press and
hold down this button for about ve seconds.
B) Volume Up/Down rocker button
Adjusts volume up and down. Pressing either side of this button will “unmute” the ZVOX speaker if
it is muted.
C) Input button:
A brief press of the INPUT button changes the input.
Back of TV
®
Europe Australia edition
Setup & Operation
TV Speaker
QUICK SETUP GUIDE
®
ZVOX AccuVoice
USA edition
1

Brauchen Sie Hilfe? Stellen Sie Ihre Frage.

Forenregeln

Missbrauch melden von Frage und/oder Antwort

Libble nimmt den Missbrauch seiner Dienste sehr ernst. Wir setzen uns dafür ein, derartige Missbrauchsfälle gemäß den Gesetzen Ihres Heimatlandes zu behandeln. Wenn Sie eine Meldung übermitteln, überprüfen wir Ihre Informationen und ergreifen entsprechende Maßnahmen. Wir melden uns nur dann wieder bei Ihnen, wenn wir weitere Einzelheiten wissen müssen oder weitere Informationen für Sie haben.

Art des Missbrauchs:

Zum Beispiel antisemitische Inhalte, rassistische Inhalte oder Material, das zu einer Gewalttat führen könnte.

Beispielsweise eine Kreditkartennummer, persönliche Identifikationsnummer oder unveröffentlichte Privatadresse. Beachten Sie, dass E-Mail-Adressen und der vollständige Name nicht als private Informationen angesehen werden.

Forenregeln

Um zu sinnvolle Fragen zu kommen halten Sie sich bitte an folgende Spielregeln:

Neu registrieren

Registrieren auf E - Mails für Zvox AccuVoice AV200 wenn:


Sie erhalten eine E-Mail, um sich für eine oder beide Optionen anzumelden.


Andere Handbücher von Zvox AccuVoice AV200

Zvox AccuVoice AV200 Zusatzinformation - Englisch - 1 seiten

Zvox AccuVoice AV200 Bedienungsanleitung - Englisch - 8 seiten

Zvox AccuVoice AV200 Bedienungsanleitung - Holländisch - 2 seiten


Das Handbuch wird per E-Mail gesendet. Überprüfen Sie ihre E-Mail.

Wenn Sie innerhalb von 15 Minuten keine E-Mail mit dem Handbuch erhalten haben, kann es sein, dass Sie eine falsche E-Mail-Adresse eingegeben haben oder dass Ihr ISP eine maximale Größe eingestellt hat, um E-Mails zu erhalten, die kleiner als die Größe des Handbuchs sind.

Ihre Frage wurde zu diesem Forum hinzugefügt

Möchten Sie eine E-Mail erhalten, wenn neue Antworten und Fragen veröffentlicht werden? Geben Sie bitte Ihre Email-Adresse ein.


Info