Helpline No. UK/Northern Ireland 0871 288 6921 Helpline No. UK/Northern Ireland 0871 288 6921 Helpline No. UK/Northern Ireland 0871 288 6921 Helpline No. UK/Northern Ireland 08
Rep. Ireland 014 319790 Rep. Ireland 014 319790 Rep. Ireland 014 319790 Rep. Ireland 014 319790
Web Support www.produktservice.info Web Support www.produktservice.info Web Support www.produktservice.info Web Support www.produktservice.info
Page 3
5. Shortly after inserting the batteri
to search for the DCF77 signal for the radio clock,
the flashing radio tower symbol.
Radio tower symbol
The base stat
this will be displayed by a const
case (the radio tower symbol will not be visible), then press the ‘– ‘
key until you hear a signal tone
try for another 4 minutes to receive a radio c
possible to receive a signal at the location of
manually (see point 5.1
base station (see point 9, Troubleshooting).
Tip: The search process will be interrupted if you press the ‘+ ‘, or ‘–
‘ or the LIGHT/SNOOZE key.
6. After inserting the batter
transmit the measured temp
the flashing of the red indicator on th
sensor. The display
external air humidity wilshow on the base station once
the search for th
If the transmission of the initial
would like to speed up the process, press the TX key in the batter
compartment on the rear of the external sens
of the signal will then
The external sensor is set in the factory so that the transm
signal takes place on channel 1. Wait a m
shown on channel no. 1 on the main device.
on channel 1.
In order to ensure the transmission of the signal, the base station and the
external sensor should be a maximum of 40 metres apart. Th
be limited by stonework, reinforced concrete, me tal-framed windows
and fog. Overlapping radio waves can also affect
sensor measures the temperature and humidity at intervals of 30 seconds.
If the data between the two ments deviate only slightly from one
another then there will be no transfer to the base station. In order to
register a second or third external sensor (not included in de
please read point 5.5.6c, Registering a second or third ex
Now you can screw the external sensor’s
back on. As soon as the radio
set it in following wa
7. Frankfurt am Main, Germany is set b
of calculation for the rising and setting of both the sun and the
moon. In order to receive the correct display for the rising and
setting of the sun and moon for
take the setting for
location as given in point 5.3, Rising and setting of the sun and
moon.
8. After inserting the batteries, the base stat
displaying humidity of 1013 hPa (factory setting). In order to
receive a useful weather
the settings specified as in point 5.6.1a, Setting the
atmospheric pressure values. This completes the process of
putting the Weather Station
or hang the external sensor where you want it to be (see point
6, Assembly
5 Modes / Function keys
5.1 Time, date and time zone
5.1.1 Radio clock time
The time basis for the radio-controlled time display is one of the ce
atom clocks operated by the Physikalisch
in Brunswick, Germany. Th
by a long-wave transm
transmission range of some 1,500 km. If
this transmission area, it receives this signal, converts it and always
displays the precise time and dat
Several times a day the radio clock time is automatica
by the base station in order to correct
possible to receive a radio signal
be set manually (see point 5.1.2, Manual setting).
5.1.2 Manual Setting
If it is not possible to receive a
can also set th
1. To set the time manually, press and hold the SET/ZONE key
for approx. 3 seconds until the year begins to flash. Press th
‘+
‘ or the ‘– ‘ ke
SET/ZONE key. The month will now begin to flash.
2. Press the ‘+ ‘ or the ‘– ‘ key
with the SET/ZONE key.da
3.
Press the ‘+ ‘ or the ‘– ‘ key to set the day.
week will be automaticall
with the SET/ZONE key. The
4. Press the ‘+ ‘ or the ‘– ‘ key to set
with the SET/ZONE key.nutes will now begin to flash.
5.
Press the ‘+ ‘ or the ‘– ‘ key
with the SET/ZONE key. The 12/24-hour format will now
begin to flash.
6. Press the ‘+ ‘ or the ‘– ‘ key to set the 12/24-hour format.
Confirm with the SET/ZONE key. The time
begin to flash.
The earth is divided into 24 time zones. A time zone is a section of the
earth’s surface where a comm
longitude from the poles. On passing into another zone, time
an hour. In an easterly direction this moves forward by an hour and in a
westerly direction it m
would like to set the time for a country which is 6 time zones west of
your country, you must input minus 6 hours.
7. Press the ‘+ ‘ or the ‘– ‘ key
Confirm with the SET/ZONE key.
to flash.
In order to display the tim
SET/ZONE key after the settings
the time. Press
time display.
8. Press the ‘+ ‘ or the ‘– ‘ key to
(see also point 5.3 Rising and setting times of the sun and
moon). Confirm with the SET/ZONE key. The name of the
city will now begin to flash.
9. Press the ‘+ ‘ or the ‘– ‘ key to set the requ
also point 5.3 Rising and setting times of the sun and moon).
Confirm this last setting again with the SET/ZO
the rising and setting
automatically calculated (even if the settings for country and
city have not been changed)
after approximately 17 seconds.
Tip: It may occur that while entering
radio clock signal is lost. You will know this has
tower symbol will no longer be indicated
hold the ‘– ‘ key to r
Tip: Please note that in the summer time phase, it is not absolutely
necessary to rec
it is possible that there is a deviation of an hour for the rising and setting
times of the sun and moon (the difference between summer and
wintertime). (For help, see point 9, Troubleshooting ‘The radio clock is
not receiving a radio clock
The settings are now completed.
5.2 Phase of the moon
The phase of the moon depends on the
calculated and the following s
Full moon waning moon new moon
New moon waxing moon Full moon
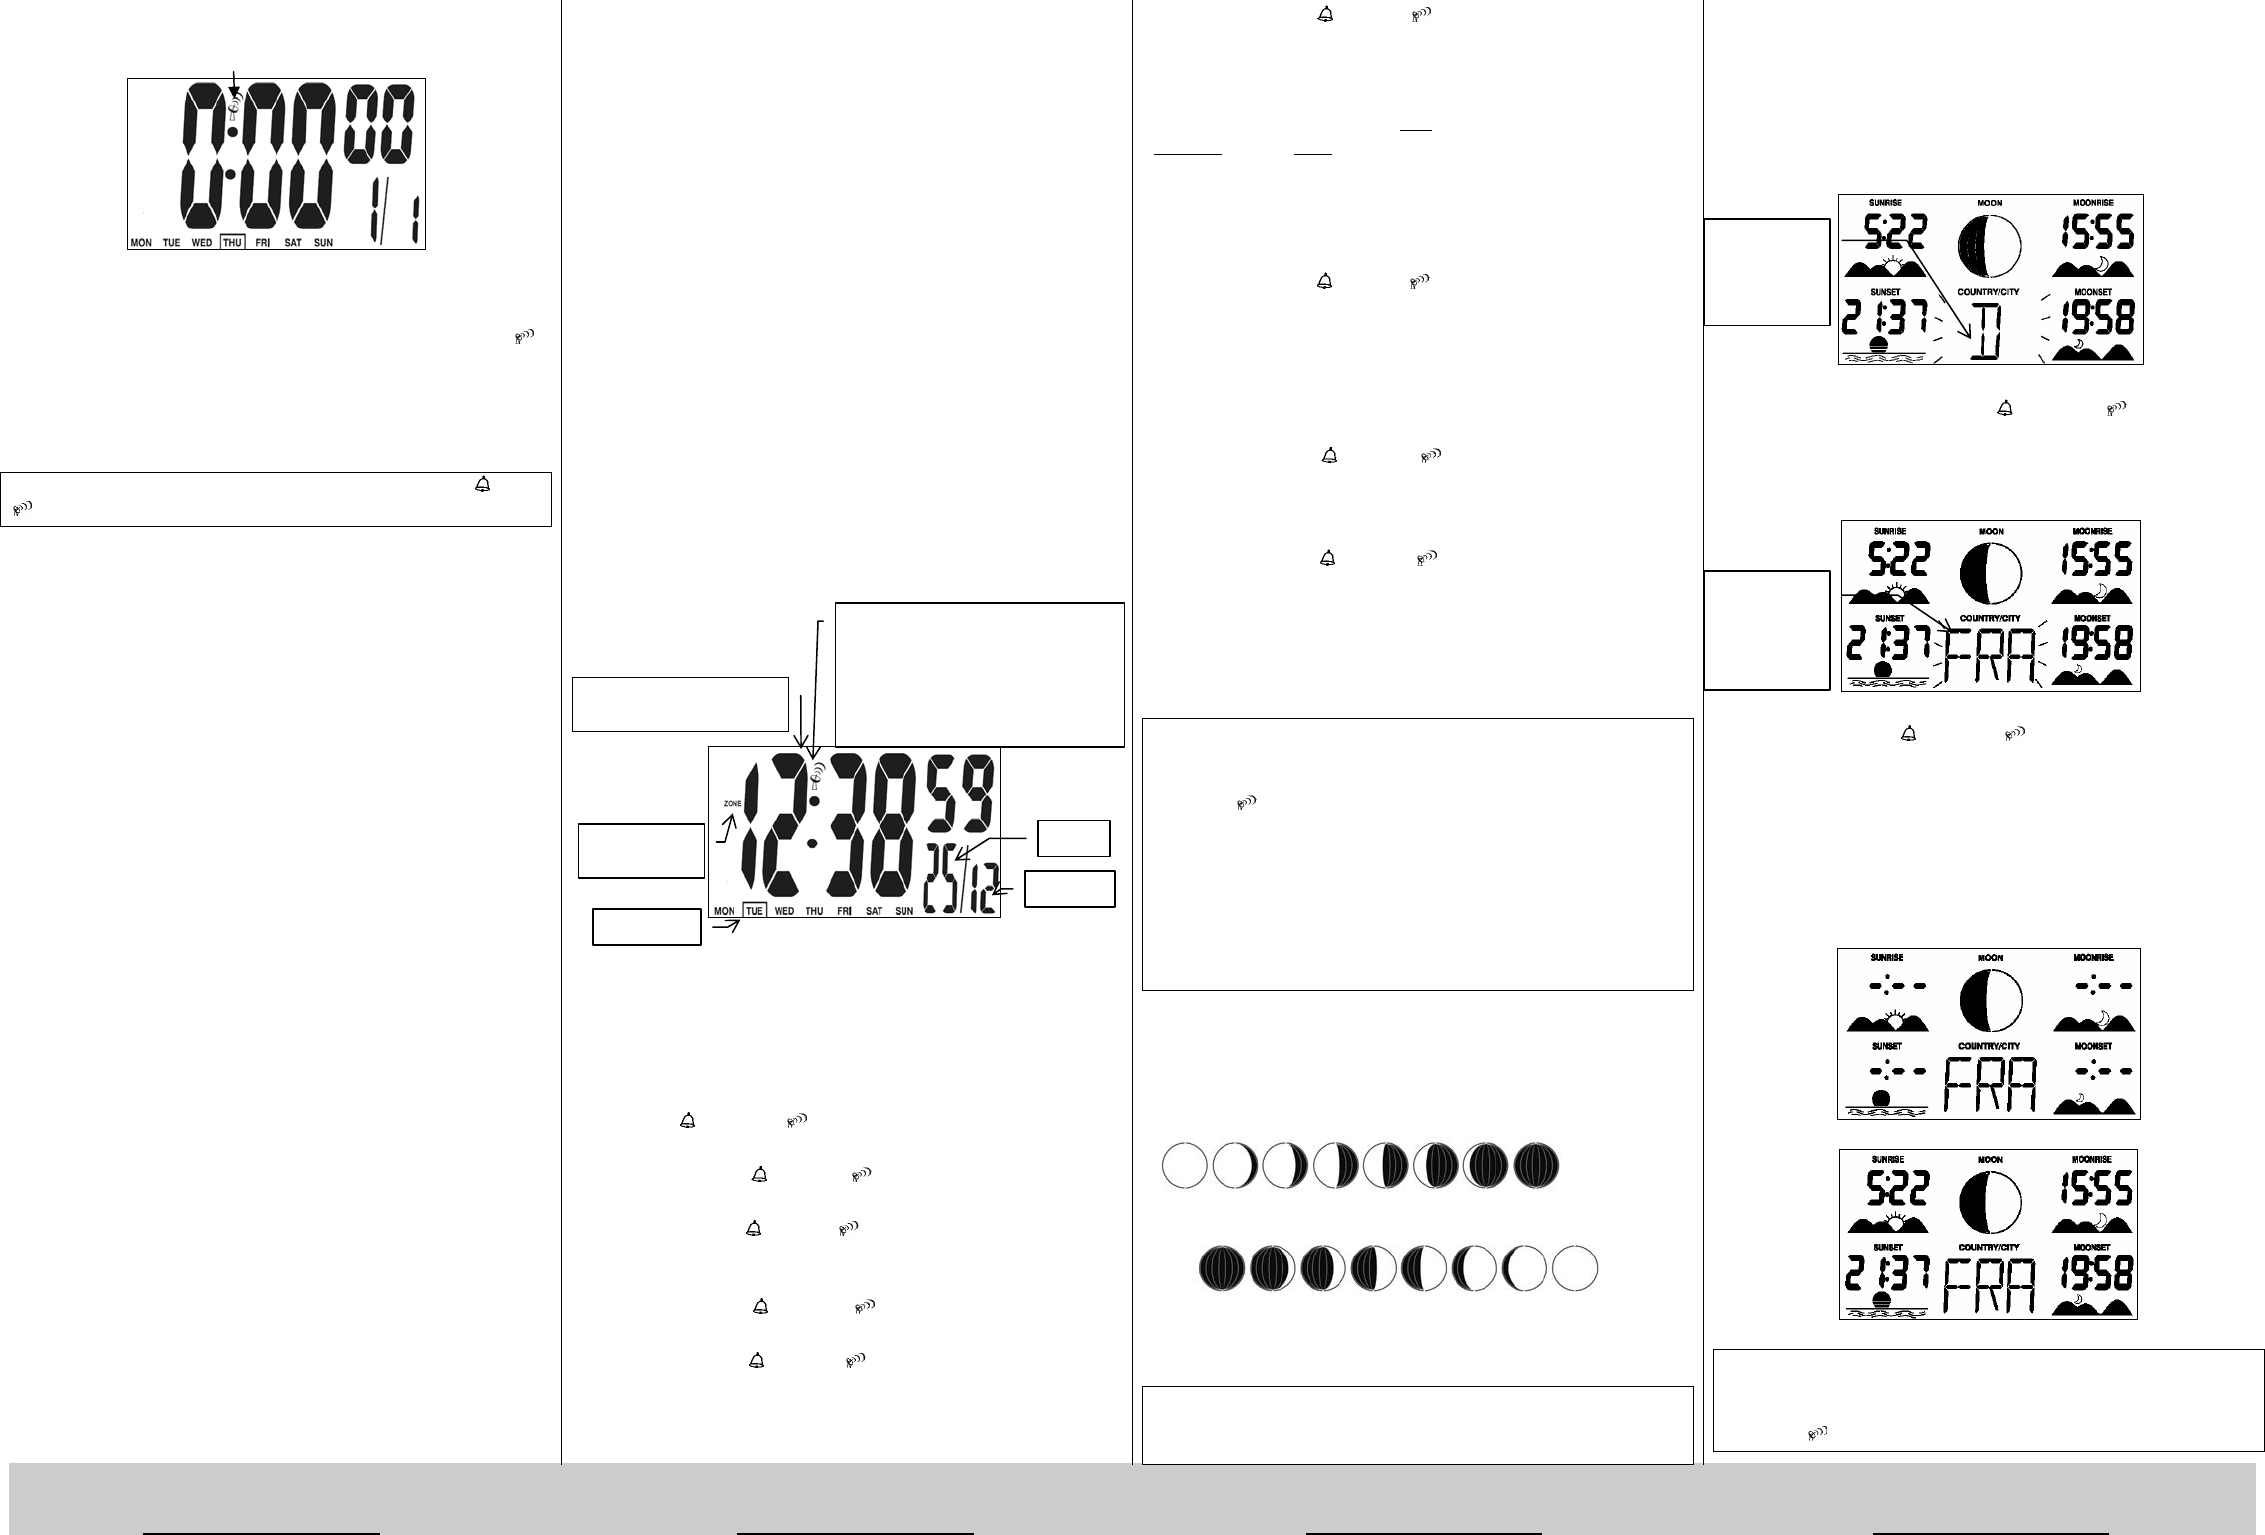
5.3 Rising and setting times of the sun and moon
Tip: Please note that this function depends on the date, i.e. it will
function once the base station has r
also the current t
Frankfurt am Main is displayed as the initial
setting times of the sun and
1. To set the times for the rising and setting of the s
at your location, press and hold the SET/ZONE ke
year begins to flash.
2. Press the SET/ZONE key (7 times) until the country display
begins to flash (see also point 5
Flashing display for the country name
3. Now, by pressing the ‘+ ‘ or the ‘– ‘ ke
country. Please use the abbreviation for your country from the
country and city lists on the following page. Confirm your
choice with the SET/ZONE key. Now the nam
will flash.
Flashing display for the city name
4. Using the ‘+ ‘ or the ‘– ‘ key, you can now select the
towns which are listed in alphabetical order by abbreviation.
Please use the abbreviations from the country and city list on
the following page for the city which is closest to
and which is stored in the base station. Confirm
pressing the SET/ZONE key.
5. Now the times for the rising and setting of the sun and the
moon will be calculated. Th
approximately 17 seconds.
View during calculation
Calculated times for rising and setting of th
Tip: It may occur that while entering
radio clock signal is lost. You will know this has
tower symbol will no longer be indicated
hold the ‘– ‘ key to r
Flashing
display for
the country
name
Flashing
display for
the city
name
Symbol for
time zone
Weekday
Day
Time in hours, minutes
and seconds
Month
Radio tower symbol:
- Constant: radio clock time
received
- Flashing: seeking radio clock time
- Not visible: Radio clock signal
lost and/or ti