Helpline No. UK/Northern Ireland 0871 288 6921 Helpline No. UK/Northern Ireland 0871 288 6921 Helpline No. UK/Northern Ireland 0871 288 6921 Helpline No. UK/Northern Ireland 08
Rep. Ireland 014 319790 Rep. Ireland 014 319790 Rep. Ireland 014 319790 Rep. Ireland 014 319790
Web Support www.produktservice.info Web Support www.produktservice.info Web Support www.produktservice.info Web Support www.produktservice.info
Page 5
5.5.5 Trend display for internal and external
temperature and internal and external
humidity
At the top right of both the internal and external temperature and the
internal and external humidit
an arrow. If the change is greater than 1 degree or 1% within an hour,
this is shown by an arrow pointing upwards or downwards. If there has
been no change, this is shown b
5.5.6 External sensor
A cable connection is not needed to transmit the signal from the external
sensor to the base station. The external sensor tr
of 433 MHz. The transmission range from the ex
station can be up to 40m in optimum conditions in the open.
Transmission between the ext
impaired by objects such as stonework, re
windows and fog or by placing the external sen
the floor, etc.
5.5.6.a External sensor display
After inserting the batteries in the external sensor (see point 4, Puttin
the device into operation), th
humidity is shown on the ex
5.5.6.b Selecting °Celsius / °F
To re-set the tem
key on the back of thnsor. (Please remove the battery
compartment cover first as d
battery). Each time the key is pressed the display will change
5.5.6.c Registering a second or third external
sensor
Additional external sensors
address or our webshop
(http://www.produktservice.info/shop/) if you
would like to buy additi
Carry out the registration of the additional ext
where you can lay the base s
other or stand them up. First set the ch
external sensor (rem
channel on which the external temperature and ex
external sensor should be displayed on the base station (the first external
sensor will normally be displaye
2 or 3 for additional sensors).
Then insert the batteries
7.2.2, Changing the batte
at the upper left
shown by the flashing of the red indicator on the front of the external
sensor. If the selected channel number does not appear at the top left of
the external sensor’s displa
transmission of the signal. If registration is not possible, please refer to
point 9, Troubleshooting.
5.5.6.d Changing the channel display on the base
station manually and automatically
When you have registered 2 or 3 external sensors, press the
key to change from one channel to the next. If a r
on the display the channels will be displayed aut
other.
Changing the channel display automatically
Tip:
If for structural or other reasons it not possible to at
sensor to the windowsill or the house wall, you can use
extension cable which wil
connector. Place the external sensor on the windowsill in the living room
for example and feed th
outside under the window. The temperature can
sensor extension cable. This sensor extension cable is however not
included in this deliv
webshop (http://www.produktservice.info/shop/)
buy a sensor extension cable.
5.5.7 Technical data, temperature and humidity
Base station temperature
Range of measurement: 0 to
Interval of measurem ever
Resolution: 0.1°
Accuracy: +/- 1°C and +/- 1.8°F
External sensor temperature
Range of measurement: -25 to +60°C (-13 to +140 °F)
Interval of measurem ever
Resolution: 0.1°
Accuracy: +/- 1°C and +/- 1.8°F
Base station and external s
Range of measurement: 20 to 99%
Resolution: 1%
Accuracy: +/- 10
External sensor’s transmission distance to base station:
max. 40 metres in the open
External sensor’s transmission frequency
433 MHz
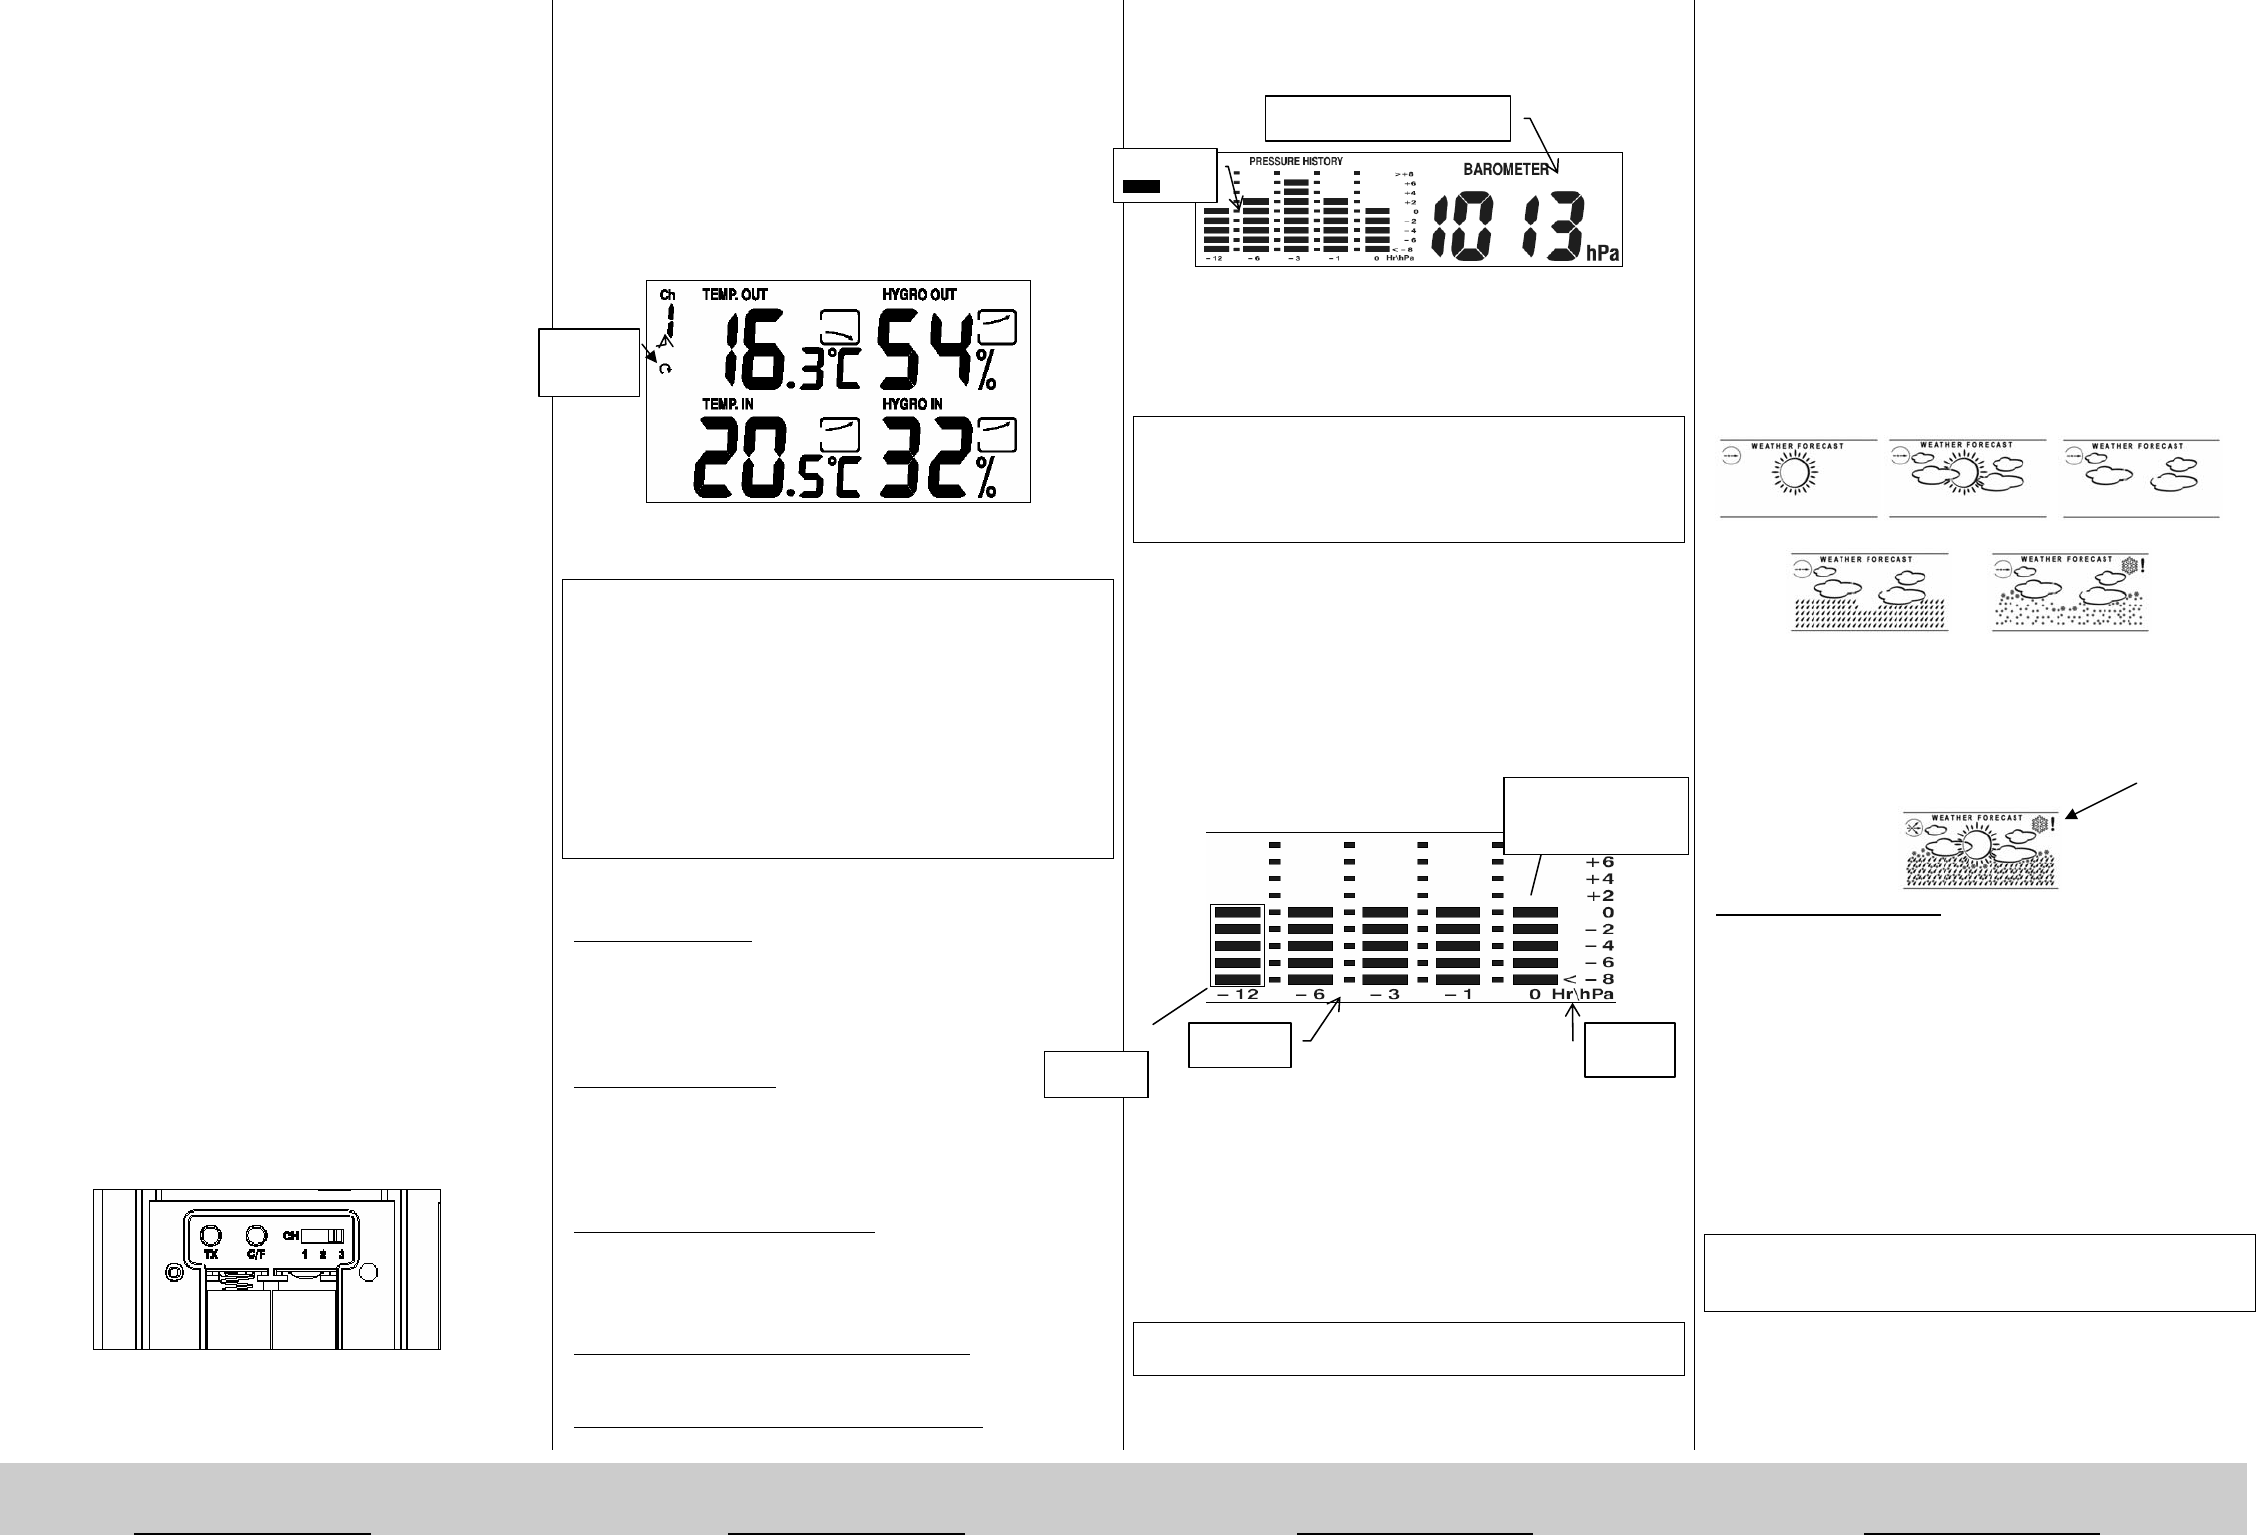
5.6 Atmospheric pressure
5.6.1 Atmospheric pressure display
Atmospheric pressure display
After inserting the batteries, the ba
atmospheric pressure of 1013
The atmospheric pressmeasured
point that the batteries are insert
atmospheric pressure value
Tip: To obtain a useful weather forecast you must input the current
atmospheric pressure value for your region (see next po
Inputting the atmospheric pressure value. You can obtain the current
atmospheric pressure value fromweather pages on video text or the
weather sites on the Intern
5.6.1.a Setting the atmospheric pressure value
Press and hold the CLEAR/SET BARO key until the atmo
pressure display begins to flash. You can alter the atmospheric pres
from 850 to 1050 hPa using the B▲ or B▼ key. Press the CLEAR/SET
BARO key quickly to confirm your setting. Th
show the current atmospheric pressure in hPa.
5.6.1.b Atmospheric pressure diagram
- Atmospheric pressure diagram
The atmospheric pressure graphic shows the development of the
atmospheric pressure over the past 12 hours in 5 stages, i.e. the
respective settings for 0 hours ago, 1 hour ago, 3 hours ago, 6 hours ago
and 12 hours ago. The
diagram which reflects the trend
on the right-hand side
scale indicates th
hPa (+/- 2, 4, 6 and 8 hPa), how high or low the pressure was earlier in
comparison to the current pressure, which is shown in the right-hand
column. One bar equals 2 hPa.
Tip: Please note that th
configured from lef
5.6.1.c Atmospheric pressure min./max memory
To read off the maximum and minimum values of atmospheric pressure,
press the MIN/MAX key once to read off the maximum value and once
again to read off the minimum value and once again to return to the
normal display. The minimum and maximum atmospheric pressure value
cannot be deleted as it is a recording of the minimum and maximum
values over the past 12 hours.
5.6.2 Weather forecast
The weather forecast
the next 12-24 hours over a radius of approximately 30-50 k
weather forecast is based on the fluctuations of the atmospheric
and agrees with the actu
70-75%. As it is not possible to predict the w
we do not accept any liability for damage which may occur as a result of
an incorrect weath
following symbols:
Ra Snow
If the measured temperature on an external s
1°C, the snowflake symbol and an exclam
of frost. A snowflake symbol and an exclam
constantly if the m
-1°C.
Bad weather / storm warning
If the weather forecasting s
bad weather or a storm front, together with falling atmospheric pressure.
It is a pre-requisite that the rel
for your region. If the atmospheric pres
forecast remains cons
tendency is shown and is updated every hour. If the atmospheric pressure
changes by more than 1 hPa within an hour, this will be indicat
arrow which points upwards or downwards. If there has been no change,
this is shown by a horizontal arrow.
horizontal arrow = constan
arrow pointing upwards = rising atmospheric pres
arrow pointing downwards = falling atmospheric pressure
Tip:
After setting the basics, it takes approximately 12 to 24 hours before you
receive a useful weather
5.6.3 Technical data for atmospheric pressure
Range of measurement: 950 to 1,050 hPa
Interval of measurement: every
Resolution: 1
Channel
1, 2 ,3
Bars
= 2
Columns
Atmospheric pressure in hPa
Hours
Scale
in hPa
Current atmospheric
pressure (=Basis for
the dia
ram