EN
Instruction M
NL
Gebruiksaanwijzing
FR
Mode d’
DE
Bedienungsanleitung
ES
Manual de instrucciones
PT
Manual de Instruções
IT
Istruzioni per l’uso
SV
Bruksanvisning
PL
Instrukcja obsługi
CS
Návod na použití
SK
Návod na použitie
C l o c k r a d i o
P
CL-1476
1 2 3 4
9
10
13 14 16
12
11
5 6 7
P
TEILEBE
CO
OPIS CZ
SE
T
5015
[WEEE L
ENInstructionmanual
SAFETY
• By ignoring the safety instructions the
manufacturer can not be hold responsible for
the damage.
• If the supply cord is damaged, it must be
replaced by the manufacturer, its service agent
or similarly qualified persons in order to avoid a
hazard.
• Never move the appliance by pulling the cord
and make sure the cord can not become
entangled.
• The appliance must be placed on a stable, level
surface.
• The user must not leave the device unattended
while it is connected to the supply.
• This appliance is only to be used for household
purposes and only for the purpose it is made
for.
• This appliance shall not be used by children
from 0 year to 8 years. This appliance can be
used by children aged from 8 years and above
and persons with reduced physical, sensory or
mental capabilities or lack of experience and
knowledge if they have been given supervision
or instruction concerning use of the appliance in
a safe way and understand the hazards
involved. Children shall not play with the
appliance. Keep the appliance and its cord out
of reach of children aged less than 8 years.
Cleaning and user maintenance shall not be
made by children unless older than 8 and
supervised.
• To protect yourself against an electric shock, do
not immerse the cord, plug or appliance in the
water or any other liquid.
•
Within an equilateral triangle, is used to
indicate that a specific component shall be
replaced only by the component specified in
that documentation for safety reason.
•
LIGHTNING FLASH WITH ARROWHEAD
SYMBOL - within an equilateral triangle, is
intended to alert the user to the presence of
uninsulated dangerous voltage within the
products enclosure that may be of sufficient
magnitude to constitute a risk of electric shock
to persons.
• The mains plug is used as the disconnect
device and it shall remain readily operable. To
completely disconnect the power input, the
Mains plug of the apparatus must be
disconnected from the mains Completely. The
mains plug should not be obstructed or should
be Easily accessed during intended use.
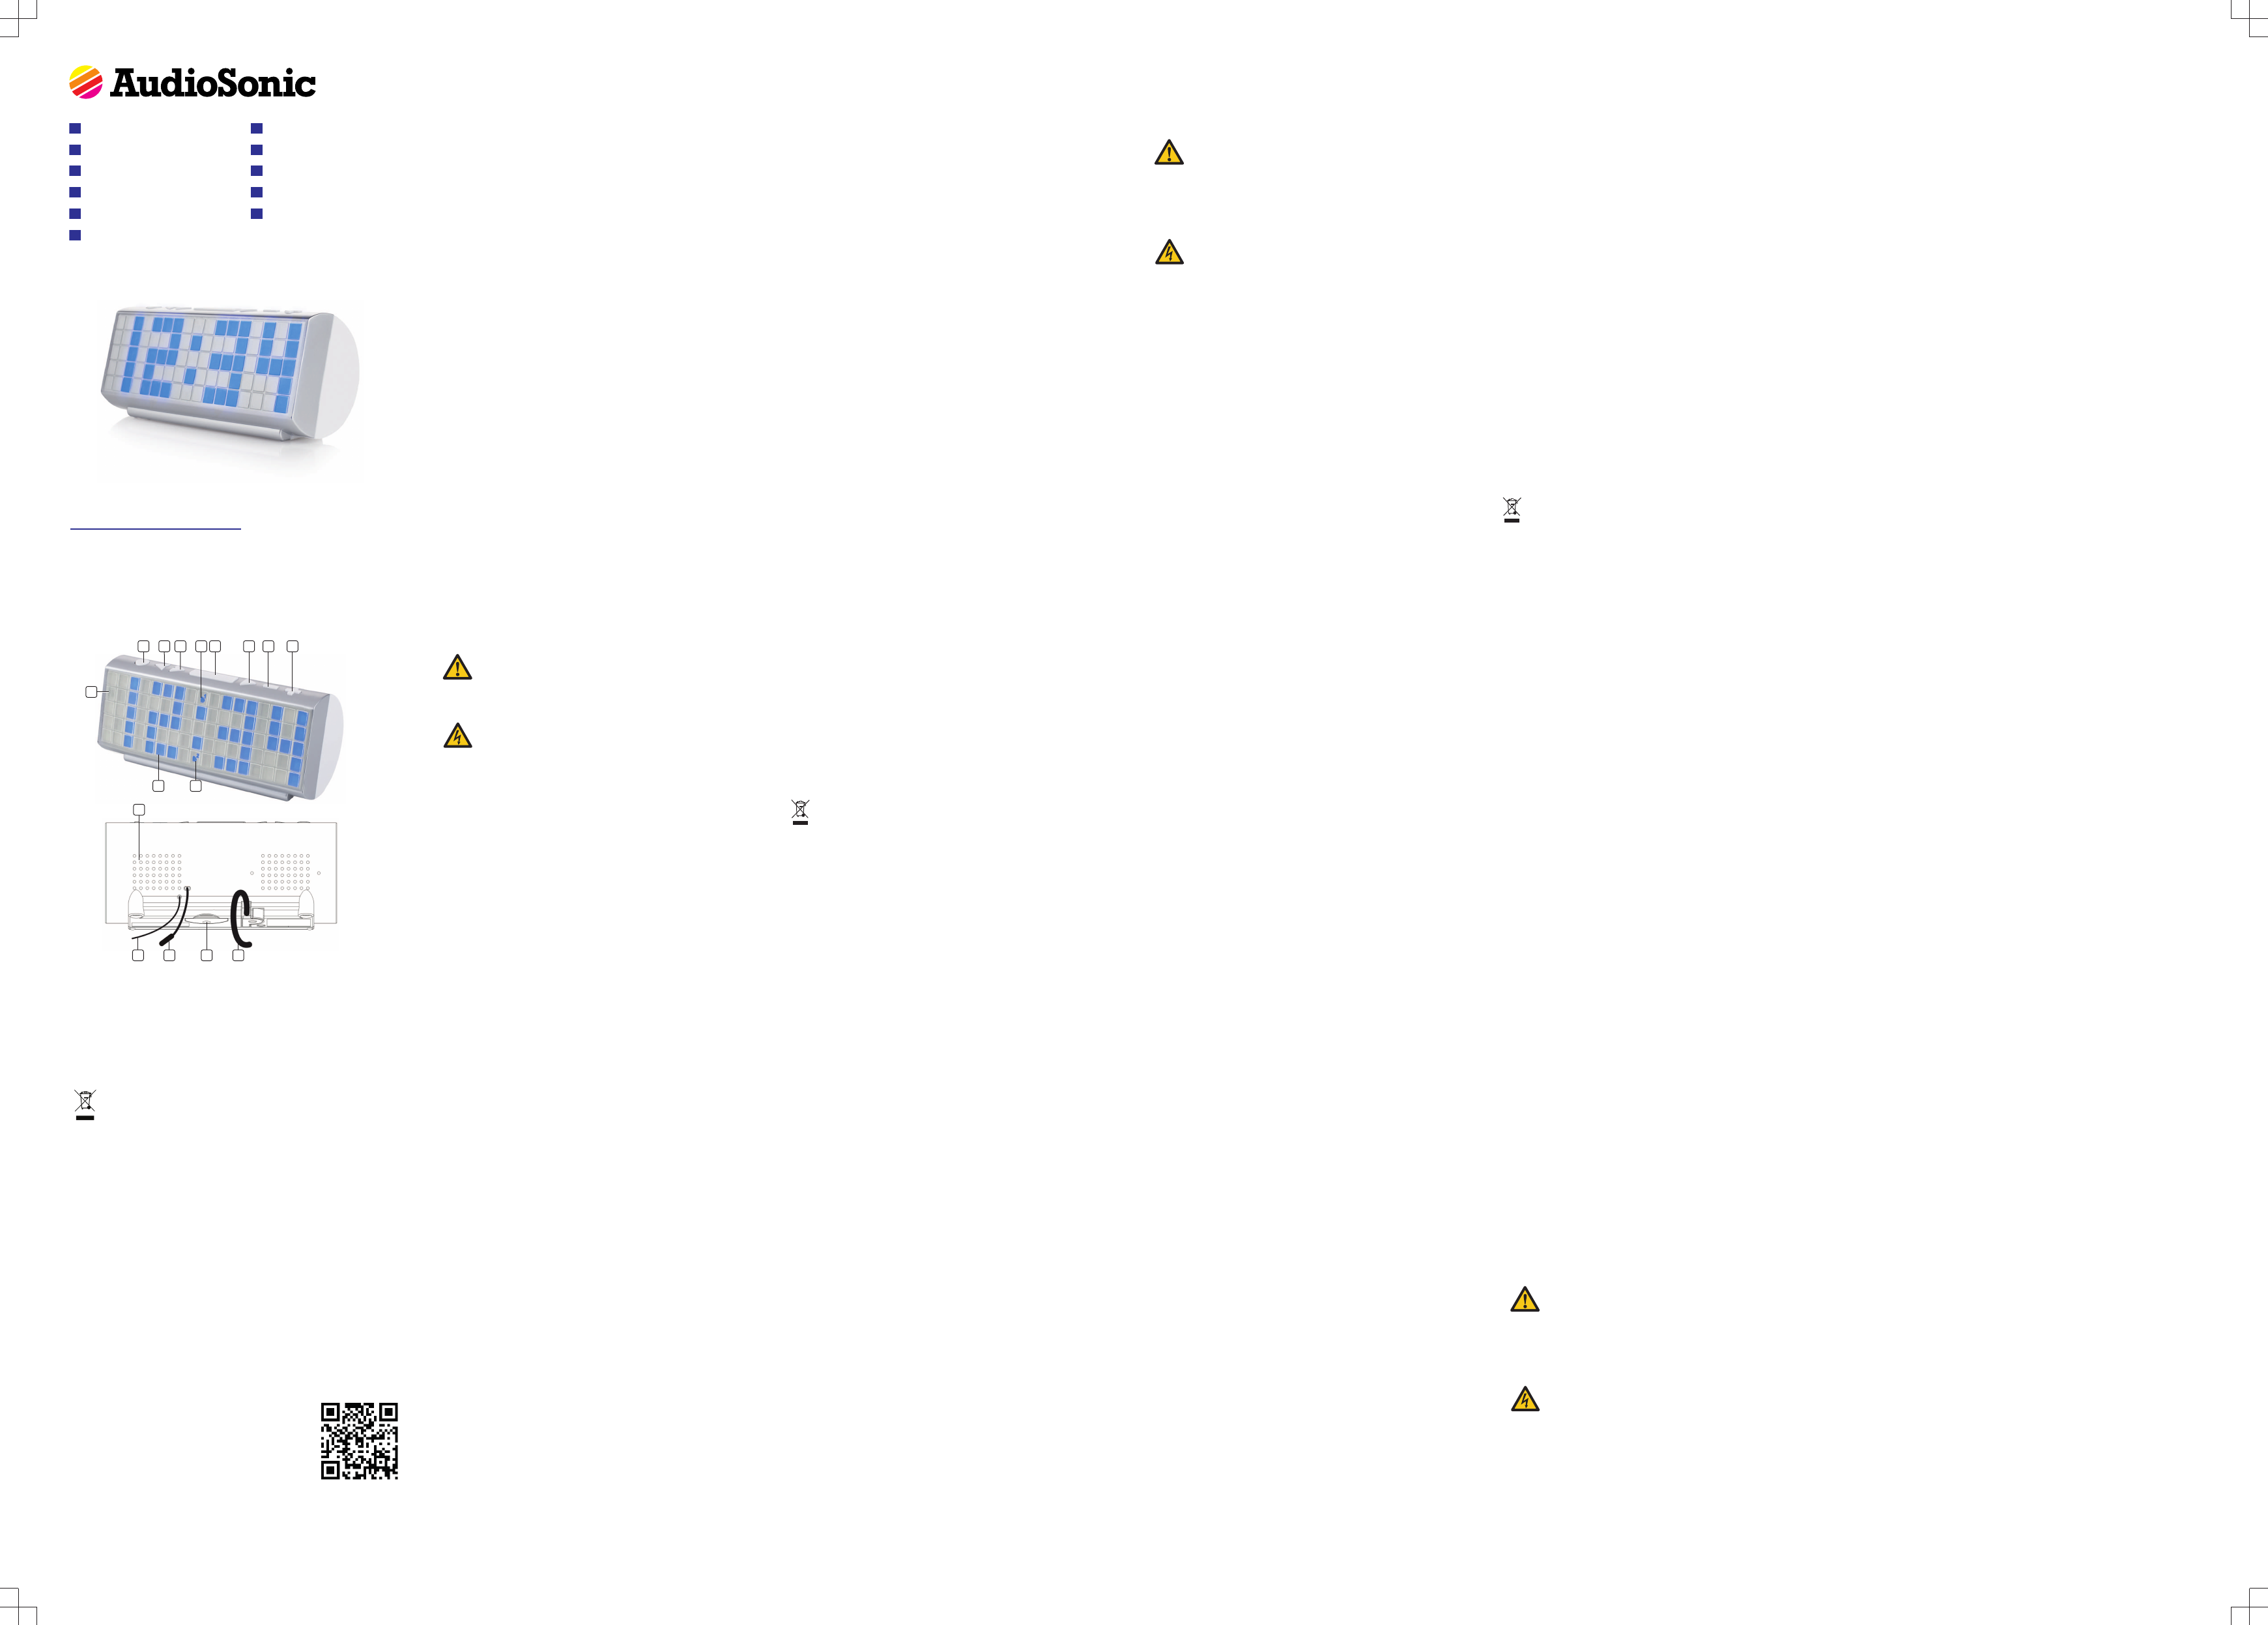
PARTSDESCRIPTION
1. ON –OFF / ALARM OFF
2. TUNE - / YEAR/MONTH-DAY / TEMPERATURE
3. TUNE + / SKIP FORWARD / NAP / DST
4. SNOOZE / SLEEP / DIMMER / POWER SAVING
5. TIME SET / MEMORY / MEMORY+
6. ALARM 1 ON - OFF SET / VOLUME DOWN
7. ALARM 2 ON - OFF SET / VOLUME UP
8. ALARM 1 INDICATOR
9. PM INDICATOR
10. TIME INDICATOR
11. ALARM 2 INDICATOR
12. SPEAKER
13. FM ANTENNA
14. TEMPERATURE SENSOR
15. BATTERY COMPARTMENT
16. AC POWER CORD
BEFORETHEFIRSTUSE
• This unit is equipped with a battery backup system, which requires a
CR2032 lithium battery (not included). Place the battery in the battery
compartment and make sure that the + and – battery terminals
correspond with the symbols in the battery compartment. If an AC power
failure occurs, the clock will automatically switch to the battery power
and the internal clock memory will continue running (note that the
display is switched off and the radio won’t operate). When the AC power
resumes, the unit automatically switches back to the AC power and will
return to normal operation.
USE
Setting time and calendar
• Press and hold the Time Set button in standby mode to enter time
setting mode, after enter the setting mode, press the Time Set button to
change the mode cycle as follows :
Year → Month → Day → 12/24 H format → Real time Hour → Real time
Min
• To adjust these settings, use the Tune - and Tune + buttons. Press and
hold these buttons to adjust faster. Use the Clock Adjust button to
confirm your setting.
• When the unit is in standby, press the Tune - button repeatedly to cycle
through the time, year, date and current temperature. When displaying
the currrent temperature, press and hold the Tune - button to switch
between degrees Celcius and Fahrenheit.
Using the alarm function
• Press the Alarm button (1/2) during normal mode to show the alarm
time. Press and hold one of these buttons to enter alarm set mode. After
entering the setting mode, press the alarm button (1/2) to change the
mode cycle as follows:
Hour → Min → weekday Alarm → wake beep → wake radio → wake radio
volume
• Select alarm weekday mode as follows: 1-5: Monday to Friday 1-7:
Whole week 6-7: Saturday & Sunday 1-1: One day of the week
• To adjust these settings, use the Tune- and tune+ buttons. Press and
hold these buttons to adjust faster. Use the alarm button (1/2) button to
confirm your setting.
• Beep alarm or radio alarm will ring for 30 minutes if no key is pressed,
then it will stop automatically and wait for same alarm time on next day.
• Press and hold the alarm button (1/2) to enable or disable the alarm.
Once the alarm is activated, the bell symbol will appear on the display.
• When the alarm rings, press the Snooze button to suspend the alarm &
to activate the snooze function. Beep or Radio alarm will stop and the
alarm will ring again 9 minutes later. Press the Snooze button again, and
the alarm will be suspended again, another 9 minutes later the alarm will
ring again and so on until the next alarm rings.
• If you want to disable the snooze function and stop the alarm
completely, press the ON/OFF Radio button. If you don't press any
button, the alarm will ring during 30 minutes and stop automatically. The
icon of ALARM 1 and ALARM 2 will blink as long as the Snooze function
is still operating. Once Snooze is turned off the icon will stop blinking.
Radio mode
• Ensure that the FM antenna is completely unrolled and extended to
have the best FM reception. Press the Radio ON/OFF button to turn the
unit on and off. Use the Tune - or Tune + buttons to select the desired
radio station. Press and hold these buttons to automatically search for
the next radio station.
• To store a radiostation to one of the 10 presets, Press and hold the
Mem/M+ button; “P01” will blink in the display. Use the Tune+ or Tune-
button to select the desired preset station (P01-P10). Press the Mem/M+
button again to set the preset. Repeat the process to set more presets.
• The unit can preset 10 stations in total. Use the Mem/M+ button to cycle
trought the presets when using the radio function.
• Set the volume to the dedesired level with the Volume + and Volume -
buttons.
Other functions
• When you listen to the radio, press the SNOOZE/SLEEP/DIMMER
button to enter into the sleep mode. You can adjust the sleep timer from
90 minutes to 15 minutes by pressing repeatedly the SNOOZE/SLEEP/
DIMMER button repeatedly. When the sleep timer is selected, the unit
will automatically turn off once time is up.
• The dimmer button allows you to set the brightness of the LCD display to
high, medium and off.
• For countries with daylight saving time (DST) (one hour of difference
between summer time and winter time), this clock radio offers you the
option to easily adjust summer/winter time. In standby mode, press and
hold the DST button for 2 seconds. The clock advances by one hour. To
exit DST mode, repeat the above operation.
• In clock mode, press and hold the Tune - button for 3 seconds. “ON”
appears on the display. Then the display automatically shows below
contents in 5-10 second intervals:
Current time → Month → Day
• To deactivate this function, press and hold the Tune - button for 3
seconds. “OFF” appears on the display. The display switches back to
the clock mode.
• The nap alarm can be used for a short “nap”. The function only operates
in standby. Press the Nap button to select the time after which the
device will beep. Select from 90 to 10 minutes or OFF (off) in steps of 10
minutes. After the selected time has elapsed, an increasingly fast beep
will sound. Use the Alarm off button to turn off the beep.
CLEANINGANDMAINTENANCE
• Clean the appliance with a damp cloth. Never use harsh and abrasive
cleaners, scouring pad or steel wool, which damages the device.
• Never immerse the electrical device in water or any other liquid. The
device is not dishwasher proof.
GUARANTEE
• This product is guaranteed for 24 months granted. Your warranty is valid
if the product is used in accordance to the instructions and for the
purpose for which it was created. In addition, the original purchase
(invoice, sales slip or receipt) is to be submitted with the date of
purchase, the name of the retailer and the item number of the product.
• For the detailed warranty conditions, please refer to our service website:
www.service.tristar.eu
ENVIRONMENT
This appliance should not be put into the domestic garbage at the
end of its durability, but must be offered at a central point for the recycling
of electric and electronic domestic appliances. This symbol on the
appliance, instruction manual and packaging puts your attention to this
important issue. The materials used in this appliance can be recycled. By
recycling of used domestic appliances you contribute an important push to
the protection of our environment. Ask your local authorities for
information regarding the point of recollection.
Support
You can find all available information and spare parts at service.tristar.eu!
NLGebruiksaanwijzing
VEILIGHEID
• De fabrikant is niet aansprakelijk voor schade
voortvloeiend uit het niet opvolgen van de
veiligheidsinstructies.
• Als het netsnoer beschadigd is, moet het
worden vervangen door de fabrikant, de
onderhoudsmonteur van de fabrikant of door
personen met een soortgelijke kwalificatie om
gevaar te voorkomen.
• Verplaats het apparaat nooit door aan het
snoer te trekken. Zorg ervoor dat het snoer
nergens in verstrikt kan raken.
• Het apparaat moet op een stabiele, vlakke
ondergrond worden geplaatst.
• De gebruiker mag het apparaat niet onbeheerd
achterlaten wanneer de stekker zich in het
stopcontact bevindt.
• Dit apparaat is uitsluitend voor huishoudelijk
gebruik en voor het doel waar het voor bestemd
is.
• Dit apparaat mag niet worden gebruikt door
kinderen van 0 tot 8 jaar. Dit apparaat kan
worden gebruikt door kinderen vanaf 8 jaar en
door personen met verminderde lichamelijke,
zintuiglijke of geestelijke vermogens of gebrek
aan de benodigde ervaring en kennis indien ze
onder toezicht staan of instructies krijgen over
hoe het apparaat op een veilige manier kan
worden gebruikt alsook de gevaren begrijpen
die met het gebruik samenhangen. Kinderen
mogen niet met het apparaat spelen. Houd het
apparaat en het netsnoer buiten bereik van
kinderen jonger dan 8 jaar. Laat reiniging en
onderhoud niet door kinderen uitvoeren, tenzij
ze ouder zijn dan 8 jaar en onder toezicht
staan.
• Dompel het snoer, de stekker of het apparaat
niet onder in water of andere vloeistoffen om
elektrische schokken te voorkomen.
•
UITROEPTEKEN - in een gelijkbenige
driehoek - wordt gebruikt om aan te geven dat
een specifiek onderdeel om veiligheidsredenen
alleen mag worden vervangen door het
onderdeel dat in de documentatie is
gespecificeerd.
•
LICHTFLITS MET PIJLSYMBOOL - in een
gelijkbenige driehoek - wordt bedoeld als
waarschuwing voor de aanwezigheid van
ongeïsoleerde gevaarlijke voltage in de
productbehuizing die sterk genoeg is om een
risico van elektrische schok te vormen voor
personen.
• De netstekker wordt gebruikt om het apparaat
te ontkoppelen en moet gemakkelijk bereikbaar
blijven. Om het apparaat volledig van de
stroomtoevoer los te koppelen, moet de
netstekker volledig van de netvoeding worden
losgekoppeld. De netstekker mag niet worden
belemmerd en moet gemakkelijk toegankelijk
zijn tijdens het beoogde gebruik.
ONDERDELENBESCHRIJVING
1. AAN / UIT / ALARM UIT
2. AFSTEMMEN - / JAAR/MAAND-DAG / TEMPERATUUR
3. AFSTEMMEN + / SNEL VOORUIT / DUTJE / DST
4. SLUIMER/ SLAAP/ DIMMER / ENERGIE BESPAREN
5. TIJD INSTELLEN / GEHEUGEN / GEHEUGEN+
6. INSTELLEN ALARM 1 AAN - UIT / VOLUME OMLAAG
7. INSTELLEN ALARM 2 AAN - UIT / VOLUME OMHOOG
8. ALARM 1 INDICATOR
9. PM-INDICATOR
10. TIJDINDICATOR
11. ALARM 2 INDICATOR
12. LUIDSPREKER
13. FM-ANTENNE
14. TEMPERATUURSENSOR
15. BATTERIJCOMPARTIMENT
16. AC-VOEDINGSKABEL
VOORHETEERSTEGEBRUIK
• Dit apparaat is uitgerust met een batterij-backup-systeem. Het apparaat
vereist een CR2032 lithiumbatterij (niet inbegrepen). Plaats de batterij in
het batterijcompartiment. Zorg ervoor dat de batterijpolen (+/-)
overeenkomen met de symbolen in het batterijcompartiment. Indien een
stroomstoring optreedt, zal de klok automatisch overschakelen naar
batterijstroom en het interne klokgeheugen blijven functioneren (de
display wordt uitgeschakeld en de radio zal niet werken). Indien de
stroomstoring voorbij is, zal het apparaat automatisch overschakelen
naar netstroom en terugkeren naar normaal bedrijf.
GEBRUIK
De tijd en kalender instellen
• Druk in de stand-by-modus op de knop Tijd Instellen en houd deze
ingedrukt om naar de tijdinstelmodus te gaan. Druk als u hier bent
aangekomen op de knop Tijd Instellen om de moduscyclus als volgt te
wijzigen:
Jaar → Maand → Dag 12/24-uursweergave → Werkelijke tijd Uur →
Werkelijke tijd Min.
• Pas deze instellingen met de knoppen Afstemmen - en Afstemmen +
aan. Druk om sneller aan te passen op deze knoppen en houd ze
ingedrukt. Bevestig de instelling met de knop Klok instellen.
• Druk als het toestel op stand-by staat, herhaaldelijk op de knop
Afstemmen om de tijd, het jaar, de datum en de actuele temperatuur te
doorlopen. Druk als de actuele temperatuur wordt weergegeven op de
knop Afstemmen en houd deze ingedrukt om tussen graden Celsius en
Fahrenheit te schakelen.
De alarmfunctie gebruiken
• Druk in de normale modus op de knop Alarm (1/2) om de alarmtijd te
laten verschijnen. Druk op één van deze knoppen en houd deze
ingedrukt om naar de alarminstelmodus te gaan. Druk als u in de
instelmodus staat op de alarmknop (1/2) om de moduscyclus als volgt te
wijzigen:
Uur → Min. → weekdag alarm → wektoon → wekkerradio
wekkerradiovolume
• Selecteer de weekdagmodus voor het alarm als volgt: 1-5: Maandag -
vrijdag 1-7: De hele week 6-7: Zaterdag en zondag 1-1: Eén dag van de
week
• Met de knoppen Afstemmen - en Afstemmen + kunt u deze instellingen
aanpassen. Druk om sneller aan te passen op deze knoppen en houd
ze ingedrukt. Bevestig met de alarmknop (1/2) de instelling.
• Wekken met een pieptoon of met de radio zal 30 minuten aanhouden
als geen knop wordt ingedrukt. Daarna stopt het alarm automatisch en
zal dit op dezelfde alarmtijd de volgende dag weer afgaan.
• Druk op de alarmknop (1/2) en houd deze ingedrukt om het alarm in of
uit te schakelen. Als het alarm is ingeschakeld, verschijnt het
belsymbool op de display.
• Druk als het alarm afgaat op de knop Sluimer om het alarm te
onderbreken en de sluimerfunctie in te schakelen. De pieptoon of de
radio stopt en de wekker gaat 9 minuten later weer af. Druk nogmaals
op de knop Sluimer om het alarm weer te onderbreken, waarna de
wekker 9 minuten later weer afgaat en zo verder tot het volgende alarm
klinkt.
• Druk om de sluimerfunctie uit te schakelen en het alarm volledig te
stoppen op de AAN/UIT draaiknop. Als u geen knop indrukt, zal de
wekker gedurende 30 minuten afgaan en daarna automatisch stoppen.
Het pictogram van ALARM 1 en ALARM 2 knippert zolang de
Sluimerfunctie nog in werking is. Zodra Sluimer is uitgeschakeld, stopt
het pictogram met knipperen.
Radiomodus
• Zorg dat de FM-antenne volledig is uitgerold en uitgeschoven voor de
beste FM-ontvangst. Druk op de knop Radio AAN/UIT om het toestel in
en uit te schakelen Kies met de knoppen Afstemmen +/- het gewenste
radiostation. Druk op de knoppen en houdt deze ingedrukt om het
volgende radiostation automatisch te zoeken.
• Druk om een radiostation op één van de 10 voorinstellingen op te slaan
op de knop Geheugen/G+ en houd deze vast; “P01” knippert op de
display. Gebruik de knop Afstemmen +/- om het gewenste
vooringestelde station te selecteren (P01-P10). Druk nogmaals op de
knop Geheugen/G+ om de voorinstelling in te stellen. Herhaal dit proces
om meer voorinstellingen in te stellen.
• In totaal kunt u 10 stations op het toestel instellen. Doorloop met de
knop Geheugen/G+ de voorinstellingen vanuit de radiofunctie.
• Zet met de knoppen Volume + en Volume - het volume op het gewenste
niveau.
Overige functies
• Druk terwijl u naar de radio luistert op de knop SLUIMER/SLAAP/
DIMMER om naar de slaapmodus te gaan. U kunt de slaaptimer tussen
90 minuten en 15 minuten instellen door herhaaldelijk op de knop
SLUIMER/SLAAP/DIMMER te drukken. Als de slaaptimer is
ingeschakeld, zal het toestel na het verstrijken van de ingestelde tijd
automatisch uitschakelen.
• Met de dimmerknop kunt u de helderheid van het LCD-scherm op hoog,
medium en uit instellen.
• Voor landen met zomertijd (DST) (één uur verschil tussen zomertijd en
wintertijd), biedt deze klokradio u de mogelijkheid de zomer/wintertijd
eenvoudig in te stellen. Druk vanuit de stand-bymodus op de DST-knop
en houd deze 2 seconden ingedrukt. De klok gaat één uur vooruit.
Herhaal de bovengenoemde handeling om de zomertijdmodus (DST) te
verlaten.
• Druk vanuit de klokmodus op de knop Afstemmen - en houd deze 3
seconden ingedrukt. "AAN" verschijnt op de display. Vervolgens toont de
display automatisch de onderstaande gegevens met tussenpozen van
5-10 seconden:
Actuele tijd Maand Dag
• Druk om deze functie uit te schakelen op de knop Afstemmen - en houd
deze 3 seconden ingedrukt. "UIT" verschijnt op de display. De display
schakelt terug naar de klokmodus.
• Bij een kort "dutje" kan het dutje-alarm worden gebruikt. De functie werkt
alleen in stand-by. Druk op de knop Dutje om de tijd waarna het toestel
moet afgaan in te stellen. Selecteer tussen 90 en 10 minuten of UIT in
stappen van 10 minuten. Nadat de geselecteerde tijd is verstreken,
klinkt een steeds snellere pieptoon. Druk op de knop Alarm uit om de
piep uit te schakelen.
REINIGINGENONDERHOUD
• Reinig het apparaat met een vochtige doek. Gebruik nooit agressieve en
schurende schoonmaakmiddelen, schuursponzen of staalwol; dit
beschadigt het apparaat.
• Dompel het apparaat nooit onder in water of andere vloeistoffen. Het
apparaat is niet vaatwasserbestendig.
GARANTIE
• Op dit product wordt een garantie van 24 maanden verleend. Uw
garantie is geldig indien het product is gebruikt in overeenstemming met
de gebruiksaanwijzing en voor het doel waarvoor het gemaakt is.
Tevens dient de originele aankoopbon (factuur, kassabon of kwitantie)
te worden overlegd met daarop de aankoopdatum, de naam van de
retailer en het artikelnummer van het product.
• Voor uitgebreide garantievoorwaarden verwijzen wij u naar onze
servicewebsite: www.service.tristar.eu
MILIEU
Dit apparaat mag aan het einde van de levensduur niet bij het
normale huisafval worden gedeponeerd, maar moet bij een speciaal
inzamelpunt voor hergebruik van elektrische en elektronische apparaten
worden aangeboden. Het symbool op het apparaat, in de
gebruiksaanwijzing en op de verpakking attendeert u hierop. De in het
apparaat gebruikte materialen kunnen worden gerecycled. Met het
recyclen van gebruikte huishoudelijke apparaten levert u een belangrijke
bijdrage aan de bescherming van ons milieu. Informeer bij uw lokale
overheid naar het inzamelpunt.
Support
U kunt alle beschikbare informatie en reserveonderdelen vinden op
service.tristar.eu!
FRManueld'instructions
SÉCURITÉ
• Si vous ignorez les instructions de sécurité, le
fabricant ne saurait être tenu responsable des
dommages.
• Si le cordon d'alimentation est endommagé, il
doit être remplacé par le fabricant, son
réparateur ou des personnes qualifiées afin
d'éviter tout risque.
• Ne déplacez jamais l'appareil en tirant sur le
cordon et veillez à ce que ce dernier ne soit pas
entortillé.
• L'appareil doit être posé sur une surface stable
et nivelée.
• Ne laissez jamais le dispositif sans surveillance
s'il est connecté à l'alimentation.
• Cet appareil est uniquement destiné à des
utilisations domestiques et seulement dans le
but pour lequel il est fabriqué.
• L'appareil ne doit pas être utilisé par des
enfants de moins de 8 ans. Cet appareil peut
être utilisé par des enfants à partir de 8 ans
sous le contrôle d’un adulte. Cet appareil ne
doit pas être utilisé par des personnes dont les
capacités physiques, sensorielles ou mentales
sont réduites ou manquant d'expérience et de
connaissance, sauf si elles sont surveillées ou
si elles ont reçu des instructions pour utiliser
cet appareil en toute sécurité en étant
conscientes des dangers liés. Les enfants ne
doivent pas jouer avec l'appareil. Maintenez
l'appareil et son cordon d'alimentation hors de
portée des enfants de moins de 8 ans. Le
nettoyage et la maintenance utilisateur ne
doivent pas être confiés à des enfants sauf s'ils
ont 8 ans ou plus et sous surveillance d’un
adulte.
• Afin de vous éviter un choc électrique,
n'immergez pas le cordon, la prise ou l'appareil
dans de l'eau ou autre liquide .
•
POINT D'EXCLAMATION - Dans un
triangle équilatéral, il est utilisé pour indiquer
qu'un composant spécifique peut uniquement
être remplacé par le composant spécifié dans
cette documentation pour une raison de
sécurité.
•
ÉCLAIR AVEC SYMBOLE DE FLÈCHE -
Dans un triangle équilatéral, il est destiné à
avertir l'utilisateur de la présence de tension
dangereuse non-isolée à l'intérieur du boîtier du
produit qui peut être de magnitude suffisante
pour constituer un risque d'électrocution.
• La prise secteur sert de dispositif de
déconnexion et doit demeurer en état de
fonctionnement. Pour être totalement
déconnectée de l'alimentation, la fiche secteur
de l'appareil doit être débranchée
complètement du secteur. La fiche secteur ne
doit pas être obstruée ou doit être facilement
accessible pendant l'utilisation prévue.
DESCRIPTIONDESPIÈCES
1. MARCHE-ARRÊT /ALARME ARRÊT
2. AJUSTER -/ ANNÉE/MOIS-JOUR / TEMPÉRATURE
3. AJUSTER + / SUIVANT / SIESTE / DST
4. RAPPEL D'ALARME /VEILLE /ATTÉNUATION /ÉCO ÉNERGIE
5. RÉGLER HEURE / MÉMOIRE / MÉMOIRE +
6. RÉGLER ALARME 1 MARCHE - ARRÊT / VOLUME BAS
7. RÉGLER ALARME 2 MARCHE - ARRÊT / VOLUME HAUT
8. INDICATEUR ALARME 1
9. INDICATEUR PM
10. INDICATEUR HEURE
11. INDICATEUR ALARME 2
12. HAUT-PARLEUR
13. ANTENNE FM
14. CAPTEUR TEMPÉRATURE
15. COMPARTIMENT DE PILES
16. CORDON ALIMENTATION CA
AVANTLAPREMIÈREUTILISATION
• Cette unité bénéficie d'un système de batterie de secours nécessitant
une pile au lithium CR2032 (non fournie). Placez la pile dans son
compartiment et assurez-vous que les bornes + et – de la pile
correspondent aux symboles du compartiment de pile. En cas de
défaillance du secteur, l'horloge passe automatiquement sur
l'alimentation de secours et la mémoire d'horloge interne continue de
fonctionner (notez que l'affichage s'éteint et la radio ne fonctionne pas).
Dès que le courant est revenu, l'unité restaure automatiquement
l'alimentation secteur et reprend son fonctionnement normal.
UTILISATION
Réglage de l'heure et du calendrier
• Appuyez sur le bouton Régler Heure sans le relâcher en mode veille
pour accéder au mode de réglage de l'heure. Une fois en mode de
réglage, appuyez sur le bouton Régler Heure pour changer le cycle du
mode comme suit :
Année → Mois → Jour → Format 12/24 H → Heure temps réel → Min.
temps réel
• Pour ajuster ces réglages, utilisez les boutons Ajuster - et Ajuster +.
Appuyez sur ces boutons sans relâcher pour aller plus vite. Utilisez le
bouton Ajuster Horloge pour confirmer votre réglage.
• Avec l'unité en veille, appuyez sur le bouton Ajuster - de manière
répétée pour faire défiler l'heure, l'année, la date et la température
actuelle. En affichant la température actuelle, appuyez sur le bouton
Ajuster - sans relâcher pour alterner entre les degrés Celsius et
Fahrenheit.
Usage de la fonction d'alarme
• Appuyez sur le bouton Alarme (1/2) en mode normal pour afficher
l'heure d'alarme. Appuyez sur l'un de ces boutons sans relâcher pour
accéder au mode de réglage d'alarme. En mode de réglage, appuyez
sur le bouton d'alarme (1/2) pour changer le cycle de mode comme suit :
Heure → Min → Alarme jour de semaine → tonalité réveil→ tonalité radio
→ volume radio réveil
• Sélectionnez l'alarme de jour de semaine comme suit : 1-5 : Lundi à
vendredi 1-7 : Toute la semaine 6-7 : Samedi et dimanche 1-1 : Un jour
par semaine
• Pour ajuster ces réglages, utilisez les boutons Ajuster - et Ajuster +.
Appuyez sur ces boutons sans relâcher pour aller plus vite. Utilisez le
bouton d'alarme (1/2) pour confirmer votre réglage.
• Le bip d'alarme ou l'alarme radio sonne 30 minutes en l'absence de
pression sur une touche puis se coupe automatiquement et attend la
même heure d'alarme le jour suivant.
• Appuyez sur le bouton d'alarme (1/2) sans le relâcher pour activer /
désactiver l'alarme. Une fois l'alarme activée, le symbole de cloche
s'affiche à l'écran.
• Lorsque l'alarme sonne, appuyez sur le bouton Rappel d'alarme pour la
suspendre et activer la fonction de rappel d'alarme. Le bip d'alarme ou
l'alarme radio cesse et l'alarme sonne à nouveau 9 minutes plus tard.
Appuyez à nouveau sur le bouton Rappel d'alarme et l'alarme se
suspend à nouveau pour reprendre 9 minutes plus tard et ainsi de suite
jusqu'à l'alarme suivante.
• Pour désactiver la fonction de rappel d'alarme et couper complètement
l'alarme, appuyez sur le bouton Radio Marche/Arrêt. En l'absence de
pression sur un bouton, l'alarme sonne 30 minutes et se coupe
automatiquement. L'icône ALARME 1 et ALARME 2 clignote tant que la
fonction de Rappel d'alarme est active. Une fois le Rappel d'alarme
coupé, l'icône cesse de clignoter.
Mode radio
• assurez-vous que l'antenne FM est complètement déroulée et déployée
pour optimiser la réception FM. Appuyez sur le bouton Radio Marche/
Arrêt pour activer/désactiver l'unité. Utilisez le bouton Ajuster - ou
Ajuster + pour sélectionner la station de radio voulue. Appuyez sur ces
boutons sans relâcher pour chercher automatiquement la station de
radio suivante.
• Pour enregistrer une station dans l'une des 10 mémoires préréglées,
appuyez sur le bouton Mém/M+ sans relâcher : “P01” clignote à
l'affichage. Utilisez le bouton Ajuster - ou Ajuster + pour sélectionner la
station préréglée voulue (P01-P10). Appuyez à nouveau sur le bouton
Mém/M+ pour régler le préréglage. Répétez le processus pour d'autres
préréglages.
• L'unité peut prérégler un total de 10 stations. Utilisez le bouton Mém/M+
pour faire défiler les préréglages en utilisant la fonction radio.
• Réglez le volume au niveau souhaité avec les boutons Volume + et
Volume -.
Autres fonctions
• Lorsque vous écoutez la radio, appuyez sur le bouton RAPPEL
D'ALARME /VEILLE /ATTÉNUATION pour accéder au mode veille.
Vous pouvez ajuster le minuteur de veille de 90 à 15 minutes en
appuyant de manière répétée sur le bouton RAPPEL D'ALARME /
VEILLE /ATTÉNUATION. Lorsque le minuteur de veille est sélectionné,
l'unité se coupe automatiquement une fois le délai écoulé.
• Le bouton d'atténuation vous permet de régler la luminosité de
l'affichage LCD sur haute, moyenne ou arrêt.
• Pour les pays appliquant un système d'heure d'été (une heure de
différence entre les heures d'hiver et d'été), ce radio-réveil vous offre
une option d'ajustement aisé heure d'été/hiver. En mode veille, appuyez
sur le bouton DST sans le relâcher pendant 2 secondes. L'horloge
avance d'une heure. Pour sortir du mode heure d'été, répétez l'opération
précédente.
• En mode horloge, appuyez sur le bouton Ajuster - sans le relâcher
pendant 3 secondes. “ON” s'affiche. L'affichage indique alors
automatiquement le contenu suivant à intervalles de 5-10 secondes :
Heure actuelle → Mois → Jour
• Pour désactiver cette fonction, appuyez sur le bouton Ajuster - sans le
relâcher pendant 3 secondes. “OFF” s'affiche. L'affichage revient en
mode horloge.
• L'alarme de sieste vous autorise une petite “sieste”. La fonction marche
uniquement en veille. Appuyez sur le bouton Sieste pour sélectionner le
délai après lequel l'appareil émet un bip. Sélectionnez entre 90 et 10
minutes ou OFF (arrêt) par étapes de 10 minutes. Une fois le temps
sélectionné écoulé, un bip s'accélérant sonne. Appuyez sur le bouton
Alarme arrêt pour couper le bip.
NETTOYAGEETENTRETIEN
• Nettoyez l'appareil avec un chiffon humide. N'utilisez pas de produits
nettoyants agressifs ou abrasifs, de tampons à récurer ou de laine de
verre, ceux-ci pourraient endommager l'appareil.
• N'immergez jamais l'appareil dans l'eau ni aucun autre liquide. L'appareil
ne peut pas être nettoyé en lave-vaisselle.