Controls and LCD display
1
2
3
4
5
6
7
8
1 Trigger
2 Infrared sensor
3 Laser outlet
4 LCD display
5 Mode button
6 Locking latch (battery compartment)
7 Battery compartment cover
8 Battery compartment
A
B
C D E F
G
A T
B T
temperature
C Laser symbol
D “SCAN” measuring indicator (displayed
during measurements)
E “HOLD” display symbol (the measured
value is displayed continuously)
F Low battery indicator
G T
the measuring unit used)
Setup
a) Inserting/replacing the battery
• Insert
the low battery indicator [empty battery] (F) is displayed.
• Press latch (6) both sides same time the battery
compartment cover (7) downwards, in order to open the battery compartment (8).
• Remove the used battery from the compartment and insert a new battery of the same type in
the correct polarity
the correct polarity
• Stow the battery in the battery compartment (8).
• Close
locking latch (6). Be careful not to pinch the cables.
b) Function
• Infrared thermometers measure the surface temperature of an object. The sensor on the
product records the heat radiation emitted, reected and transmitted through the object, and
converts this information into a temperature value.
• T imprecise. T
materials cannot be measured. T
paper tape to the object, allow the tape to reach the temperature of the object, and then
measure the surface temperature of the transparent object at the taped location.
• Emissivity is used to describe the energy emission characteristics of a material. The higher
the emissivity
have an emission level of approx. 0.95. Metallic surfaces or shiny materials have low
emissivity
• The thermometer's emissivity settings cannot be changed.
Emissivity of different surfaces
The emissivity levels listed in the following table are approximate values. Parameters
such as the shape and characteristics of the material can affect the emissivity of
an object. Measuring materials with an emissivity that is different from the preset
emissivity may lead to slightly inaccurate readings.
Surface Emissivity Surface Emissivity
Asphalt 0.90 – 0.98 Plastic 0.85 – 0.95
V 0.97 Hard plaster 0.80 – 0.90
Concrete 0.94 Sand 0.90
Human skin 0.98 Glass/ceramics 0.90 – 0.95
Ice 0.96 – 0.98 T 0.90
Mortar 0.89 – 0.91 Rubber (black) 0.94
Ferric oxide 0.78 – 0.82 Water 0.92 – 0.96
Paper 0.70 – 0.94 V 0.80 – 0.95
Soil/humus 0.92 – 0.96 Bricks 0.93 – 0.96
c) Switching on
• Press the trigger (1) to switch on the infrared thermometer
The to the ambient be able to
supply precise measurement values. When using the product in a new location, wait
until it has had time to adjust to the new ambient temperature.
d) Measurement of surface temperatures
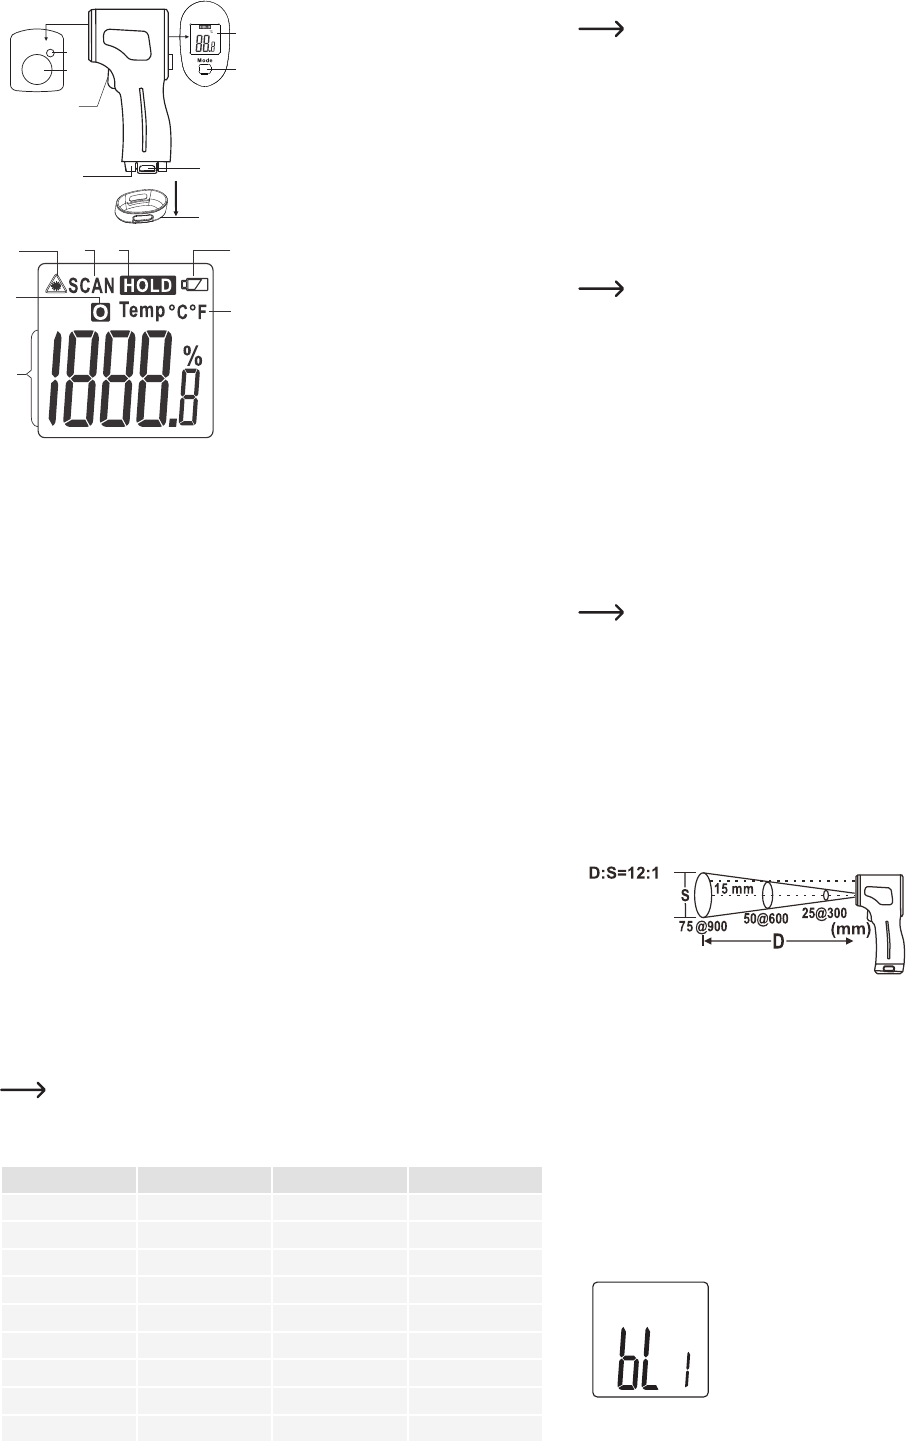
• For a measurement, point the infrared sensor (2) and the laser outlet (3), preferably
perpendicular to the object to be measured. Make sure that the object to be measured is not
smaller
ratio; D/S)”).
• Press
value in
temperature is being measured. The temperature displayed is the surface temperature of the
measured object. The symbol for the object temperature (B) is displayed.
Make
lens may distort the results.
• The
displayed measurement value corresponds to the average surface temperature of the IR-
measuring spot.
• After
display . The
be displayed. The current measurement process is completed.
• T
back and forth or up and down whilst you pull the entire object laterally
measurements whilst doing so. The laser beam indicates the measured area.
• When you release the trigger
other buttons are pressed.
• "Hi" will
displayed if the temperature is lower than the measuring range (<-50 °C).
Longer measurements of high temperatures, with a close measuring distance, lead
to heating of the measuring device itself and thus to inaccurate measurements.
Adhere to the following rule in order to obtain exact measuring values: The higher
the temperature the greater the measuring distance and the shorter the measuring
time.
e)
• In order to obtain precise measuring results, the measured object must be larger than the IR
measuring spot. The measured temperature is calculated using the average temperature of
the measured area. The smaller the object, the closer it must be to the thermometer
indicated on the thermometer
be at least twice the size of the measuring spot.
• The exact size of the IR measuring spot is shown in the following diagram.
Settings
• Switch the thermometer on for setup. Press the trigger (1) to switch on.
a) Changing the temperature unit (°C / °F)
The temperature unit can be switched between °C / °F
• Press and hold the
changed, if a temperature indicator is shown in the LCD display (4).
• Press the MODE
can
character of the measuring unit appears after every key press in the LCD display (4).
b) Switching the backlight on and off
• Press and hold the Mode button for 3 seconds, to enter settings mode.
• T
LCD display
• T
The backlight is switched on.
• The backlight lights up, as soon as "1" is selected, and goes off when set to "0".
• Press and hold the Mode button for 3 seconds to conrm the setting.