9
06.06.2019
EN EN
3.
The is home
intended for permanent installation above a gas or electric
stovetop to remove or neutralize cooking fumes.
The user is liable for any damage resulting from
unintended use of the device.
3.
BCCH-65C -60D
q) Do not leave the device in operation above a gas
stove with an exposed ame.
r) Before installing the
in the room are not blocked.
s) Before installing the device, make sure that the
surface on which you is
stable and provides sucient load-bearing capacity.
t) DO NO check the condition of the device lters
when the device is in the operating mode.
u) It is recommended to supervise the dishes being
cooked as hot fat is a re hazard.
b) The device
(including children)
functions or persons lacking relevant experience
and/or knowledge unless they are supervised by
a person responsible for their safety or they have
received instruction on how to operate the device.
c) When
and stay alert.
using the device may lead to serious injuries.
d) T
make
connecting to a power source.
e) If suction
connections make sure tight.
dedusting system may reduce the risks associated
with dust.
f) Remove all adjusting tools or spanners before
turning
revolving part of the device may cause injury.
g) The device is
to ensure that they do not play with the device.
2.
a) Do not
function properly
o). which cannot be switched on and o
using
be operated and must be repaired.
b) Disconnect the device from the power supply
before
maintenance. Such a preventive measure reduces
the risk of accidental activation.
c) Keep the device in perfect technical condition.
Before each use check for general damage and
especially cracked parts or
for
operation of the device. If damage is discovered,
hand over the device for repair before use.
d) Keep the device out of the reach of children.
e) Device
by qualied
This will ensure safe use.
f) T
not remove
any screws.
g) Avoid situations where the device stops working
during use
in overheating of the
the device.
h) Do
the been disconnected from the power
source.
i) Do not move, adjust or rotate the device in the
course of work.
j) Clean
from accumulating.
k) Do not cover the air intake and outlet.
l) The a Cleaning
may not be carried out by children without
supervision by an adult person.
m) It is forbidden to interfere with the structure of
the device in order to change its parameters or
construction.
n) Keep the device away from sources of re and heat.
o) Do not connect the hood extraction conduit to
combustion gas exhaust chimneys or ues.
p) If
burning
ventilation.
A!
and its protective features, and despite the use of
additional elements protecting the operator, there
is
the
using the device.
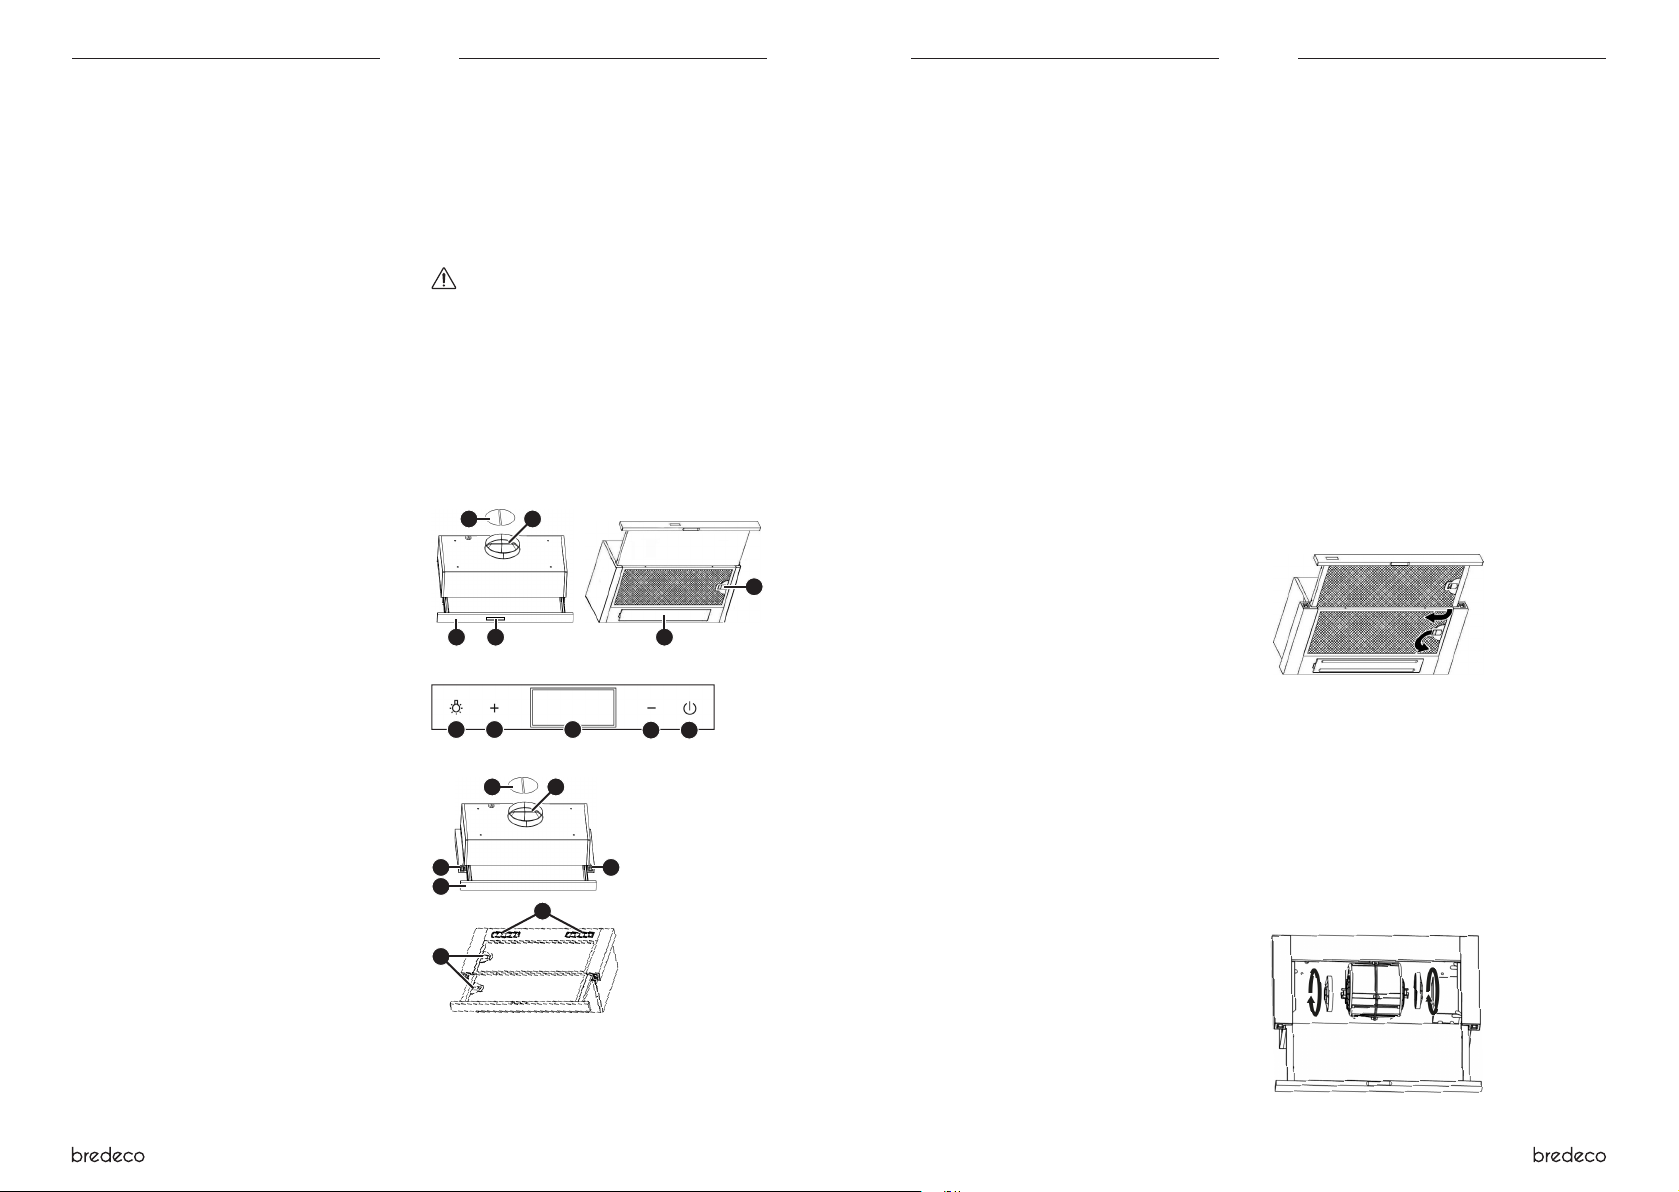
2. pull-out front panel
3. check ap valve
4. hood outlet
5. handle opening the lter cover
6. LED lighting
7. the hood three-pole I/OFF/II button
8. lighting ON/OFF button
3.
APPLIANCE L
The
40°C relative humidity should be less than 85%.
Ensure in the room
is being used. There should be at least 10 cm distance
between each side of the device and the wall or other
objects.
on an even, stable, clean, reproof and dry surface, and
be of the children limited
mental and
you always have access to the power plug. The power cord
connected to the appliance must be properly grounded
and correspond to the technical details on the product
label.
ASSEMBLING THE APPLIANCE
PLEASE NOTE! Observe the applicable regulations
regarding exhaust ventilation during installation.
PLEASE
xed symmetrically to the cooktop.
Before installing the device, remove the protective lm
from its surface.
W
persons.
PLEASE
hood should be at least 650 mm above the stove top.
3.
OPERA
The device can work in two modes:
A. Extraction mode
a) In the
ventilation duct and draws air out of the building.
b) Before assembling the hood as a kitchen hood,
make sure
correctly, and that the
not used as a gas exhaust ue.
c) A simple
device to work most eciently.
d) Make sure that the connections are correctly
insulated, and the exhaust outlet is properly
protected outside the building wall.
e) Connect the hood outlet to the ventilation duct
using a ø 150 mm conduit.
f) The discharge pipe should installed permanently,
without bends reducing its cross-section.
g) No carbon lters are used when operating in the
kitchen hood mode.
B. Absorber mode
a) In the
of circulation; it to
ventilation duct.
b) It is recommended to use a exible aluminium
conduit, installed at the air outlet, which draws air to
the
grille. Do not use rigid metal or plastic conduits.
c) In the lter mode, suitable carbon lters must be
used.
1. control panel
b. lighting ON/OFF button
c. air ow boost button
d. display
e. air ow decrease button
f. the hood ON/OFF button
BCCH-65C-60S
Control panel
34
7
2
6
5
abc e
d
34
1
5
6
CONTROL
BCCH-65C-60D
The
out front panel.
1) Pull out the front panel.
2) Press the [e] button to start the fan.
3) Press the [b] or [d] button to change the fan speed.
4) Press the [a] button to turn the lighting on/o.
5) When you have nished work, return the front panel
to its initial position.
BCCH-65C-60D
The device
behind the pull-out front panel.
1) Pull out the front panel
2) Set the switch [7] to "I" to start the fan.
3) Set
speed.
4) Set the switch [8] to "ON" to turn on the lighting.
5) When have nished work, set the
and [8] to "OFF” to switch o the device.
6) When you have nished work, return the front panel
to its initial position.
3.
FIL
A. Filter
Filters in the form of layered grilles are located on the
underside
regularly, at least once every two months.
1) S
2) Loosen the lter clips.
3) R
not to bend the lters.
4) W
Allow the lters to dry.
5) Before retting, make sure that the lter clips are
on the underside of the lter and that lter inlet
openings match the openings in the hood’s main
module.
6) Install a
before using the device.
B. Carbon lter (absorber mode)
It is
least once every three months.
1) S