6. Place the XP-P 11 in the side of the child safety
seat closer to the vehicle door
8. Place the child safety seat in driving direction on
a vehicle seat approved for use.Ensure that the
backrest 14 is flush with the backr
seat .
9. Position the two ISOFIT locking arms 06 dir
front of the two insertion aids 02 .
10. Push both ISOFIT locking arms 06 into the insert
guides 02 until the ISOFIT locking arms 06 engage
on both sides with a clicking sound.
DANGER! 08 must be
visible on both sides so that the child
safety seat is correctly fastened.
11 Hold the ISOFIT settings button 09 down and push
the child safety seat as far back as possible.
1. Carry out the steps in Section 8 "ADJUSTING THE
HEADREST".
2. Place the XP11 on the side of the child safety
seat closer to the vehicle door
3. Guide the elastic holding str 11
into the dark red belt holder 03 of the headrest 22
until it lies completely in the belt holder 03 and is
not twisted.
4. Place the child seat on the vehicle seat. Ensure that
the backrest 14 is flush with the backr
vehicle seat.
Tip! If the head r
the child seat from being fastened in place pr
should be removed (see vehicle oper
removing the head restr
in the vehicle so that it cannot be thrown around.
5. Carry out the st "SECURING
Y.
12. Shake the child safety seat to ensure that it is
securely fastened and check again the fast
buttons 08 t both are fully gr
13. Carry out the steps in Section 10 "SECURING
Y.
F
Źthe child safety seat is slotted in on both sides with the ISOFIT locking arms
06 in the ISOFIT fastening points 01 and both safety butt08 are fully
green;
Źthe child safety seat is securely fastened;
Źthe lap belt 16 runs in the bright red belt guides on both sides of the seat
cushion 05 ,
Źthe
lap belt
16
runs through the bright red
SecureGuard 10 .
Źthe diagonal seat belt section 17 on the side of the vehicle seatbelt buckle
18 also runs through the light red belt guide 05 of the seat cushion,
Źthe diagonal seat belt section 17 runs through the dark r 03 of
the headrest,
ŹXP-P 11 and XP-SIC 04 are correctly installed and used,
Źthe diagonal seat belt section 17 runs diagonally backward,
Źthe straps ar and not twisted,
Źthe seatbelt buckle 18 must not be positioned on the red belt guide 05 in
the seat cushion.
DANGER!
If your child try to use to open the vehicle belt buckle 18 or
introduce the diagonal belt section 17 int10 ,
stop as soon as possible. Check whether the child safety seat is correctly
fastened and ensure that your child is corr
child the dangers associated with his actions.
7. SAFETY NO
Please take the time to r
to hand in the intended stor 13 on the child safety seat
at all times! The instructions must be with the child safety seat if the latter
is passed on to a third party
DANGER! F
•
child safety seat may be damaged without the damage becoming immediately
visible. In this case the child safety seat must be replaced. Please dispose of
it properly
•
on the ground).
• Regularly check all important parts for damage. Ensure that all mechanical
parts, in particular
• Never lubricate or oil parts of the child seat.
•
Never leave your child unattended in the child seat in the vehicle.
•
•
The child safety seat can get very hot in direct sunshine. Child skin is sensitive
and could thereby be harmed.
•
The more snugly the belt fits over your child's body, the better they will be
protect
•
opportunity to play around.
•
feet cannot hit the backrest of the front seat (t
DANGER! F
In the case of an emergency stop or an accident, unsecur
may cause injury to other vehicle occupants. Please always check that...
•
bench latch is engaged).
• all heavy or sharp-edged objects in the vehicle (e.g. on the parcel shelf
secured.
• all persons in the vehicle have their seatbelts fastened.
•
is being transport
WARNING! F
• Never use the child safety seat free-standing, not even for test sitting.
• The backrest 14 may tip backward. Always place the child seat on the vehicle
seat before having your child sit down in it.
• 14 , nothing must come between the
backrest 14 and the seat cushion15 . Y
fingers, injuring them.
•
T
hard objects (car door
•
Keep the child safety seat in a safe place when it is not in use. Do not place any
heavy objects on the seat and do not store it dir
in direct sunlight.
CAUTION! T
•
Certain car seat covers made from more sensitive mat
etc.) may sustain signs of wear and tear when using child safety seats. F
optimum protection of your car seat covers, we r
RÖMER car seat protect
P
F
Źthe child safety seat is securely fastened;
Źthe lap belt
16
runs in the bright red belt guides on both sides of the seat
cushion
05
,
Źthe
lap belt
16
runs through the bright red
SecureGuard 10 .
Źthe diagonal seat belt section 17 on the side of the vehicle seatbelt buckle
18 also runs through the light red belt guide 05 of the seat cushion,
Źthe diagonal seat belt section 17 runs through the dark r 03
of the headrest,
Źthe diagonal seat belt section 17 runs diagonally backward,
Źthe straps ar and not twisted,
ŹXP-P 11 and XP-SIC 04 are correctly installed and used,
Źthe seatbelt buckle 18 must not be positioned on the red belt guide 05 in
the seat cushion.
DANGER! If your child try to use to open the vehicle belt buckle 18 or
introduce the diagonal belt section 17 int10 ,
stop as soon as possible. Check whether the child safety seat is correctly
fastened and ensure that your child is corr
child the dangers associated with his actions.
A correctly set headrest 22 ensures that the diagonal seat belt section 17 is
optimally positioned, and gives your child optimum protection.
The headrest 22 must be adjusted so that there is a space two fingers wide
between the headrest 22 and your child's shoulders.
T
1. Reach into the adjustment handle 12 on the back
of the headrest 22 and pull it towards you.
This unlocks the headrest.
2. Y22 to
the desired height. As soon as you release the
adjustment handle 12 , the headrest 22 will lock
into place.
3. Place the child safety seat on the vehicle seat.
4. Have your child sit down in the child safety seat and
check the height. Repeat the procedure until the
headrest 22 has the correct height.
01
02
1. If your vehicle is not fitted with ISOFIX insertion aids by standard, clamp
the two insertion aids 02 , with are included in the scope of delivery of the
seat*, with the section pointing upwards to the two ISOFIX fast
01 of your vehicle.
TIP!
The ISOFIX fastening points are locat
of the vehicle seat.
* The insertion aids facilitate the installation of the child safety seat with the
use of the SOFIX fastening points and prevent damage t
As long as they are not used, remove them and keep them in a safe place. F
vehicles with foldable a backrest, the insertion aids need to be r
folding the backrest. Any problems occurring usually come fr
ternal objects on the insertion aids and on the hook. Remove soiling or ext
objects to rectify such pr
2. Moving the headrest of the vehicle seat into the top position.
3. Carry out the steps in Section 8 "ADJUSTING THE HEADRES.
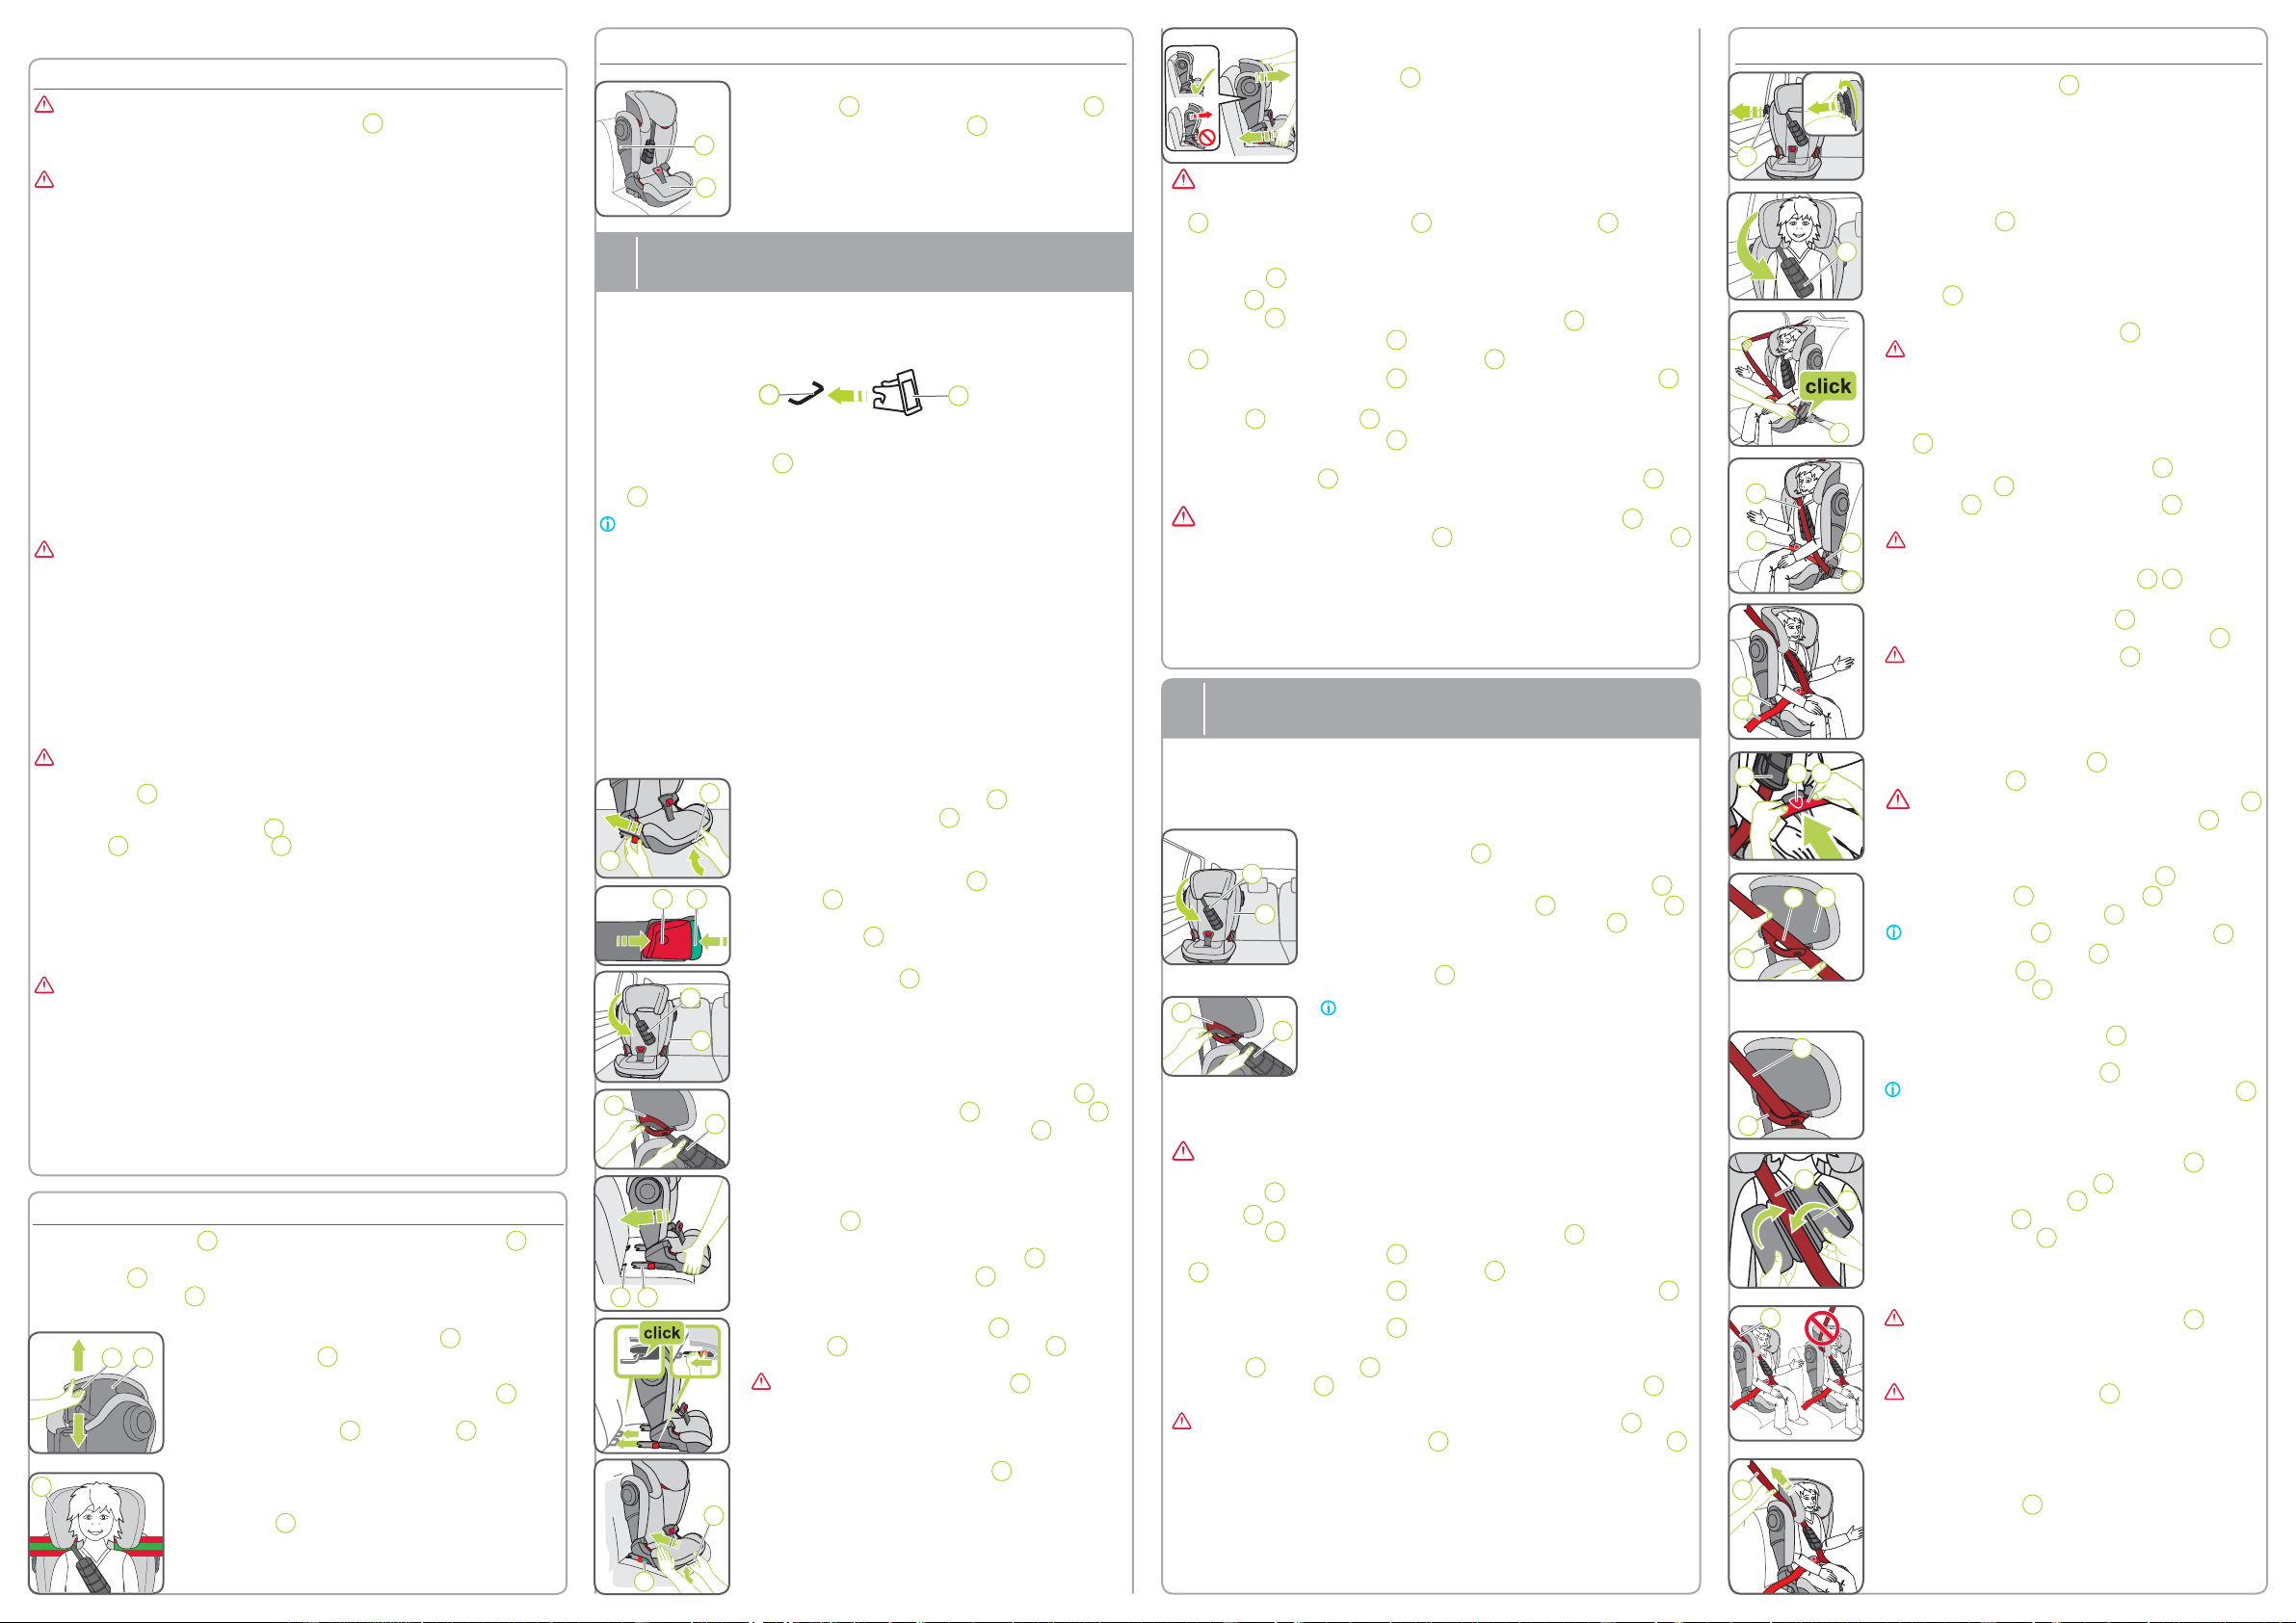
8. ADJUS
9. INS
With ISOFIT + 3-point belt
A
The
KIDFIX III S
is installed permanently in the vehicle with the ISOFIT locking
arms.
Y
4. Hold the ISOFIT settings button 09 down and push
the ISOFIT locking arms 06 out in full .
2. L
the XP-P 11 over the chest area of your child.
If you find that the retr
belt is not enough to ensure that the seat belt is tight
(against the child), the child seat can be used without
XP-P 11 ; see Chapter 3 “ [P
3. P
child to the vehicle seat buckle 18 .
DANGER!
otherwise the full protective eect of the
retaining system is not ensur
4. Engage the buckle tongue in the vehicle seat buckle
18 with a CLICK!
5. Place the diagonal seat belt section 17 and lap
belt section 16 on the side of the vehicle seatbelt
buckle 18 into the light r 05 of the seat
cushion.
DANGER!
be positioned between the light red belt
guide and the armrest.18 05
6. Also place the lap belt section 16 on the other side
of the seat cushion in the light red belt guide 05 .
DANGER! 16 must lie as low
as possible over your child's hips on both
sides.
8. Guide
17 into the dark
red belt holder 03 of the headr 22 until it lies
completely in the belt holder 03 and is not twist
Tip! If the backr
14
conceals the belt holder
03
,
you can adjust the headrest
22
upwards. The diagonal
seat belt section
17
can now be easily inserted. Now
return the headrest
22
to the proper height.
9. Ensure that the diagonal belt 17 runs over the collar-
bone of your child and is not on the neck and that
the key on the belt holder is 03 fully closed.
Tip! Y 22
again here in the vehicle.
10. 11 and fold
the top part of the XP 11 to the side.
11 Insert the diagonal belt 17 in the die nubby surface
of the XP-P 11 .
12. Close the XP-P 11 again by folding the folded
part back and closing the V
DANGER! 17 must
run diagonally backward. Y
the course of the belt with your vehicle's
adjustable belt deflector
DANGER! The diagonal belt 17 must never be
directed forwards t
on the vehicle. In this case, use the child
safety seat on the back seat only
13. T
seat belt section
17
.
14. Observe the further steps of the relevant installation
type.
1. Unscrew the XP 04 anti-clockwise (on the side
closer to the vehicle door) until it has a distance of
5 mm to the vehicle door or has been unscrewed t
the maximum.
5. Push the gr
08
and the red release
button
07
on both sides of the seat towards each
other
locking arms
06
are open and ready t
10. SECURING Y
UNF
T
Section 6 "REMOV" [P
The
KIDFIX III S
is not installed permanently in the vehicle. It is simply secured
together with your child using the vehicle's 3-point seatbelt.
With 3-point belt
B
7. Guide the elastic holding strap of the XP-P 11
into the dark red belt holder 03 of the headrest 22
until it lies completely in the belt holder 03 and is not
twisted.
UNF
T
in Section 6 " REMOV" [P
Adjusting the backrest:
The backrest 14 is connect15 by
an articulated axis. The backrest 14 of the child seat can
be adjusted to any inclination of the vehicle seat.
Please know that optimal protection is guar
the vehicle seat is in an upright position.
7. Guide the lap belt section 16 int
SecureGuard 10 .
DANGER!
Do not guide the diagonal the section
17
into the bright red Secur
10
.
2212
0807
22
11
04
18
17
16 05
18
16
05
17
17
11
17
17
11
03
11
03
03
17
03
22
09
06
06
08
09
11
14
11
14
15
14
17 10 16