b)
• The rechargeable battery is permanently built into the product and cannot be replaced.
• Never damage the rechargeable battery
might cause an explosion or a re!
• Never short-circuit the contacts of the rechargeable battery
product into re. There is a danger of re and explosion!
• Charge the rechargeable battery regularly
rechargeable battery technology being used, you do not need to discharge the rechargeable
battery rst.
c) Miscellaneous
• Consult an expert when in doubt about operation, safety or connection of the device.
• Maintenance,
qualied shop.
• If you have questions which remain unanswered by these operating instructions, contact our
technical support service or other technical personnel.
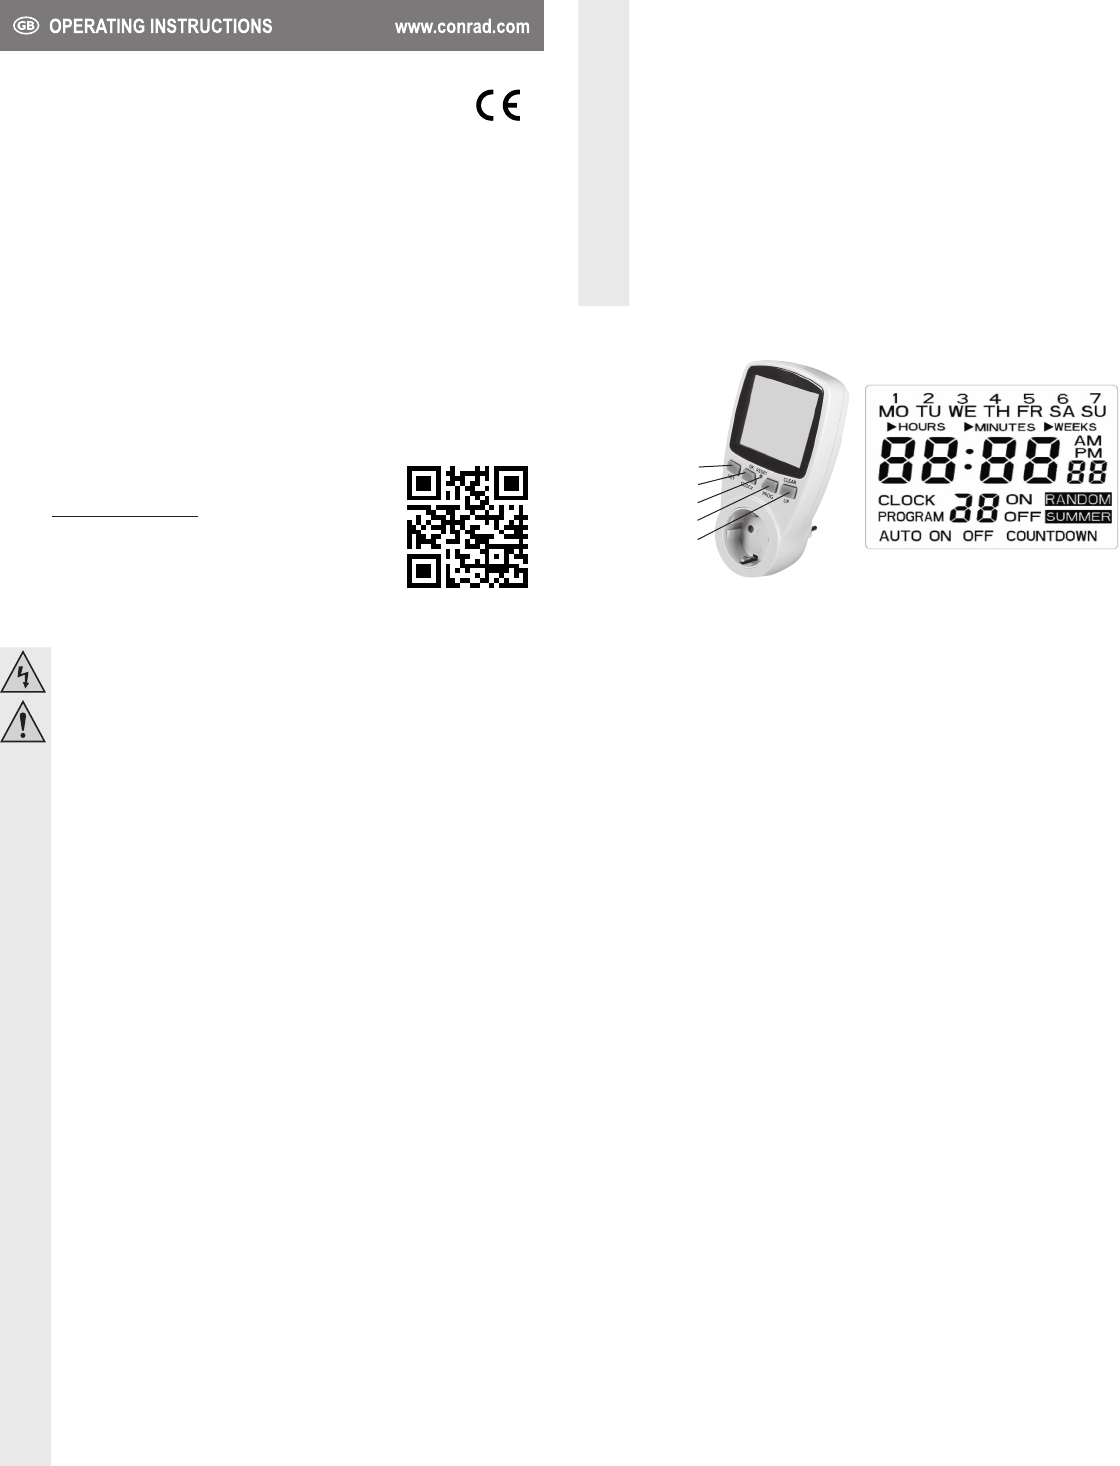
Operating elements
SET button
CLOCK/OK button
UP/CLEAR button
PROG button
RESET button
Operation
Unpack the product and check it for possible transport damage. Connect the week timer to a suitable isolated
ground receptacle. The display lights up and all characters appear for approx. 3 seconds, as shown above.
In case the display of the device malfunctions you may use the RESET button to reset the device. Press and
hold the reset button for approx. 3 seconds. Then enter the data for setting the following program functions:
Clock time � Timer � Random function � Countdown function
The days of the week, Monday till Sunday
Explanation of weekdays
1 MO - Monday
2 TU - Tuesday
3 WE - Wednesday
4 TH - Thursday
5 FR - Friday
6 SA
7 SU - Sunday
Explanation of buttons
SET Select
CLOCK Clock time
OK Conrm
RESET Reset
PROG Program
UP Set the clock, count forward
CLEAR Delete
a) Setting the clock
3. Press and hold the “CLOCK” button for at least 3 seconds to select the clock time setting mode. The
display shows “CLOCK”.
4. Press the “SET” button. The ► symbol in front of “HOURS” starts ashing.
5. Press the “UP” button repeatedly until the correct hours are displayed. Press and hold the “UP” button
to quickly scan through the hours. Y
(weekday) next.
6. Press the “SET” button. The ► symbol in front of “MINUTES” starts ashing.
7. Press the “UP” button repeatedly until the correct minutes are displayed.
8. Press the “SET” button. The ► symbol in front of “WEEKS” starts ashing. Displaying “WEEKS”
indicates the setting of the weekday
9. Press the “UP” button repeatedly until the desired weekday (Monday till Sunday) is displayed.
10.
1 Simultaneously press the “CLOCK” and “SET” buttons to change the time by one hour forward or
backwards. This function allows you to adjust the winter and daylight saving time settings in just one
step. T
“SUMMER”.
12. Simultaneously press the “CLOCK” and “PROG” buttons to select the 12- or 24-hour time format. When
selecting the 12-hour time format, the display will show “AM” (from 00:00 till 1
12:00 till 23:59 o’clock).
b)
1. Connect a device and switch it on.
2. Press the “PROG” button to select timer setting mode. The display will show “ON” and program number
“1”. It is possible to program up to 16 program groups.
and one turn-off time.
3. Press the “SET”
starts ashing.
4. Press the “UP” button repeatedly until the correct hours are displayed.
5. Press ► symbol in front of “MINUTES” starts ashing. Press the “UP” button
repeatedly until the correct minutes are displayed.
6. Press the “SET” button. The ► symbol in front of “WEEKS” starts ashing.
Digital week timer
V
04/16
Item no.
618495
Intended use
Use this digital week timer to program turn-on and turn-off times for suitable electric devices and lamps.
The large display provides a clear overview of different settings. The week timer features a random function
allowing for lamps to turn on and off at different times, for example when you are away on vacation.
scare off thieves. The product is suitable for electric devices with a maximum power / current consumption of
3680 W / 16
For safety and approval purposes (CE), you must not rebuild and/or modify this product. If you use the
product for purposes other than those described above, the product may be damaged. In addition, improper
use can
keep them. Make this product available to third parties only together with its operating instructions.
This product complies with the statutory national and European requirements.
product names are trademarks of their respective owners.
Delivery content
• Digital week timer
• Operating instructions
Up-to-date Operating Instructions:
1. Open in a browser or scan the displayed
QR code.
2. Select document type and language and enter the item number into
the search eld. After submitting the
records.
Safety instructions
Read the operating instructions carefully and especially observe the safety information.
If you do not follow the safety instructions and information on proper handling in this
manual, we assume no liability for any resulting personal injury or damage to property
Such cases will invalidate the warranty/guarantee.
a) Persons / Product
• The device is not a toy
• Do not leave packaging material lying around carelessly
playing material for children.
• Protect the product from extreme temperatures, direct sunlight, strong jolts, high humidity
moisture, ammable gases, vapours and solvents.
• Do not place the product under any mechanical stress.
• If it is no longer possible to operate the product safely
any accidental use. Safe operation can no longer be guaranteed if the product:
is visibly damaged,
is no longer working properly,
has been stored for extended periods in poor ambient conditions or
has been subjected to any serious transport-related stresses.
• Please handle the product carefully
the product.
• Also observe the safety and operating instructions of any other devices which are connected
to the product.
• It is intended for indoor use only
bathrooms, must be avoided under all circumstances.
• Use the product in dry environments only
• Do not connect several timers in a row
• Do not cover the product during use.
• Never plug or unplug the product with wet hands.
• For safety reasons, disconnect the product from the mains socket during storms.
• The product must be easily accessible at any time.
• The product must be unplugged in order to fully disconnect it from the mains.
• Never use the product immediately after it has been brought from a cold room into a warm
one. The condensation generated could destroy the product.
temperature before connecting and using it. This may take several hours.
• Never
device. If liquid or an object enters the
respective socket (e.g. switch off circuit breaker) and then pull the mains plug from the mains
socket. Do not operate the product anymore afterwards, but take it to a specialist workshop.
• Do not overload the week timer
• For installations in industrial facilities, follow the accident prevention regulations for electrical
systems and equipment of the government safety organization or the corresponding authority
for your country