!
Lieferumfang:
- CUBE Race
- batter
-
- handlebar bracket
- transmitter
- cable ties for mounting
- spoke magnet
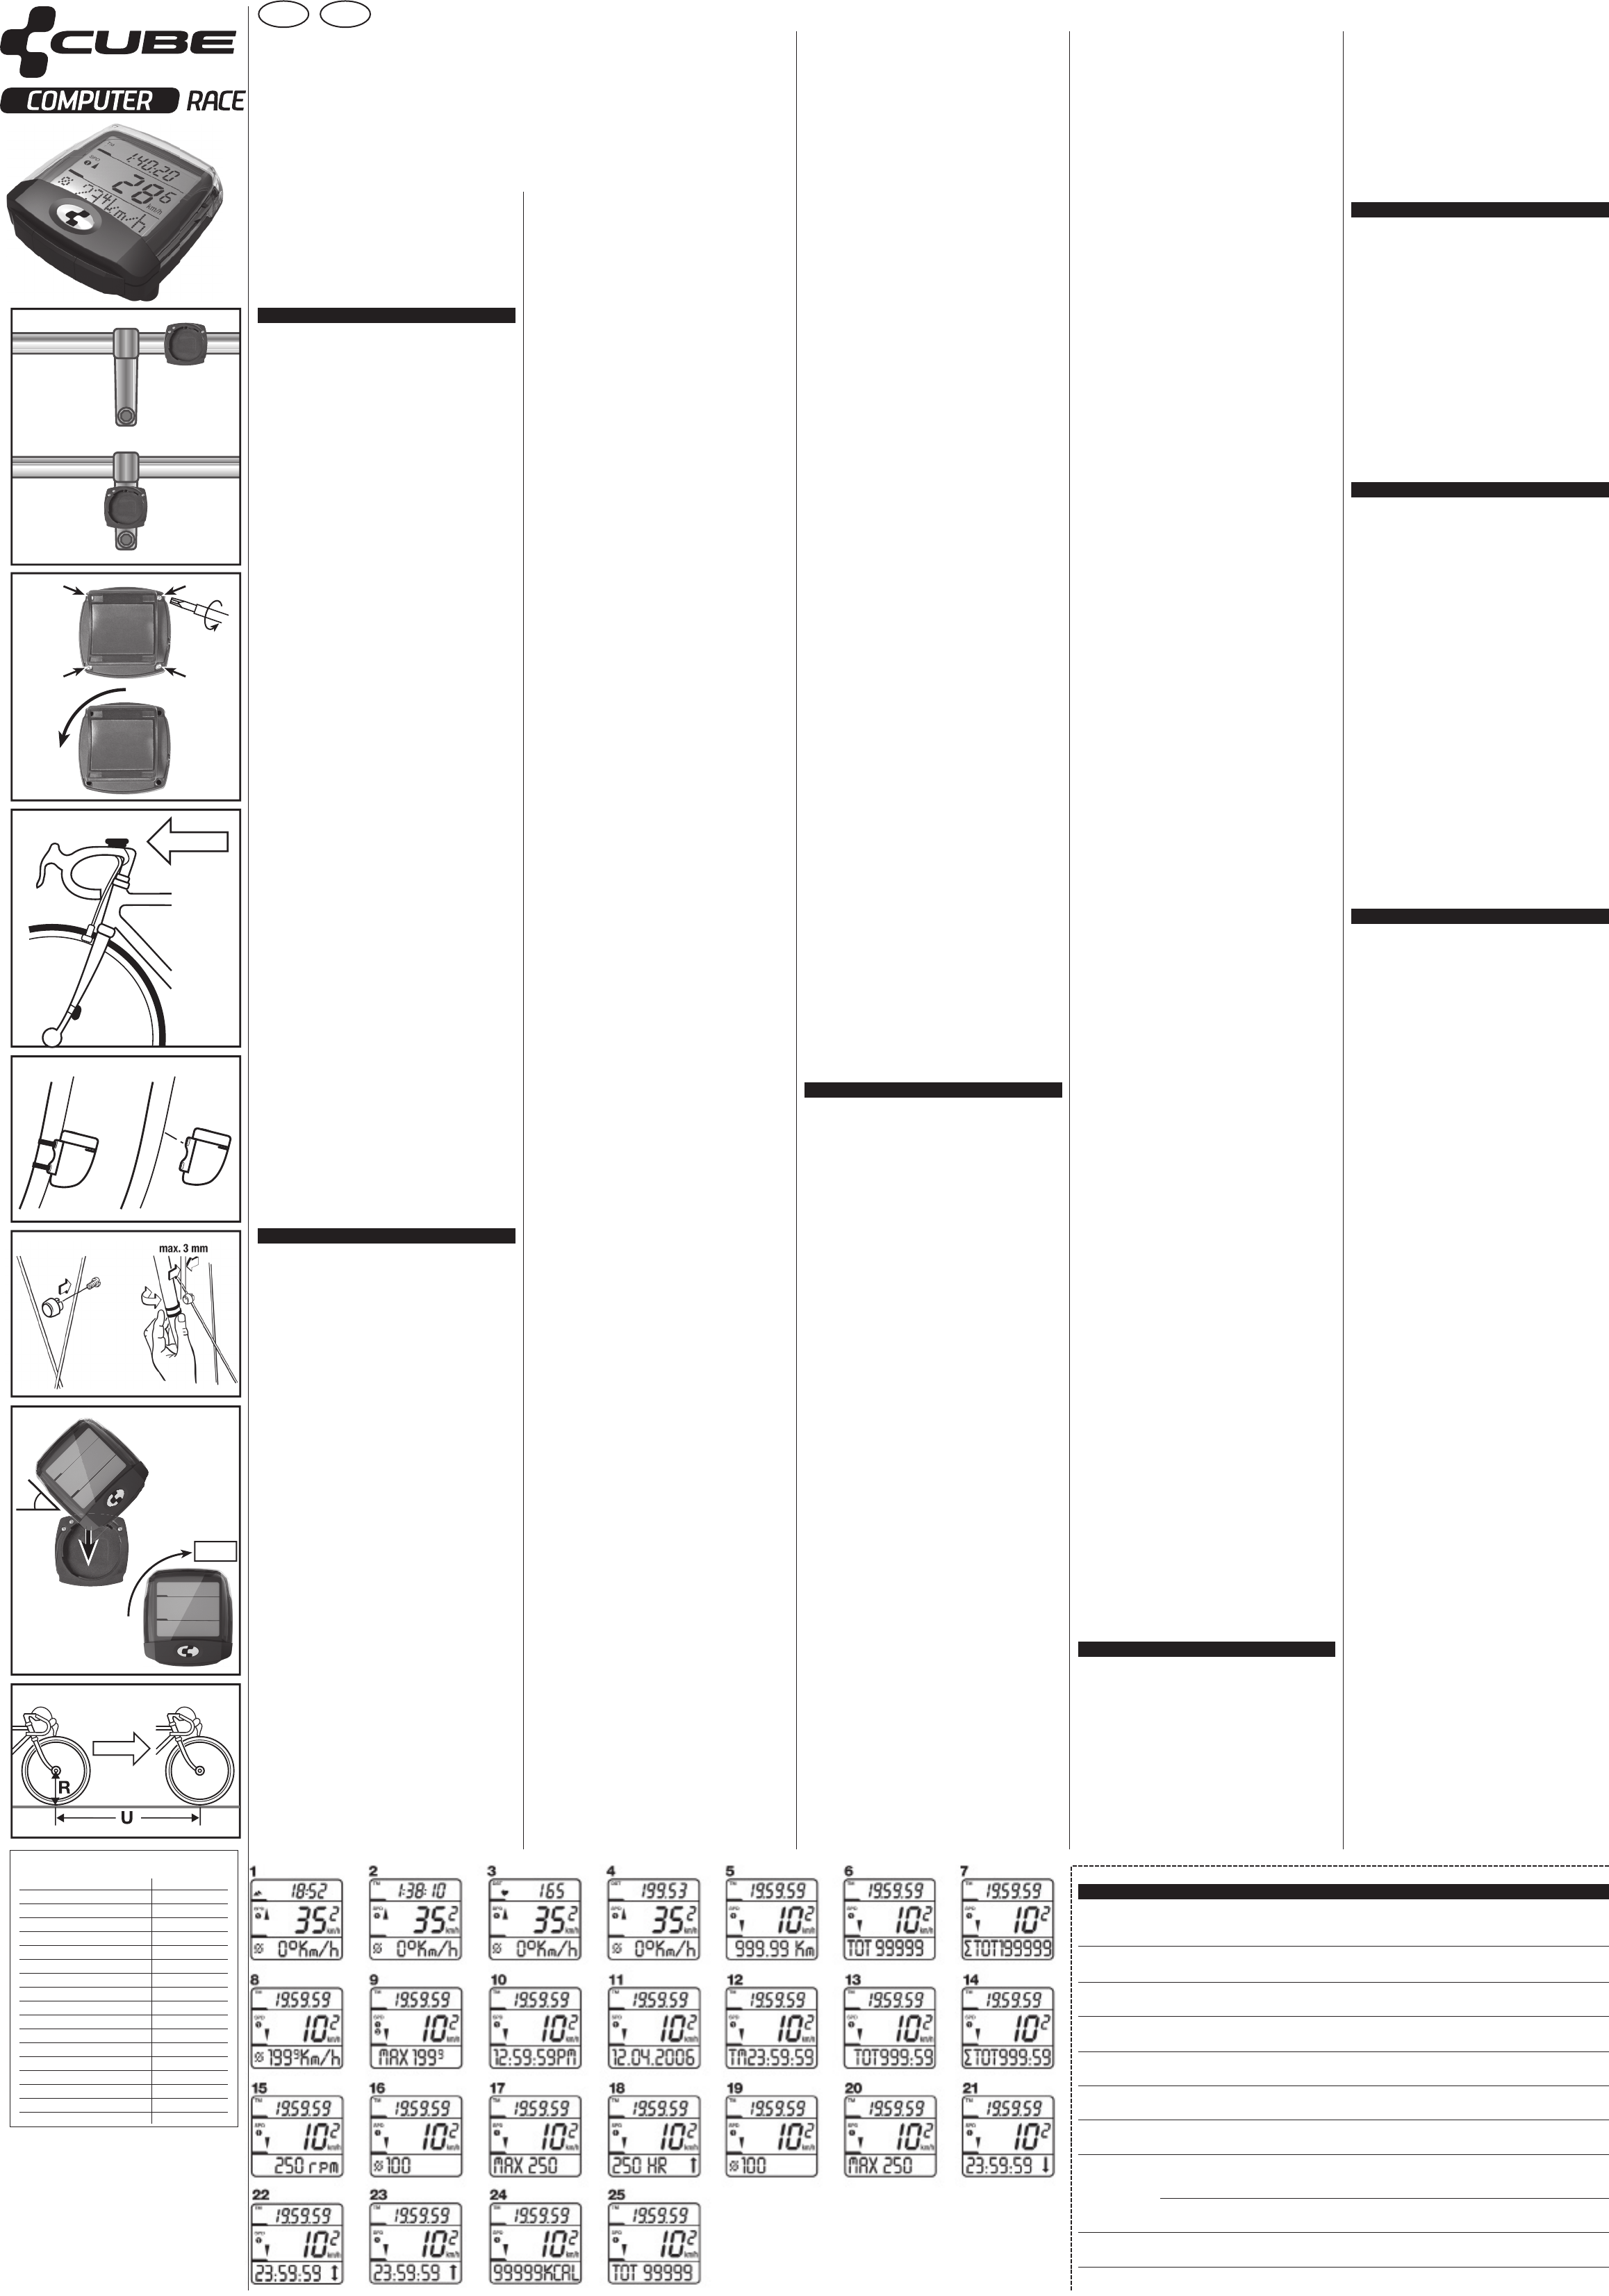
1. Mounting
The handle brack c be on t h and
also on the stem.
Picture A: or
stem (Position
Picture B: For us the st bracket m
orientation from Position
Remove the protective tape.
Place the handle bar and fasten it with the cable ties.
Pic C: M th tra wit ca t on th for
(m d t t h b ma 6 c b
moun on t right side brac and trans
should be on the same side).
Pictur D: Fix the ma on a spoke so t i wil fac the
mar on t tr th ma po and f
tune
magnet max.
Picture
the
rotate 45 degrees to the left.
1.1 Mounting of optional cadence-set
(separately available)
Mount
the stem.
Place on in
of the
to
tie) on
sensor should be max.
The
swi o the c m i the m o t
Rac ( c cra a few t c if the
mounting is correct.
1.2 Putting on the heart rate transmission belt
Wa w c o s s ha a g
medical
beginners,
has suff from illnesses or in past. is
mended
of r fa s as sm h b p h
cholesterol values,
Pace we sho co the d be
using any heart rate measurement device!
The transmitter
aro the upp b t (pl p wit th
CUB sh lie o t of upp s
im b t br s th th lo on t
transmitter is
electrodes in the
be in contact with the skin.
Pull
the body is guaranteed during movement.
If th Ra fa to di a h ra m
that th is no conta betw the ski an t elect
Moisten th and the skin of hel
Best
pharmacies).
Measurement
belt fitt corre Ra is wi tr
reception range (max.
2. Preparation
Inserting the battery
In b ty CR w pl f up Cl
ba ca w a coi sur no to ov ti
inserting the battery the display will show normal mode.
(If nothing
the AC-button on the rear of the computer with help
pen this will delete all
setting).
2.1 Settings
E s m b p m b f 3
seconds.Display shows ‘SET BIKE1’.
T
any setting.
(T c the to l le bu
short,
this func and then betwe and
with
setting mode with short pressing of right button).
Though
shows both possible displays.
The d se m can be s by pr
right
setting mode is chosen.
Possible setting modes:
SET BIKE1 / SET RAD1
SET CLOCK / SET UHR
SET HR / SET HF
SET MISC
EXIT / ENDE
LANGUAGE / SPRACHE
Each setting mode can have different setting possibilities.
Th fo i va fo t s t bl
value be changed value
sto b sho pr t le bu and t nex
value blinks or the next v
For
are fat printed and the settings f.
SET BIKE1 / SET RAD1
Adjustm o va d
ference,
Choose with middle button.
T
simultan in s to 2,
ent aga sett m (di the s SET BIK
RAD2).
D
Adjustment of the daily distance
Default:
Range:
Set with right and left button,
Here
a tour
(This
ridden kilometres are counted).
TOT DST / GES.
Adjustment of the total distance
Default:
Range:
Set with right and left button,
Here the total distance can be adjusted.
Wheel/Radumf.
Adjustment of circumference
Default:
Range:
Set with right and left button,
Here the circumference can be adjusted.
The ci of the whe can be t f the
char
Measuring the circumference of the
wheel (for a more precise setting):
Put a marking at the front-tire and on the
ground (e.g.
ahead exactly one turn of a tire (for a very
exact measurement, check
on your bike) and mark this position
the
at the ground (in mm) – see pict. F
Unit km bzw
Adjustment of the measuring unit (kilometres or miles)
Default:
Set with right button,
Here you can choose
(km/h) or miles (m/h).
CAD OFF/TRITT AUS
Switch cadence on/off (ON/AN – OFF/AUS)
Default:
Set with right button,
Here
fun you n th opt cad (a at yo
local dealer).
SET CLOCK / SET UHR
Adjustment of clock,
Choose with middle button
Time / Uhrzeit
Adjustment of clock
Range:
Set with right and left button,
Here
then the minutes.
Y
Adjustment of the year
Default:
Range:
Set with right button,
Here you can set the current year
Month / Monat
Adjustment of the month
Default:
Range:
Set with right button,
Here you can set the current month.
Day / T
Adjustment of the day
Default:
Range:
Set with right button,
Here you can set the current day
Clock / Zeit
Adjustment of the clock format
Default:
Set with right button,
Here you can select between 24- or 12-hour format (AM/PM).
SET HR / SET HF
Adjustments f
function y t ra (a at
local dealer).
HR OFF/ON / HF EIN/AUS
Switch heart rate on/off (ON/AN – OFF/AUS)
Default:
Set with right button,
Here you can switch on/off the heart rate measuring.
Fitness / Fitness
Adjustment of the fitness level.
Default:
Set with right button,
Range 1-4,
1 – poor fitness
2 – average fitness
3 – good fitness
4 – high fitness
He y s yo pe f l ne fo t
CUBEInZone -calculation.Sex / Geschlecht
Set with right button,
Change between
m = male and f = female.
Th s i n fo t CUI - a th
calorie consumption.
Weight / Gewicht
Range:
Set with right and left button,
The weig is n f the CUBEInZo -c and the
calorie consumption.
Birthdate /Gebjahr
Adjust with right and left button,
Default:
Range:
The year of birth is necessary for the CUBEInZone -calculation.
InZone
Here InZone -calculation
of r an l bu si ( a ch 4 fo
CUBEInZone ).
In order to ignore the calculation,
I a e o o
CUBEInZone
fitness-level,
In o to c th CI po th ch b
correctly
start InZone
left button simultaneously
The
seated,
heart
store this value for the subsequent calculation.
After t m t of calculate
CUBEInZone appears in the display
Lower HR / untere HF
A h limit b here or CUBEInZone -
calculation) the calculated value is shown.
When current rate l t
shows an arrow (t ) as an optical alarm.
Range:
Adjust with right and left button,
Upper HR / obere HF
An InZone -
calculation) the calculated value is shown.
When
shows an arrow (s ) as an optical alarm.
Range:
Adjust with right and left button,
Max HR / Max HF
Shows the maximum heart rate,InZone .
Range:
Adjust with right and left button,
SET MISC
Here
(delete all values).
Choose with middle button
Powerdown / STROMSP
Swi o the p ( ch o the
battery
T
di fad o and R is i po B sh
pr of a b R sta ag and sho n
mode.
Reset / Löschen
Here you can delete
press right an button short s shows
‘reset’ and then normal mode.
If y only to va and left
button for three seconds in normal mode.
3. Functions
The Race an star w on the handl
bracket.
That the shows
normal mode and the current speed.
1 m a th la w t (a w a bu is
pressed)
this mode,
If th wh t o a b i p th co w
resume normal functions.
Th op he ra me wo a wi sp
signal:
auto-start),
And
automatically switching to sleep mode.
T
button
changes to 2 and back).
T res al da val pr ri a lef b fo
three seconds.
The Race three d th m a
the
shows whether the current values are valid for bike 1 or bike 2.
T adva the func of up disp pres ri
button, to functions of lower display press
left button.
Always short pressing of the middle button shows the sub-
functions of the function in the lower display
the upper display:
TM – Daily ride-time (pic
Heartrate – if switched on (pic
DST – Daily distance (pic
Time (p
(Explanation of these functions see ‚functions in the lower
display’)
Function in the middle display:
SPD – current speed
Inidcates the current speed in km/h or m/h .
Range:
An the si t the
current speed is ( or slower (arrow down)
the current average speed.
Functions in the lower display:
DST - daily distance (pic
Indicates the distance ridden up to now in kilometres or miles..
Range:
TOT - Gesamtdistanz (pict.
Sub-function of function daily distance
Indi the tot dist ri u t n in kilo or
miles (since last reset or battery change).
Range:
∑TOT - sum of total distance of bike 1 and bike 2 (pict.
Sub-function of function daily distance
In t su o t t di ri u t n in
kilometres
and bike 2.
Range:
Ø - average speed (pict.
Indicates the current average speed in km/h or mi/h.
Ra 0 to 19 k or m/ (t de p is hi
ranking)
MAX - maximum speed (pict.
Sub-function of function average speed
Indicates the highest speed ridden up to now in km/h or mi/h.
Ra 0 to 19 k or m/ (t de p is hi
ranking)
Time (pict.
Indicates the current time.
Range:
Date (pict.
Sub-function of function time
Indicates the current date (dd.mm.yy).
TM - daily ride time (pict.
Indicates the current daily ride time.
Range:
TOT - total ride-time (
Sub-function of function daily ride time
Indicates the total ride time (since last reset or battery change).
Range:
∑TOT - sum of total ride time of bike 1 and bike 2
(pict.
Sub-function of function daily ride time
Indicates the sum
change) of bike 1 and bike 2.
Range:
The following
setting (for
separately available cadence set).
CAD - cadence (pict.
Indicates the current cadence (rpm = rounds per minute)
Range:
Ø - average cadence (pict.
Sub-function of function cadence
Indicates the average cadence.
Range:
MAX - maximum cadence (pict.
Sub-function of function cadence
Indicates the maximum reached cadence.
Range:
The
appear
measuring
rate-set).
HR -
Indicates the current heart rate (bpm = beats per minute)
Range:
On
the t ),ts ) s )
the set heart rate limits.
Ø -
Sub-function of heart rate function
Indicates the average heart rate (since last reset).
Range:
MAX
Sub-function of heart rate function
Indicates the maximum heart rate reached (since last reset).
Range:
T
(pic
Sub-function of the heart rate measurement function.
Displays
the lower limit set.
(since last reset).
Range:
T
Sub-function of the heart rate function.
Indicates the
limits set (since last reset).
Range:
T
(pic
Sub-function of heart rate function.
Indicates
upper limit set (since last reset).
Range:
kCal
Indicates the current calorie consumption (since last reset).
Range:
TO
Sub-function of calorie consumption function
In th to c co (s la r or
battery change)
Range:
4. CI®-P
CUBEI ® is s f the v pe of
your training routine.
It
CUBEInZon ® f on t basis your d and
your pulse rate when at rest.
CUBEInZone ® is
applied
road and indoor cycling.
Improve your fitness? – Lose weight? – T
your
to
aims
right of ef the training? InZone ® the
optimum training ZONE for effort, resistance and weight loss.
What does CUBEInZone ® do?
It
weight loss.
The v f t p and off a v
training support –
maximum heart rate.
(+/-
rate when at rest and the level of training).
The que o b fat is seen wit
CUBEInZone ® – on the basis of the personal data collected.
5 . Battery change
Race:
bat typ CR20 (pl u bat wit smoo min
pole)
to inserting the battery the display will
normal mode.
If
the AC-button on the rear of the computer with help
pen this will delete all
setting.
(Ba cha i the o che bel wor in t sam
way
T
a
12 batter 23A (with plus
cap,
Please do not throw away battery in your normal garbage.
6. Trouble shooting
Faulty or no display
- check to see if batter
(Attention:
the Race)
- press AC-button on the rear of the computer
Speed not displayed
-
-
to wheel-sensor)
- make sure Race is mounted in bracket correctly
- check wheel circumference
Speed to high or to low
- check wheel circumference
- check to see if you are using miles or kilometers
No displaye or
or u
- proof whether heart rate is switched on in setting mode
- Check transmitter belt (batter
- Skin too dr
- Distance between Race and transmitter belt is too great (max.
60 cm)
Cade
- Check whether switched on in setting mode
- Check sensor and magnet for correct installa
7. Guarantee
We
on
faults.
The guarantee
been
ting instructions.
T r t R un co of t g
ple ref t you dea y l di or s the
computer the proof of and all
and with sufficient postage, to:
C CUBE Service
Pending System GmbH & Co KG
Ludwig-Hüttner
D-95679
T
Fax:
info@CUBE.eu
www
Pl re t t i m c b
sending
device or
if just into qu
contact our local distributor
Repair:
If yo Ra is se in f re (o b c o i a
gu cl is no v r u t E 1 w b
carried out automatically
In
device will be sent back COD.
O E R T I G A N A L
Con
WitCUB
theRac
mea
The
com
Ple
Guar
Send
Name
irst
Stree
Code/
T
Fax
E-Mai
Reas
Afte
!
GB
US
Ti C
40-5 26 x 2026
44-5 26 x 2051
47-5 26 x 2070
50-5 26 x 2026
54-5 26 x 2089
57-5 26 x 2114
37-5 26 x 2133
32-6 27 x 2199
40-6 28 x 2224
47-6 28 x 2268
40-6 28 x 2265
37-6 28 x 2205
20-6 700 2114
23-6 700 2133
25-6 700 2146
28-6 700 2149
32-6 700 2174
G
A-1
B
90ϒ
D
C
E
45ϒ
KLICK!
F
A-2