6 7
GAS
Z
2
1
3
4
5
L
N
A
Using your appliance in all simplicity
USING GAS BURNERS
The following symbols are on the control panel next to each knob:
- Black circle gas off
- Large flame maximum setting
- Small flame minimum setting
The minimum position is at the end of the anti-clockwise rotation
of the knob.
positions of max. and min., never choose them between max. and
off.
AUTOMA
T
burner and turn it anticlockwise to the minimum position. Keeping
the knob pressed, the electric automatic ignition of the burner will
be started up.
In case there is no electric current, the burner can also be lighted
using a match.
APPLIANCES WITH SAFETY V
Follow the same procedure described above to ignite the burners.
In this case, however
setting, hold it pressed in for 10 seconds.
If for any reason the burner flame goes out, the safety valve
automatically shuts of
ENERGY SA
• The diameter of the p
the burner
diameter
• Use flat-bottomed pans only
• Whenever possible, keep a lid on the pan while cooking.
Y
• Cook vegetables, potatoes, etc. with as little water as possible
to reduce cooking times.
USE OF THE ELECTRIC OVEN
The first time the oven is used, it may give off acrid smells, caused
by the first heating of isolating panels glue surrounding the oven
(it is necessary to heat up the oven at the maximum
temperature for about 30-40 minutes with closed door).
It is something normal, and in case it will occur
to stop before introducing the food into the oven.
The oven is fitted with: a rod shelf for cooking food contained in
oven dishes or placed directly on the rod shelf itself, a drip-tray
for cooking sweets, biscuits, pizzas, etc., or for collecting juices
and fats from food cooked directly on the rod shelf.
Note: The following tables give the main points for cooking some
of the most important dishes.
in these tables are approximate.
you will be able to adjust the times to get the results you want.
Conventional cooking table T
Fan oven cooking table T
Conversion to LPG
Always isolate the cooker from the electricity supply
gas supply temporarily and proceed as follows.
- change the injectors,
- adjust the minimum flow of the burners.
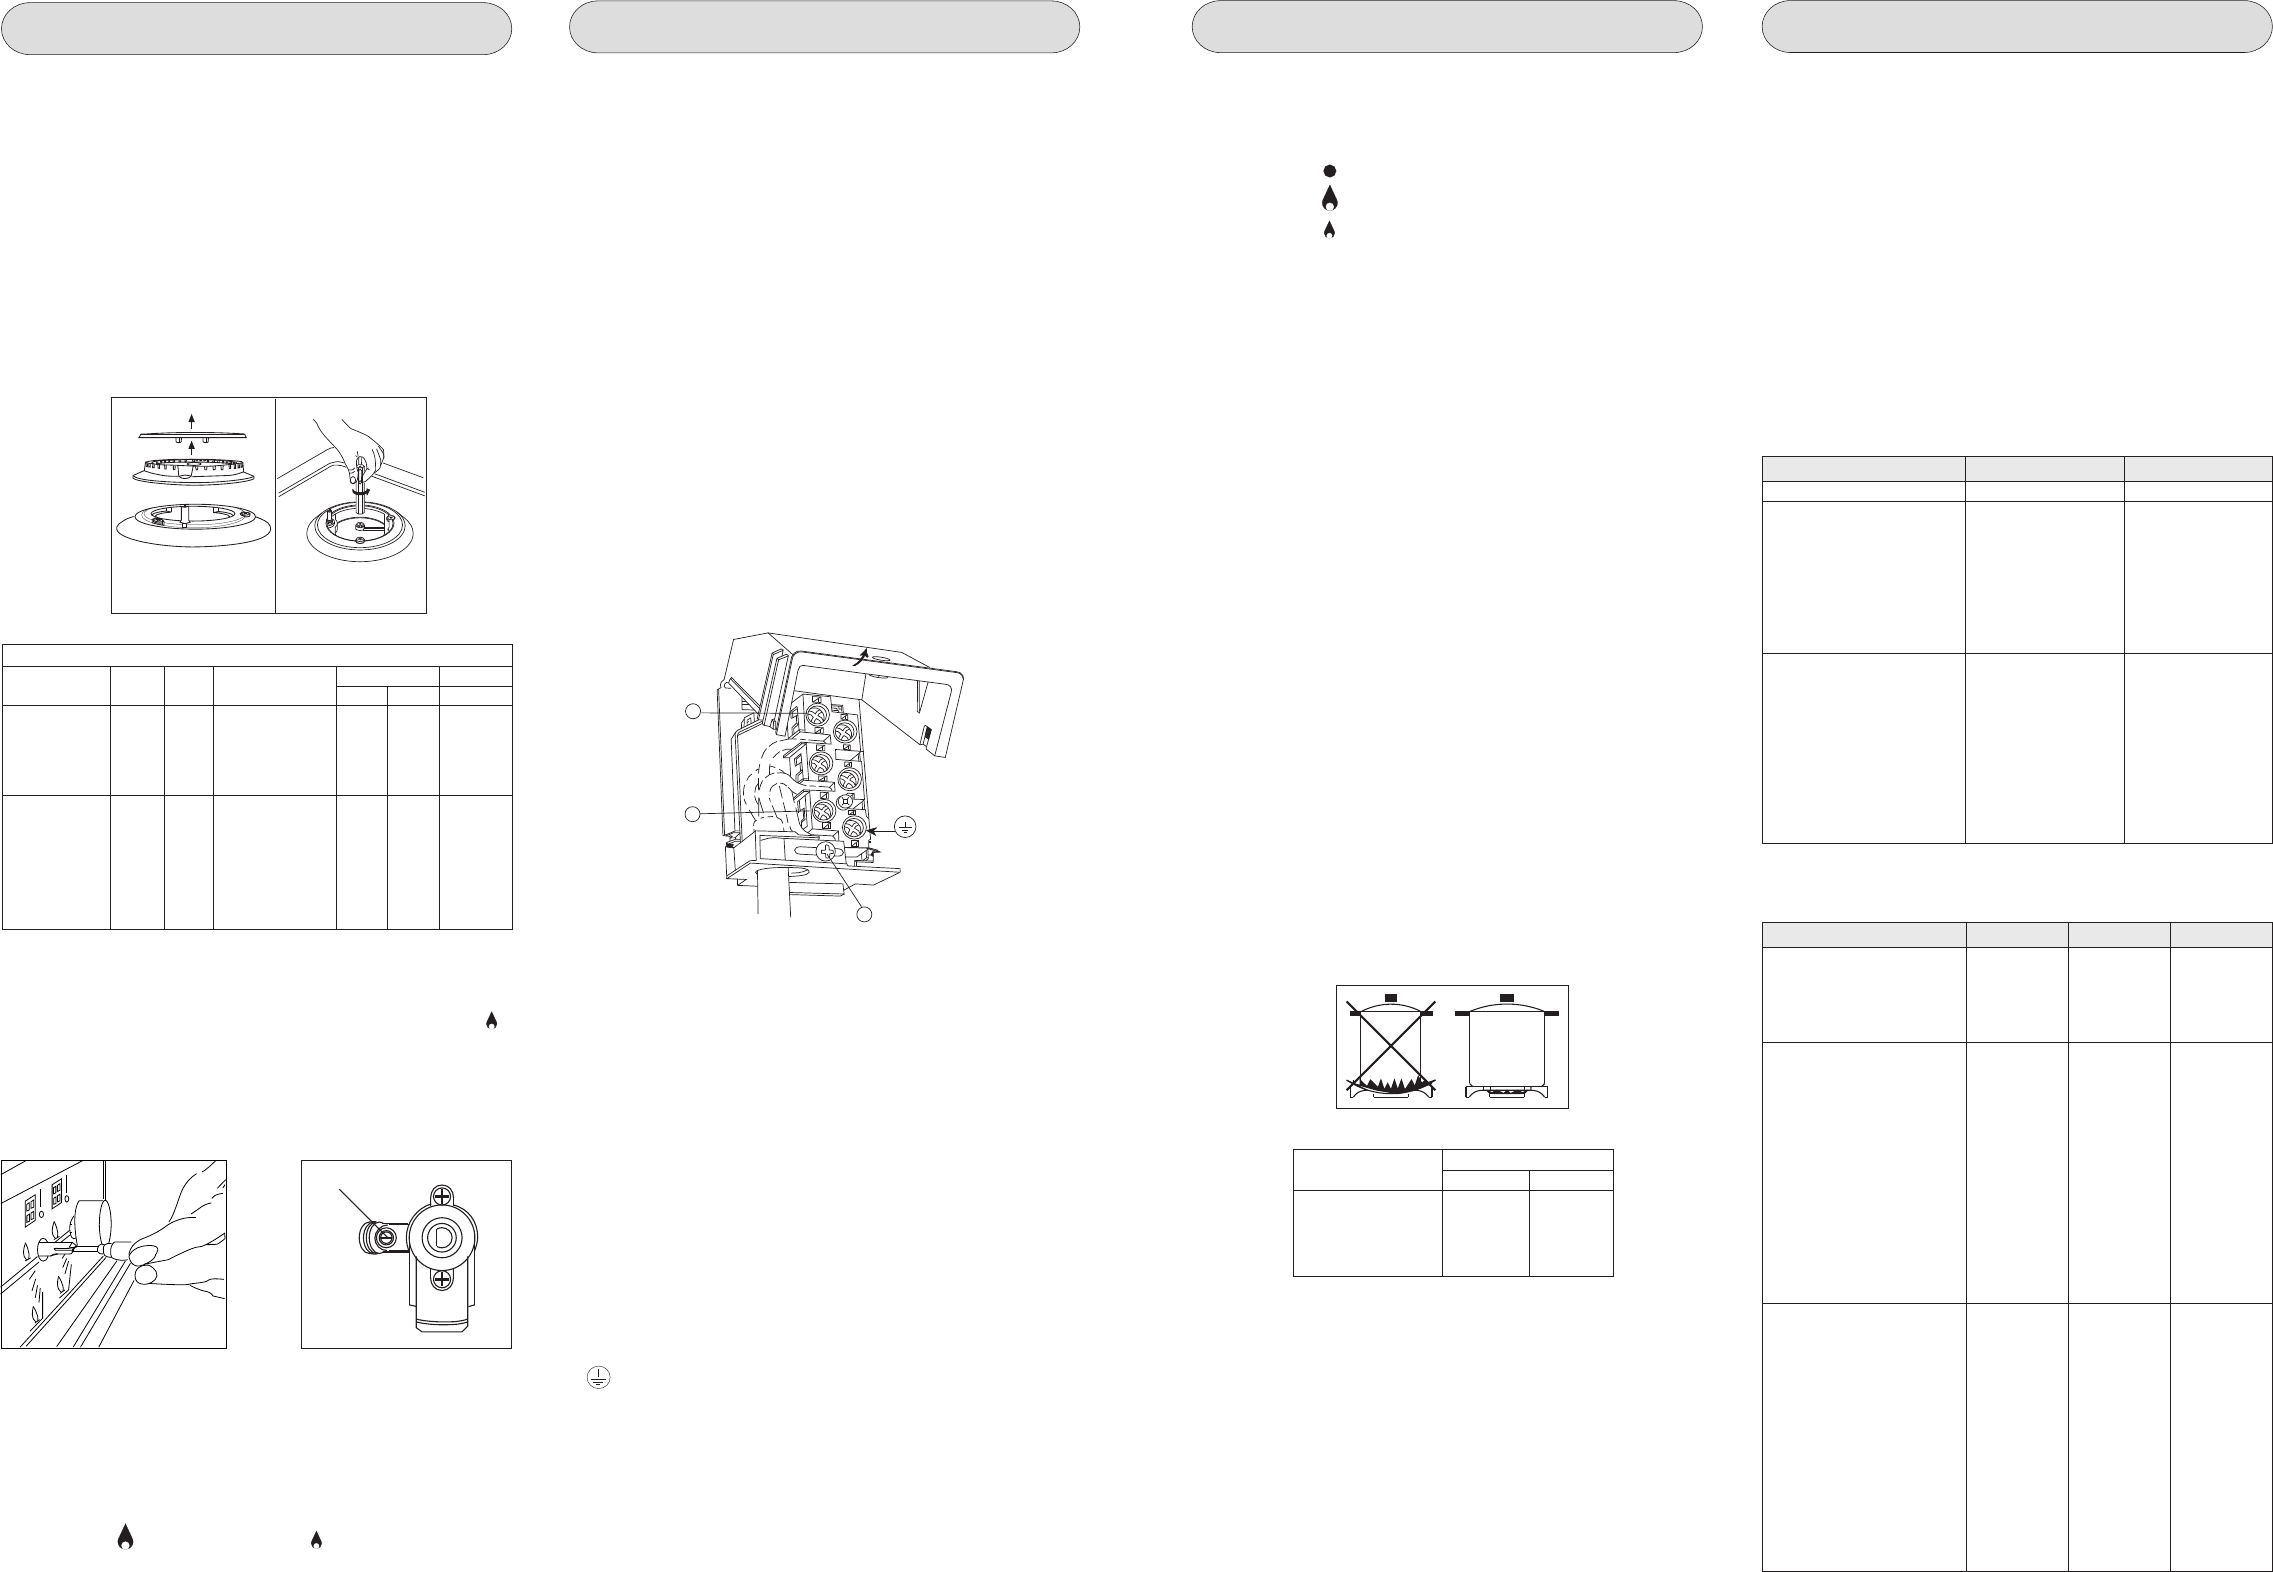
REPLACEMENT OF WORK-TOP
In order to change the work-top injectors, it is necessary to act as
follows: remove the grids, remove burners and flame-spreaders
(see fig.A), change the injector (see fig.B) and replace it with
another one suitable for the new type of gas (see table D). Re-
assemble everything in the opposite direction, paying attention to
place the flame-spreader in the right way on the burner
A B
T GENERAL
Kind of gas mbar Nozzle Burners Power W Consum.
mm/100 Posizione-type max. min. max.
1 -Rapide 3000 750 286 l/h
NA 20 97 -Semi rapide 1750 480 167 l/h
72 -Auxiliary 1000 330 95 l/h
128 -Triple crown 3300 1300 315 l/h
G 30 85 -Rapide 3000 750 219 g/h
BUT 28 65 -Semi rapide 1750 480 128 g/h
PROP 37 50 -Auxiliary 1000 330 73 g/h
93 -Triple crown 3300 1300 241 g/h
Fig. 4 Fig. 5
MINIMUM FLOW
In order to adjust the minimum, act as follows: switch the burner
on, and turn the knob towards the minimum flow position .
Remove the knob from the tap, introduce a little screwdriver in
the tap rod (fig. 4).
Attention: in taps with security valve, the minimum adjusting screw
“Z” is placed outside the rod tap (fig. 5).
Unscrew the adjusting screw in order to increase the flow or screw
it to decrease the flow
The right adjustment is obtained when the flame has a length of
about 3 or 4 mm.
For butane/propane gas, the adjusting screw must be tight screwed.
Make sure that the flame does not go out passing quickly from
the max. flow to the minimum flow .
Assemble the knob again.
IMPORT
The wires in the mains lead are coloured in accordance with the
following code:
GREEN .....EARTH
BLUE .................................
BROWN
REPLACEMENT OF THE CABLE
In case the cable is damaged, replace it in accordance with the
following instructions:
- open the box of the supply board as described on the picture
below;
- unscrew screw “A” fixing the cable;
- replace the cable with one of the same lenght and in accordance
with the features described on the table; switch the appliance
off, and close the gas t
- the ‘green-yellow” earth wire must be connected to the terminal
and it must be about 10 mm longer thean the live wires;
- the “blue” neutral wire must be connected to the terminal marked
with letter “N”;
- the live wire must be connected to the terminal marked with letter
“L”.
ELECTRICAL CONNECTION
This appliance must be installed by a qualified person in
accordance with the latest edition of the IEE Regulations and
in compliance with the manufacturer instructions.
Ensure that the voltage is the same as that stated on the rating
plate. The rating plate can be found on the back cover .
W
The cooker must be connected to a suitable cooker control unit
incorporating a double pole switch having a contact separation
of at least 3mm in all poles, which is adjacent to (but not above),
and not more than1.25m away from the cooker and capable of
electrical isolation.
We recommend that the cooker circuit is rated to 20amp
Cable type HO5 RRF 3X 2.5mm
2
Connecting the mains cable
Open the mains terminal block cover as shown, unscrew screw
“A” the cable clamp and unscrew (not fully) the screws in the
mains terminal block “L
mains cable. Fit the cable and refit screw “A” the cable clamp.
Allow sufficient cable length for the cooker to be pulled out for
cleaning, but do not let it hang closer than 50mm (2”) to the floor
The cable can be looped if necessary
kinked or trapped when the cooker is in position.
Dish T Minutes Weight kg.
Firs courses
Lasagne 200-220 20-25 0,5
Oven pasta 200-220 25-30 0,5
Creole rice 200-230 20-25 0,5
Pizza 210-230 30-45 0,5
Meat
Roast veal 160-180 65-90 1-1,2
Roast pork 160-170 70-100 1-1,2
Roast ox 170-190 40-60 1-1,2
Roast beef joint 170-180 65-90 1-1,2
Roast fillet beef (rare) 180-190 40-45 1-1,5
Roast lamb 140-160 100-130 1,5
Roast chicken 180 70-90 1-1,2
Roast duck 170-180 100-160 1,5-2
Roast goose 160-180 120-160 3-3,5
Roast turkey 160-170 160-240 5 approx.
Roast rabbit 160-170 80-100 2 approx.
Roast hare 170-180 30-50 2 approx.
Fish 160-180 acc. to weight
Sweets (p
Fruit flan 180-200 40-50
Plain sandwich cake 160-180 35-45
S 200-220 40-45
S 200-230 25-35
Currant cake 230-250 30-40
Buns 170-180 40-60
S 160 25-35
Cream slices 180-200 20-30
Apple fritters 180-200 18-25
S 170-180 30-40
S 150-180 50-60
T 230-250 7
Bread 200-220 40
Dish T Minutes
Fish 180-240 acc. to size
Meat
Roast ox 250 30 per kg.
Roast veal 200-220 30 per kg.
Chicken 200-240 50 about
Duck and goose 220 acc. to weight
Leg of mutton 250 30 per kg.
Roast pork 250 60 per kg.
Soufflets 200 60 per kg.
Sweets (p
T 160 50-60
S 160 30-50
Shortcrust pastry 200 15
Puff pastry 250 15
Fruit flan 200-220 30
Meringues 100 60
Quiches, etc. 220 30
4 quarters 120-140 60
Buns 160-180 45
BURNERS P
Ø min. Ø max
RAPIDE 180 mm 220 mm
SEMIRAPIDE 120 mm 200 mm
AUXILIARY 80 mm 160 mm
TRIPLE CROWN 220 mm 260 mm