INDOOR & OUTDOOR
WIRELESS FL
USER MANUAL WOFL-150
© DREAM-LED WOFL-150 - VERSION 1 - 07/2018
GB NL FR D
PARTS & ELEMENTS
ENGLISH
Copyright © DreamLED® . DreamLED® is a registered trademark of TE-Group NV.
The DreamLED® brand stands for superior product quality and outstanding customer
service. That is why DreamLED® warrants this product against all defects
in material
and workmanship for a period of two (2) years from the date of original purchase of
the product. The terms of this guarantee and the extent of responsibility of DreamLED
under this warranty can be downloaded from the website: www.dream-led.eu.
As a consumer, you are legally obligated to dispose of or return empty
batteries! Batteries marked with the Recycling symbol and bearing
the symbol of the crossed out rubbish bin must never be put into the
domestic trash! You can hand in your batteries at the public collection
points in your local authority or anywhere where batteries of the type
involved are sold. This product contains valuable raw materials, which
can be recycled. Please hand in this product at your waste collection
point or your local authority.
The lighting tting is designed, produced and tested in accordance
with the strictest European safety standards.
The luminaire is suitable for indoor & outdoor use.
Copyright © Dreamled® . Dreamled® is een gedeponeerd handelsmerk van TE-
Group NV. Het merk Dreamled® staat voor producten van superieure kwaliteit en
een uitstekende klantenservice. Daarom garandeert Dreamled® dat dit product vrij
is van materiaal- en fabricagefouten gedurende een periode van twee (2) jaar na de
oorspronkelijke aankoopdatum van het product. De voorwaarden van deze garantie
en de omvang van de verantwoordelijkheid van Dreamled® onder deze garantie kunt
u downloaden vanaf de website: www.dream-led.eu.
Als consument bent u wettelijk verplicht gebruikte batterijen correct
af te danken of terug te geven. Met een Recyclage-symbool en een
doorstreepte vuilbak gemerkte batterijen mogen niet bij het gewone
huisvuil worden geworpen. U kunt uw lege batterijen afgeven bij de
inleverpunten van uw gemeente of overal waar batterijen van de
betreffende soort worden verkocht. Dit product bevat waardevolle
grondstoffen die verder verwerkt kunnen worden. Breng dit product
dan ook naar een sorteercentrum in uw stad of gemeente wanneer
u het afdankt.
Het armatuur is ontworpen, geproduceerd en getest volgens de
strengste Europese veiligheidsnormen.
Geschikt voor binnen- & buitengebruik
See illustration I
1. Lampshade with built-in LED base
2. Lamp foot base
3. Adapter + Connection cable (3m) with plug
USE OF THE RF REMOTE CONTROL
Note: One remote control can be paired to max. 8 LED lights in a range of max. 15~20 meters.
To pair the remote control with extra LED lights: Turn off the light and press and hold the ON/
OFF/
1x any button on the remote control to establish the pairing connection.The light will flash 2x in
green color to confirm that the pairing with the remote control has been successful.
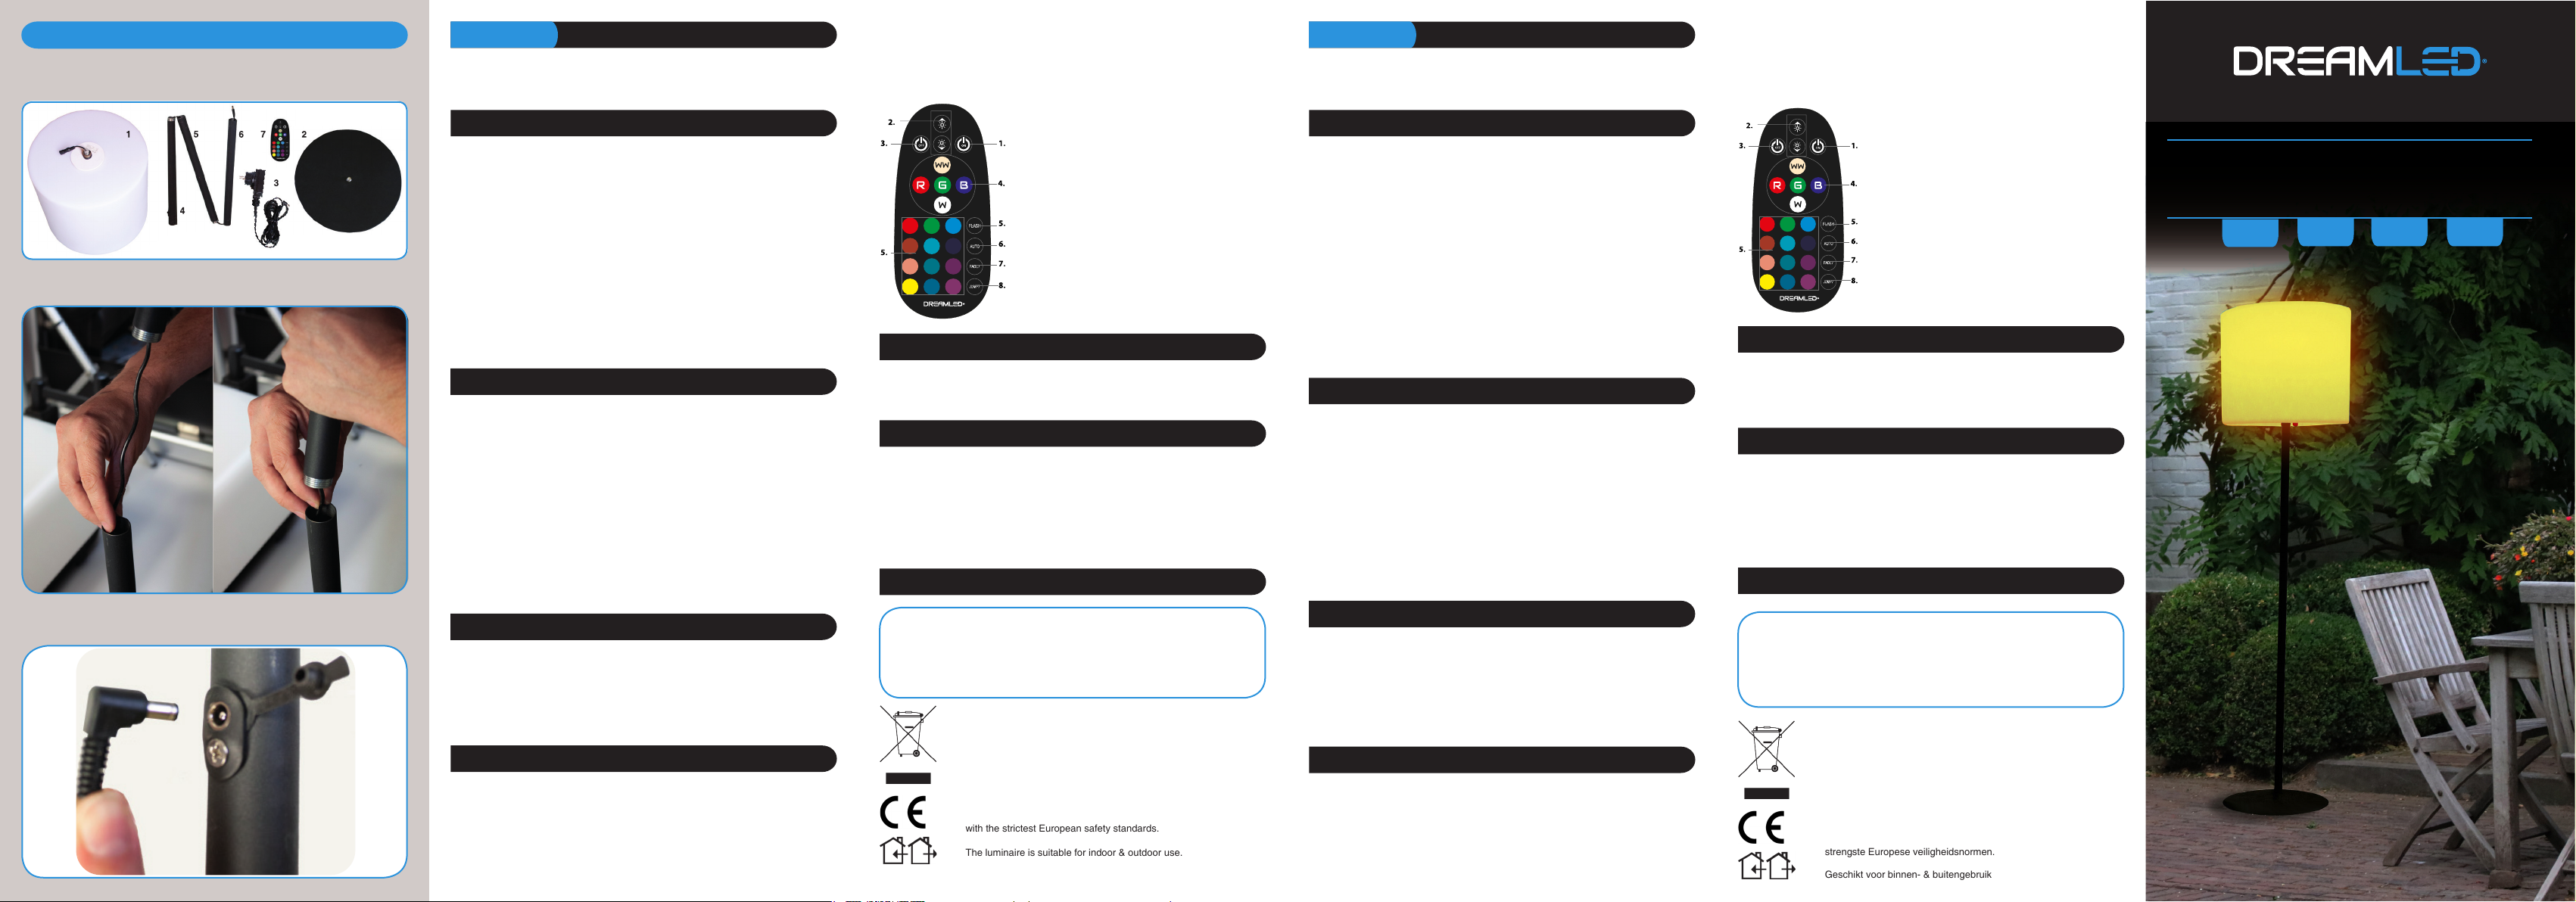
1. ON: Turn the LED Floorlamp ON
2. DIM-keys: Brighten or darken the chosen color
3. ON: Turn the LED Floorlamp OFF
4. Main colors: Red, green, blue, white and warm white
5. Predefined colors: Change the main colors
6. FLASH: The LED Floorlamp will flash in white color (*)
7. AUTO: All available light effects are shown one by
one (*)
8. FADE 7: 7 colors of the LED Floorlamp will slowly
change, from one color shade to another, without
flashing (*)
9. JUMP 7: 7 colors of the LED Floorlamp will change
quickly (*)
(*) The brightness of these light effects can be adjusted
using the DIM buttons (2).
SAFETY PRECAUTIONS
INSTALLATION
CHARGING
ILLUSTRATIONS
OPERATION
illustration I
CLEANING
TECHNICAL SPECIFICATIONS
• Lampshade material: PE white
• Lampshade size: 34x34x30 cm
• Steel pole with black outdoorcoating
– corrosion free
• Lamp base diameter: 30 cm
• Lamp height: 150cm
• Weight: 7310g
• Color: Black/white
GUARANTEE
illustration II
illustration III
ONDERDELEN
NEDERLANDS
4. Bottom stand pole
5. Middle stand pole
6. Top stand pole
7. RF remote control
• Make sure you switch off the power before installation.
• Do not install when it is raining.
• Make sure that cables cannot cause a trip hazard.
• Do not immerse the product in water.
• Do not cover the unit during use, make sure there is sufficient ventilation.
• Do not use the unit if you suspect that it is damaged. Do not try to open or repair the
unit yourself. To avoid considerable subsequent damage to the device, only let a
qualified expert repair the unit otherwise the warranty will be void.
• Keep the light away from children, it is not a toy. Keep the packaging materials away from
children. Danger of suffocation! The packaging contains small parts that can be swallowed.
• Avoid direct eye contact with the unit, the light beam might hurt your eyes.
• When in use, make sure to avoid extremely high or low temperatures.
• The LED source is not replaceable. The LED’s contained in this lamp shall only be
replaced by the manufacturer, his service agent or a similar qualified person.
• If the external flexible cable or cord of the luminaire is damaged, it shall be exclusive-
ly replaced by the manufacturer or his service agent or a similar qualified person in
order to avoid a hazard.
• T
he minimum distance from the luminaire to any lighted objects shall be kept at least 0.3 m.
1. Check if the lamp is complete according to the packaging contents described above.
IMPORTANT: Do not connect the power cable into the power outlet yet!!
2. Place the lampshade upside down on the floor. Make sure it is placed on a soft
surface (soft cloth or towel).
3. Connect the plug coming out of the top stand pole (6) to the connector at the bot-
tom of the lamp shade (1). Screw the top stand pole (6) on the lamp shade (1).
IMPORTANT: Only turn the top stand pole by hand and keep the lampshade with the
LED base in position with your other hand so the wire will not be twisted.
4. Now screw the middle stand pole (5) into the top stand pole (6).
IMPORTANT: Only turn the middle stand pole by hand and keep the top stand pole
with the LED base in position with your other hand so the wire will not be twisted.
5. Take the bottom stand pole (4) in one hand and push the wire inside the middle pole
(5). See illustration II. Then screw the bottom stand pole (4) onto the middle stand
pole (5) and make sure that the connection wire will be free so it will not twist and
lock during the process.
6. Take the complete pole with the power connection in 1 hand and screw it on the lamp
foot base (2). Make sure it is fixed firmly.
See illustration III
Connect the adapter to the charging socket inside the bottom stand pole (4) of the Floor-
lamp and plug into an outlet with an input voltage of 110V-240V AC. The LED indicator on
the adapter will be red. The indicator light will turn green when fully charged.
Note: When the lamp is fully charged but not in use (standby mode), it will still use power.
This means that the battery capacity will go from 100% down to 0% within a certain period
of time. Exact time depends on the last used settings. Please recharge first when needed.
USE OF THE BUTTONS AT THE BOTTOM OF THE LAMP SHADE
• Switch ON the light by pressing the ON/OFF/SELECT COLOR button.
• When the lamp is ON, short press the ON/OFF/SELECT COLOR button to select
a color and/or setting. Each short press leads you to the next setting (settings as
described for the remote control).
• Press and hold the DIM button to increase and/or decrease the brightness.
• Switch OFF the light by pressing the ON/OFF/SELECT COLOR button for a few secs.
Unplug the unit at the main power socket before cleaning. Do not use any solvent based
cleaning agents, only a soft, dry anti-static cloth. Ensure that no liquid enters the luminaire.
Dry the lamp well before turning it on again. This lamp is IP44 rainproof.
• LED: RGB + WW dimmable
• LED power: 450 Lm max.
• Input: 230~240V 50Hz
• Color temperature: 2700 ~ 3000 K
(warm white)
• Beam angle: 360°
• LED life: > 25000 hours / A+
• Protection class: IP44 rainproof
Zie illustratie I
1. Lampenkap met ingebouwde LED-basis
2. Lampvoet
3. Adapter + verbindingskabel (3 m) met connector
GEBRUIK VAN DE RF AFSTANDSBEDIENING
Opmerking: Eén afstandsbediening kan worden gekoppeld aan max. 8 LED lampen binnen
een bereik van max. 15 ~ 20 meter. De afstandsbediening koppelen met extra LED lampen:
Schakel de lamp uit en houd de ON / OFF / SELECT COLOR knop ongeveer 6-7 sec.
ingedrukt tot de lamp rood begint te knipperen. Druk vervolgens 1x op een willekeurige
knop op de afstandsbediening om de koppeling tot stand te brengen. De lamp zal 2x groen
knipperen om te bevestigen dat de verbinding succesvol tot stand is gebracht.
1. ON: De vloerlamp aanschakelen
2. DIM-toetsen:
Gekozen kleur helderder of donkerder maken
3. OFF: De vloerlamp uitschakelen
4. Hoofdkleuren: Rood, groen, blauw, wit en warm wit
5. Vooraf gedefinieerde kleuren: Maken het mogelijk de
hoofdkleurtinten te wijzigen
6. FLASH: De vloerlamp knippert in de witte kleur (*)
7. AUTO: Alle beschikbare lichteffecten worden een voor
een afgespeeld (*)
8. FADE 7: Laat 7 kleuren van de voetlamp langzaam
veranderen, van de ene kleurtint naar de andere,
zonder te knipperen (*)
9. JUMP 7: Laat 7 kleuren snel veranderen (*)
(*) Voor al deze lichteffecten kan de helderheid ingesteld
worden met behulp van de DIM-toetsen (3).
VEILIGHEIDSINSTRUCTIES
INSTALLATIE
OPLADEN
WERKING
ONDERHOUD
TECHNISCHE SPECIFICATIES
GARANTIE
4. Onderste paal
5. Middelste paal
6. Bovenste paal
7. RF-afstandsbediening
• Schakel de stroom uit voordat u de installatie aanvangt.
• Installeer het apparaat niet als het regent.
• Zorg ervoor dat de kabels geen gevaar voor struikelen vormen.
• Dompel de lamp niet onder in water.
• Dek het toestel niet af tijdens het gebruik, zorg ervoor dat er voldoende ventilatie is.
• Gebruik het apparaat niet als u vermoedt dat het beschadigd is. Probeer het apparaat
niet zelf te openen of te repareren. Om gevolgschade te voorkomen mogen enkel gespe-
cialiseerde experts reparaties uitvoeren aan het product anders zal de garantie vervallen.
• Houd de lamp uit de buurt van kinderen, het is geen speelgoed. Houd het
verpakkingsmateriaal uit de buurt van kinderen vanwege verstikkingsgevaar! De
verpakking bevat kleine onderdelen die door kinderen kunnen worden ingeslikt.
• Vermijd direct oogcontact met de lamp, de lichtbundel kan uw ogen pijn doen.
• Vermijd extreem hoge of lage temperaturen tijdens het gebruik.
• De LED lichtbron is niet vervangbaar. De LED’s in deze lamp mogen alleen worden
vervangen door de fabrikant of zijn servicedienst dan wel door een gelijksoortig
gekwalificeerde persoon.
• Als de externe flexibele kabel of het snoer van deze lamp beschadigd is zal deze
uitsluitend worden vervangen door de fabrikant of zijn servicedienst dan wel door
een gelijksoortig gekwalificeerde persoon ter vermijding van gevaar.
• De minimale afstand van de lamp tot de verlichte voorwerpen moet minstens 0,3 m zijn.
1. Controleer of de lamp compleet is volgens de verpakkingsinhoud hierboven beschreven.
BELANGRIJK: Steek de stekker nog niet in het stopcontact!
2. Plaats de lampenkap ondersteboven op de vloer. Zorg ervoor dat deze op een zacht
oppervlak wordt geplaatst (zachte doek of handdoek).
3. Sluit de stekker die uit de bovenste paal (6) komt aan op de connector aan de
onderkant van de lampenkap (1). Schroef de bovenste paal (6) op de lampenkap (1).
BELANGRIJK: Draai enkel de bovenste paal met de hand en houd de lampenkap
met de LED-basis in positie met uw andere hand zodat de draad niet wordt gedraaid.
4. Schroef nu de middelste paal (5) in de bovenste paal (6).
BELANGRIJK: Draai enkel de middelste paal met de hand en houd de bovenste paal
met de lamphouder in positie zodat de draad niet wordt gedraaid.
5. Neem de onderste paal (4) in 1 hand en duw de draad in de middelste paal (5). Zie
illustratie II. Schroef dan de onderste paal (4) op de middelste paal (5) en zorg ervoor
dat de aansluitkabel vrij is zodat deze niet draait en vast komt te zitten.
6. Houd de volledige staander met de stroomaansluiting in 1 hand en schroef deze op de
lampvoet (2). Zorg ervoor dat alles stevig vast zit.
Zie illustratie III
Sluit de adapter aan op het laadcontact in de onderste paal (4) van de vloerlamp en
steek deze in een stopcontact met een ingangsspanning van 110V-240V AC. Het LED
indicatielampje op de adapter is rood. Het indicatielampje wordt groen als de lamp volledig
is opgeladen.
Opmerking: wanneer de lamp volledig is opgeladen maar niet in gebruik (standby-
modus), zal deze nog steeds stroom verbruiken. Dit betekent dat de batterijcapaciteit
binnen een bepaalde tijd van 100% naar 0% gaat. De exacte tijd is afhankelijk van de
laatst gebruikte instellingen. Laad eerst als dat nodig is.
GEBRUIK VAN DE KNOPPEN AAN DE BODEM VAN DE LAMPENKAP
• Schakel de lamp aan door op de ON / OFF / SELECT COLOR knop te drukken.
• Als de lamp brandt, drukt u kort op de ON / OFF / SELECT COLOR knop om een
kleur en/of instelling te selecteren. Elke druk op de knop leidt u naar de volgende
instelling (instellingen zoals beschreven voor de afstandsbediening).
• Houd de DIM-knop ingedrukt om de helderheid te verhogen en/of te verlagen.
• Schakel de lamp UIT door een paar seconden op de ON / OFF / SELECT COLOR
knop te drukken.
Haal de stekker uit het stopcontact voordat u de lamp schoonmaakt. Gebruik geen
reinigingsmiddelen op basis van oplosmiddelen, alleen een zachte, droge anti-statische
doek. Zorg ervoor dat er geen vloeistof in de armatuur komt. Droog de lamp goed voordat
u deze weer inschakelt. Deze lamp is IP44 regenbestendig.
• LED: RGB + WW dimmable
• LED vermogen: 450 Lm max.
• Input: 230~240V 50Hz
• Kleurtemperatuur: 2700 ~ 3000 K
(warm wit)
• Stralingshoek: 360°
• LED levensduur: > 25000 uren
• Beschermingsklasse: IP44
• Materiaal lampenkap: PE wit
• Afmetingen lampenkap: 34x34x30 cm
• Stalen staander met zwarte outdoor
coating - corrosievrij
• Lampvoet: diameter 30 cm
• Lamphoogte: 150cm
• Weight: 7310g
• Kleur: Zwart / Wit