Gas detected
Carbon Monoxide
Sensor
technology
Electrochemical Cell
XC70:
XC100,
Third party
approvals
EN50291-1:2010
EN50291-2:2010
BSI Kite marked KM 565387
Other
compliances
RoHS,
Self test
Every 60 minutes
Lifetime and
warranty
XC70:
XC100,
T
-10°C to +45°C
Humidity
25 - 95% RH (non-condensing)
IP rating
IP44
Power supply
Long life lithium battery,
of the product (no replacement necessary)
Visual
indicators
Power:
Alarm:
Fault:
Ventilate:
Audible
> 90 dB @ 1 m
Contents:
• CO alarm
• Wall mounting plate
• Fixing nail
• Instructions (this document)
Caution: The alarm must be connected to the wall mounting
plate to switch it on.
The alarm can be free standing (e.g.
xed to a wall or ceiling.
either hooked onto the nail provided,
appropriate wall plugs and screws (not provided).
After you have carefully read all instructions and your alarm still
fails to work,
in the
able to resolve your problem quickly
local supplier
If the product needs to be returned for repair or replacement,
it in a padded box with a letter describing the fault and postage
paid.
switched off.
A proof of purchase must be provided to claim repair under
warranty
15.
10.
7.
9.
17 18 19 20
21 22 23 24
25 26 27 28
29 30 31 32
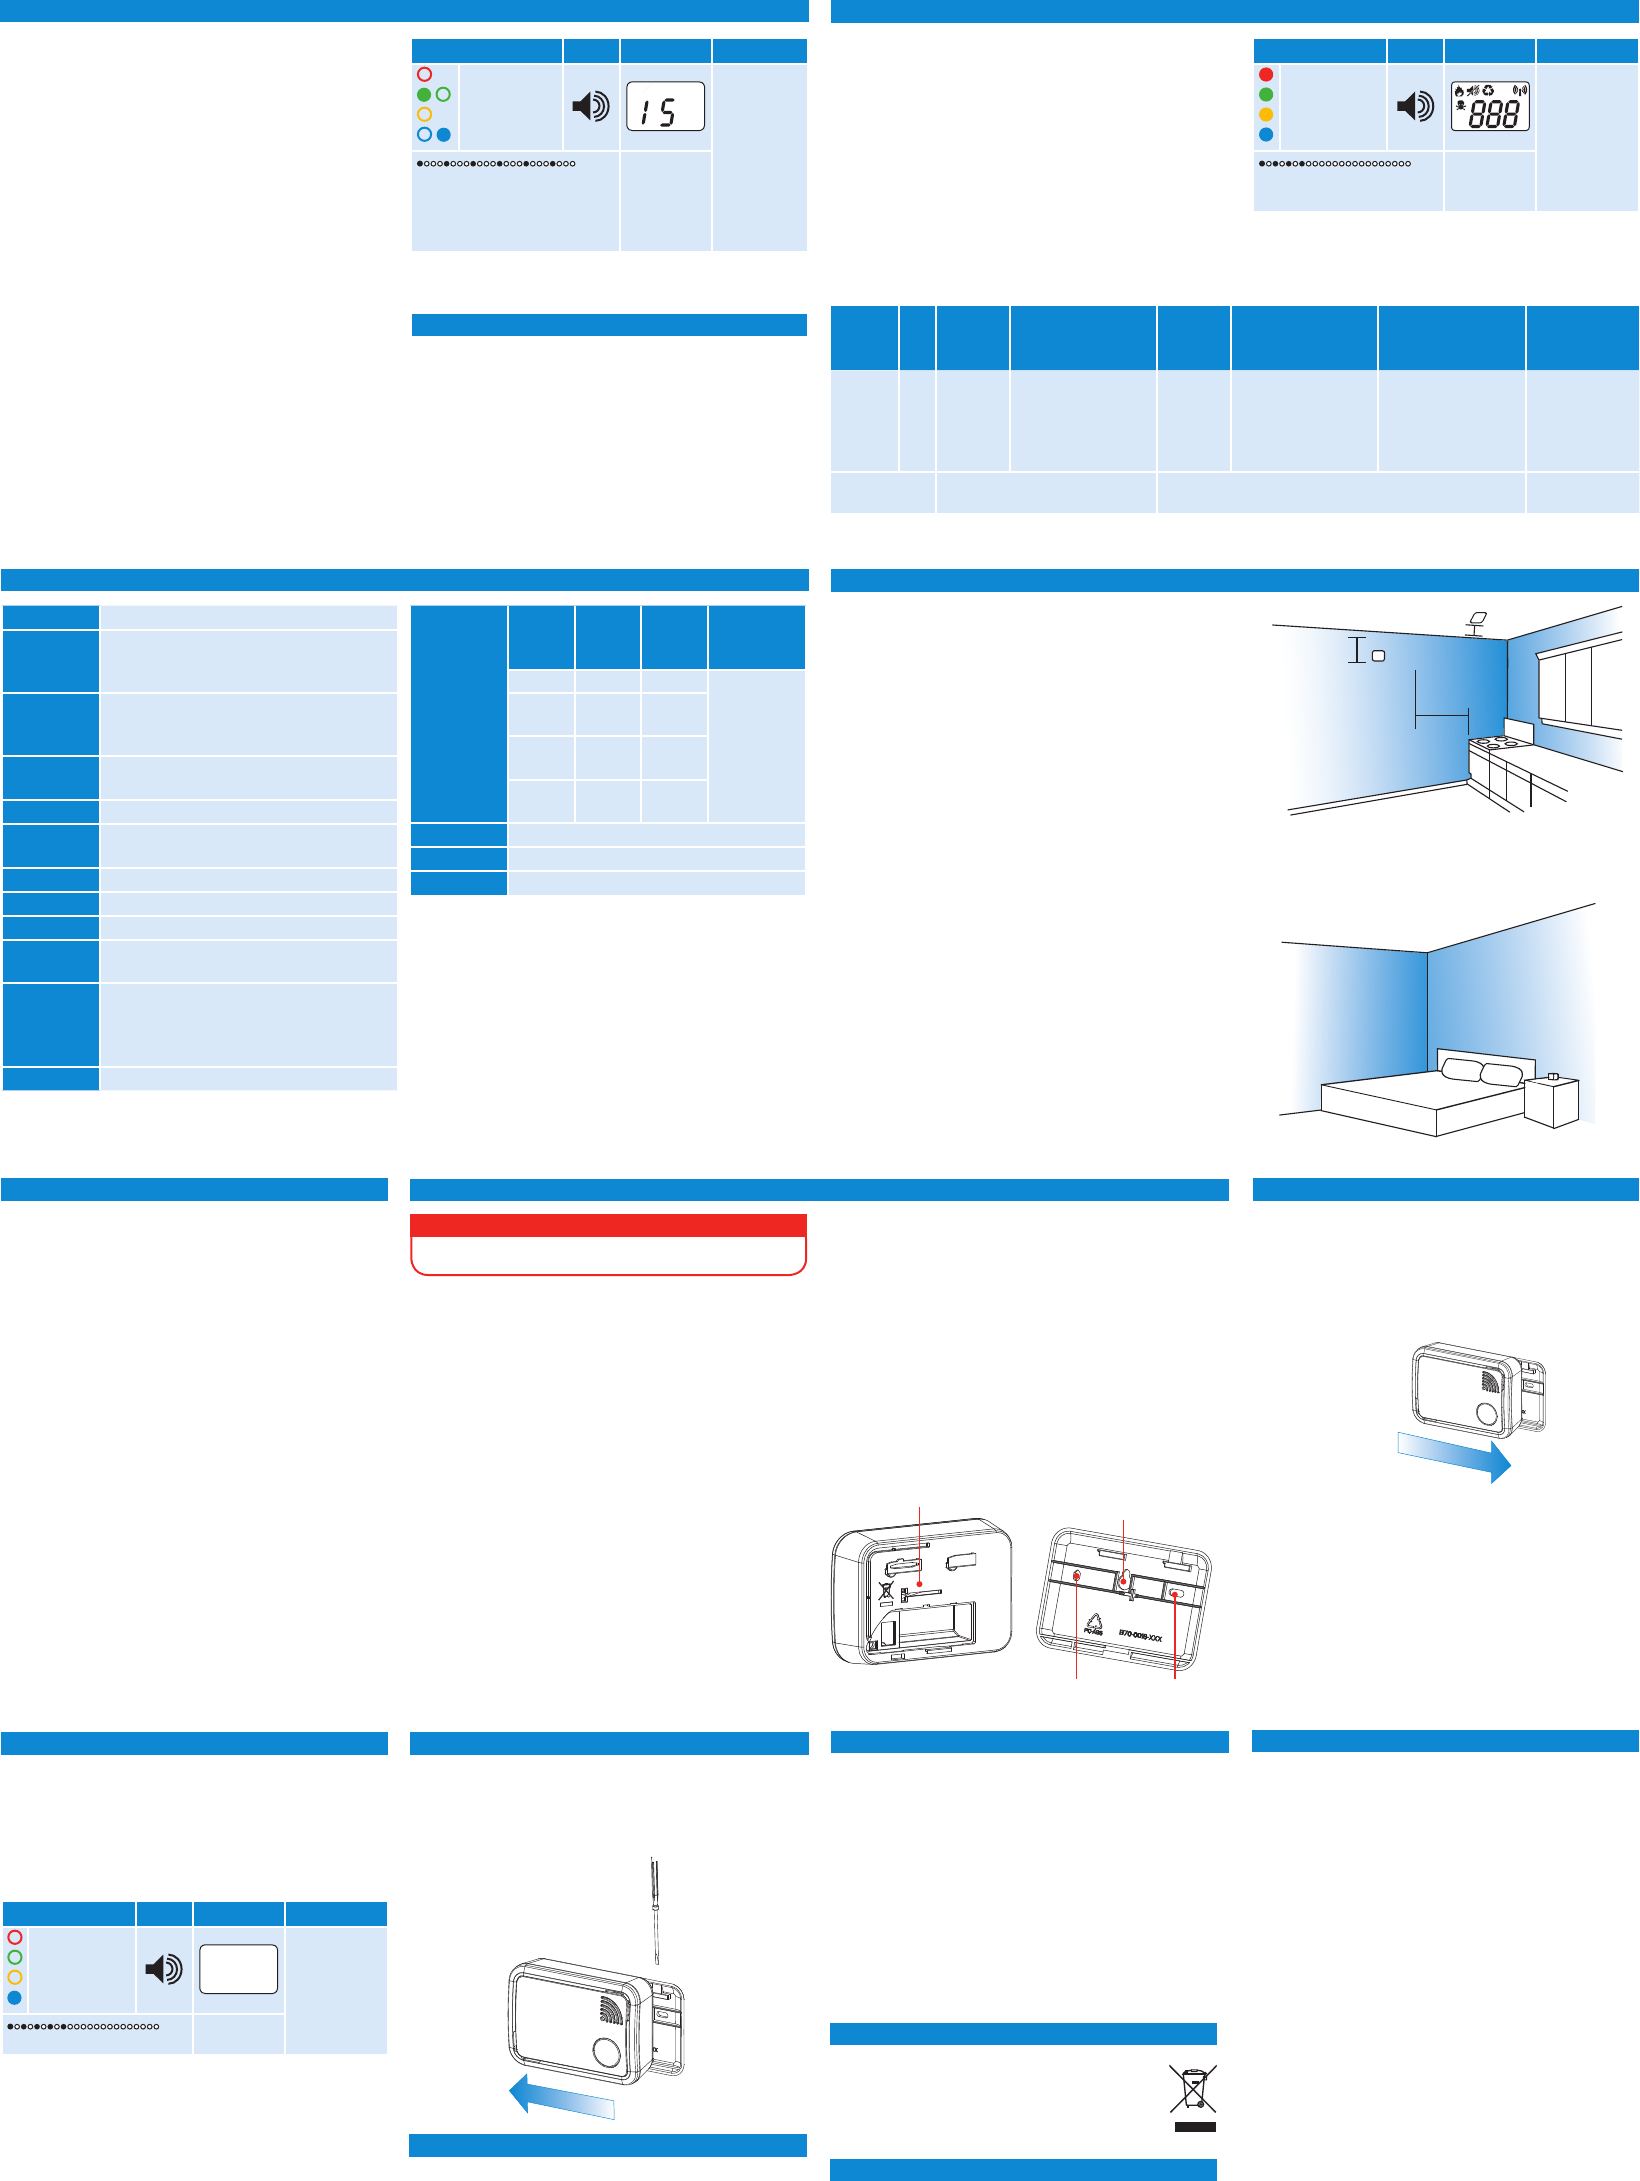
Ideally
fuel-burning appliance. It is strongly recommended to also t
alarms in bedrooms,
If the alarm is being tted in the same room as a fuel-burning
appliance:
• It should be located close to the ceiling and at a height greater
than the height of any door or window
• A ceiling mounted alarm should be at least 300 mm from any
wall,
from the ceiling.
proof locking tab.
• The alarm should be at a horizontal distance of between 1 m
and 3 m from the nearest edge of the potential source
If the alarm is being tted in a room without a fuel-burning
appliance it should be located relatively close to the breathing
zone of the occupants.
For premises such as bedsits,
accommodation is a single living space incorporating the sleeping
area,
appliances as possible but near to where the person sleeps.
Warning
The apparatus should be installed by a competent person.
8.
At least 30 cm
CO Alarm
1 m to 3m
At least 15 cm
CO Alarm
The alarm should not be installed:
• In any outside location or where the temperature may drop
below -10°C or exceed 45°C
• In an enclosed space or where it can be obstructed
• Directly above a sink or in the immediate vicinity of a cooking
appliance
• Next to a door or window,
• Where dirt and dust may block the sensor
• In a damp or humid location
For quick wall mounting:
1. Place the wall mounting plate where you want to mount the
alarm
2. With a pencil,
3. T
For tamper proof wall or ceiling mounting:
1. Place the wall mounting plate where you want to mount the
alarm
2. With a pencil,
3. Drill holes of diameter 5 mm and insert appropriate wall plugs
4. Screw the mounting plate to the wall/ceiling
12.
T
indication of a dangerous CO condition, press the TEST/HUSH
button ve times during the rst 30 seconds after switching on
the alarm.TEST/HUSH
button is pressed.VENTILA
light will ash ve times in conjunction with short chirps.
Lights Sound Display* Meaning
Alarm (red)
Power (green)
Fault (yellow)
Ventilate (blue)
Pre-alarm
function was
activated
sucessfully
5 times within 4 seconds
Blank
If activation is not successful, switch off the alarm and try again.
T
alarm,
TEST/HUSH button.
activated, briey press the TEST/HUSH button.
is activated, the green POWER and the blue VENTILA lights
will ash once together
only the green POWER light will ash.
13.
The alarm is switched off by removing it from the wall mounting
plate. Use a suitable tool such as a small screwdriver to press on
the tamper proof tab located at the top right edge of the alarm,
and then slide the alarm to the left to remove it from the wall
mounting plate.
11.
Note:
during the rst 30 seconds after switching on the alarm.
The alarm is switched on by clipping it into place in the wall
mounting plate.
Caution: Even if your alarm is free standing,
the wall mounting plate.
1. Fit the alarm onto the wall mounting plate approximately
10 mm to the left of centre
2. Press rmly against the wall plate and slide the alarm to the
right
3. T
4. All lights will ash in sequence and the sounder will chirp to
indicate that the alarm has been activated.
5. The green light will blink once per minute indicating that the
alarm is operating
6 T
The CO
EN 50291-1
monoxide in domestic premises”
apparatus for continuous operation in a xed installa
recreational vehicles and similar premises including recreational
craft”.
Restriction of Hazardous Substances Directive (RoHS).
16.
This Carbon Monoxide alarm is designed to alert you to a
potentially dangerous build-up of Carbon Monoxide gas.
designed to remedy a Carbon Monoxide problem nor to locate a
specic source of Carbon Monoxide.
to pay for any Carbon Monoxide investigation or ser
carried out or arranged in response to an alarm.
17.
14.
Honeywell warrants your new CO alarm for seven years
(XC70 model) or ten years (XC100 and XC100D models) from
the date of purchase by the end user or until the expiry da
on the side of the unit,
specications as set out in this instruction manual.
We will,
product,
in either materials or workmanship within the warranty period.
We shall be under no obligation to repair or replace units which
are found to be defective in any way due to unreasonable use or
neglect,
with the user manual or if the product has been tampered with or
found to have been dismantled.
This warranty is instead of and excludes all warranties implied
by law,
warranty is capped at the price of the product.
In no event are we liable for (a) any direct, indirect,
consequential loss; (b) any loss arising from business
interruption; (c) loss of prots; (d) loss of revenue; (e) loss of use
of any property or capital; (f) loss of anticipated sa
of data.
18.
6.
4.
Low Level Monitoring Mode
Normally
a gas concentration higher than 43 ppm has been present for a
period of time.
mode,
mode is activated, the alarm will signal the presence of a CO
level higher than 10 ppm immediately
T
test button for 18 seconds.
high volume tests will be active).
green and a blue light ash and hear a short chirp and you can
release the button.
for 60 minutes,
every 4 seconds.
CO concentrations higher than 10 ppm will be indicated by
a ashing blue ventilate light. XC100D will also display the
CO concentration level.
The low level monitoring mode will end automatically after
60 minutes or by pressing the button at any time.
Alarm levels
PPM Full
Alarm
Pre-
Alarm
Low Level
Monitoring
Mode
≥ 10 - -
Immediately
≥ 43 ~ 75
minutes
~19
minutes
≥100 ~25
minutes
~ 6
minutes
≥ 300 ~90
seconds
~ 23
seconds
Dimensions
100 mm x 72 mm x 36 mm
Weight
133 g
Installation
Free standing,
When the unit has come to the end of its life,
it in accordance with local regulations. It is c
electronic waste and contains a battery and therefore
should be disposed of separately from household waste.
T
Press the
button for
1 s 2 s 3 s 4 s 5 s 6s 7s 8s 9s 10s 11s 12s 13s 14s 15s 16s 17s 18+s
Unit mode Green Flash
+ chirp
Y
+ chirp
Blue Flash
+ chirp
Reduced volume alarm
pattern
Pause High volume alarm pattern Pause Low level monitoring
mode start indication:
Green Flash +
Blue Flash + chirp
Done even if button released Will go back to Normal mode as soon as button released Button may be
released
Hanger key-hole
for non-permanent
wall mounting
Discreet ON/OFF switch, activates
when mounted to wall bracket
Wall mount screwholes
CO Alarm
The CO alarm does not require any maintenance other than to
clean the outside case occasionally with a c
the holes on the front of the unit are not blocked with dust or dirt.
Some common household substances can affect the sensitivity of
the CO alarm.
or aerosol sprays on or close to the alarm.
polish remover
5.
Lights Sound Display* Meaning
Alarm (red)
Power (green)
Fault (yellow)
Ventilate (blue)
All light and
sound signals
are working
Each light ashing
sequentially with a chirp
All icons
shown
*only available on XC100D
Lights Sound Display* Meaning
/
/
Alarm (red)
Power (green)
Fault (yellow)
Ventilate (blue)
Green power
light ashing
= Low level
monitoring
mode.
Blue Ventilate
light ashing
= CO detected
Green/blue light ashing every
4 seconds.
One short chirp when CO rises
above 10 ppm
Current CO
concentration
*only available on XC100D
Automatic self-test
Y
electronics,
Monthly T
The CO alarm should be tested once per month,
visual and audible signals are working.
Press the test button for 1 second to activate a full test cycle
showing all lights/messages (green, yellow
the audible output at a reduced level. If you wish,
button for 10 seconds to test with the full 85dB sound level.