This manual is valid for control panel J A-83K The control pa ne l can be configured by a P C run ning OLink software.
JA-83K control pan el installation manu al - 3 - MKG51101
Device installation shall only be undertaken by
qualified technic ians holding a t raining
certificate issued by an au th orized distributo r .
The manufacturer cannot be he ld responsible
for any damage o r co nsequences relate d to the
improper or incorrect installation of this
product
1 Control panel architecture
The JA-83K contr ol panel is a modula r unit, with 50 add resses (marked
01 to 50). The heart of t he unit is the JA-83K mai n board with 10 w ired inputs.
The follow ing additional mod ules can be p lugged into this board:
JA-82R – a radi o module which m akes it possi ble to enrol up to 50
wireless dev ices of th e JA-8x and R C-8x range t o the contr ol panel.
JA-82C – an extensio n module whic h provides 10 additional w ired
inputs, thus extending the to tal capacity to 20 (or 3 0 as the case m ay
be) wired inp uts. One or tw o modules can b e used.
A communicator can also be us ed with the control panel:
JA-8xY – a GSM communicator which the contr ol panel uses for
transmi t ting alarm re po rts to the us er and whi c h communic a tes with th e
ARC (alarm receiv ing centre) v ia the GSM band. It also enables rem ote
access via a pho ne keypad, or sy stem administr ation via the GSMLin k
website (JA-80Y only) or via O link software runnin g on an internet
enabled com puter (JA- 82Y only).
JA-80V – a LAN (Ethernet ) computer network comm unicator combi ned
with a phone-lin e communicator. It allow s communicatio n with the ARC
via LAN and tr ansmission of reports v ia a telephone line. It also
enables sy stem administration via the GSMLi nk application .
JA-80X – a pho ne-li ne communicator w hich is able to comm unicate
with an ARC and w hich allows voice-r eporting to the user pursuant to
the type of alarm. This mo dule can be used in com bination w ith a JA-
80Y – a GSM pho ne-line backu p.
JA-80Q – in the case of u sing a PIR de tector with a camera.
The JA -68 outputs mod ule can also be u sed with the con trol panel – e.g.
to provide a link to the transmitter for communication w ith the surv eillance
centre.
The control panel box als o houses th e power sup ply and spa ce for a
backup batte ry (up to 18 A h). For a v iew of the cont rol panel c ase see fig. 17.
1.1 Required system configuration
The requiremen ts of technic al standards (namely of the EN -501-0x
series) sho uld be observ ed when pl anning the sy stem struct ure. The OA SiS
control panel c omplies with sa fety grade 2. It must h ave one of the f ollowing
configuration s as a minimum:
at least two non- backup-battery sirens (JA-80L o r SA-105) + ATS 2
class communica tor (JA-8xY , JA-80V or JA-80X)
at least one backup-battery siren (JA -80A or OS-360 /365/300) + AT S2
class communica tor (JA-8xY , JA-80V or JA-80X)
no siren + AT S3 class communic ator (JA-8x Y or JA-80V )
Note:
the above-recommended con figurations ar e based on the EU
standa rd EN-50131-1 va l id at the time of issui n g this man u al
2 Preparing the control panel for installation
First, select the correct locati on of the contro l panel box . If you are going
to use the radi o module, av oid installing th e control pa nel near large metal
objects (they might interfere with radio communic ation). The same rul e
applies to the GSM module (t est the strength of the receiv ed signal).
Removal of the c ontrol panel b oard and pow er supply before adjustment
and installati on of the control panel box is recomm ended. Brea k out th e two
push-out tab s leaving tw o holes at the bottom of the box (the battery spac e).
You will use o ne of these lat er to pass t he power supply cable thro ugh. A
battery fix ing tape (Velcro fastener tape e nclosed in pa ckage) can t hen be
pulled throug h the holes.
Then make holes for the ca bles. Lead the pow er supply cable to the left
side of the pow er supply (term inal) sepa rately from th e other cabl es.
If requested, i nstall a rear tamper sen sor and attach a spr ing to it
(included in t he package).
The control panel box ca n be attached to the wall u sing screws – make
marks on the wall usi ng the holes o n the box and drill holes for the anc horing
screws. The tw o top holes are u sed to hang the b ox on screws on th e wall,
the bottom ones are used to secur e it. Route all input c ables (power supply,
telephone ca ble etc.) i nto the box as well as th e battery fixing tape a nd then
attach the co ntrol panel box to the wall.
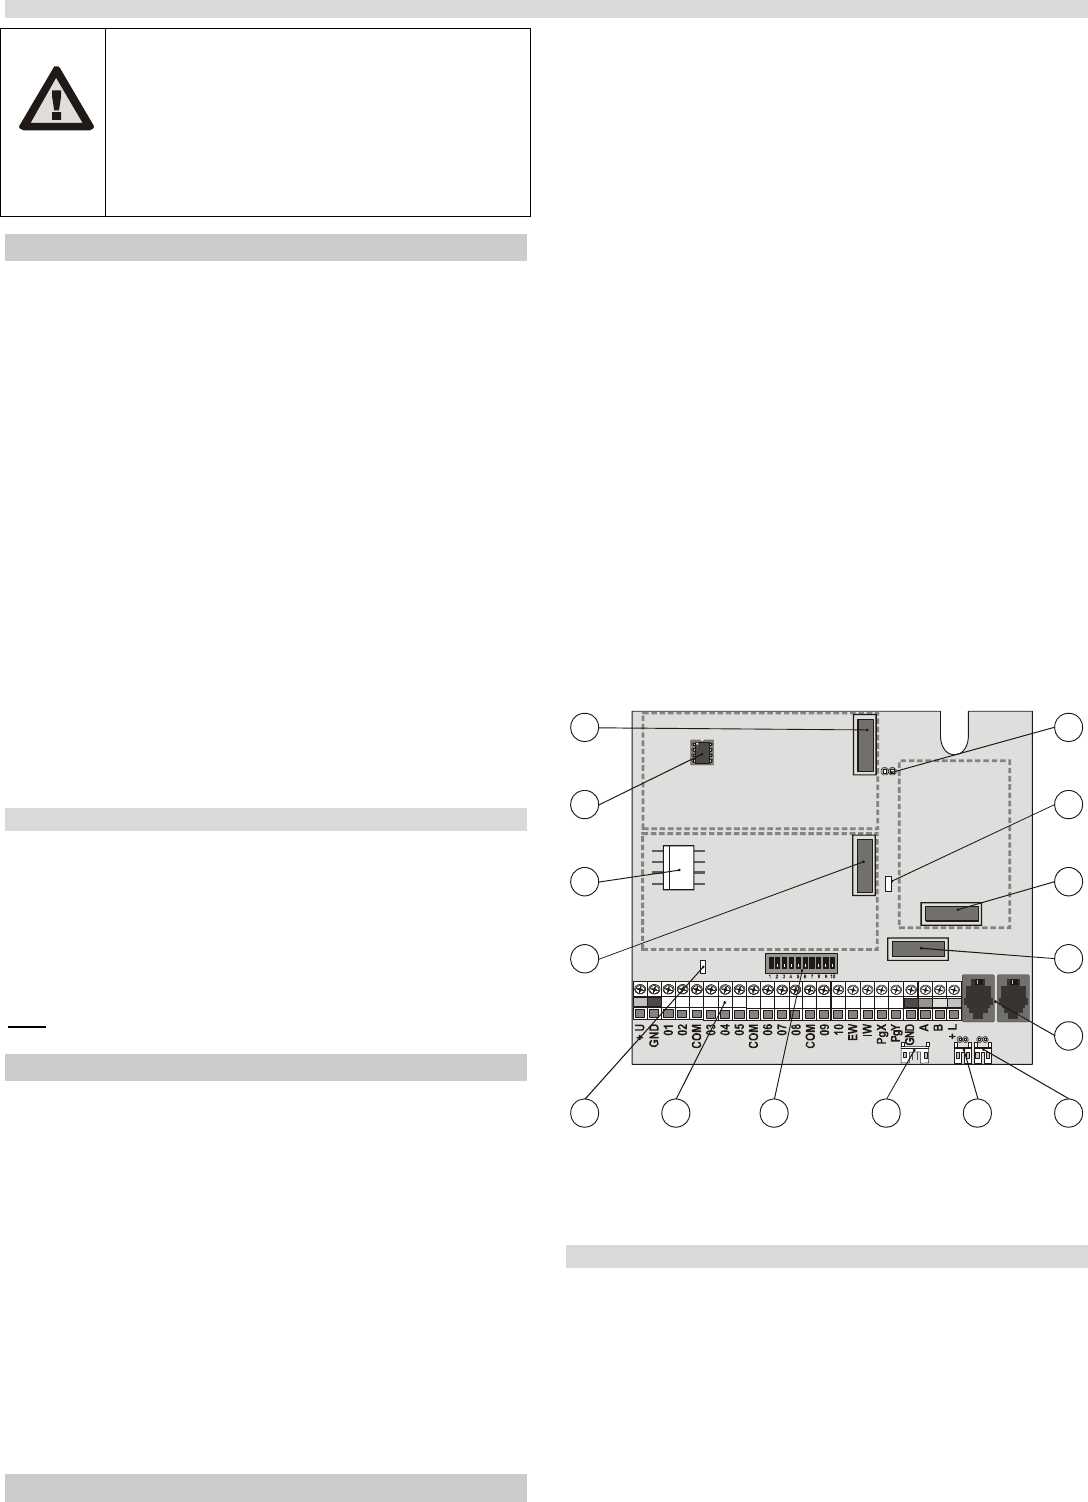
3 Control panel main board
1. Connector for a second JA-82C wired input module – it is intended
for an in pu t module us in g address e s from L21 to L30. The firs t mod ule
(position 4) must always be connect ed if the second mod ule is to
operate.
2. Memory chip – for mo re inform at ion see 3.6
3. Power input conne c tor – for connecting th e power supply module.
Always unplug th e power input a nd the battery before connecti ng and
disconne c ting the co nn ector.
4. C onn ector for the first JA -82C wired input module – it is designed
for an input mo dule using ad dresses from L11 to L20.
5. + U power output overload indicator fo r detector s, modules, sirens...
6. Terminal for conn ection of dete ctors, modul es and sir ens (see 3.1 .)
7. Switch enabling/d isabling L1 ... L10 wired in put.
8. E-LINE bus co nnector for th e connection of extern al devices (k eypad,
PC). It is identi cal to the GND , A, B and +L termi nals and it is u sed with
the connecto r on the contr ol panel box .
9. and 10. T MP1 and T MP2 Front and rear tam per connector. When it is
not used, coupl e the pins behi nd the connecto r with a shortin g link.
When the connector is used, remov e the link.
If you add a rea r tamper, orienta te it correctly according to the front
tamper into the hole in t he bottom and push it to th e side till the tab clicks.
After that you ca n mount the spring fr om the back, connect th e cable and
remove the link
11. I-LINE bus connector fo r the connec t ion of in t ernal (sit u ated in the box)
devices (commu nicator, JA -68 module). T he bus output cannot be
outside the control pa nel box.
12. JA-8xY co mmunicator conn ector or the JA -80Q module w hen
needed.
13. JA-82R wireles s module connector
14. T he “heart beat ” LED (indication of a healthily-ru nn ing contr ol panel)
15. RESET link – it is normally open and serv es for resett ing the sy stem (if
it is short-circ uited when t he control pan el power supply is switched
on). This link can also be u sed to enter cont rol panel enr ollment mode
by briefly sh orting the lin k while the c ontrol panel i s powered.
ON
OFF
RESET
E-LINE
I-LI NE
TMP2
TMP1
11 . . . 2 0
21 ... 30 RADIO
OVER LOAD
1
2
3
4
13
12
11
105 6 7 8 9
14
15
fig. 1 Con t rol panel main bo ar d
Description: 1. JA-82C connector (ad dresses 21-30); 2. memory chip; 3. power
supply connector; 4. JA -82C connector (addres ses 11-20); 5. +U overload
indicator; 6. terminal; 7 . 01 -10 inpu t switch; 8 . external bus conne ctor; 9,10. fron t
and rear tamper connector; 11. intern al bus connector; 12. JA-8xY connector; 13.
JA-82R connector; 14. the heart beat LED; 15 .RESET link
3.1 Main board terminal description:
+U backup power sup ply (10 to 14V ), 2A electroni c fuse, max .
intermittent loa d - 2A. If th e fuse is blow n, the fault i s reported
("fault" sy stem event + OVE RLOAD indicato r flashes on the
main board). If the system is armed, an ala rm is trigger ed.
When the ov erload curren t decreases, the power s upply is
restored.
GND common grou nd connection
01 to 10, COM are hard- wired inputs for th e control p anel. The reaction to
the triggering of an input i s determined by the settin g of these
addresses. T he natural reac tion (a delay ed alarm) is set in
the factory and the input i s in section C.
EW external w arning output, (ma x. 0.5A). This output i s ground ed
during an ala rm. The control panel al so transmits the ex ternal
warning relay signal for w ireless sire ns.
IW interna l warning out pu t. This outpu t is grounded during an
alarm. A stand ard siren can be wired be tween +U and I W