495201
1
Zoom out
Zoom in
Vorherige Seite
1/2
Nächste Seite
INTRODUCTION
CONTENTS
Item no.: 608728
Ages 3+
ADULT BATTERY INSTALLATION REQUIRED
Get ready to make your own movies with the Little Tikes™ My Real Digital Video Camera! This
durable and fun camera is easy to use and really records video and takes pictures, even up to a
depth of three feet under water!
Illustrations may vary from actual contents.
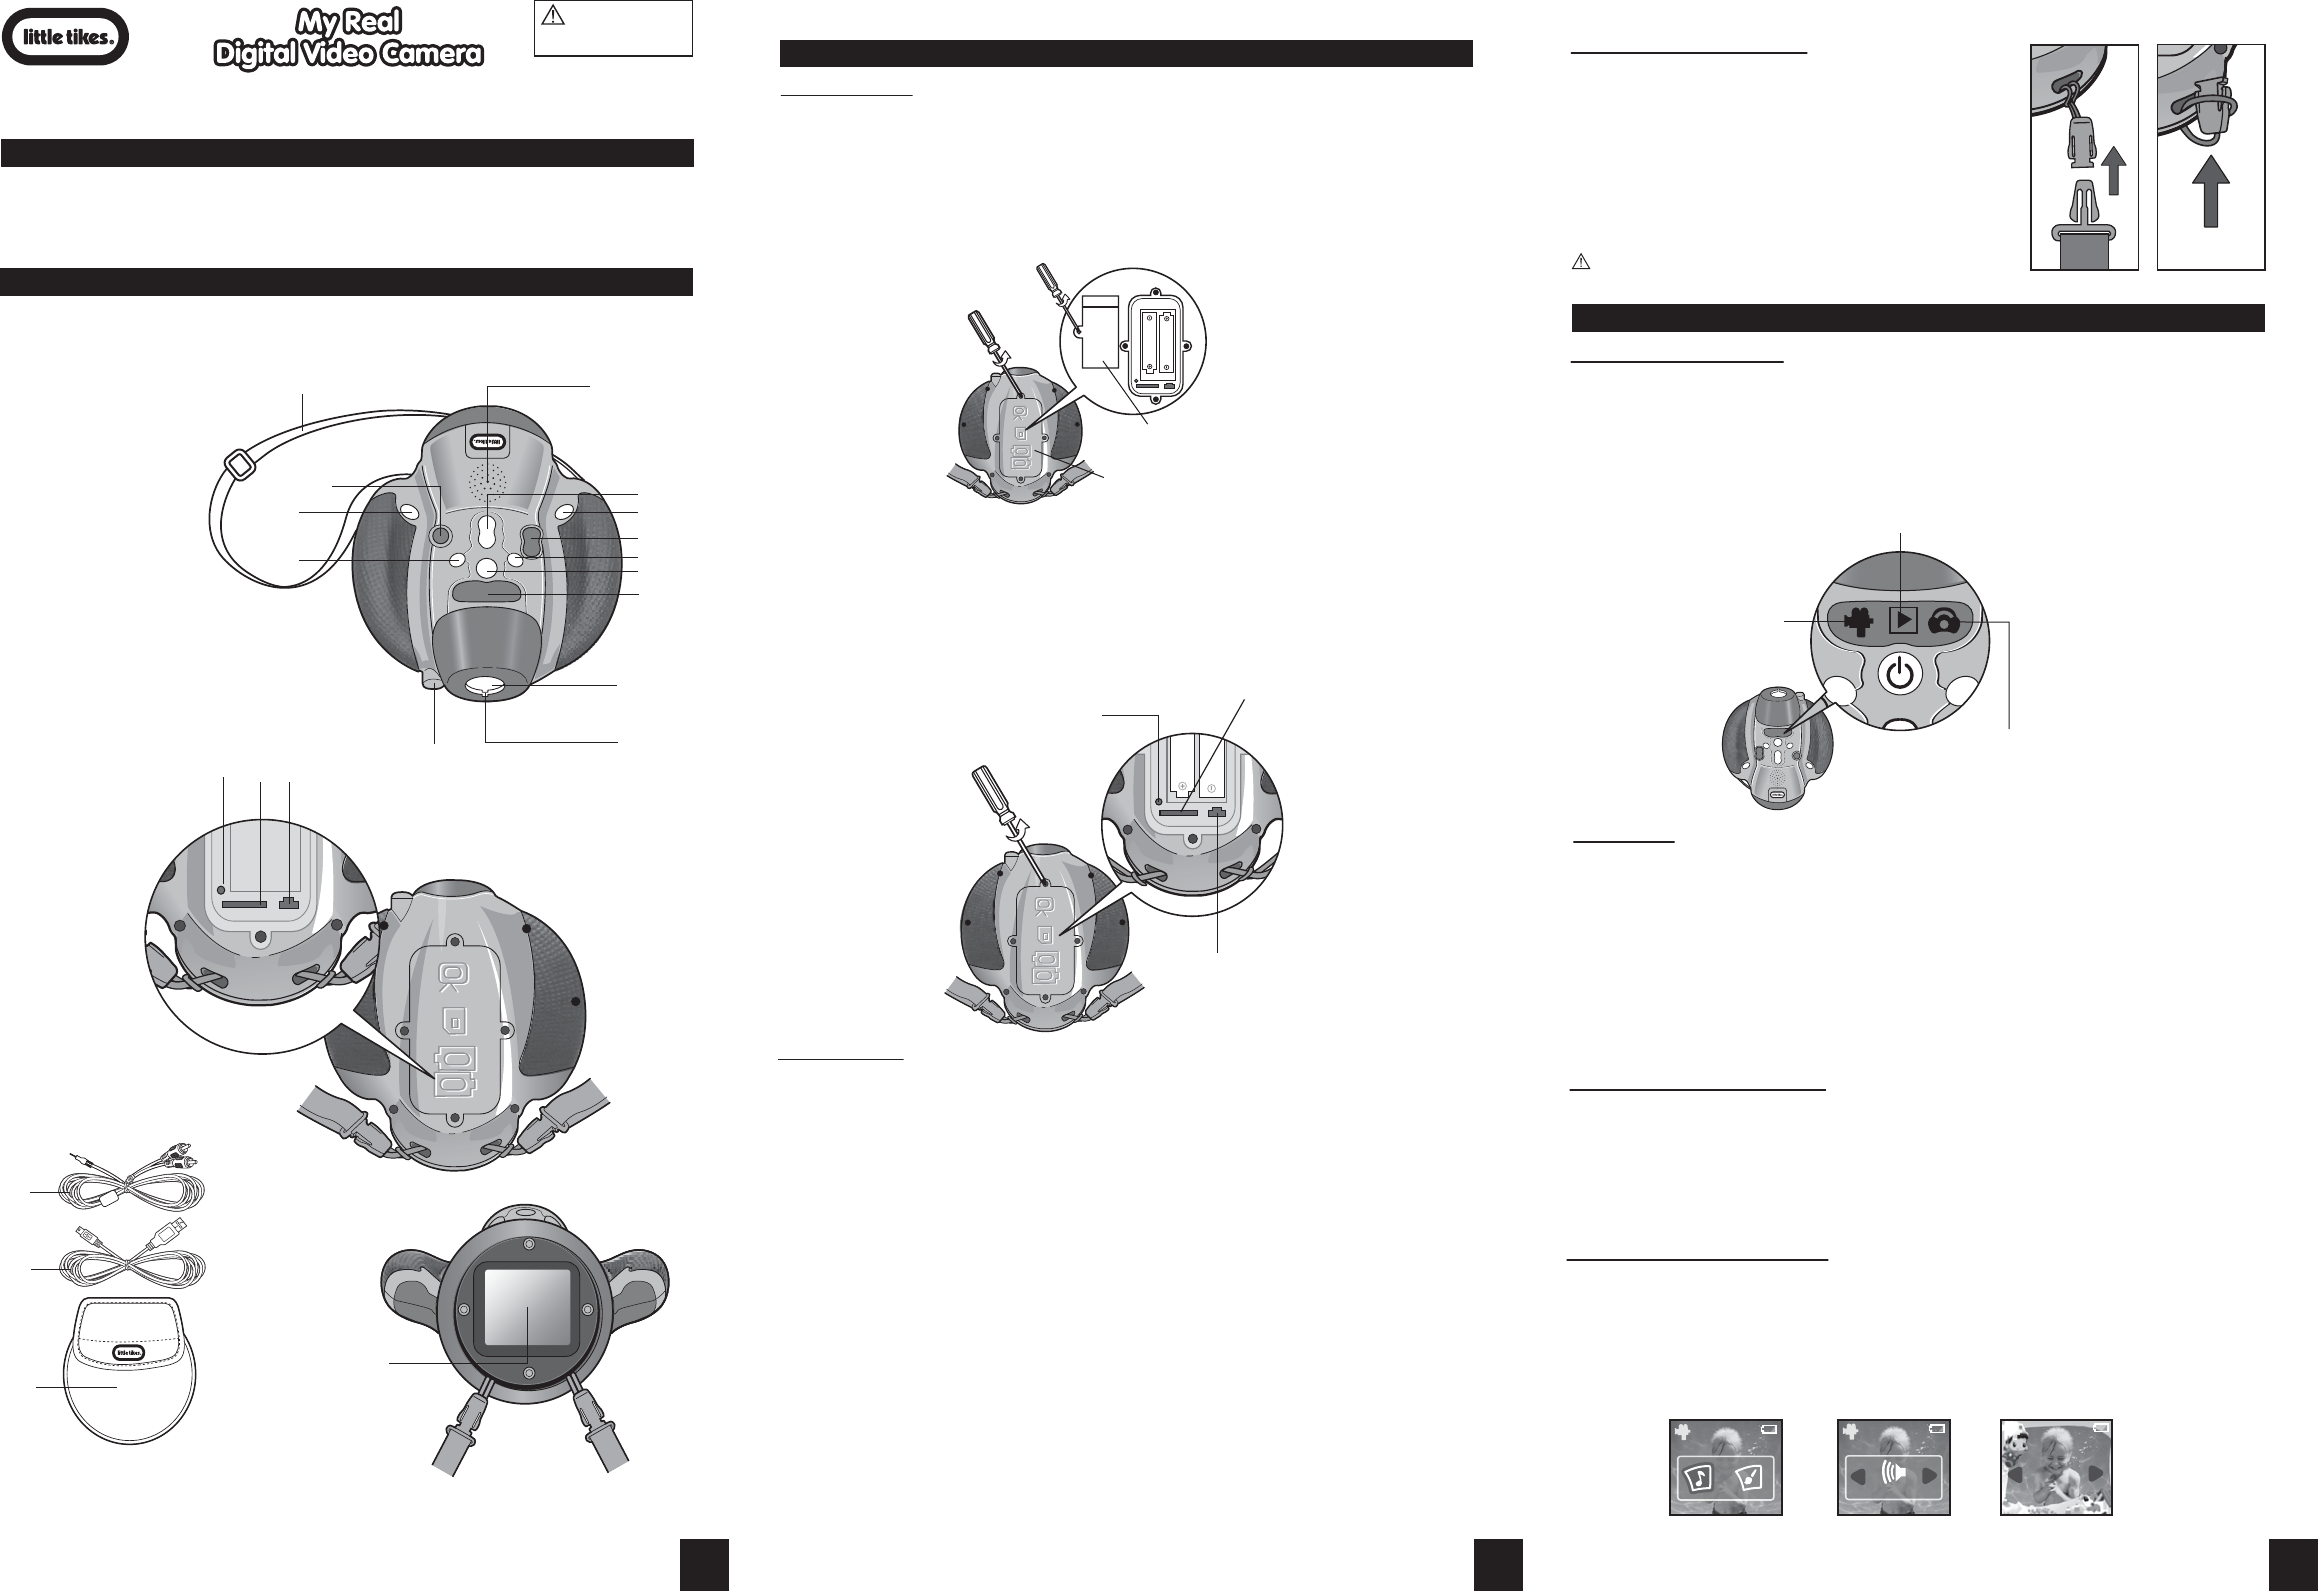
IMPORTANT: An adult must remove and discard the plastic label from the LCD Display before use.
Little Tikes™ My Real Digital Video Camera
a. Microphone
b. LED Light
c. Lens
d. Power Button/Mode Selector
e. Mode Display
f. Edit Button/Edit Mode
g. Trash Button/Delete Mode
h. Volume Selector
i. Zoom Button
j. Record/Confirm Button
k. Speaker
l. Left Button
m. Right Button
n. LCD Display
o. USB Port
p. TV Out Port
q. SD Card Slot
r. TV Out Cable
s. USB Cable
t. Adjustable Neck Strap
u. Carrying Case
WARNING
Constant, competent adult supervision
is required at ALL TIMES when small
children are near or in water.
m
g
t
k
a
b
c
j
d
f
i
h
l
e
o
p q
(inside the cover)
n
s
r
u
BEFORE YOU BEGIN
Battery Installation
An adult must install batteries. Here’s how:
1. Using a Phillips screwdriver (not included) remove the screws and Watertight Cover from the
bottom of the camera.
2. Remove the screw and Battery Compartment Cover .
3. Install two (2) AA alkaline batteries (not included) making sure the (+) and (-) ends face the
proper direction as indicated inside the battery compartment.
4. Replace the Battery Compartment Cover and tighten the screw.
5. Replace the Watertight Cover and tighten the screws firmly to ensure a good seal.
Optional SD Card
Your Camera will hold approximately 10 minutes of video or 250-1000 still photos. Since portions
of the free memory space indicated in the Menu Mode are used to store the photo program, the
available space for storing photos etc., may be reduced. These numbers may also vary depend-
ing upon the camera mode settings and the images being captured. To enlarge the memory, an
SD card (not included) may be purchased from your local camera store. To install the card an
adult must:
1. Make certain the camera is turned OFF.
2. Using a Phillips screwdriver (not included) remove the screws and Watertight Cover from the
bottom of the Camera.
3. Slide the SD card (not included) into the slot until it clicks. (DO NOT force the SD card. If you
feel resistance, remove the card, make sure it is facing the correct direction, and try installing
again).
NOTE: SD card label must face toward the Camera Viewfinder and the edge of the card with the
copper contacts must be inserted first.
4. Replace the Watertight Cover and tighten the screws firmly to ensure a good seal to keep
water from entering the card slot.
IMPORTANT NOTES:
• If the Watertight Cover is not completely sealed, water may enter the compartment causing
irreparable damage to the camera.
• USE CAMERA IN FRESH WATER ONLY. DO NOT USE IN SALT WATER.
• Using the Camera at a depth of more than 3 feet is not recommended.
TIP: Keep an eye on your battery level by checking the Battery Gauge in the top-right corner of
your screen. If the Gauge is red, new alkaline batteries need to be installed.
1.5V AA/LR06
1.5V AA/LR06
unscrew
TV Out Port
USB Port
SD Card Slot
unscrew
unscrew
1.5V AA/LR06
1.5V AA/LR06
Battery
Compartment
Cover
Watertight
Cover
IMPORTANT: To save your photos and videos directly to an SD card, you must go to the Storage
Section of the Menu Mode (see Page 5) and change the setting from internal memory to external
memory.
NOTE: Never insert anything other than an SD card into the card slot as doing so may damage the
camera and the SD card. To remove the card, press in on it and it will pop out.
IMPORTANT: Should water or any foreign object get into the Battery Compartment or the Card
Slot, turn the camera off immediately, remove the card and/or batteries, and allow the camera to
dry out completely before attempting to use again.
QUICK START
ATTACHING THE NECK STRAP
An adult must attach the Neck Strap. Here’s how:
Place the clip on the end of the Neck Strap into the
opening in the connector which is attached to the camera
and press firmly until it clicks into place. (Fig. A)
Repeat the instructions above to attach the remaining
end of the strap. (To detach the Neck Strap squeeze the
clip edges and pull apart.)
Adjust the length of the Strap by using the plastic buckle
located along the strap.
NOTE: To attach or detach camera portion of connector,
see Fig. B.
CAUTION - DETACH NECK STRAP FROM CAMERA
BEFORE ENTERING WATER.
CAMERA MODES
VIDEO MODE
In this mode the Viewfinder will show what the camera sees in real time.
Set up your shot in the Viewfinder then press and release Record to take a video.
NOTE: A red “RC” icon will appear in the top-left corner of the screen, and the elapsed time will
appear in the lower right corner.
To stop recording and store what you have recorded, press the Record button again. The screen
will switch to the beginning of the film you just recorded with a big red Play arrow in the middle.
Press the Record Button and the video will play back.
Press the Left Button (or wait 5 seconds) and the camera will go back to the live image.
TIP: You can zoom the camera in and out by pressing the Zoom buttons! The Zoom Indicator on
the right side of the screen will tell you how far you are zoomed in or out!
NOTE: There is no zoom function in 640 X 480 video mode.
Video Mode
Still Picture Mode
Playback Mode
Fig. A Fig. B
ADDING SOUND TO YOUR VIDEO
Before recording, press the Edit Button. You will see Sound and Image icons. (Fig. 5)
Use the Left or Right Buttons to select Sound then press Record to confirm.
Press the Left or Right Button again to hear the available sounds. (Fig.6) Stop at the one you
like, then press Record to add it to your video. The camera will then return to the live image.
Press Record to record your video with the sound included. Press Record again to stop
recording. (Press edit to exit edit mode.)
NOTE: Turn the Volume up high so the microphone can hear and record the sound!
ADDING IMAGES TO YOUR VIDEO
Before recording, press the Edit Button. You will see Sound and Image icons. (Fig. 5)
Use the Left or Right Buttons to select your choice then press Record to confirm.
Press the Left or Right Buttons to see the available images. (Fig.7) Stop at the one you like,
then press Record to add it to your video. The camera will then return to the live image with
your selected graphic. Press record to record your video with the image! Press Record again to
stop recording. (Press edit to exit edit mode.)
IMPORTANT - Images on videos will only appear when viewed on camera viewfinder or on
TV screen.
Fig. 5
Fig. 7
R
L
Fig. 6
R
L
Construction
TURNING THE CAMERA ON
Once an adult has installed the batteries:
Press and hold the Power button for 2 seconds. The Little Tikes™ logo will appear on the screen.
Once the logo disappears the camera will automatically be set to Video Mode.
NOTE: To change modes, press and release the Power button. To turn the camera off, hold down
the Power button for 2 seconds.
IMPORTANT: Before making videos or taking pictures, see Page 4 (MENU MODE) to set picture
quality. Also, camera must be at least 2 feet away from subject for best focus.
1 2 3
1

Brauchen Sie Hilfe? Stellen Sie Ihre Frage.

Forenregeln

Missbrauch melden von Frage und/oder Antwort

Libble nimmt den Missbrauch seiner Dienste sehr ernst. Wir setzen uns dafür ein, derartige Missbrauchsfälle gemäß den Gesetzen Ihres Heimatlandes zu behandeln. Wenn Sie eine Meldung übermitteln, überprüfen wir Ihre Informationen und ergreifen entsprechende Maßnahmen. Wir melden uns nur dann wieder bei Ihnen, wenn wir weitere Einzelheiten wissen müssen oder weitere Informationen für Sie haben.

Art des Missbrauchs:

Zum Beispiel antisemitische Inhalte, rassistische Inhalte oder Material, das zu einer Gewalttat führen könnte.

Beispielsweise eine Kreditkartennummer, persönliche Identifikationsnummer oder unveröffentlichte Privatadresse. Beachten Sie, dass E-Mail-Adressen und der vollständige Name nicht als private Informationen angesehen werden.

Forenregeln

Um zu sinnvolle Fragen zu kommen halten Sie sich bitte an folgende Spielregeln:

Neu registrieren

Registrieren auf E - Mails für Little tikes My Real Digital Video Camera wenn:


Sie erhalten eine E-Mail, um sich für eine oder beide Optionen anzumelden.


Das Handbuch wird per E-Mail gesendet. Überprüfen Sie ihre E-Mail.

Wenn Sie innerhalb von 15 Minuten keine E-Mail mit dem Handbuch erhalten haben, kann es sein, dass Sie eine falsche E-Mail-Adresse eingegeben haben oder dass Ihr ISP eine maximale Größe eingestellt hat, um E-Mails zu erhalten, die kleiner als die Größe des Handbuchs sind.

Ihre Frage wurde zu diesem Forum hinzugefügt

Möchten Sie eine E-Mail erhalten, wenn neue Antworten und Fragen veröffentlicht werden? Geben Sie bitte Ihre Email-Adresse ein.


Info