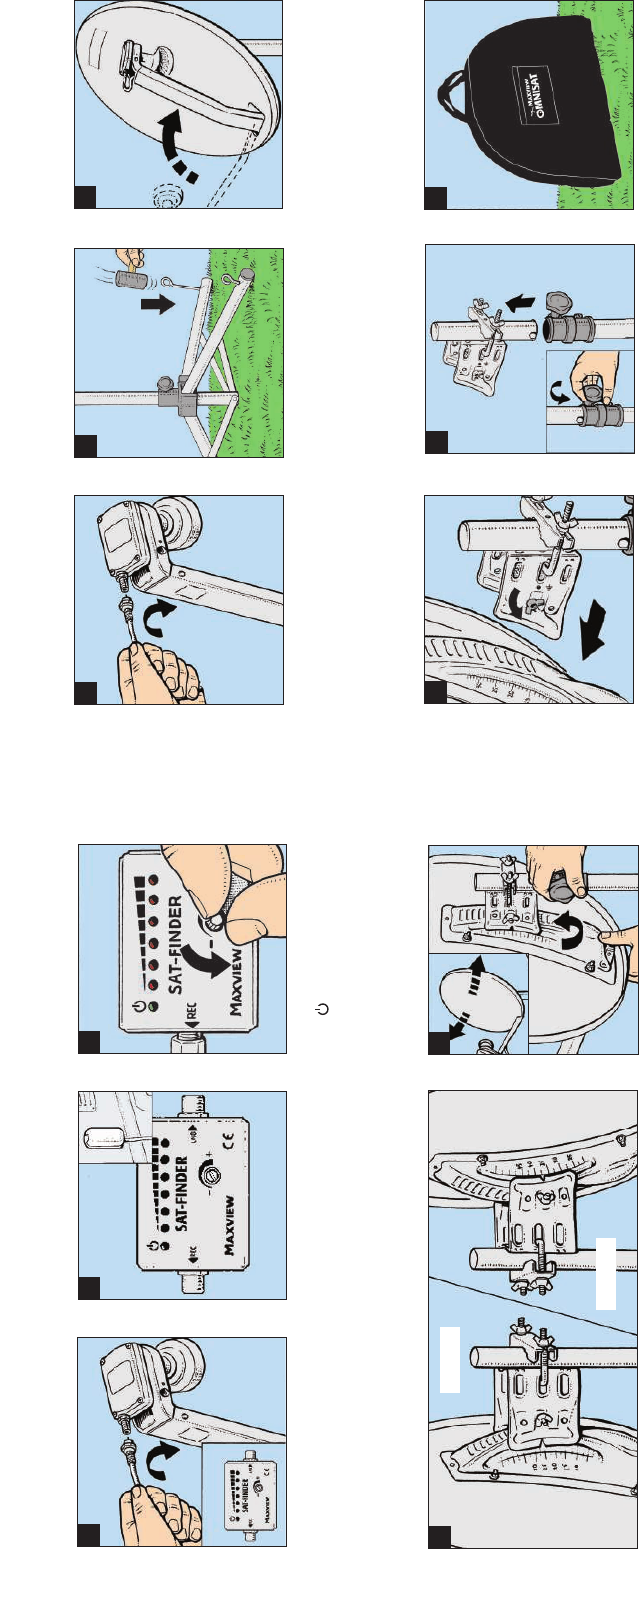
10
Connect one end of the short flylead into
the ‘F’ connector on the underside of the
LNB. Connect the other end to the socket
marked ‘LNB’ on the satellite finder.
Twin LNB Version - Connect the remaining
output on the Twin LNB to the 2nd LNB
input on your SKY+ receiver.
11 12
Connect the longer cable to the socket
marked ‘REC’ on the satellite finder and
route from the satellite finder to the
satellite receiver.
Switch TV and receiver on and the LED
marked will light up. Turn the signal
level control knob anticlockwise to adjust
the satellite finder so that the built in
buzzer gives a deep tone and the 2nd
LED is lit.
To receive a clear satellite picture, the dish must have the correct Vertical and Horizontal or
Azimuth Alignment.
Vertical alignment is the dish angle of elevation and refers to the angle at which the satellite
signals hit the earth’s surface. The elevation angle increases the closer you travel to the
equator.
Horizontal alignment is the adjustment of the dish in the direction (east or west) of the
satellite from which you wish to receive signals. Please note that the dish alignment is critical.
Digital reception produces a substantial delay between receiving a signal and displaying a
picture. Therefore small adjustments of the dish should be made in order to allow time for
the digital meter in the satellite receiver to respond correctly.
Consult the manufacturer’s instruction manual of your satellite receiver for more details.
Elevation Alignment
Using zone map provided, identify your position and required angle of elevation. To adjust
elevation of dish, line up degrees on the dish braket to the notch on the pole bracket and
tighten.
Please note that depending on your location, elevation angle will need to be adjusted. If your
location is North adjust elevation angle on the dish marked 5-40˙. If South adjust using
elevation angle marked 20-55˙.
INFORMATION
13
B : 20˙- 55˙
Azimuth Alignment
Once the correct elevation angle has been
set, loosen the clamp at the top of the
mast. Refer to the Omnisat Compass and
slowly rotate the dish by turning to the left
and then back towards the right within the
coloured segment of the desired satellite
until you hear a change in tone from the
satellite finder.
As the tone and number of red LED’s
increase, turn the signal level adjustment
control anticlockwise to turn the tone
down and repeat this fine adjustment until
there is no further increase in tone. You
may also need to fine tune the elevation
to achieve best reception. N.B. Ensure that
you continuously turn down the tone as if
the tone is too high you will not hear an
increase in the tone.
As the satellite finder only determines the
reception level and doesn’t know from
which satellite the signals actually come
from, check on the receiver, whether the
desired satellite is being received. If this is
not the case, continue to search for the
next satellite position. If you are receiving
signals from the desired satellite, continue
to finely adjust the dish until picture is
clear.
14
Remove the sat finder. Connect the long
cable lead to the LNB by screwing the ‘F’
connector into the underside of the LNB.
Ensure the ‘F’ connector is screwed on
tightly.
15
For additional stability, the tent pegs
supplied can also be used to prevent
the stand from falling over in the wind.
16
Stowage recommendation (for quick
re-assembly).
Fold LNB arm towards dish.
17
To align the satellite dish to the Astra 2 satellite for digital satellite reception, use the SIGNAL TEST menu built into the SKY digibox. To access this
menu you will first have to press the SERVICES button on the remote control. In the SERVICES menu you will then need to access the SYSTEM
SET UP (number 4) and the SIGNAL TEST (number 6).
The display will then show, from top to bottom: SIGNAL STRENGTH - SIGNAL QUALITY - LOCK INDICATOR - NETWORK ID -TRANSPORT STREAM
You will need to adjust the dish until there is at least a quarter of the SIGNAL QUALITY bar display, the LOCK INDICATOR shows OK and the
NETWORK ID is displaying 0002. If the NETWORK ID is showing any other details, you have locked onto the wrong satellite and will need to
re-align the dish. When Astra 2 North Beam is being received the TRANSPORT STREAM will display 07d4. This is not the case if receiving South
Beam. Press BACK UP.
A : 5˙- 40˙
Loosen the M6 bolt and wing nut on the
bracket assembly then remove dish
assembly.
18
Loosen the knob on tripod swivel top,
then lift off with bracket assembly still
attached.
19
GUIDELINES FOR SKY DIGITAL SATELLITE RECEPTION
# This satellite system is guaranteed against defective parts or workmanship for 2 years from time of purchase. (This excludes any malfunction
caused by improper use, accidental or malicious damage. This does not affect your statutory rights.
# If you do experience a problem with the product contact Maxview Customer Services
# All instructions and models are subject to change. Maxview reserve the right to alter specifications without prior notice.
# Copyright
©.
These instructions are the sole property of Maxview Ltd and may not be reproduced.
# Recycle packaging where facilities exist.
SUPPORT, TERMS & CONDITIONS
FOR FREE TO AIR OR FREESAT RECEIVER INSTALLATION INFORMATION PLEASE
SEE OPERATING MANUALS
You can now pack all the seperate parts
neatly in the kit holdall provided.
Please note there is a pocket located on
the font side of the holdall for all your
satelllite finding accesories.
20