IMPORT
Warning! U
Ni-MH rechargeable battery) supplied with your C101xLX.
BA
If E icon flashes on the display and you hear a w
during a call, you will need to recharge the
When charging, f icon will scroll on the display.
BA
In ideal conditions, a fully charged battery should give up
to 200 hours standby time on a single charge.
1
Note that new
use for se
T
hours at a time.
Running the batteries down at least one
possible.
The charge capacity of
giving the handset less talk / standby
After charging your
hours a day. The battery and handset may become
normal.
1
All talk and standby times are appro
usage pattern.
Date and time
If y
and time will set automatically
If y
section “5.3. Date and Time
Y
Charging the handset
3. If y
charge for at least 24 hours c
4. When the handset is fully icon will appear steady
Plug the other end of
plugged into the base
Connecting the handset and charger
(for
If y
handsets and chargers.
1. Plug the power on the rear of
and plug the other end into an electrical outlet.
2. If y
to charge for
3. When the handset is fully icon will appear steady
The display
Handset
and handset number (
registered to the base.
3. Press m . Scroll d to
Docking tone
.
4. Press m , u or d to select
On
or
O
and press m to conrm.
5.1.5 Battery tones
When the battery is running lo
beep on or o.
1. Press m , scroll d to
Phone setup.
2. Press m .
Sounds
.
3. Press m . Scroll d to
Battery tone
.
4. Press m , u or d to select
On
or
O
and press m to conrm.
5.2 Handset
Personalize
Maximum 12 characters.
1. Press m , scroll d to
Phone setup.
2. Press m .
Sounds
.
3. Scroll d to
Phone name
and press m .
4. Enter the nem to conrm.
Delete the current name bb .
5.3 Date
1. Press m , scroll d to
Phone setup.
2. Press m .
Sounds
.
3. Scroll d to
Date & time
and press m .
4. Enter the dat
press m to conrm.
5. Enter the time using the 12 hour format
hh:mm
, e.g. 02:45 for 2:45.
6. Scroll u or d to select
am
or
pm
and press m to conrm.
5.4 Language
1. Press m , scroll d to
Phone setup.
2. Press m .
Sounds
.
3. Scroll d to
Language
and press m .
4. Scroll u or d to select the requirm to conrm.
5. P
5.1 Sounds
5.1.1 Ring volume
Y
volume levels or
1. Press m , scroll d to
Phone setup.
2. Press m .
Sounds
.
3. Press m .
Ring volume
.
4. Press m , scroll u or d to select
5. Press m to conrm orb to return to the previous menu.
5.1.2 Ringer tones
Y
dierent ringer tones.
NOTE
Y
1. Press m , scroll d to
Phone setup.
2. Press m .
Sounds
.
3. Press m . Scroll d to
Ring tones
.
4. Press m , scroll u or d to select
5. Press m to conrm orb to return to the previous menu.
5.1.3 Key
When you pr
these beeps on or o.
1. Press m , scroll d to
Phone setup.
2. Press m .
Sounds
.
3. Press m . Scroll d to
Key
.
4. Press m , u or d to select
On
or
O
and press m to conrm.
5.1.4 Docking tone on /
When you r
this beep on or o.
1. Press m , scroll d to
Phone setup.
2. Press m .
Sounds
.
WRITING TIPS
Press b to delete the
Press u or d to move betw
Press 0 to insert a space.
4.2 Vie
1. Press u .
2. Scroll u or d to the entry you want.
OR
Enter the
The rst name that starts with
displayed. Scroll u or d to the entry y
3. Press t to dial ore to return to standby
4.3 Edit a name and number
1. Press m twice.
View
.
2. Scroll d to
Edit
and press m .
3. Scroll u or d to the entry
m. The existing name is displa
4. Press b to delete the name if required,
m. The existing number
5. Press b to delete the number if r
press m to save .
4.4 Delete an entry
1. Press m twice.
View
.
2. Scroll d to
Delete
and press m .
3. Scroll u or d to the entry
m. The display
Conrm?
.
4. Press m to conrm orb to cancel.
4.5 Delete all entries
1. Press m twice.
View
.
2. Scroll d to
Delete all
and press m .
3. The display shows
Conrm?
.
4. Press m to conrm orb to cancel.
3.7.4 Delete the entire R
1. Press r to open
2. Press m . Scroll d to
Delete all
. The display
Conrm?
.
3. Press m to conrm orb to cancel.
3.8 Lock / unlock the ke
Y
NOTE
When the keypad is lock
handset normally during a call. When the call ends,
1. Press and hold 0 .
Key
is displayed.
2. T0 again.
3.9 Paging / Find handset
Paging is a useful wa
1. Press p on the base.
2. Press p again to cancel
the paging call.
4. Phonebook
The C101xLX handset phonebook can store up to 50 names and numbers.
Names can be up to 14 characters long and numbers up t
4.1 Store a name and number
1. Press m .
Phonebook
is displayed.
2. Press m .
New Entry
is displayed.
3. Press m .
Enter Name
is displayed.
4. Enter a name and press m .
5. Enter a numberm to sav
6. Press e to return to standby.
ENTERING NAMES
Use the k
Press 8 once to enter
Press 6 three times to enter O.
Press 6 once to enter
3.6 Hands-free
T
listen to the con
3.6.1 Mak
1. Dial the number and h .
2. Press e to end the call.
3.6.2 Answer a call hands-free
Press h to answ
NOTE
Press h to switch the c
During a hands-free call, press u or d to adjust the volume.
3.7 Redial
The last 10 entries dialed are stored in the r
3.7.1 View or
1. Press r to open
2. Scroll u or d to the entry you want.
3. Press t to dial e to return to standby
3.7.2 Copy a Redial list number
1. Press r to open
2. Scroll u or d to the entry you want.
3. Press m .
Save number
.
4. Press m again.
Enter name
.
5. Enter the name and prm . The number
6. Edit the numberm to save.
3.7.3 Delete an entry
1. Press r to open
2. Scroll u or d to the entry you want. Press m .
3. Scroll d to
Delete
and press m . The displa
Conrm?
.
4. Press m to conrm orb to cancel.
3.5 Intercom
3.5.1 Make an internal call
If more than one handset is regist
between two handsets. icon flashes and the display show
are calling.
1. If only 2 handsets ar* and the other handset
rings automatically.
2. If more than 2 handsets ar* and scroll d to the
handset that is to be called and press
t
.
3.5.2 Receive an internal call
When you r icon flashes and the handset number that is calling
you is displayed.
1. Press t to mak
3.5.3 T
Y
During an external call:
1. If only 2 handsets ar* and the other
handset rings automatically.
2. If more than 2 handsets ar* and scroll
dto the handset that is tm .
3. When the other handset answers, pre to complete the transfer
NOTE
Y
3.5.4 3-way conference call
Y
During a call with an external caller:
1. If only 2 handsets ar* and the other
handset rings automatically.
2. If more than 2 handsets ar* and scroll
d to the handset that is m .
3. When the other handset answers, prm to connect all thr
the conference call.
4. Press e to end the
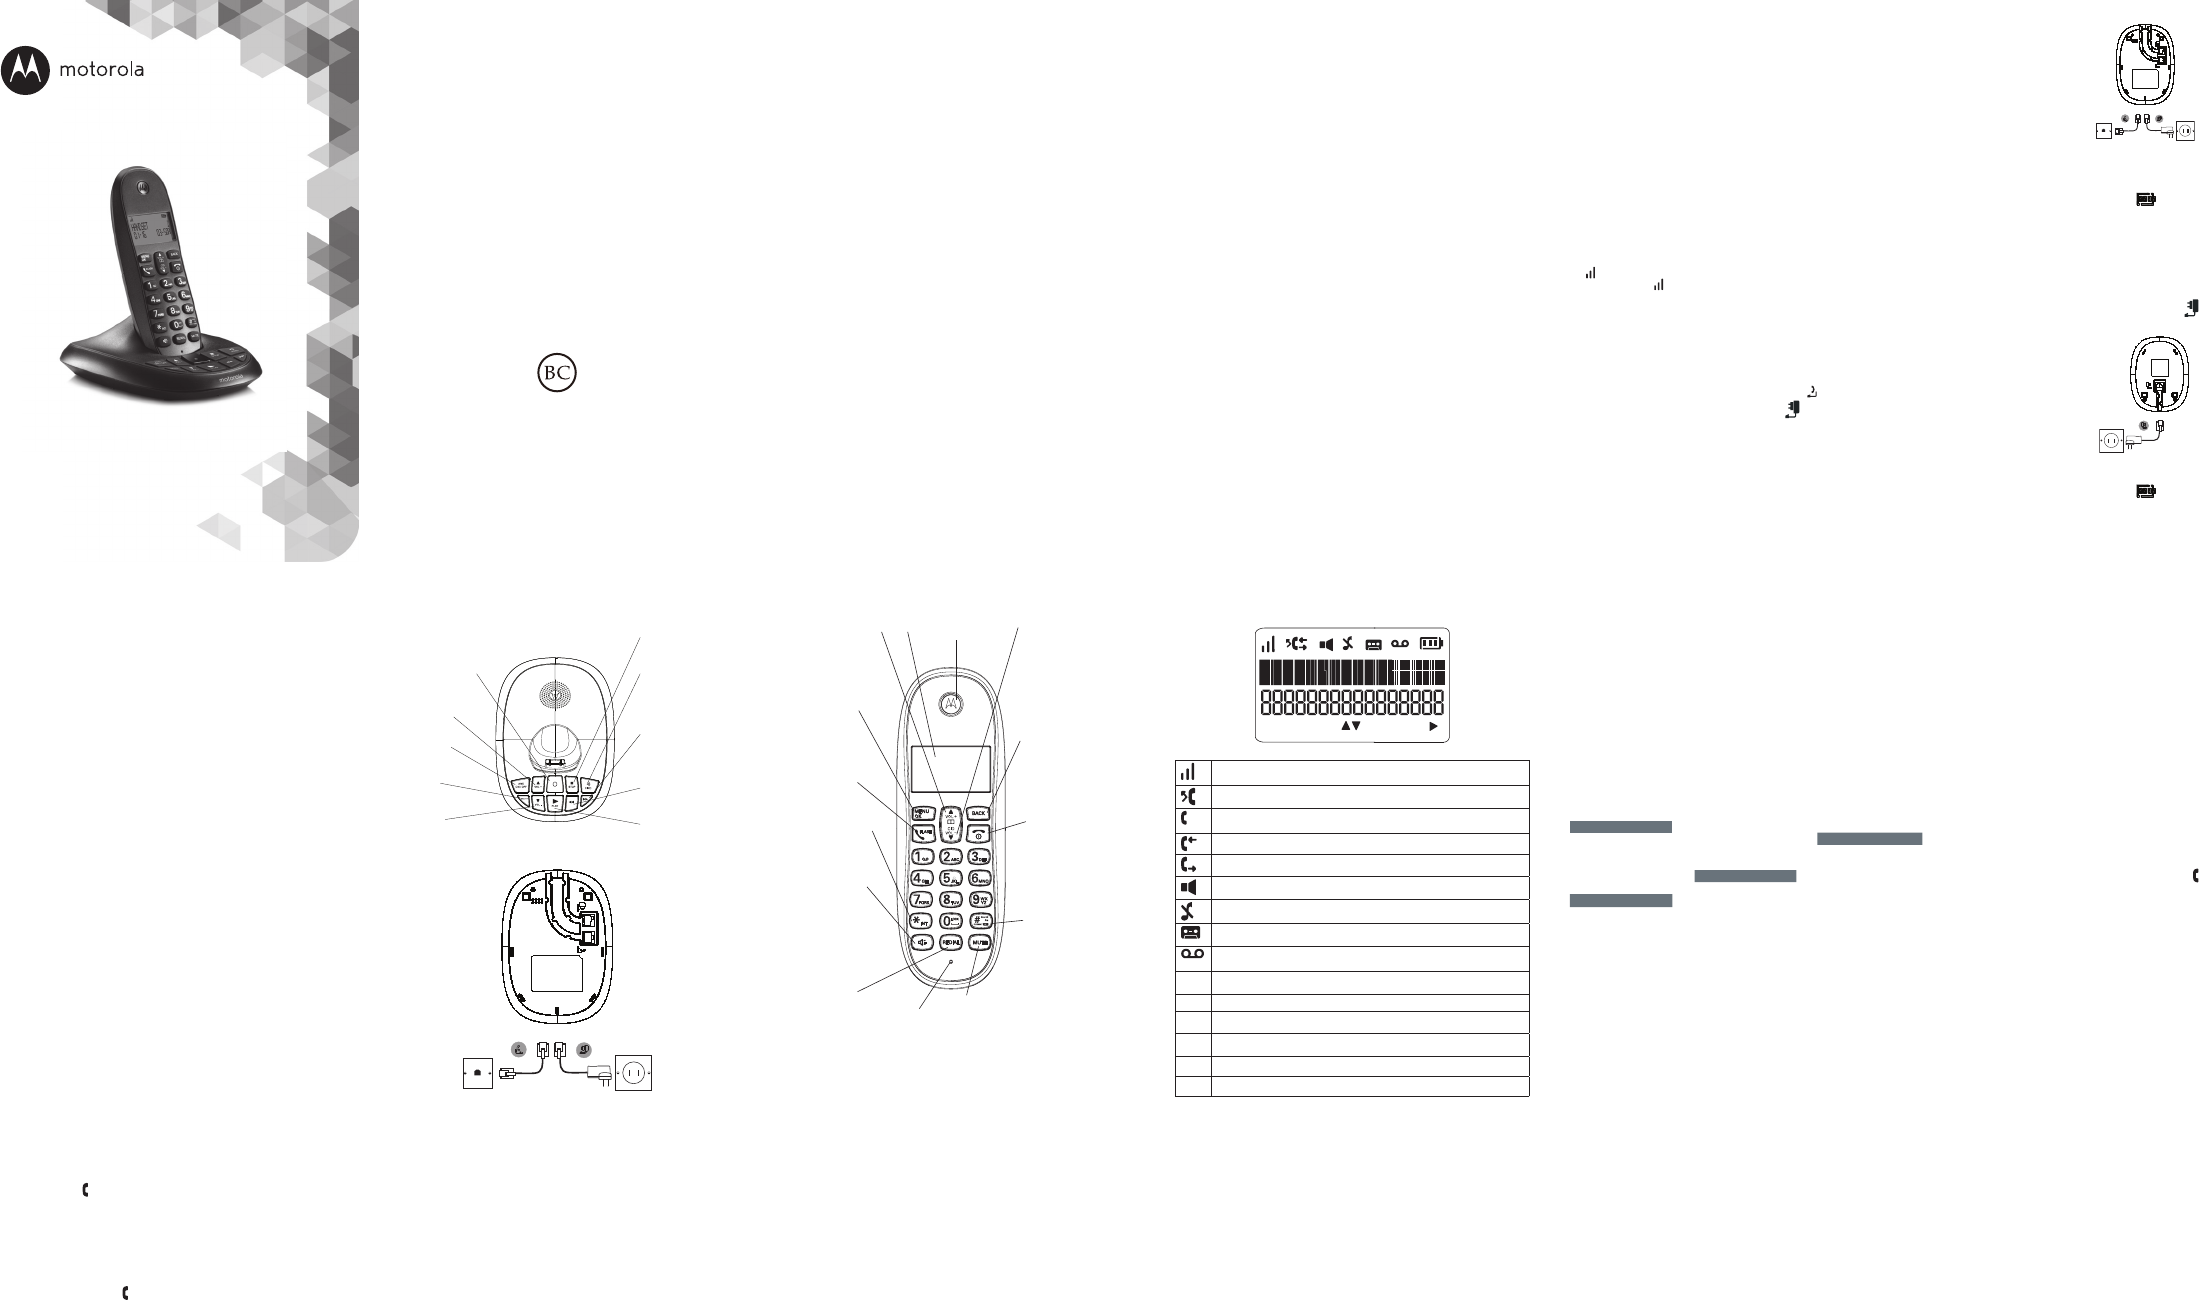
2. Getting to know
Overview
LED
Indicates when the answering
machine is on or o and
when you hav
Status Action
On answering machine on
O answering machine o
Flashes New message (
Volume U
Adjust playback volume.
Ans On / O
Switches the answering
machine on / o.
Delete
Press to delete rec
messages during playback .
Volume D
Adjust playback volume.
Stop
Stops message playback.
Skip forward
Press to skip forward through
your answering machine
messages.
Skip back
Press to skip backward
through your answering
machine messages.
Page
In standby mode, press
ring the handset(s).
Press and hold to enter
registration mode when
registering handsets.
Play
Handset display
Display ic
Indicates signal strength.
Flashes when the handset is not register
Indicates a missed call.
Steady
Flashes to indicate an incoming or
Indicates an incoming call when
Indicates an outgoing call when
Hands-free is on.
Handset ringer is o
Answering machine is on.
Indicates new
1
O when
pq
Indicates you can scr
u
Indicates more text aft
f
Battery is fully
H
Battery is partially
l
Battery is running low
E
Flashes when battery is almost
Overview
Earpiece
Display
Phonebook / Scroll Up /
V
Open the phonebook.
Scroll up through lists and
menus.
Increase the earpiece v
Menu / OK
Enter the main menu.
Select the option
displayed on screen.
Conrm menu option.
T
Make or ans
Use flash (F) functions.
* / Intercom
Press and hold to mak
an internal call.
Dial a *.
Hands-free
Activate and deactivate
hands-free during a call.
IMPORT
Hands-free activation can
suddenly increase the
volume in the earpiece to
a very
sure the handset is not
too close to y
Redial
In standby mode, press
to open the redial list.
Clear / Back
Delete characters on screen
when entering names and
numbers.
Go back to previous menu
level is displayed on
screen.
Call list / Scroll Down /
V
Press to enter
Scroll down through lists
and settings.
During a call, press to
decrease earpiece volume.
When the phone is ringing,
press to decrease
handset ringer v
End call / Switch handset
on/o
End a call.
When in a menu, go back
to standby mode.
Press and hold to switch
handset o (when in
standby) or
Pause / # / Change case
Press and hold to enter
pause (P) when pre-dialling
or storing numbers.
Dial a #.
When entering letters /
editing, press and hold to
change the case from
to abc or ABC mode.
When viewing the Calls
List press to change the
CID format.
Microphone
Mute
Mute / unmute the
microphone during a
call.
Handset display
1
This feature is dependent on
subscription fee may
Navigating the menus
Each menu has a list of options, which can be seen in detail on
below list.
When the handset is switched on and in standby
1. Press m to open
2. Then use u or d buttons to scroll through
3. Press m to select an option.
press b . Te .
NOTE
If you do not press a button on the handset
return to standby. It will also return to standby when the
or charger
Menu map
Phonebook Battery tone Reset
View Phone name Answ. Machine
Add new Date & time Play
Edit Language Delete all
Delete
1
Services Announcement
Delete all
1
Call list type V
Phone setup Area code Ring delay
Sounds Flash time Remote access
Ring volume Dial mode V
Ring tones Auto clock
Key tone Register
Docking tone Unregister
1
Only av
3. Using the phone
NOTE
Y
display after the
your talk
3.1 Switch the handset on / o
Press and hold e to swit
3.2 Calls
3.2.1 Make a call
1. Press t .
2. Dialing a telephone number
3.2.2 Pre-dial
1. Use the kb to delete the
last digit.
2. Press t to dial.
3.2.3 End a call
Press e , or place
3.2.4 Answer a call
When you r icon flashes on the display
1. Press t to answer the call.
3.3 Adjust the
During a call, press u or d to increase or decr
to choose from.
3.4 Mute
Y
hearing.
1. During a call, press M . The displa
Mute on
and your
you.
2. Press M again to r
1. Getting started
IMPORT
Do not place your C101xLX
Location
Y
telephone wall sock
telephone service.
Make sure it is at least 3
Y
strength of the signal depends on
possible ensures the best signal.
HANDSET RANGE
The unit has a range of up
between the base
reduce the range
outdoors, the range will normally be up
severely aect the
SIGNAL STRENGTH
The icon on your handset indicates that you are within range of
range of the base, the icon disappears. If you are on a call, you will hear
If you are on a call, the
Move
Setting up
IMPORT
Use only the pow
Connecting the base
1. Plug the telephone line cor on the rear of
2. Plug the power on the rear of
plug the other end into
This User G
get the most from
Before y
F
few pages.
IMPORT
Only use the
Got everything?
• C101xLX base & cordless handset
• 1 x rechargeable Ni-MH batt
• P
• T
• User
• Quick Start Guide
If y
items:
• Cordless handset & charger
• Rechar
• P
• T
W
to your new
with Answering machine!
• Answering machine up
• All handsets are completely
• Bright backlit display
• Speak
• 50 Name and Number
• Caller ID sho
a Calls list.
1
• Redial up
• Regist
• Mak
• Choose from 10 di
Please note that this equipment is not designed f
calls when the pow
to emergency servic
Need help?
If y
T
1-888-331-3383. Alternatively
back of this guide.
1
Y
work. A
Please note that this equipment is not designed f
calls when power
emergency services.
Manufactured, distributed or sold b
for this pr
trademarks of Motorola
trademarks are the property
All rights reserved.
V
Models: C1011LX, C1012LX, C1013LX and C1014LX
Digital Cordless T
Answering Machine