MODÈLES:
C1011LX
C1012LX
C1013LX
C1014LX
GUIDE DE DÉMARRAGE RAPIDE
MODELS:
C1011LX
C1012LX
C1013LX
C1014LX
GUÍA RÁPIDA DE INICIO
EN
QUICK ST
Fs Guide.
MODELS:
C1011LX
C1012LX
C1013LX
C1014LX
FR ES
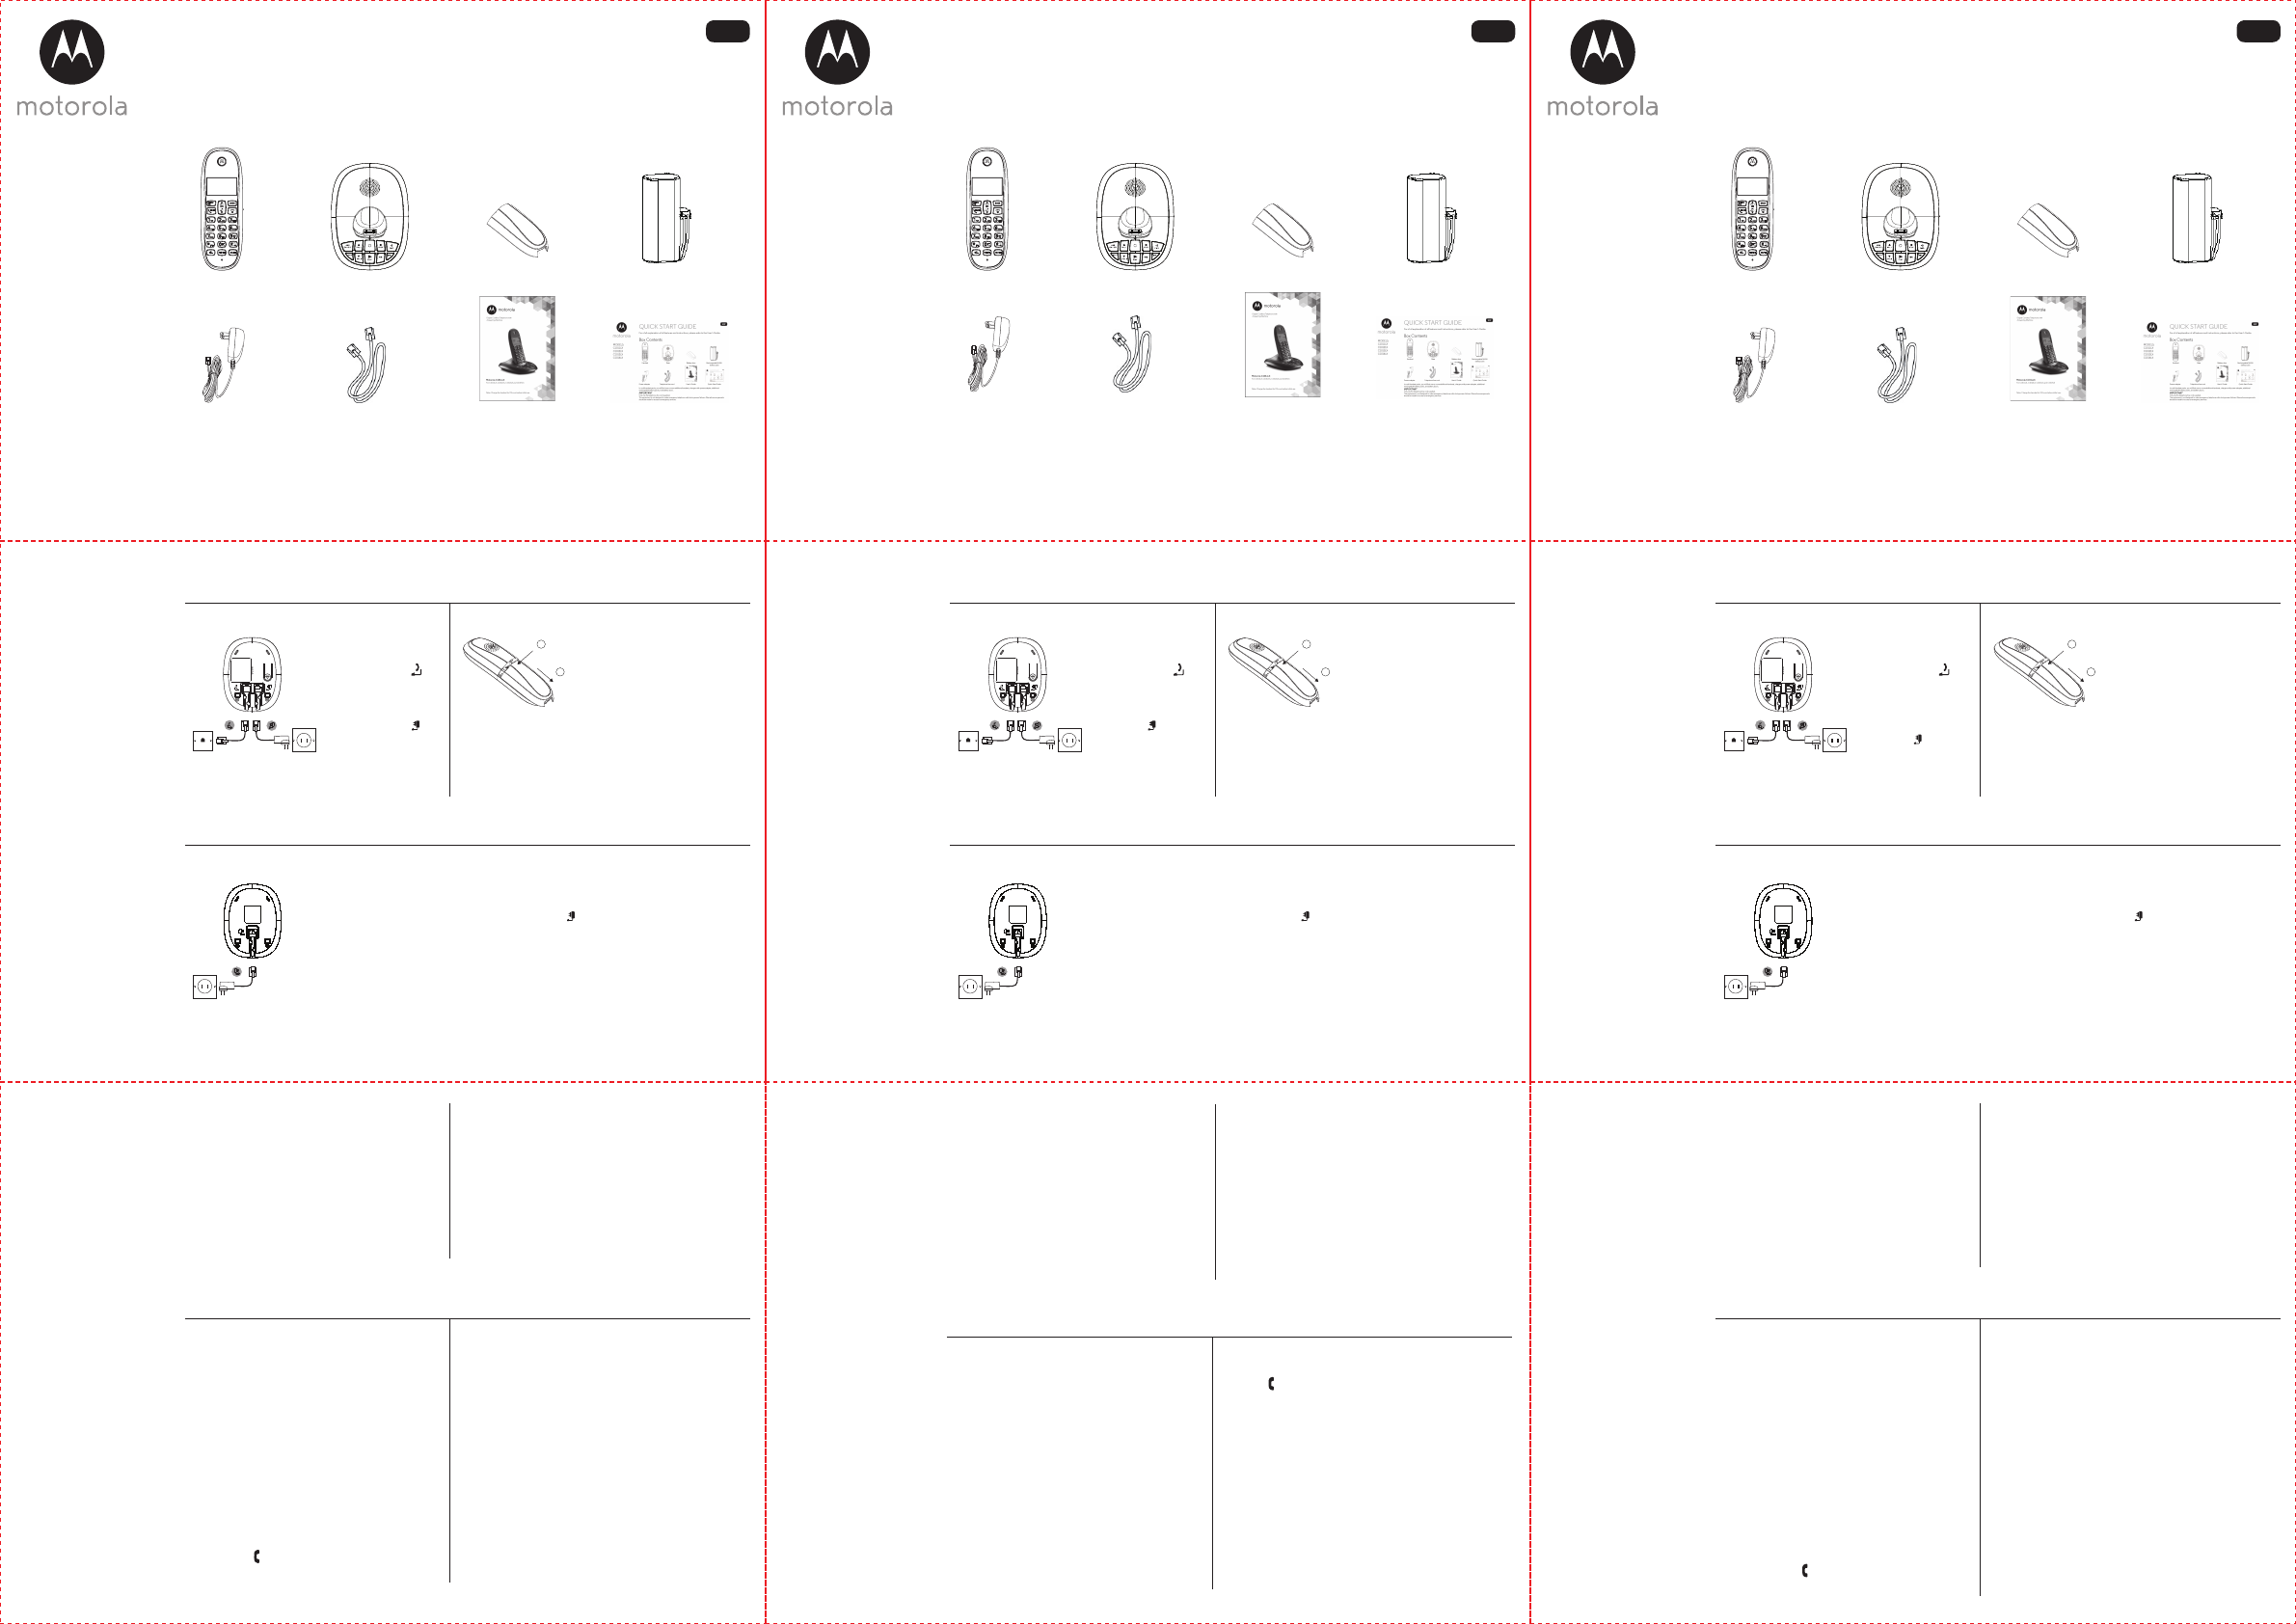
1. Getting Started
A. Connecting the base B. Installing and charging the handset battery pack
C. Connecting the handset and charger (for multi-pack only)
1. Plug the telephone
line cord into the
socket marked on
the rear of the base.
2. Plug the power
adapter into the
socket marked on
the rear of the base
and plug the other
end into the electrical
outlet.
1. If you are charging the battery for
the rst time, place the handset
on the base to charge for at least
24 hours continuously.
2. When the handset is fully
charged, the f icon will appear
steady on the display. Plug the
other end of the telephone line
cord (make sure that one end is
already plugged into the base)
into the telephone wall socket.
If you have purchased a multiple pack, you will need to carry out the same process for
all the handsets and chargers.
1. Plug the power adapter into the socket marked on the rear of the charger and
plug the other end into an electrical outlet.
2. If you are charging the battery for the rst time, place the handset on the charger to
charge for at least 24 hours continuously.
3. When the handset is fully charged, the f icon will appear steady on the display.
The display will show handset and handset number (e.g. 2) to indicate that it is
registered to the base.
IMPORTANT
Warning! Use only the approved rechargeable Ni-MH battery pack (AAA 2.4v 300mAh Ni-MH rechargeable battery)
supplied with your C101xLX.
Press down
1
Slide
2
Box Contents
Rechargeable Ni-MH
battery pack
Quick Start Guide
In multi-handset packs, you will nd one or more additional handsets, chargers with power adapter, additional
rechargeable battery packs, and battery doors.
IMPORTANT
Only use the telephone line cord supplied.
This equipment is not designed to make emergency telephone calls during power failures. Alternative arrangements
should be made for access to emergency services.
Telephone line cord User’s Guide
Battery doorHandset
Power adapter
Base
Pour tous les détails sur les fonctions et les instructions d'utilisation, veuillez consulter le
mode d'emploi.
1. Pour Commencer
A. Installation de la base B. Chargement du combiné
C. Installation du combiné et du chargeur (seulement pour les multi-pack)
1. Branchez le cordon
téléphonique à la
prise marquée à
l’arrière de la base.
2. Branchez
l’adaptateur à la prise
marquée à l’arrière
de la base et
branchez l’autre
extrémité à la prise
électrique.
1. Si vous chargez la batterie pour la
première fois, laissez le combiné
sur la base pendant au moins 24
heures sans interruption.
2. Quand le combiné est
complètement chargé, le
symbole, f s’allumera sur
l’aicheur. Branchez l’autre
extrémité du cordon téléphonique
à la prise téléphonique murale
(vériez que le cordon est bien
connecté à la base).
Si vous avez acheté un multi-pack, vous devrez eectuer cette opération pour tous les
combinés et chargeurs.
1. Branchez l’adaptateur à la prise marquée à l’arrière du chargeur et branchez
l’autre extrémité à la prise électrique.
2. Si vous chargez la batterie pour la première fois, laissez le combiné sur le chargeur
pendant au moins 24 heures sans interruption.
3. Quand le combiné est complètement chargé, le symbole, f s’allumera sur
l’aicheur. Le numéro du combiné et le mot «combiné» s’aicheront (par exemple
2) pour indiquer qu’il est souscrit à la base.
IMPORTANT
Attention! Utilisez seulement l’ensemble de piles Ni-MH (piles rechargeables AAA 2,4v 300mAh Ni-MH) fourni avec votre
C101xLX.
Appuyer
1
Glisser
2
D. Congurer la langue d’aichage E. Régler la date et l’heure
1. Appuyez sur m , faites déler vers Phone
setup (Conguration combiné).
2. Appuyez sur m . L’aicheur montre Sounds
(Mélodies).
3. Faites déler vers Language (Langue) puis
appuyez sur m.
4. Faites déler ou pour sélectionner la
langue, puis appuyez sur m pour conrmer.
1. Appuyez sur m , faites déler vers Phone setup
(Conguration combiné).
2. Appuyez sur m . L’aicheur montre Sounds (Mélodies).
3. Faites déler vers Date & Time (Date et heure) et
appuyez sur m.
4. Saisissez la date au moyen du clavier (par ex. 08--12--14
pour 12 août 2014) puis appuyez sur m pour conrmer.
5. Saisissez l’heure au format 12 heures hh:mm, par
exemple 02:45 pour 2:45.
6. Faites déler ou pour sélectionner AM ou PM puis
appuyez sur m pour conrmer.
Contenu de la boîte
Bloc de piles Ni-MH
rechargeable
Guide de démarrage rapide
Dans les ensembles à plusieurs combinés, vous trouverez un combiné supplémentaire ou plus, des chargeurs avec
adaptateurs d’alimentation, des blocs piles supplémentaires rechargeables et des compartiments à piles.
IMPORTANT
Utiliser le cordon de ligne téléphonique fourni seulement.
Cet équipement n’est pas conçu pour eectuer des appels téléphoniques d’urgence pendant les pannes de courant.
D’autres dispositions doivent être prises pour accéder à des services d’urgence.
Cordon de ligne
téléphonique
Guide de l’utilisateur
Compartiment à pilesCombiné
Adaptateur
d’alimentation
Base
Para una explicación completa de todas las funciones e instrucciones, consulte la
Guía de usuario.
Contenido de la caja
Batería Ni-MH recargable
Guía rápida de usuario
En paquetes con varias terminales, encontrará una o más terminales adicionales, cargadores con adaptadores de
corriente, baterías recargables adicionales, y tapas de batería.
IMPORTANTE
Utilice sólo el cable de línea telefónica suministrado.
Este equipo no está diseñado para realizar llamadas telefónicas de emergencia en caso de apagones de electricidad. Se
deberán realizar ajustes alternativos para poder acceder a los servicios de emergencia.
Línea telefónica Guía de usuario
Tapa bateríaTerminal
Adaptador corriente
Base
2. Utilisation du Téléphone
Allumer/éteindre le combiné
Appuyez longuement sur e pour allumer ou
éteindre le combiné.
Faire un appel
1. Appuyez sur t.
2. Composer un numéro de téléphone.
Prénumérotation
1. Utilisez le clavier pour composer un numéro, si
vous faites une erreur, appuyez sur b pour
eacer le dernier chire.
2. Appuyez sur t pour composer.
Raccrocher
1. Appuyez sur e , ou placez le combiné sur la
base ou le chargeur.
Répondre à un appel
Lorsque vous recevez un appel externe, le téléphone sonne
et l’icône clignote sur l’aicheur.
1. Appuyez sur t pour répondre l’appel.
Régler le volume de l’écouteur
Pendant un appel, appuyez sur ou sur pour
augmenter ou diminuer le volume.
Vous pouvez choisir parmi 5 niveaux.
Sourdine
Vous pouvez couper le son de votre combiné et parler à
une personne à côté de vous sans que votre correspondant
vous écoute.
1. Pendant un appel, appuyez sur M . L’aicheur montre
Mute (sourdine) et votre correspondant ne peut pas vous
entendre.
2. Appuyez sur M de nouveau pour reprendre la conversation.
Switch the handset on / o
Press and hold e to switch the handset on or o.
Make a call
1. Press t.
2. Dial a telephone number.
Pre-dial
1. Use the keypad to dial a number, if you make a
mistake press b to delete the last digit.
2. Press t to dial.
End a call
1. Press e , or place the handset back on the base
or charger.
Answer a call
When you receive an external call, the phone will
ring and the icon will appear on the display.
1. Press t to answer the call.
Adjust the earpiece volume
During a call, press or to increase or decrease the
volume. There are 5 levels to choose from.
Mute
You can mute your handset so that you can talk to someone
nearby without your caller hearing.
1. During a call, press M . The display shows Mute on and
your caller cannot hear you.
2. Press M again to resume your call.
Redial
The last 10 entries dialed are stored in the redial list.
View or dial an entry
1. Press r to open the Redial list.
2. Scroll or to the entry you want.
3. Press t to dial the displayed entry or press e to return to
standby.
2. Using the Phone
D. Setting the display language
1. Press m , scroll to Phone setup.
2. Press m . The display shows Sounds.
3. Scroll to Language and press m.
4. Scroll or to select the required language
and press m to conrm.
E. Setting date and time
1. Press m , scroll to Phone setup.
2. Press m . The display shows Sounds.
3. Scroll to Date & Time and press m.
4. Enter the date using the keypad (e.g. 8-12-14 for the
August 12, 2014) and press m to conrm.
5. Enter the time using the 12 hour format hh:mm, e.g.
02:45 for 2:45.
6. Scroll or to select AM or PM and press m to conrm.
1. Primeros Pasos
A. Conectar la base B. Cargar el terminal
C. Conectar el terminal y el cargador (sólo para multi-pack)
1. Enchufe el cable de
línea telefónica en la
toma marcada en la
parte trasera de la
base.
2. Enchufe el adaptador
de corriente en la toma
marcada en la parte
trasera de la base y
enchufe al otro
extremo en la toma de
corrient.
1. Si carga la batería por primera
vez, coloque el terminal en la base
para cargarlo de forma continua
durante al menos 24 horas.
2. Cuando el terminal esté cargado
por completo, el icono, f
aparecerá en la pantalla. Conecte
el otro extremo del cable de la
línea telefónica (asegurarse que
un extremo ya esté conectado a la
base) en la toma telefónica de la
pared.
Si usted ha comprado un pack múltiple, tendrá que llevar a cabo este proceso para
todos los terminales y cargadores.
1. Enchufe el adaptador de corriente en la toma marcada en la parte trasera del
cargador y enchufe el otro extremo en la toma de corriente.
2. Si carga la batería por primera vez, coloque el terminal en el cargador para cargarlo
de forma continua durante al menos 24 horas.
3. Cuando el terminal esté cargado por completo, el icono, f aparecerá en la
pantalla. La pantalla mostrará el terminal y el número de terminal (por ejemplo 2)
para indicar que está registrado en la base.
IMPORTANTE
Advertencia! Utilice sólo el paquete de baterías recargables Ni-MH aprobadas (AAA 2,4v 300mAh Ni-MH batería
recargable) suministrada con su C101xLX.
Presione
hacia abajo
1
Deslice
2
Encender / apagar el terminal
Mantenga pulsado e para encender o apagar el
terminal.
Realizar una llamada
1. Pulse t.
2. Marca un número de teléfono.
Pre-marcar
1. Utilice el teclado para marcar un número, si se
equivoca pulse b para eliminar el último dígito.
2. Pulse t para marcar.
Finalizar una llamada
1. Pulse e , o vuelva a colocar el terminal en la
base o cargador.
Responder una llamada
Cuando recibe una llamada externa, el teléfono
suena y el icono parpadea en la pantalla.
1. Pulse t para atender la llamada.
Ajuste el volumen del terminal
Durante una llamada, pulse o para subir o bajar el
volumen. Puede elegir entre 5 niveles de volumen.
Silencio
Puede silenciar el terminal así puede hablar con alguien
que esté cerca sin que la persona al teléfono le oiga.
1. Durante una llamada, pulse M . La pantalla indica Mute
on (Silencio activado) y la persona al teléfono no le
podrá oir.
2. Pulse M otra vez para volver a la llamada.
Rellamar
Las últimas 10 entradas marcadas se guardarán en la lista
de rellamada.
Visualice o marque una entrada
1. Pulse r para abrir la lista de rellamada.
2. Desplácese con o hacia la entrada que desee.
3. Pulse t para marcar la entrada en pantalla o pulse e
para volver al modo standby.
2. Usar el Teléfono
D. Congurar el idioma de la pantalla
1. Pulse m , desplácese con hacia Phone setup
(Conguración teléfono).
2. Pulse m . La pantalla muestra Sounds (Sonidos).
3. Desplácese con hacia Language (Idioma) y
pulse m.
4. Desplácese con o para seleccionar el
idioma necesario y pulse m para conrmar.
E. Congurar fecha y hora
1. Pulse m , desplácese con hacia Phone setup
(Conguración teléfono).
2. Pulse m . La pantalla muestra Sounds (Sonidos).
3. Desplácese con hacia Date & Time y pulse m.
4. Introduzca la fecha utilizando el teclado (p. ej. 08--12--14
para el 12 de agosto 2014) y pulse m para conrmar.
5. Introduzca la hora utilizando el formato de 12 horas
hh:mm, p. ej. 02:45 para 2:45.
6. Desplácese con o para seleccionar AM o PM y
pulse m para conrmar.