``` ``` ```
```
a
b
c
d
```
a
Current date
b
Recording mode indicator
c
Microphone sensitivity indicator
d
Total number of recorded les
for the date
e
Current le number
f
Elapsed recording time
g
Remaining recording time
a
b
c
d
e
f
g
```
VOICE REC
NO
DP
EN
INST
Thank youympus Digital V
Please read
abo
Keep the instructions handy for
T
you test
Shinjuku Monolith, 3-1 Nishi-Shinjuku 2-chome, Shinjuku-ku, T
T
http://www.olympus.com
3500 Corporate Parkway
T
http://www.olympusamerica.com
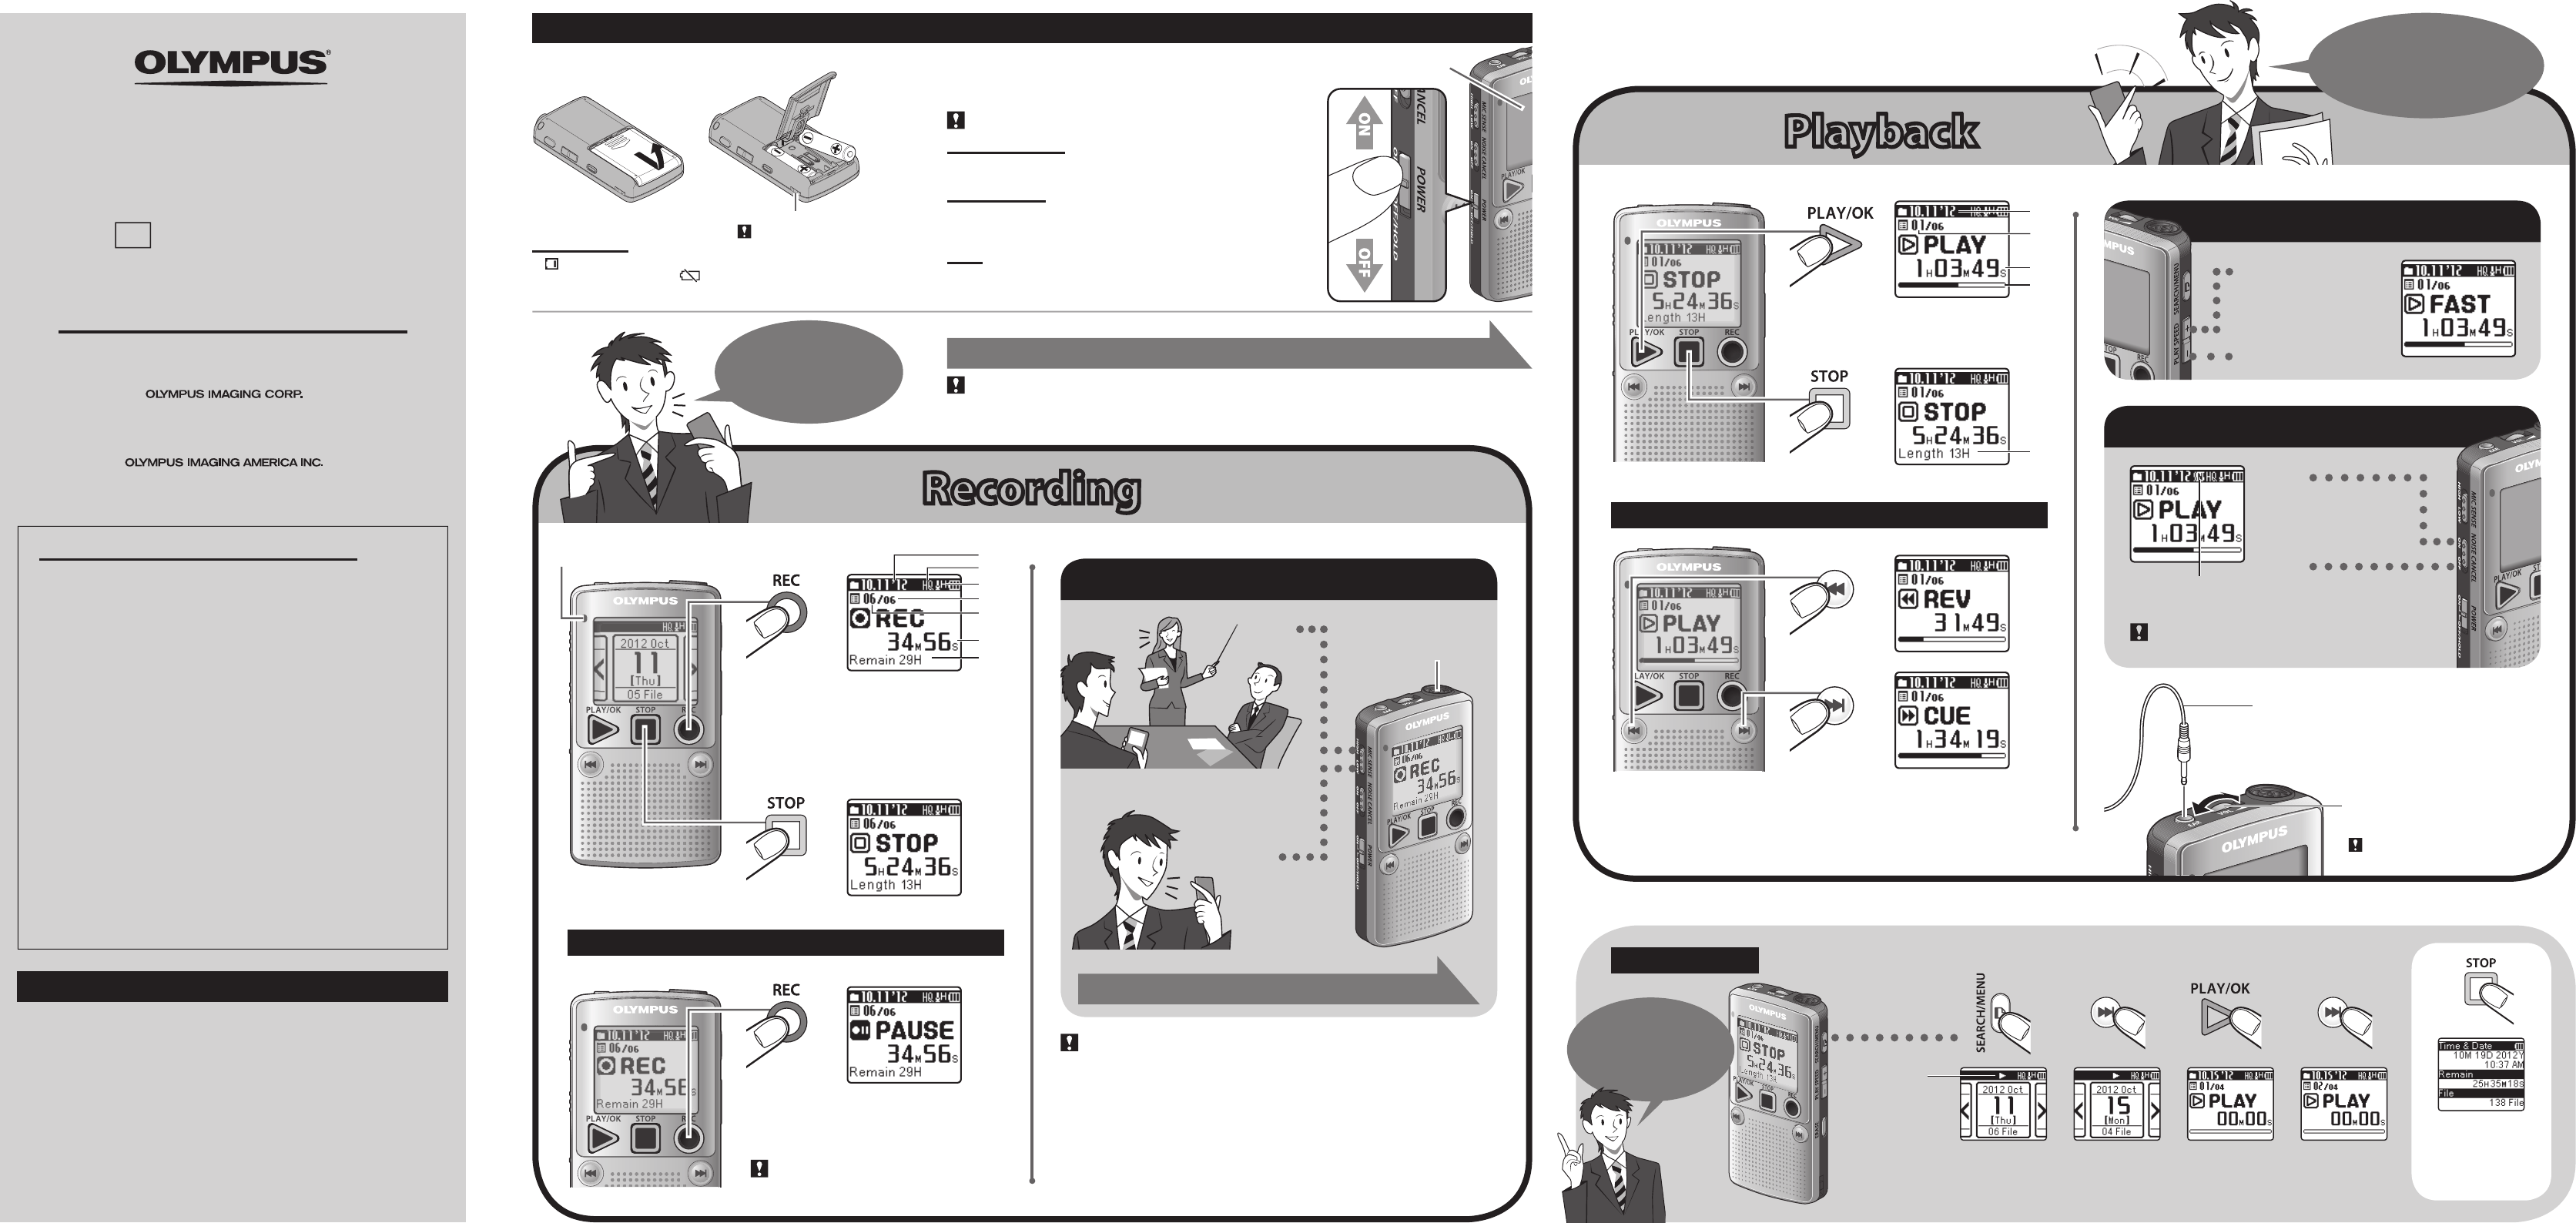
Getting star
1 Insert bat 2 T
Slide the POWER switch to ON.
•
Be sure to remo
T
While the recorder is in the st mode, slide the
POWER switch to
OFF/HOLD.
Po
If no operations are per for more than 10 minutes when the
power is on, the display automatically turns off and the recorder enters
the power sav T
HOLD:
If sliding the
POWER swich to OFF/HOLD while the recorder is in
operation, all buttons and switches are disabled without interrupt
-
ing the current operations.
Str
•
A strap is not supplied with this product.
Battery indicator:
If [ ]i
battery lev too low
]aBatt] are displayed and then
t
Set the time and date.
“Setti
“Changing t
Recording indicat while recording.
Pause
Microphone se
Tu t m
toward a sound source to
be recorded.
High
Low
Highly sen mode which can rec
ing noi
H
)
Standard sensitivit
(
L
)
•
functions and volume beforehand.
• ensure recording from the beginning, star recording a sound source after the
recording indicat
•
Memory Full]oMax]i
d
• the recorder is placed direc on a tab the vibrations of the table are likely to be
r
recorder and the table to preven vibrations from being recorded.
• the available re time b less than 6 seconds, the recording
i
seconds and to 1
Recording
Recording
• [Set ] screen appears when y
than 30 minutes without power supply
• the time and date are not set, the time and date of the default settings are recorded to les .
a
Recording date
b
Current le number
c
Elapsed playback time
d
Playback position bar indicator
F
Changing the pla
Noise cancel
Fa
Slow
Noise Cancel indicator
On
Off
Noise is reduced when
play to achieve
better sound qualit
When an earphone is connected, the speak
off. P sound for an earphone is monaural.
T the ear
the volume before inserting an earphone.
Do not raise the volume too high when
using an earphone. It may cause hearing
impairment and a decrease in hearing
ability.
• earphone is not supplied with
this product.
Vo
High
Low
File sear
Recorder status
indicator
: During playback
F
: During fast playback
S
: During slow playback
When the recorder is in
stop mode, press and
hold the
STOP (/ )b
ton to the
Time &
Date]aRemain].
e
Approximate le length
Pl
Pl
Press and hold
e
Y
change the
recording
mode!
T the RE (- )b
recording. T the rec the
REC (-)
button again.
• is automatically stopped if 60
m
Select the sensitivity ac to the surrounding conditions.
Recorded files are
grouped by date.
s To fast-forward or rewind a le, press and hold
0
or
9
button while playing
back a le.
s To skip to the next le or previous le, press
0
or
9
button.
s Fast-forwarding or rewinding continues to the next le.
Playback speed is changed
betw 0.5 0. n
1. 1. an 2. b ea
press of the buttons.
The file i played back as it
was recorded.
• th NOISE CANCEL switch is set to ON ,p
speed returns to normal.
Search for files
by the date the
were recorded.
s
When searching for a le recorded on October 15.
The date displa
appears.
Select October 1 The f f is
play
If the file is skipped,
the recorder play
back the next file.
U1-BS0952-01
TR1111
Introduction
• The conten of this documen may be changed in the future without advanced
notice. Contact our C relating
to product names and model numbers
• The screen and recorder illustrations shown in this manual were produced during
the developmen stages and may differ from the actual produc The utmost care
h
u
our C
• Any liability for p damages or damage of any kind o due to data loss
incurred by a defect of the product, repair per by the third part other
than Olymp an Oly authorized service s or any other reaso
excluded.
F
USA RFI:
T
f
limits are designed to pro protection against harmful
interference in a residen This equipment generates, uses
and can radiate radio frequency energy and, if not installed and u
accordanc cause harmful interference t
communications. Howev is no guarant
not occur in a particular installation. If this equipment does cause harmful
interference t or television reception, which can be det
turning the equipmen on, t is encouraged to tr to c
the in one or more of the follo
• Reorient or relocate the receiving antenna.
• Increase the separat bet the equipment and receiver
• Connect the equipment into an outlet on a circuit different from that to
which t connected.
•
Canadian RFI:
This digital appara exceed the Class B limit radio noise
emissions from digit set out in the Radio Interference
Regulations of the Canadian Department of C
Cet appareil numérique ne dépas les limit Catégorie B pour les
émissions de bruit radio émanant d’ tel que prévu
dans les Règlements sur l’Interférence Radio du D
des Communications.
Protective lm