CMT
WARNING
T
opening of the a
curtains, etc. Do not place the naked ame sour
as lighted candles o
T
this appa
objects lled with liquids, such as vases, on the a
Do not install the ap
bookcase or built-in cab
As the main p
mains, co
Should yo
the main plug fr
Do not expose batteries or a
installed to excessive hea
like.
e unit is no
is connected to the A
been turned o.
Excessive sound p
headpho
CAUTION
e use of op
increase eye hazar
is ap
as a CLASS 1 LASER
product. is ma
is located on the r
exterior
Notice for cust
information is only applicable to
equipment sold in countries applying EU
directives.
e man
1-7-1 Ko
A
Sony Deutschland G
Stu
please refer to the addr
guaran
Disposal of Old Elec
Electronic Equipment
(A
Union and other European
countries with separ
collection systems)
is symbol on the pr
that this pr
waste. I
collection point fo
electronic equip
disposed of correctly
negativ
health, which could otherwise b
waste handlin
will help to con
informa
con
disposal ser
product.
A
Disposal of waste batteries
(applicable in the European
Union and other European
countries with separ
collection systems)
is symbol on the ba
that the bat
treated as ho
On certain batteries this symbol migh
comb
symbols for m
battery con
lead.
By ensuring these bat
you will help p
for the en
otherwise b
the battery
conserve natural r
In case of p
integrity r
incorporat
qualied ser
be treated pr
to the ap
electrical and electronic equipm
Fo
to remo
battery over t
recycling of was
Fo
product o
your ho
you pur
Note on DualDiscs
A DualDisc is a two sided disc product which mates
DVD reco
audio ma
audio ma
Disc (CD) standard
guaran
Music discs encoded with cop
protection technologies
is prod
to the Compact Disc (CD) standar
music discs encoded with cop
technologies ar
Please be aware tha
that do no
playab
License and
MPEG Layer
licensed from Fra
All other trademarks and r
their respective holders. I
TM
and
®
marks
are no
Operations
T
If the USB device has mo
examp
select which memory to use and then start playback.
Y
to select a memory before starting playback.
U
device.
1 Press FUNCTION
repeatedly to select the USB
function.
2 Connect the USB device to the (USB) port
.
3 While holding down ENTER
, press
.
4 Press /
repeatedly to select a memory
number
Proceed to step 5 if o
T
.
5 Press ENTER
.
Notes
supplied wi
manual su
the operation method.
on the type of USB device connected.
USB device. If there a
may take a lon
there may be a dela
guarant
with incom
interrupt
following cases;
5,000.
(including the “
ese numbers ma
Do not save o
device that has audio les.
in a connected USB device.
USB device.
an “
Not
actual le diers, the system may p
T
Y
devices that hav
system is on.
e chargin
to the (USB) port
. e charg
the USB device display
your US
Note on charging the USB device with this sy
Y
function is selected. See “
Getting Star
Unit
Remote
is man
remot
using the bu
names.
T
Slide and r
the two R6 (size AA) batt side
rst, ma
Notes on using the remote
batteries.
batteries to a
When carr
1 Remove a disc to prot
2 Press (po
on the unit to turn o the
system and conrm that
3 Unplug the power cor
T
1 Press
to turn on the system.
2 Press CL
to select the clock set
mode.
If “ /
repeatedly
to select “CL
.
3 Press /
repeatedly to set the hour
press ENTER
.
4 Use the same procedur
Note
e clock settings are los
power failur
T
Press D
. e clock is displa
8 seconds.
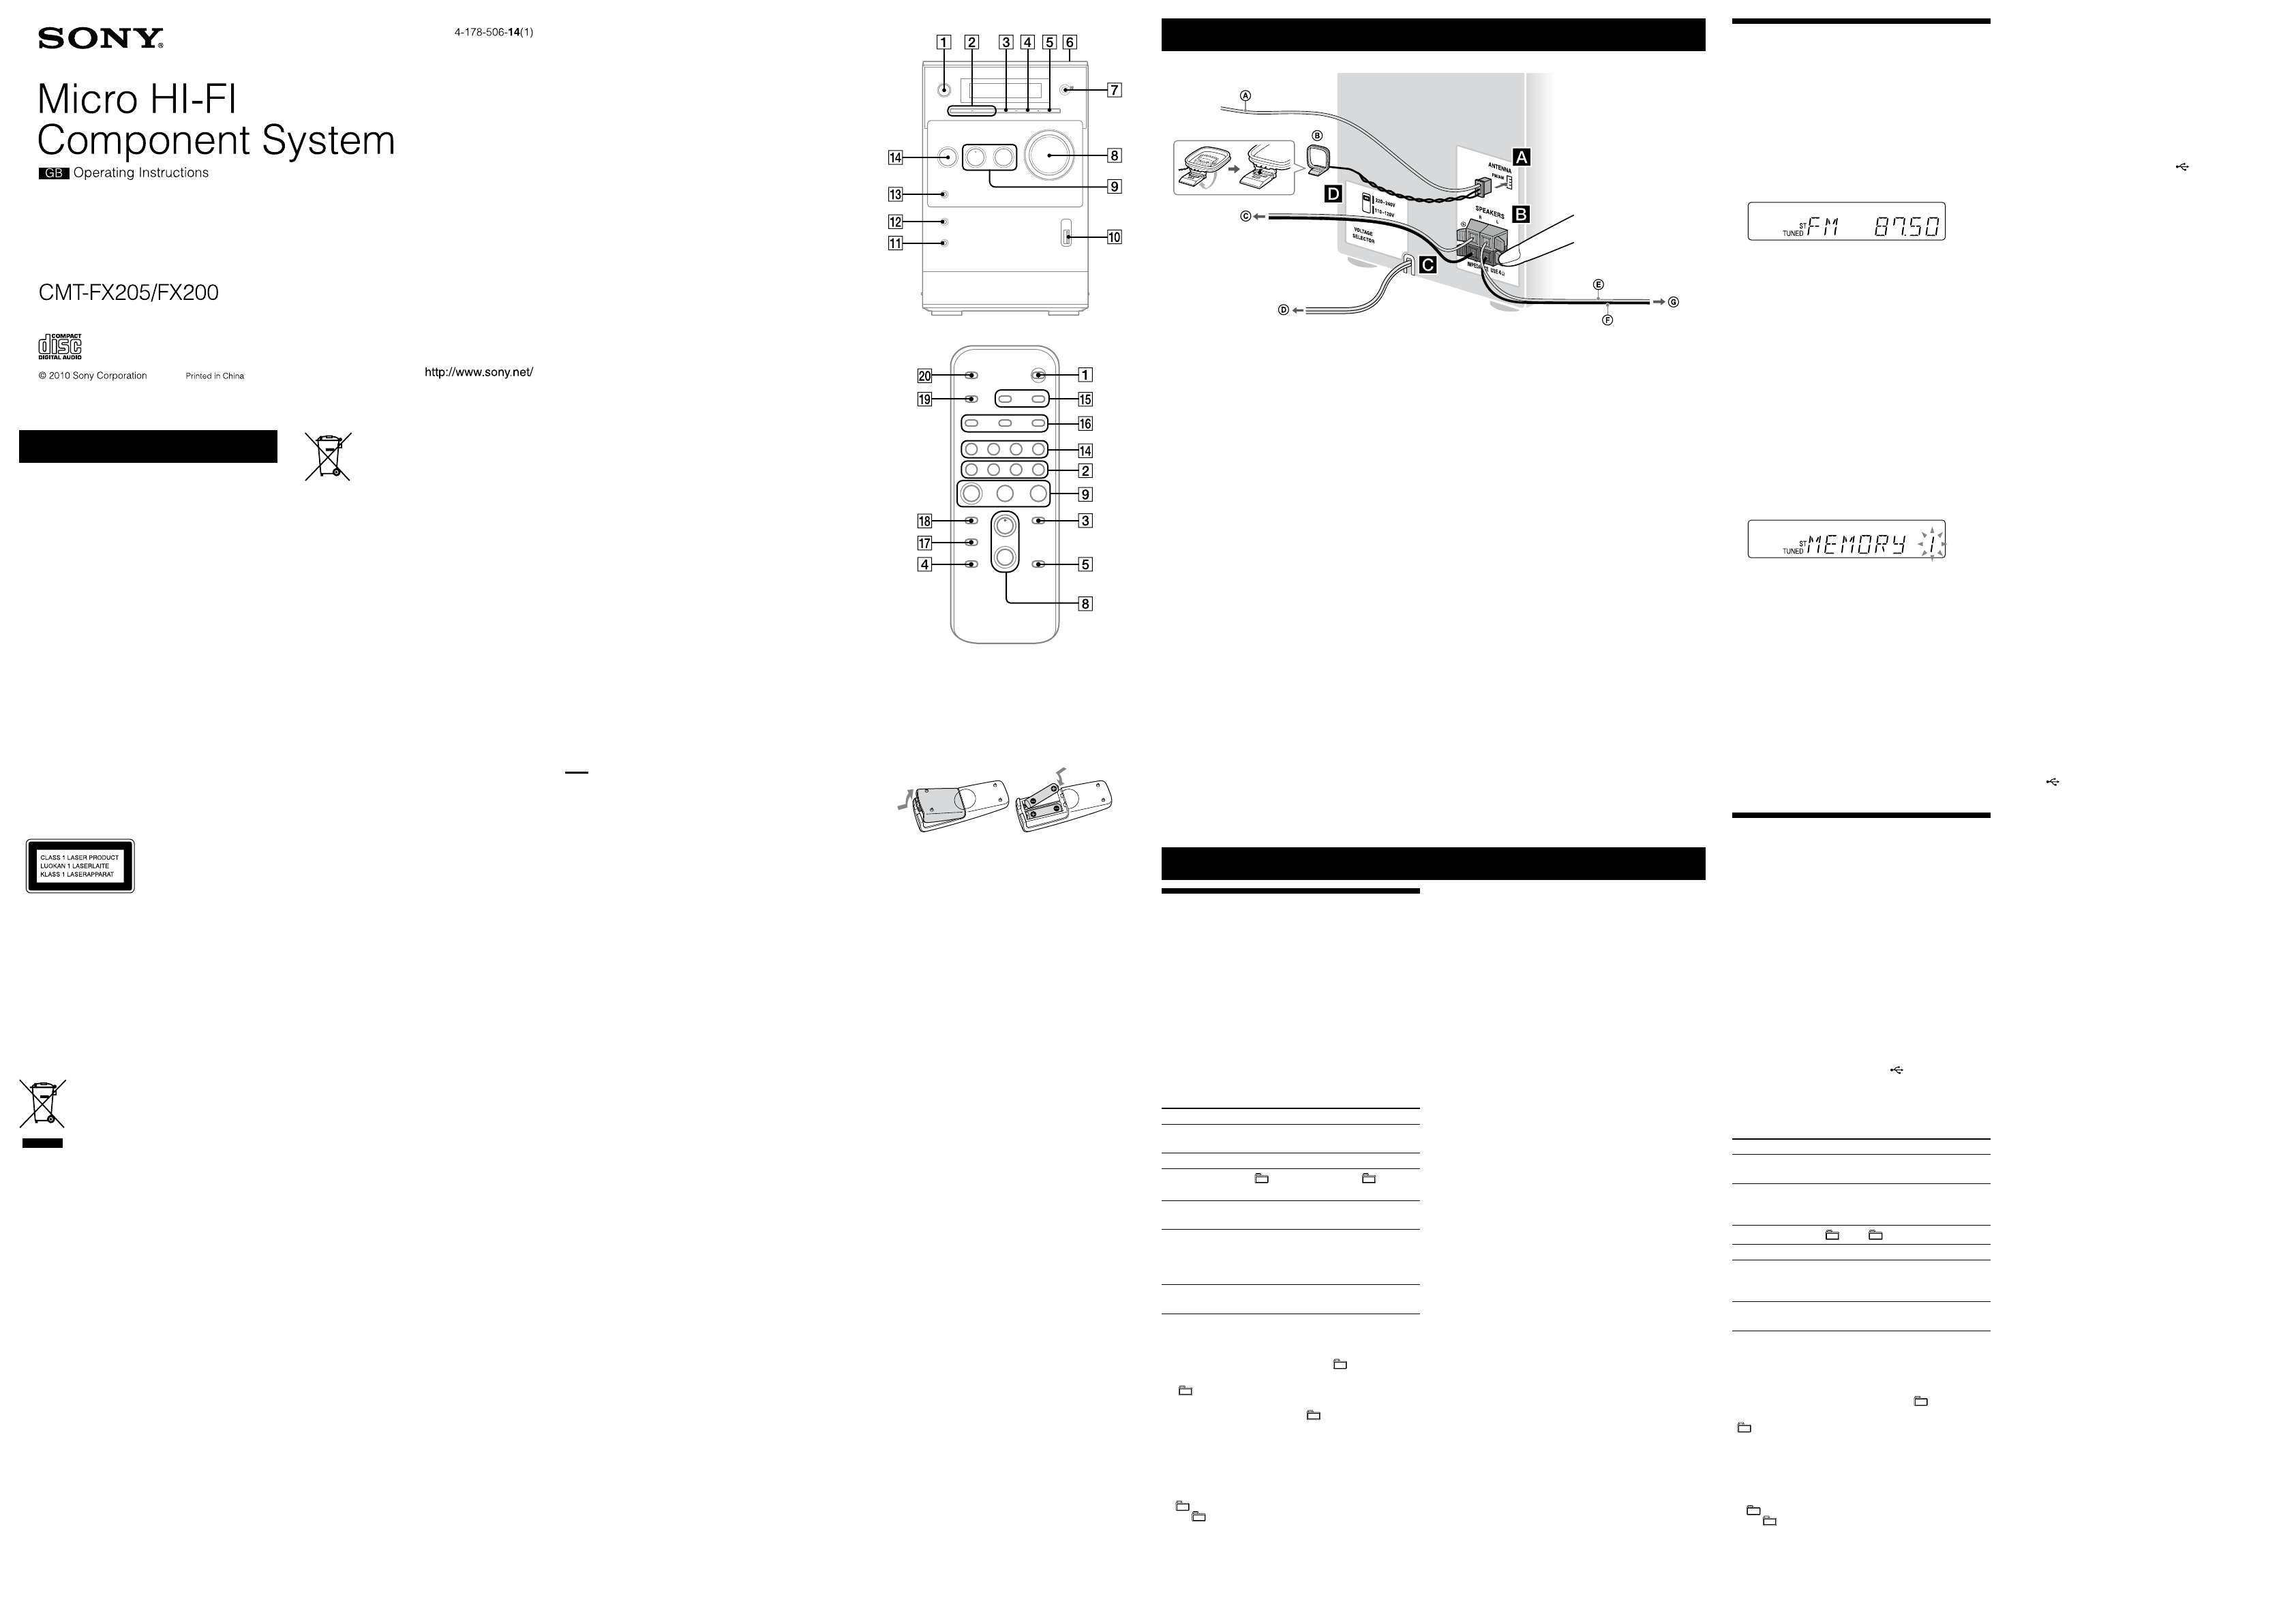
Antennas
Find a locatio
reception, a
Keep the an
power cor
Speakers
Insert only the strip
Po
Connect the power cord t
If the pl
plug ada
Voltage selector
Fo
SELECTOR t
Listening to the radio
1 Select
Press TUNER/B
repeatedly
2 Perform tuning.
For aut
Press TUNIN
repeatedly un
appears, a
. Scanning stops
au
“TUNED” and “
up in the displa
If “TUNED” does no
not sto
to stop scannin
man
When yo
ser
(Eur
For manual tuning
Press TUNIN
repeatedly un
“MANU
repeatedly to t
Tip
T
repeatedly un
Presetting radio stations
1 T
2 Press
to select the tuner
memory mode.
3 Press +/
repeatedly to select the desired pr
number
If ano
preset n
station.
4 Press ENTER
to store the station.
5 Repeat steps 1 through 4 to stor
Y
preset sta
if you disconnect the pow
occurs.
6 T
MODE
repeatedly until
then press +/
repeatedly to select the desired
preset number
Playing a le of the USB de
e audio f
is MP3*.
* F
cannot be play
Files downloaded from an o
back on this system.
Check the websites belo
com
Fo
<htt
Fo
<htt
Fo
<htt
1 Select the USB func
Press US
.
2 Connect the USB device to the (USB) port
.
3 Start playback.
Press
.
Other operations
T Press
Pa
. T
but
Sto
. T
*. T
again.
Select a folder
+
/
repeatedly
Select a le
/
.
Find a poin
a le
Ho /
during
playback, and r
the desired point.
Select Rep
REPEA
repeatedly un
or “REP1” a
* When pla
from a dieren
T
Press P
repeatedly while the USB device
is stop ” for all les
in the folder on the US
“ SHUF”), or pr
Note on Repeat Play
“REP” indica
you sto
Note on shue play mode
When you
or “ SHUF”) is cleared a
mode (“ ”).
Playing a CD/MP3 disc
1 Select the CD func
Press CD
.
2 Place a disc.
Press PUS
on the unit,
and place a disc with the label side up o
com
T PUSH OPEN/
CLOSE
on the unit.
3 Start playback.
Press (p
.
Other operations
T Press
Pa
(pause)
. T
the but
Sto
(stop)
.
Select a folder on
an MP3 disc
(select folder) +
/
repeatedly
Select a track or
le
(go back)/ (go fo
.
Find a poin
track or le
Ho (rewind)/ (fast
forward)
during pla
release the but
point.
Select Rep
REPEA
repeatedly un
or “REP1” a
T
Press P
repeatedly while the play
stop ” f
les in the folder on the disc), sh
or “ SHUF*” f
(“PGM
* When pla (S
same operation a
Note on Repeat Play
“REP1” indicat
playback.
Note on shue play mode
When you
or “ SHUF”) is cleared a
mode (“ ”).
Notes on playing MP3 discs
disc that has MP3 les.
the disc.
“
le diers, playing this le ma
damage the speaker system an
device, and recor
MP3 discs may pr
at all.
Notes on playing multisession discs
on the disc cannot be recognized regar
only CD-D
following sessio
contin
until the system encoun
format.
FM lead antenna (Extend it horizon
AM loop antenna
T
Connect headphones t
on the
unit.
Speaker cor )
Speaker cor )