2-654-464-12(1) DSC-R1
Zoom ring
Select the image size for use
MENU button
1 Select . 2 Press MENU.
3 Select (Image Size) by
moving the multi-selector to
b, then select the desired
image size by moving the
multi-selector to v/ V.
• The recordable number of st
the right side of [Image Size].
4 Press MENU to complete the
setting.
10M
7M
3M
5M
1M
50
pic
Image Size
On still image sizes
For details on the image size t “User’s Guide/Troubleshooting” (page 13)
The default settings are marked with .
* The images recorded using the cam
postcards, etc.
** This is a size larger than A3 size. You
• You can resize the images later ([Resize] t “User’s Guide/Troubleshooting” (page 6 ).
On the recordable number of still images
Recordable number of still images vary depending on the image size selected.
For details on recordable number t “User’s Guide/Troubleshootin
• The number of recordable images can di
Image size* Guidelines No. of images Printing
10M (3888×2592) For storing important im
A3/A3+** size or fine A4 size images
Less
More
Fine
Rough
7M (3264×2176)
5M (2784×1856) For printing in A4 size or hig
images in A5 size
3M (2160×1440)
1M (1296×864) For printing in postcard
For recording a larger nu
For creating web pages
Maximum number of recordable images
1M
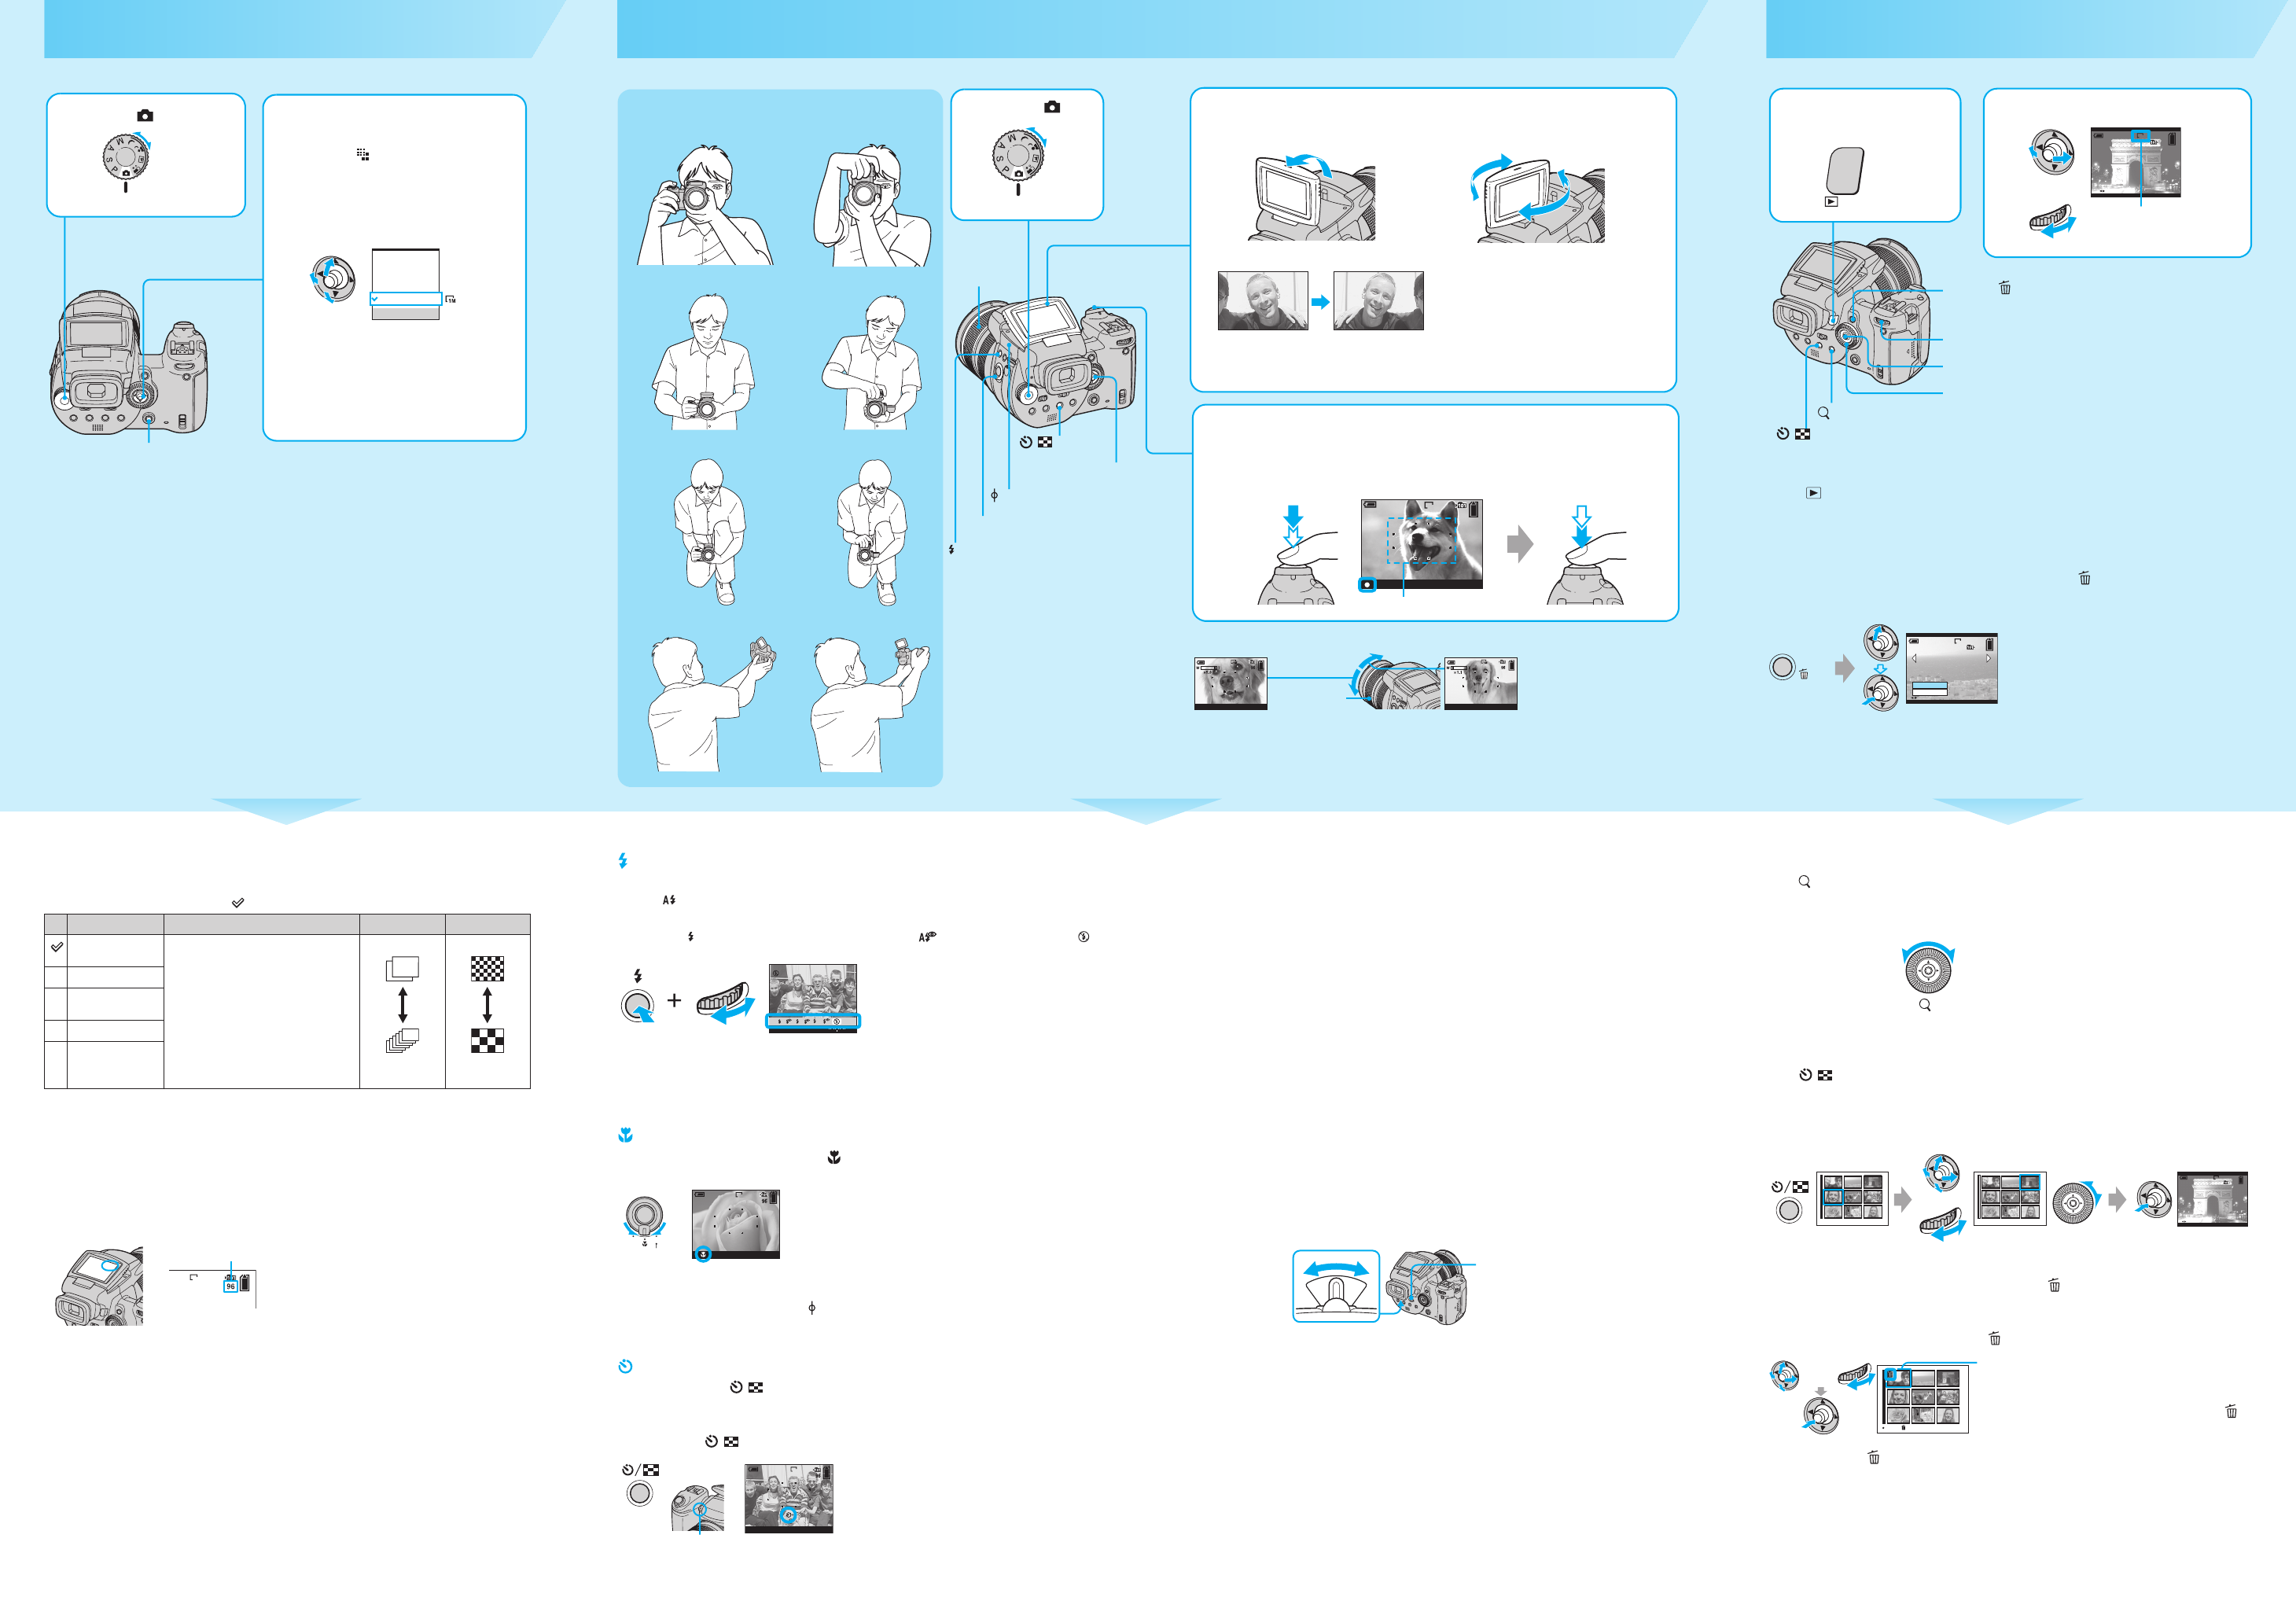
Shoot images easily (Auto adjustment mode)
Holding the camera
Using finder
Using LCD
At a low-angl
At a high
Using the zoom
• Optical zoom scalin
For details on thet “User’s Guide/Troubleshooti
(page 71)
2 Adjust the angle of the LCD screen for your preference.
Position a subject in the center of the focus frame.
Rotating the LCD screen
Turn over the LCD screen to the le
The image on the LCD scr
image. However, the ima
when recorded.
Up to 90 degrees
Up to 180 degrees
Recorded image
Image on the LCD
screen
3 Shoot with the shutter but
Press and hold the
shutter button halfway
down to
AE/AF lock indic
Flashing indica
t Indicator lit/beeps
Press the shutter
fully down.
The shutter sounds.
96
1M
FINE
F2.8
MA
110min
AF range finder frame
M AF
110min
M AF
110min
Zoom ring
Selecting a flash mode for still
The flash automatically pops up and strobes when the surroundings
subject ( (Auto)). Close the
When reducing
Press and hold (Flash) and turn the main command dial to select (Auto with red-eye reduction)/
(No flash).
• For details on the flash mot “User’s Guide/Troubleshoo
• Shooting distance (when [ISO] is set to [AUTO
W side: Approx. 0.5 to 8.5 m (1 feet 7 3
T side: Approx. 0.4 to 5.0
• The flash strobes twice. T
Shooting close-up (Macro)
Before step 3, set the FOCUS switch to .
To cancel, set to AUT
• The in-focus range becomes narrow, and th
• The Auto Focus speed drops.
Shortest sh base point of d
Setting all the way
Setting all the way to t
Using the self-timer
Before step 3, press / (Self-
Press the shutter button, the self-
(approximately 10 seconds later).
To cancel, press / again.
2000 F2.0
-2 2+101
AA
SL
SL
FOCUS
AUTO
MANUAL
PUSH
AUTO
M AF
110min
1M
M AF
1M
110min
Self-timer lamp
If you shoot a still image of a subject that is difficult to focus on
• If the subject is clos
• When the camera can
slowly and the b
manual focus mode.
Subjects di
To identify items on the screen
t “User’s Guide/Troubleshooting” (page 19)
To shoot using the finder
With the FINDER/AUTO/LCD switch, you can c
LCD screen. When set to
and the LCD screen. You can immediately react to the various angles.
FINDER: The image appears in the finder and it does not appear on the LCD screen.
AUTO: When you move your head away from the finder, the available screen is automatically switched from
the finder to the LCD screen.
LCD: The image appears on the LCD screen and it does not appear in the finder.
Adjust the finder adjustment lever until the image appears clearly
the image.
• The camera may not aut
than AUTO.
–t FINDER
–
t LCD
–
–e subject an
background is poor.
–
–M
–
– Flashing
–B
Finder adjustment
lever
FINDER/AUTO/
LCD switch
View/delete images
To return to the shooting mode
• Press (Playback) again.
• Press and hold the shutter button halfway down.
• Change the position of the mode dial.
To delete images
1 Display the image you want to delete and press AE LOCK/ (De
2 Select [Delete] by moving the multi-selector to v, then press the center of
To cancel th
Select [Exit], then pres
selector.
1 Turn to playback
mode.
2 Select an image.
10:30
PM
2005 1 1
-
0003
1M
3/ 9
110min
BACK/NEXT
Image size is indicated.
or
Sub comma
AE LOCK/ button
/ button
button
Multi-selector
Main command dial
2/ 9
1M
110min
AE LOCK
Delete
Exit
BACK/NEXT
To view an enlarged image (p
Press (Playback zoom) while displaying a
Adjust the portion: Multi-selector (v /V /b /B )
Adjust the zoom scaling: Sub command dial
Cancel playback zoom: press or the
To store enlarged images: [Trimming] t “User’s Guide/Troubleshooting” (page 70)
Viewing an index screen
Press / (Index) and select an image by moving the multi-selector to v/ V/ b/ B.
To return to the single-
(previous) index screen, keep moving to b/ B.
To delete images in
1 While an index screen is displayed, press AE LOCK/ (Delete)
moving the multi-selector to v/ V , then press the center of the multi-se
2 Select v/ V/ b/ B, then press the
center of the multi-selector to di
Green frame
To cancel a se
Select an image you have previously selected for deletion,
then press the center of the multi-selector to delete the
indicator from the image.
3 Pres (Delete).
4 Select [B, then press the center of the multi-selector.
• To delete all the iv/ V in step 1 instea
[Select], then press the center.
Scaling down Scaling up
10:30
PM
2005 1 1101
-
0003
3/ 9
10:30
PM
2005 1 1101
-
0003
1M
110min
BACK/NEXT
•
SINGLE DISPLAY
•
SINGLE DISPLAY
To disp
previous/next image
To display a previous/
next index screen
or
TO NEXTSELECT
or
1 Select .
button
FOCUS switch
Base point of distance
/ b
Multi-selector