Portable MiniDisc
Player
Operating instructions
Manual de instrucciones
MZ-E500
Sony Corporation © 2000 Printed in Japan
“WALKMAN” is a trademark of Sony
Corporation.
“WALKMAN” es una marca comercial de
Sony Corporation
3-224-424-12 (1)
WARNING
To prevent fire or shock hazard, do not
expose the unit to rain or moisture.
To avoid electrical shock, do not open the
cabinet. Refer servicing to qualified
personnel only.
Caution
The use of optical instruments with this product will increase
eye hazard.
CAUTION — INVISIBLE LASER RADIATION WHEN OPEN
DO NOT STARE INTO BEAM OR VIEW DIRECTLY WITH
OPTICAL INSTRUMENTS
Information
IN NO EVENT SHALL SELLER BE LIABLE FOR ANY DIRECT,
INCIDENTAL OR CONSEQUENTIAL DAMAGES OF ANY
NATURE, OR LOSSES OR EXPENSES RESULTING FROM ANY
DEFECTIVE PRODUCT OR THE USE OF ANY PRODUCT.
Certain countries may regulate disposal of the battery used to power this
product.
Please consult with your local authority.
BGetting started
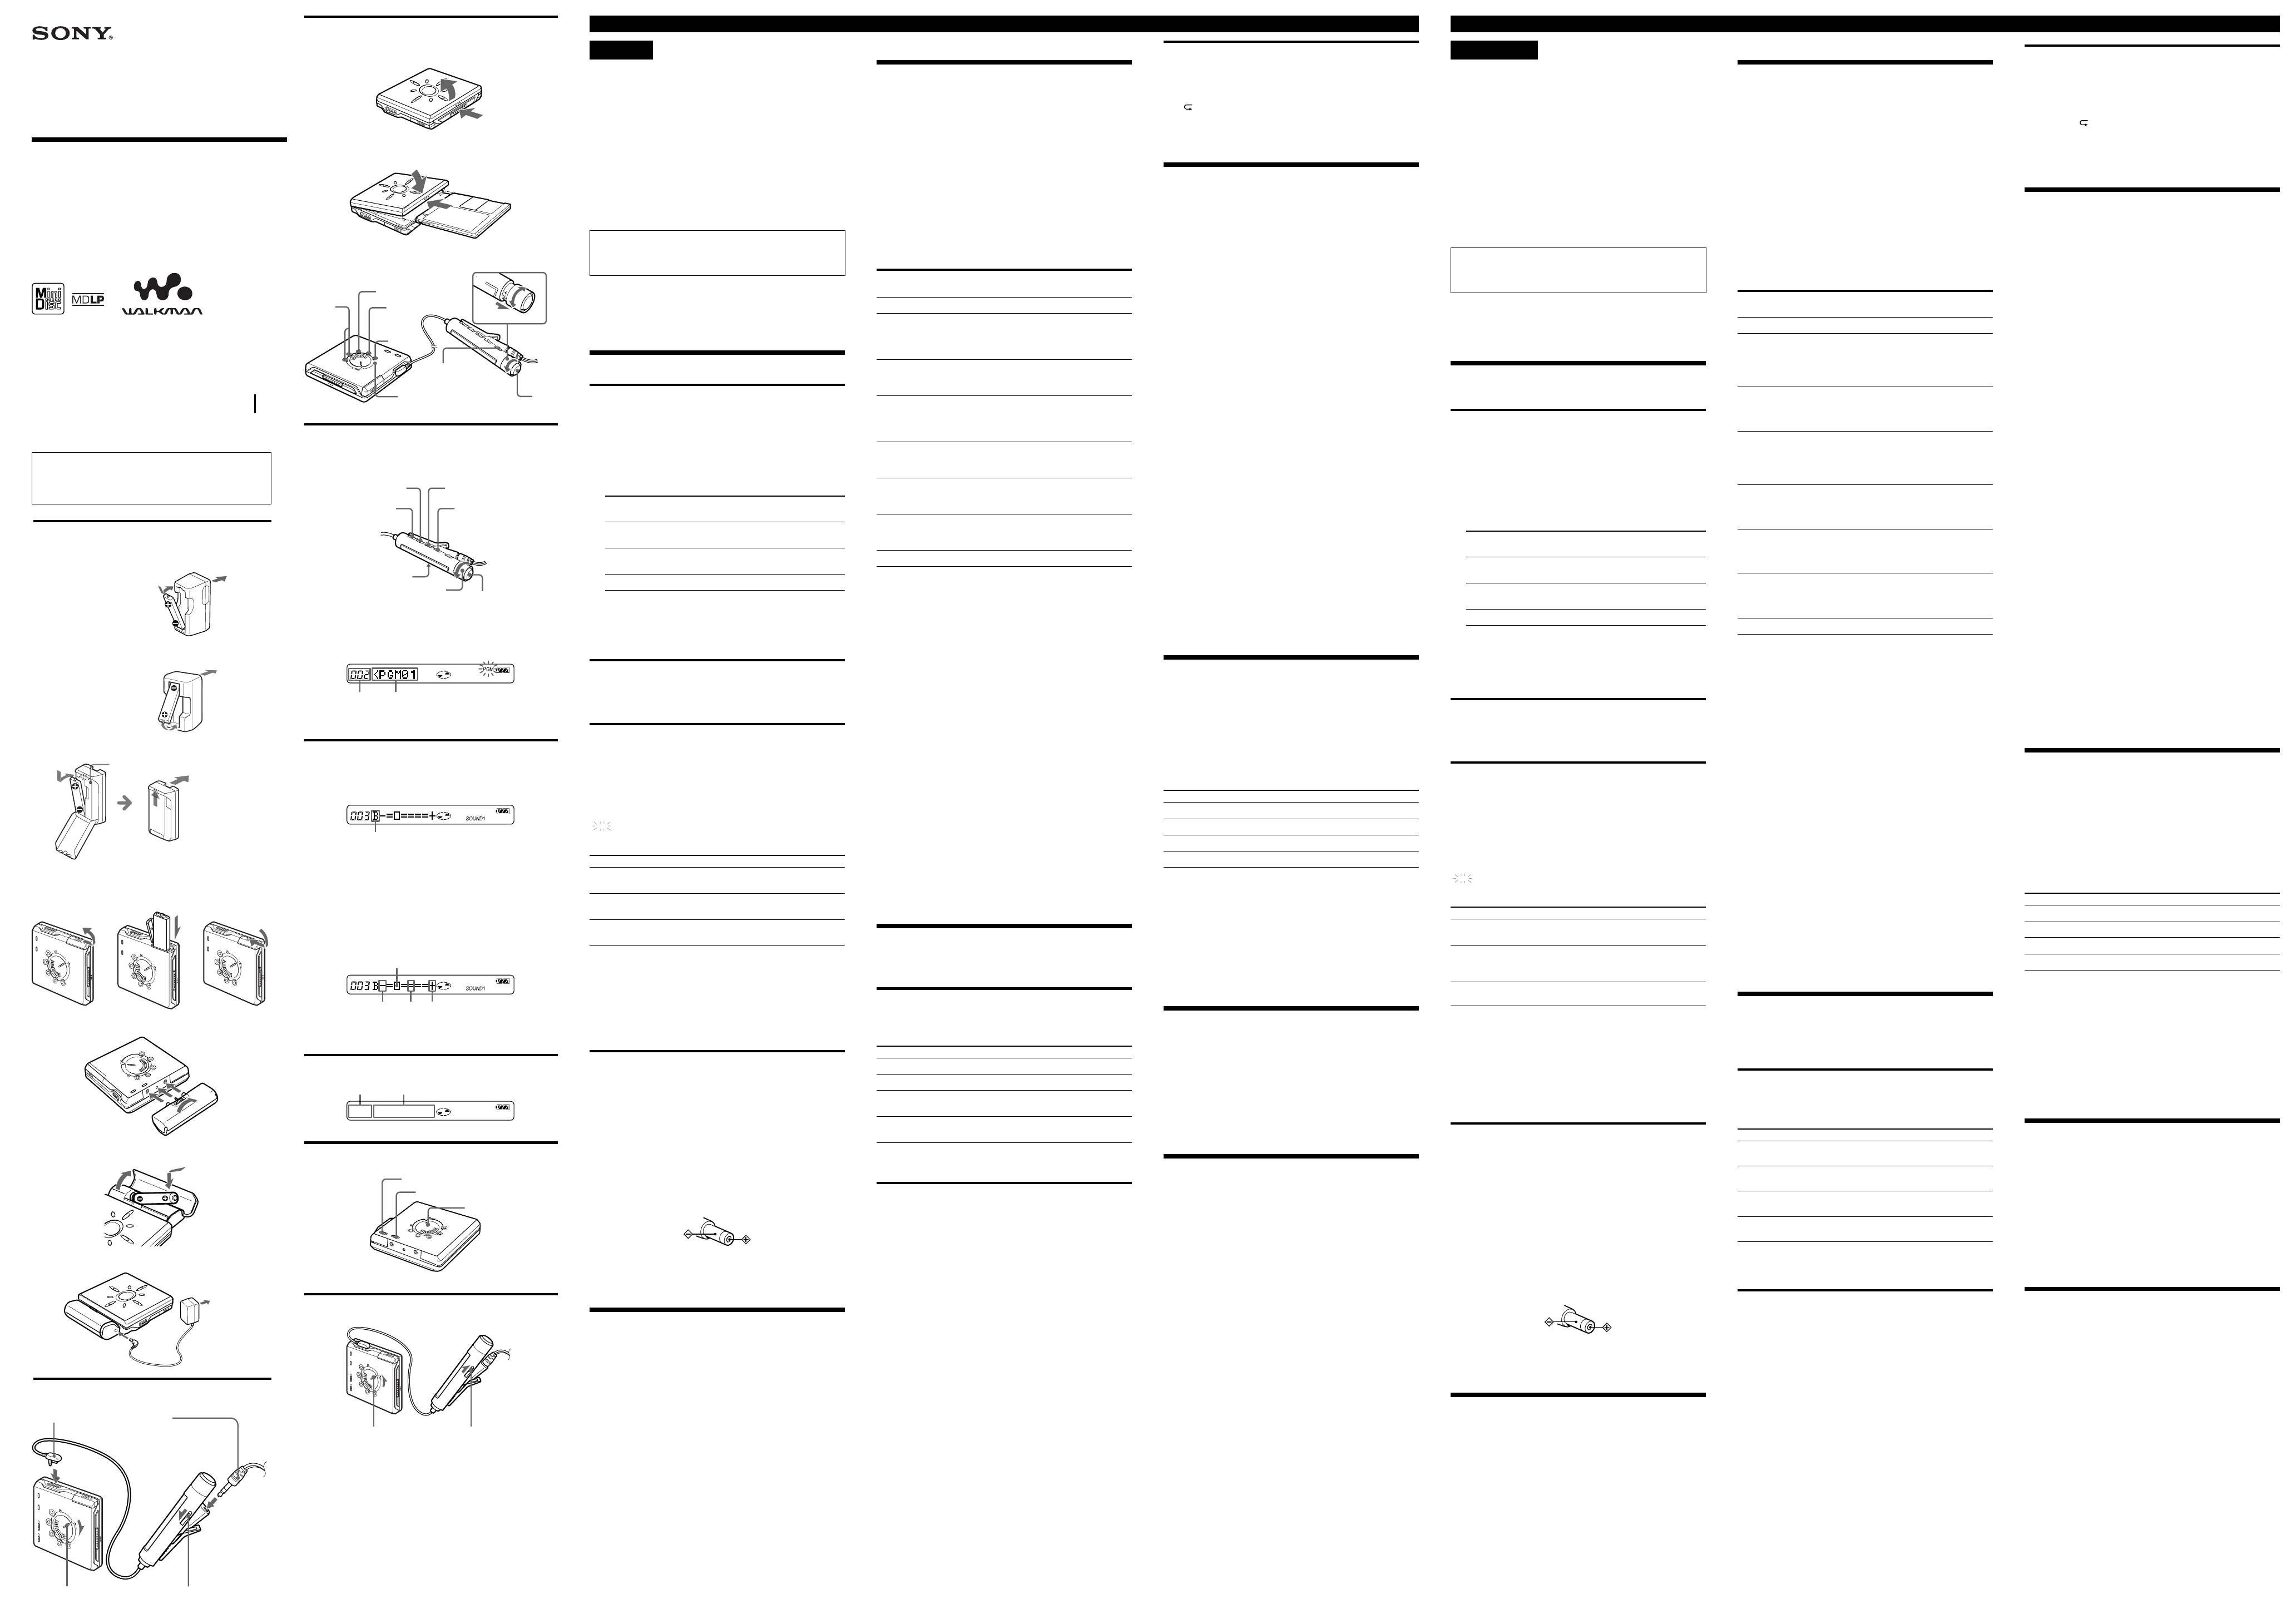
Preparing a power source
Using on the rechargeable battery
Charge the supplied rechargeable battery before using it for the
first time.
1 Insert the supplied NC-6WM rechargeable battery into the
supplied battery charger with correct polarity, and plug the
battery charger into a wall outlet. (See Fig. A -A )
Full charging time
(Unit: Approx. hours)
U.K., Australian, and
Hong Kong model
U.S.A., Canadian, European Continent,
and Saudi Arabian model
Korean model
Other models*
* If the plug of the charger does not fit into the wall outlet, attach the
supplied AC plug adaptor.
2 Open the rechargeable battery compartment lid and insert
the charged battery with correct polarity. (See Fig. A -B )
You can charge the battery about 300 times.
Using on a dry battery (See Fig. A -C )
Attach the supplied battery case to the player, and then insert
one LR6 (size AA) battery with correct polarity. Be sure to insert
the battery (minus) end first.
When to replace or recharge the battery
You can check the battery condition with the battery indication
on the remote control while using the player.
t Battery power decreasing
v
r Weak batteries
v
e The batteries have gone out. “LOW BATT” flashes in the display
on the remote control, and the power goes off.
Battery life (EIAJ
1)
)
Batteries
Ni-Cd rechargeable
battery NC-6WM
2)
LR6 (SG) Sony
Alkaline dry battery
3)
LR6 (SG)
3)
and
NC-6WM
2)
(Unit: Approx. hours)
1)
Measured in accordance with the EIAJ (Electronic Industries
Association of Japan) standard (using a Sony MDW-series Mini-disc).
2)
With a fully charged battery
3)
When using a Sony LR6 (SG) “STAMINA” alkaline dry battery
(produced in Japan).
Note
The battery life may be shorter depending on operating conditions, the
surrounding temperature, and the battery type.
Using on house current (See Fig.A-D )
1
Attach the supplied battery case to the player.
If the rechargeable battery is inserted in the player, remove it.
2 Connect the optional AC-E15L AC power adaptor (for use in
Japan) or the optional AC-E15HG AC power adaptor (for
use outside of Japan) to the DC IN 1.5V jack of the battery
case.
3 Connect the AC power adaptor to a wall outlet.
Notes
• Do not use any other AC power adaptor. Specifications for AC-E15HG
AC power adaptor vary in each region. Check the voltage and the
shape of the plug before purchasing.
Polarity of the plug
• The battery indication mark is displayed while using the AC power
adaptor.
To connect the headphones/
earphones (See Fig.B )
1 Connect the supplied headphones/earphones to the remote
control.
Connect the remote control to i jack of the player.
Slide HOLD on the remote control and the player to the
direction of the arrows shown in the illustration.
BMD playing
Playing an MD (See Fig.C )
1 Insert an MD.
1 Press OPEN. (See Fig. C - A)
2 Insert the MD with the label side facing up, and press
the lid down to close. (See Fig. C -B )
2 Play the MD. (See Fig. C -C )
1 Turn the control towards . or N> on the remote
control (or press N > on the player).
When using the remote control, a short beep sounds in
the headphones/earphones.
2 Pull and turn VOL +/– on the remote control (or press
VOL +/– on the player) to adjust the volume.
The volume indicator appears on the remote control to
allow you to check the volume.
BOther disc operation
To
Stop
Pause
Find the beginning
of the current track
Listen to the beginning
of the previous track
Listen to the
beginning of the
next track
Go backwards
while playing
1)
Go forward
while playing
1)
Remove the MD
1)
When you press . or N > on the player during pause, the
player resumes playback.
If you turn and hold the control towards . or N> on the remote
control (or hold down . or N > on the player) during pause,
you can fast forward/rewind without listening to the playback sound.
2)
Once you open the lid, the point to start playback changes to the
beginning of the first track.
Note
When removing the disc, make sure to press x first, and then press
OPEN.
About the G-PROTECTION function
The G-PROTECTION function has been developed to provide excellent
protection against sound skipping during many active uses. This
function provides a higher level of shock protection during playback than
the traditional one.
Tips
• The player can play the track recorded by double or 4 times long mode
(LP2 or LP4). Normal stereo playback, LP2 stereo playback, LP4 stereo
playback or monaural playback is automatically selected to match the
audio source.
• During the operation of the unit, the OPERATE lamp on the player
turns on. After you press x to stop the playback, the OPERATE lamp
turns off.
• The display on the remote control will turn off shortly after you press
x.
Note
Sound may skip if:
— the player receives stronger continuous shock than expected.
— a dirty or scratched MiniDisc is played.
BVarious ways of playback
Changing the play mode
(See Fig.D )
You can select from various play modes using the PLAYMODE
and RPT/ENT on the remote control.
Selecting the play mode (See Fig. D-A )
1 Press PLAYMODE repeatedly to select one of the four play
modes, as follows.
Display Play mode
(none) (normal play)
“1 ” (single play)
“SHUF ” (shuffle play)
“PGM ” (program play)
Tip
Press PLAY MODE on the player repeatedly to select a play mode.
Listening to tracks in a desired sequence
(Program play)
1 Press PLAYMODE repeatedly until “PGM” flashes in the
display.
2 Turn the control towards . or N> repeatedly to select
a track. (See Fig. D -B )
3 Press RPT/ENT.
The track is entered.
4 Repeat steps 2 and 3 to select other tracks in the desired
sequence.
5 Press RPT/ENT for 2 seconds or more.
The settings are entered and playback starts from the first
programmed track.
Tips
• The program play settings will remain in memory even after playback
finishes or is stopped.
• You can set the program play up to 20 tracks.
Notes
• All program settings are lost when the disc is removed from the player.
• If no settings are made for five minutes while the player is stopped, the
settings made up to that point are entered.
A
A
• Other countries model
• Modelo para otros países
The charger lamp goes off when the charging has finished.
La luz del cargador se apaga una vez finalizada la carga.
B
b
e
E
b
C
2
1
m
4
3
D
B
HOLD
C
A
B
C
.
x
VOL +/–
x
X
1N >
.
N >
VOL+
VOL–
2
D
A
./N >
VOL +/–
HOLD
DISPLA SOUND
PLA RPT/ENT
x
B
E
A
When you select bass-setting mode, “B” appears. When you
select treble-setting mode, “T” appears.
Cuando se selecciona el modo de ajuste de graves aparece “B”.
Cuando selecciona el modo de ajuste de agudos aparece “T”.
B
Example: While adjusting the bass,
the cursor moves. (Position: –2)
Ejemplo: Mientras se ajustan los graves
Se mueve el cursor (Posición: –2)
–4 ±0 +3
The sound can be adjusted in eight steps, from –4 to +3.
Se puede ajustar el sonido en ocho pasos de –4 a +3.
F
B
G
HOLD
A
PLA
H
HOLD
lamp
luz
to a wall outlet
A un tomacorriente
de la pared
Track number
Número de
canción
Program number
Número de programa
English
All the tracks are played once.
A single track is played once.
All the tracks are played in random
order.
Tracks are played in the order that
you specified.
Repeat play
You can use this function to repeat playback in normal play,
single play, shuffle play, or program play mode.
1 Press RPT/ENT during playback.
“ ” appears in the display.
Tip
Press PLAY MODE on the player repeatedly to select a repeat play.
To adjust the sound quality (Digital
Sound Preset)(See Fig.E )
You can make adjustments to the sound quality to suit your
taste, and then store two sets of these adjustments.
1 Press SOUND on the remote control repeatedly to select
“SOUND1” or “SOUND2.” (See Fig. D -A )
2 During playback, press SOUND on the remote control for 2
seconds or more. (See Fig. E -A )
The player changes to the bass-setting mode. Pressing
SOUND for 2 seconds again changes the player back to the
treble-setting mode.
3 Turn the control on the remote control towards . or
N> repeatedly to adjust the bass or the treble.
(See Fig.
E-B
)
When you press SOUND for more than 2 seconds while
adjusting the bass, the display switches to the treble (or vice-
versa).
When you press SOUND for a short time while adjusting the
bass or the treble, the setting for that sound is entered and
the display switches to the other sound setting.
4 Press RPT/ENT on the remote control.
The sound settings are stored and the playback display
appears again.
To select a preset sound
Press SOUND on the remote control repeatedly to select
“SOUND1,” “SOUND2,” or no display.
Selecting no display turns off the Digital Sound Preset function.
Digital Sound Preset factory settings
The Digital Sound Preset Factory settings are as follows:
• “SOUND1”: bass +1, treble ±0
• “SOUND2”: bass +3, treble ±0
Tip
Settings can be changed while playback is momentarily paused.
Notes
• Settings cannot be changed through the operation buttons on the
player.
• When you use the Digital Sound Preset, the sound may break or
become distorted when the volume is turned up too high, depending
on the settings.
To know the track name and playing
time (See Fig.F )
During playback, you can check the track name and track
number, the elapsed time of the current track, and the total
number of tracks on the MD.
1 Press DISPLAY on the remote control while the player is
playing an MD.
Each time you press DISPLAY, the display changes the
indications as the followings (See Fig.
F
):
AB
Track number The elapsed time
Track number Track name
1)
The number of total tracks Disc name
1)
Track number Track mode
2)
1)
Appears only with MDs that have been electronically labeled.
2)
The mode for each track is indicated as follows:
“Mode : SP” Standard mode (stereo)
“Mode : LP2” 2 × mode (2 × normal playing time)
“Mode : LP4” 4 × mode (4 × normal playing time)
“Mode : MONO” Monaural
Note
The mode indication appears only during playback. The mode appears
for 2 seconds. It is then replaced by the elapsed time of the current track.
B Other operations
To protect your hearing (AVLS)
(See Fig. G )
1 Press AVLS (Automatic Volume Limiter System) on the
player to display “AVLS ON” on the remote control.
The volume is kept at a moderate level, even if you try to
turn the volume above the limited level.
To cancel the AVLS function
Press AVLS on the player to display “AVLS OFF” on the remote
control.
To lock the controls (HOLD) (See Fig.
H)
1 Slide HOLD on the remote control in the direction of the
. to lock the controls of the remote control and slide
HOLD on the player in the direction of the . to lock the
controls of the player.
To unlock the controls
Slide HOLD to the opposite direction of the arrow.
Stereo (normal)
LP2 Stereo LP4 Stereo
14 16 18
42 49 58
59 65 75
Do this (Beeps in the headphones/
earphones)
Press x . (A Long beep)
Press X on the remote control.
(Continuous short beeps)
Press X on the remote control again to
resume playback.
1)
Turn the control towards . on the
remote control. (Three short beeps)
Press . on the player once.
Turn the control towards . on the
remote control repeatedly. (Continuous
three short beeps)
Press . on the player repeatedly.
Turn the control towards N> on the
remote control. (Two short beeps)
Press N > on the player once.
Turn and hold the control towards .
on the remote control.
Hold down . on the player.
Turn and hold the control towards
N> on the remote control.
Hold down N > on the player.
Press x , and then press OPEN.
2)
to a wall outlet
A un tomacorriente de
la pared
Español
to DC IN 1.5V jack
a DC IN 1.5V
• U.S.A., Canadian, Korean,
and European continental
model
• Modelo para los EE.UU,
Canadá, Corea y Europa
continental
• UK, Hong Kong, and
Australian model
• Modelo para el Reino
Unido, Hong Kong y
Australia
to a wall outlet
A un tomacorriente
de la pared
Insert the plugs firmly.
Enchufe firmemente los cables.
to a wall outlet
A un tomacorriente
de la pared
OPERATE lamp
Indicador OPERATE
3.5
2.5
110 V: 10
220 V: 2.5
1
ADVERTENCIA
Para evitar un incendio o peligro de
descarga, no exponga el aparato a la lluvia
o humedad.
Para evitar una descarga eléctrica, no abra
el mueble. Solicite siempre el servicio de un
técnico cualificado.
Precaución
El uso de lentes de aumento con este producto puede perjudicar
su vista.
PRECAUCIÓN — TENGA CUIDADO CON LOS RAYOS
LASER INVISIBLES CUANDO ABRA.
NO MIRE HACIA AL RAYO U OBSERVE CON
INSTRUMENTOS OPTICOS.
Información
EN NINGUN CASO SERA EL VENDEDOR RESPONSABLE POR
DAÑOS DIRECTOS, INCIDENTES O CONSECUENTES DE
CUALQUIER NATURALEZA O PERDIDAS O GASTOS
DERIVADOS DE PRODUCTOS DEFECTUOSOS O DE SU USO.
Algunos países pueden controlar el desecho de la batería utilizada para
hacer funcionar este producto.
Consulte con las autoridades locales.
BPara empezar
Preparación de la alimentación
eléctrica
Utilización de batería recargable
Cargue la batería recargable incluida, antes de utilizarla por
primera vez.
1 Coloque la batería recargable incluida NC-6WM en el
cargador de batería incluido, con la polaridad correcta y
enchufe el cargador de batería en un tomacorriente de la
pared. (Consulte la Fig. A -A )
Tiempo de carga total
(Unidad: horas aprox.)
Modelo para el Reino Unido,
Australia y Hong Kong
Modelo para los EE.UU., Canadá,
Europa continental y Arabia Saudita
Modelo para Corea
Otros modelos*
* Si el enchufe del cargador no entra en el tomacorriente, instale el
adaptador de enchufe incluido.
2 Abra el compartimiento de la batería recargable y coloque la
batería cargada con sus polos correctos. (Vea la Fig. A -B )
Puede cargar la batería unas 300 veces.
Utilización de una pila (Vea la Fig. A -C )
Instale la caja de pila incluida en el reproductor y coloque una
pila LR6 (tamaño AA) con sus polos correctos. Coloque la pila
primero por su polo negativo primero.
Cuando cambie o recargue la batería
Puede confirmar el estado de la batería con las indicaciones de
carga de batería en el mando a distancia mientras utiliza el
reproductor.
t Disminuye la carga de la batería o pila
v
r Batería o pilas débiles
v
e Se han descargado las baterías o pilas. Destella “LOW BATT” en
la pantalla del mando a distancia y se desconecta el aparato.
Longevidad de la batería o pila (EIAJ
1)
)
Baterías o pilas
Batería recargable
Ni-Cd NC-6WM
2)
Una pila alcalina
LR6 (SG) de Sony
(tamaño AA)
3)
LR6 (SG)
3)
y NC-6WM
2)
(Unidad: Horas aprox.)
1)
Medida según normas EIAJ (Electronic Industries Association of Japan)
(con un minidisco de serie MDW de Sony).
2)
Con una batería o pila totalmente cargada
3)
Cuando se utiliza una pila alcalina “STAMINA” LR6 (SG) de Sony
(fabricada en Japón).
Nota
La longevidad de la batería o pila puede ser más corta según las
condiciones de funcionamiento, la temperatura ambiente y el tipo de
batería o pila.
Utilización con la corriente del hogar (Vea la
Fig. A -D )
1 Instale la caja de pila incluida en el reproductor.
Si hay una batería recargable en el reproductor, sáquela.
2 Conecte el adaptador de CA opciona AC-E15L (para
utilización en el Japón) o el adaptador de CA opcional AC-
E15HG (para utilización fuera del Japón) en la toma DC IN
1.5V de la caja de pilas.
3 Conecte el adaptador de CA en el tomacorriente de la pared.
Notas
• No utiliza ningún otro adaptador de CA. Las especificaciones para el
adaptador de CA AC-E15HG son diferentes según la región. Confirme
el voltaje y la forma del enchufe antes de hacer la compra.
Polos del enchufe
• Aparece la marca de indicación de pila mientras utilice el adaptador de
CA.
Para conectar los auriculares/
audífonos (Vea la Fig. B )
1 Conecte auriculares/audífonos con el mando a distancia
incluido.
Conecte el mando a distancia en la toma i del reproductor.
Deslice HOLD del reproductor y del mando a distancia en el
sentido de la flecha en la figura.
BMando a distancia
Reproducción de un minidisco (Vea la
Fig. C )
1 Coloque un minidisco.
1 Presione a OPEN. (Vea la Fig. C - A)
2 Coloque el minidisco con la etiqueta hacia arriba y
presione la tapa para cerrar. (Vea la Fig. C -B )
2 Reproduzca el minidisco. (Vea la Fig. C -C )
1 Gire el control hacia . o N> en el mando a
distancia (o presione N > en el reproductor).
Cuando utilice el mando a distancia, suena un timbre
corto en los auriculares/audífonos.
2 Levante y gire VOL +/– en el mando a distancia (o
presione VOL +/– en el reproductor) para ajustar el
volumen.
El indicador de volumen aparece en el mando a
distancia para que pueda verificar el volumen.
BOtras funciones del disco
Para
Parar
Pausa
Encuentre el principio
de la pista actual
Escuchar el principio
de la pista anterior
Escuchar el principio
de la siguiente canción
Ir hacia atrás mientras
reproduce
1)
Ir hacia adelante
mientras reproduce
1)
Retire el minidisco
1)
Cuando presione . o N > en el reproductor durante una pausa,
el reproductor continúa reproduciendo.
Si se gira y se mantiene el control hacia . o N> en el mando a
distancia (o mantiene presionado . o N > en el reproductor)
durante una pausa, puede avanzar/rebobinar rápidamente sin
escuchar el sonido reproducido.
2)
Cuando abra la tapa, el punto de inicio de la reproducción cambia al
principio de la primera canción.
Nota
Cuando retire el disco, asegúrese de presionar primero x y presione a
OPEN.
Acerca de la función G-PROTECTION
La función G-PROTECTION fue desarrollada para darle excelente
protección contra el salto de sonido durante muchos usos activos. Esta
función le da un mayor nivel de protección contra golpes durante la
reproducción que el tradicional.
Sugerencias
• El reproductor puede reproducir la canción al doble o 4 veces el modo
de larga duración (LP2 o LP4). La reproducción etéreo normal, la
reproducción estéreo LP2, la reproducción estéreo LP4 o la
reproducción monoaural se seleccionan automáticamente de acuerdo
con la fuente de audio.
• Durante el funcionamiento del aparato se enciende la luz OPERATE
del reproductor. Después de presionar x para parar la reproducción,
se apaga la luz OPERATE.
• Se apaga la pantalla en el mando a distancia un poco después de
presionar x .
Nota
Puede haber un salto del sonido si:
— tel reproductor recibe un golpe continuo más fuerte que el esperado.
— se reproduce un minidisco sucio o rayado.
BDistintas formas de reproducción
Cambio del modo de reproducción
(Vea la Fig.
D)
Se pueden seleccionar distintos modos de reproducción
utilizando PLAYMODE y RPT/ENT en el mando a distancia.
Selección del modo de reproducción (Vea la
Fig. A -D )
1 Presione repetidamente PLAYMODE para seleccionar uno
de los siguientes cuatro modos de reproducción.
Indicación Modo de reproducción
(nada) (reproducción
normal)
“1 ” (una reproducción)
“SHUF ” (reproducción
aleatoria)
“PGM ” (reproducción
programada
Sugerencia
Presione repetidamente PLAY MODE en el reproductor para seleccionar
un modo de reproducción.
Para escuchar las canciones en la secuencia
deseada (reproducción programada)
1 Presione repetidamente PLAYMODE hasta que destelle
“PGM” en la pantalla.
2 Gire repetidamente el control hacia . o N> para
seleccionar una canción. (Vea la Fig. D -B )
3 Presione RPT/ENT.
Entra en la canción.
4 Repita los pasos 2 y 3 para seleccionar otras canciones en la
secuencia deseada.
5 Presione RPT/ENT durante 2 segundos o más.
Los ajustes se entran y empieza la reproducción desde la
primera canción programada.
Sugerencias
• Los ajustes de reproducción programada permanecen en la memoria
incluso después de terminar la reproducción o de pararla.
• Se pueden seleccionar hasta 20 canciones en la reproducción/
programada.
Notas
• Se perderán todos los ajustes programados cuando se retire el disco del
reproductor.
• Si no se hacen más ajustes durante cinco minutos con el reproductor
parado, se entrarán los ajustes hechos hasta ese punto.
Reproducción repetida
Se puede utilizar esta función para repetir la reproducción en el
modo de reproducción normal, reproducción de una canción,
reproducción aleatoria o reproducción programada.
1 Presione RPT/ENT durante la reproducción.
Aparece “ ” en la pantalla.
Sugerencia
Presione repetidamente PLAY MODE en el reproductor para seleccionar
la reproducción repetida.
Para ajustar la calidad de sonido
(Prefijado de sonidos digitales) (Vea
la Fig. E )
Se pueden hacer ajustas en la calidad de sonido de acuerdo a sus
preferencias y memorizar dos juegos de estos ajustes.
1 Presione repetidamente SOUND en el mando a distancia
para seleccionar “SOUND1”, “SOUND2”.(Vea la Fig. D -A )
2 Durante la reproducción, presione SOUND en el mando a
distancia durante 2 segundos o más. (Vea la Fig. E -A )
El reproductor cambia al modo de ajuste de graves. Presione
SOUND durante 2 segundos para cambiar otra vez el
reproductor al modo de ajuste de agudos.
3 Gire repetidamente el control en el mando a distancia hacia
. o N> para ajustar los graves o agudos.
(Vea la Fig. E-B )
Si presiona SOUND durante más de 2 segundos mientras
ajusta los graves, las indicaciones cambian a agudos (o
viceversa).
Cuando presione SOUND durante un corto período de
tiempo mientras se ajustan los graves o agudos, se entra el
ajuste para ese sonido y la indicación cambia al otro ajuste
de sonido.
4 Presione RPT/ENT en el mando a distancia.
Los ajustes de sonido se memorizan y aparecen nuevamente
las indicaciones de reproducción.
Para seleccionar un sonido prefijado
Presione repetidamente SOUND en el mando a distancia para
seleccionar “SOUND1”, “SOUND2” o sin indicación.
La selección sin indicación desactiva la función de Prefijados de
Sonido Digital.
Ajustes por omisión de Prefijados de Sonido
Digital
Los ajuste por omisión de Prefijados de Sonido Digital son los
siguientes:
• “SOUND1”: graves +1, agudos ±0
• “SOUND2”: graves +3, agudos ±0
Sugerencia
Los ajustes pueden cambiarse durante una pausa momentánea de la
reproducción.
Notas
• No puede cambiar los ajustes con los botones de funcionamiento del
reproductor.
• El sonido reproducido puede quedar cortado o distorsionado según el
ajuste de Prefijados de Sonido digital, cuando se levanta el volumen
demasiado alto, según los ajustes.
Para saber el nombre de la canción y
el tiempo de reproducción (Vea la Fig.
F)
Durante la reproducción, puede confirmar el nombre y número
de la canción, tiempo transcurrido de la canción actual y el
número total de canciones en el minidisco.
1 Presione DISPLAY en el mando a distancia cuando el
reproductor está reproduciendo un minidisco.
Cada vez que presione DISPLAY, la pantalla cambia las
indicaciones de la siguiente forma (Vea la Fig. F ):
AB
Número de canción Tiempo transcurrido
Número de canción Número de canción
1)
Número total de canciones Nombre del disco
1)
Número de canción Modo de canción
2)
1)
Aparece sólo con minidiscos con etiqueta electrónica.
2)
El modo para cada canción aparece como sigue:
“Mode : SP” Modo normal (estéreo)
“Mode : LP2” Modo 2 × (2 veces la reproducción normal)
“Mode : LP4” Modo 4 × (4 veces la reproducción normal)
“Mode : MONO” Monoaural
Nota
La indicación de modo sólo aparece durante la reproducción. El modo
aparece durante 2 segundos. Después cambia por el tiempo transcurrido
de la canción actual.
BOtras operaciones
Para proteger sus oídos (AVLS)
(Vea la Fig. G )
1 Presione AVLS (Automatic Volume Limiter System) en el
reproductor para que aparezca “AVLS ON” en el mando a
distancia.
El volumen se mantiene a un nivel moderado, incluso
aunque trata de girar el volumen por encima del límite.
Para cancelar la función AVLS
Presione AVLS en el reproductor para que aparezca “AVLS
OFF” en el mando a distancia.
Para fijar los controles (HOLD)
(Vea la Fig. H )
1 Deslice HOLD en el mando a distancia en el sentido de .
para fijar los controles en el mando a distancia y deslice
HOLD en el reproductor en el sentido . para fijar los
controles en el reproductor.
Para activar los controles
Deslice HOLD en el sentido opuesto de la flecha.
Se reproducen una vez todas las
canciones
Se reproduce una canción una sola
vez.
Todas las canciones se reproducen en
orden aleatorio.
Se reproducen las canciones en el
orden especificado.
Estéreo (normal)
LP2
Estéreo
LP4
Estéreo
14 16 18
42 49 58
59 65 75
Haga esto (suenan timbres por los
auriculares/audífonos)
Presione x . (Un timbre largo)
Presione X en el mando a distancia.
(Timbres cortos continuos)
Presione nuevamente X en el mando a
distancia para continuar la
reproducción.
1)
Gire el control hacia . en el mando a
distancia. (Tres timbres cortos)
Presione . una vez en el
reproductor.
Gire el control . del mando a
distancia repetidamente. (Tres timbres
cortos continuos)
Presione . repetidamente en el
reproductor.
Gire el control hacia N> en el
mando a distancia. (Dos timbres cortos)
Presione N > en el reproductor
una vez.
Gire y mantenga el control hacia .
en el mando a distancia.
Mantenga presionado . en el
reproductor.
Gire y mantenga el control hacia
N> en el mando a distancia.
Mantenga presionado N > en el
reproductor.
Presione x, y presione a OPEN.
2)
3,5
2,5
110 V: 10
220 V: 2,5
1
Reproductor de Minidisco portátil
POR FAVOR LEA DETALLADAMENTE ESTE MANUAL DE
INSTRUCCIONES ANTES DE CONECTAR Y OPERAR ESTE
EQUIPO.
RECUERDE QUE UN MAL USO DE SU APARATO PODRÍA
ANULAR LA GARANTÍA.