Baby Monitor BCF 910
ON/OFF RESET
15 16 17 18
19
13
14
12 3
4
5
6
7
8
9
10
12 11
MIC
ENG
Oper m
Please read and observe the f ollowing
formati and keep the operating manual
nearby for f uture reference!
Safety inform
WARNING!
• Ri of f through cabl
Children could b eco entangled in the cables and strang le
themselves.
Ensure that the b ab y monitoring units and po cables are
out of reach of babies/children, i.e. they are at least o n meter
away.
• Risk of explosion!
Only use the power adapter pl suppl
Only use b su or on of the same type!
Alwa tr bat with due care and at and onl
use batteries as described.
Never use stand and rechargeable batteries together.
Never use rech arg eab batteri or stan d batteries with
different capaciti or charg statuses together. Never use
sta or rec bat which are damaged.
• Ris of suffocat through smal object packaging and
prote f
Keep children away from the product and its packaging!
CAUTION!
• Ri of f through power adapt pl
Power adapter plugs can hea up.
Never leave any ob on the po w adapter p Ensure
access to po w er adapter plugs is not obstructed b furniture or
such.
• Ri of t due to improper lai cabl
Lay the cable so that can tr over them!
• Risks to health and the environment from batteries!
Never op en damage or swall batteries or all th em to
poll the envi They could contai toxi and ecol
gicall harmful heavy metals.
Intended use
The baby monitor serves to monitor a baby/c in a room. The
trans unit, located near the child, transm noises and images
from its immediat vicinit to t receiver unit. Any ot use is con-
sidered unintended use. modif or rec
is not perm Under no circumst open the devic or com-
plete any repair work yourself
The devices are not intended for medical purpos Warning
and signal tones f respirat or heart monit equip-
ment are not transmit
Use only in suitable environments
Observe all local direc and regulations.
Prevent excessiv exposure t smoke, dust, vibr chem
moist heat and direct sunlight
Package contents
- Receiver unit
- T ransmitt unit
- Cradle for receiv unit
- Base for tr unit
- Batter for rec unit
- 2 power adapter plugs
- USB cable
- O perating manual
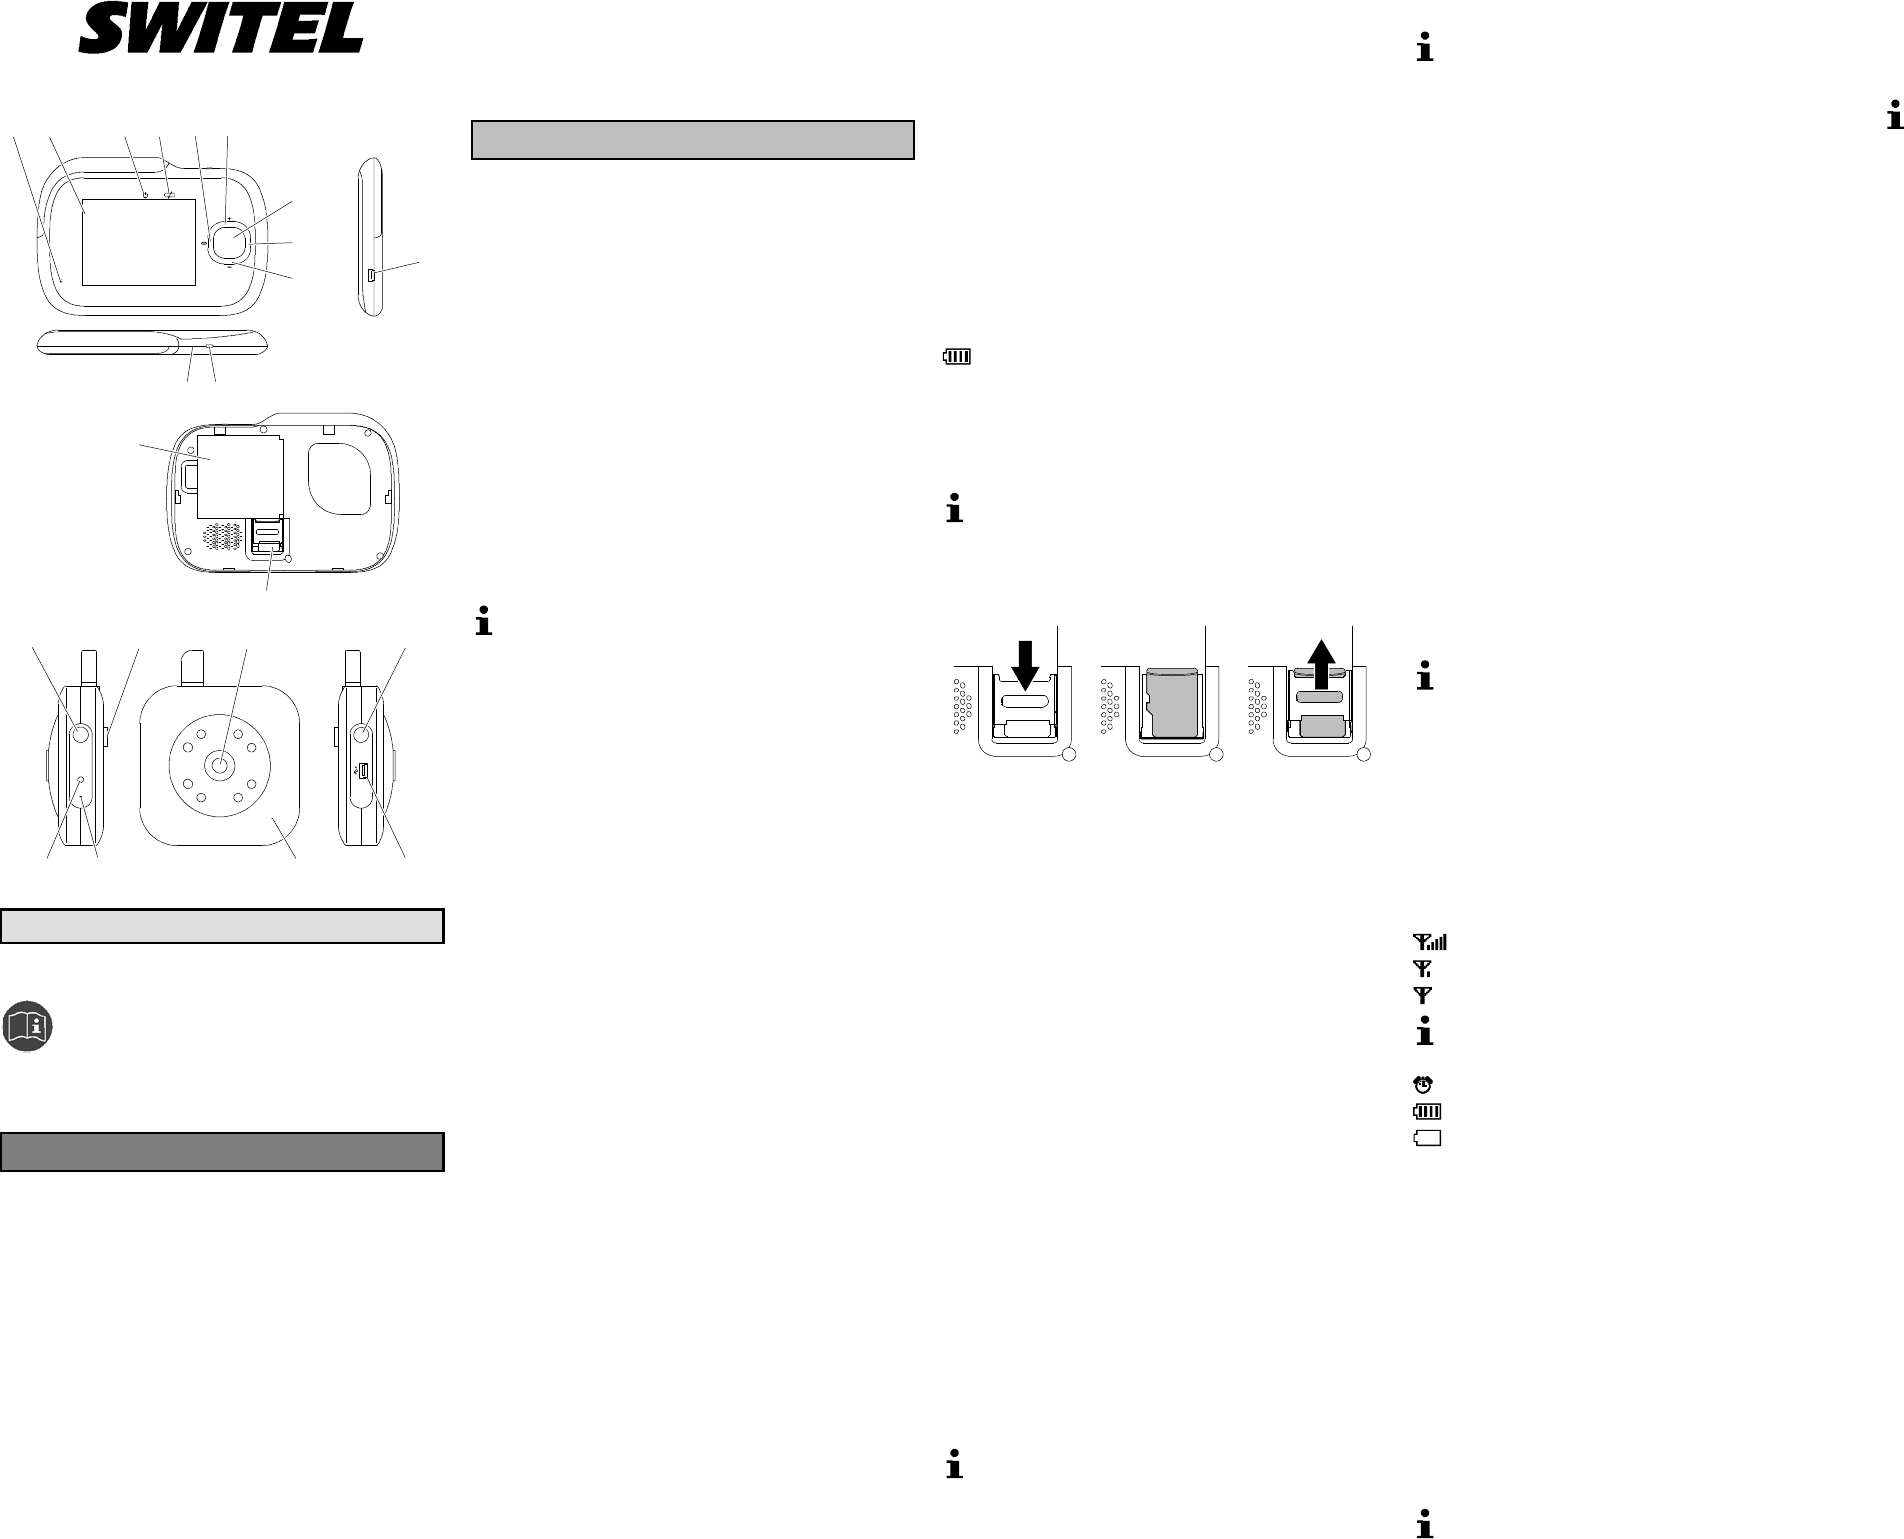
Operating elements
Receiver unit
1 Mic
2 Display
3 Operat indicator
4 Charge indicat
5 Left button (Talk / Menu navigation)
6 Top button (Volum adjustment / Camera selec / Menu
navigation)
7 Menu bu
8 Right button (Phot / Record / Menu navigation)
9 Bo butt (Volume adjustment / Camera select / Menu
navigation)
10 USB connection / Power adapter connection
11 On/Off button (E / Split
12 RESET bu
13 Bat compartment
14 Micr SD card (not included)
Transm unit
15 ON/OFF bu
16 Thread for base
17 Camera
18 RESET bu
19 USB connection / Power adapter connection
20 Micr
21 Only f firm update
22 Operation indicator / Charge indicat
Display and explanation of operations
Acti to ta
Result of action
[2] Referenc in the graphic
RESET Press the button
Press and hold the button
5s Keep the but pressed the button for 5 seconds
Select the subsequent menu option with the
Navigation but Left [5 Top
[6Right [8] o Bottom [9
and confir the selec by press the Menu
butt [7].
┠Volume ┨ Represent the appearance of a menu option
Represent an icon in the display
Inserti the battery i the receiver unit
Slide the cov on the rear downwards and remov it.
Insert rechargeable battery in the battery co
Close the batt com
The battery must be charged f at least 8 hours befor being
used for the first time.
Inserti the m SD card in the receiver unit
In order t record videos or pict a micro SD card [14] must be
insert (not included).
Slide the holder downwards caref The holder is unlocked.
Open out the holder.
Insert the mi SD card [14].
Close the holder.
Slide the holder upwards caref The holder is locked.
Using the base for the transmi unit
The base enables the cam [17] to be aligned accurately.
base can also be used t install the t unit on a wall or the
ceiling.
Screw t screw in the base in the thr [16] on the rear side of
the tran u
Align the cam [17]
Fix the alignment using the screw at the rear of the base.
Starting up the transmi unit
The transm unit is equipped with a built-in batt The unit can
be powered by the integr batt by a normal mains power
supply via t power adapter plug or by a USB connection on a
comput
Connecting the transmitter unit via the power adapter
plug
Connect t power adapter plug to the power connection [19] on
the t unit and a properly installed mains power out
The transm unit is switched on aut
Connecting the transmitter unit vi the USB
Connect t USB cable to t power adapter connect [19] on
the tr unit and a free USB port on the com
The transm unit is switched on aut
The USB cable only serv to charge the battery It does not
serve f data trans
Switching the transmitter unit on/off
The transm unit continues t transmit even when the receiv-
er unit is swit off The signals can be rece by other
devices.
ON/OFF [15] 5 sec. The transmitt unit is swit on.
ON/OFF [15] 5 sec. The transmitt unit is switched off
Operation/Charge indicator on the transmitter uni
Operation/ indicator [22] lights up green.
The unit is switc on, the batt is char
Operation/ indicator [22] flashes green. The unit is
switc on, the bat is being charged.
Operation/ indicator [22] lights up red. T he unit is switched
on, the battery mus be charged.
Operation/ indicator [22] flashes red. The unit is switched
off the bat is being charged.
Starting up the recei unit
The unit can be powered by the bat by a normal mains power
supply via t power adapter plug or by a USB connection on a
comput
Connecting the receiver unit vi the power adapter plug
Connect t power adapter plug to the power adapter connection
[10] on the receiver unit and a properly installed mains power outlet.
The receiver unit is switched on autom
Connecting the receiver unit vi the USB cable
Connect t USB cable to t USB connect [10] on the rec
er unit and a free USB port on the com The receiver unit is
switc on automat
The USB cable only serv to charge the battery It does not
serve f data trans
Switching the receiver unit on/off
On/Off [11] 5 sec. The receiver unit is swit on.
The start screen appears in the display
On/Off [11] 5 sec. The receiver unit is swit off
Operation and charge indicators o the receiver uni
Operation indicat [3] lights up. The unit is switc on.
Charge indicat [4] light up. The battery is charged.
Charge indicator [4] flas The batter is being charged.
Ico in the displa
High signal strengt
Low signal strengt
No signal.
The equipment has a range of up to 200 m. The range can be
reduced by obst such as walls etc. Electronic equip-
ment in the vicinity can also cause dist
Alarm cloc or feed alarm is switched on.
Batt is f charged.
Batt is em
If the bars run thr the batt icon, the battery is being charged.
Spli screen
Up to four transmit units can be registered on the rec unit.
The split sc funct can be used to display all (four) pict
from the transm units regist
Press On/Of [11] briefly. Swit between f screen and
split screen.
Talk function
Left [5 Voice communicat is possible fr the
receiver unit to the transmit unit.
Photo function
In order to take a photo, a micro SD card (not included) must be
installed in the receiver unit .
Right [8] Photo is saved on the m SD card.
All the photos taken in one day are stored in a separat folder.
Night vi function
If the brightness of the area monitor no longer suffices for normal
operation, the equipment automatic switc to night vis
When the night vis function is activated, only objects up t
2 m away can be viewed. The display only provides a black and
white image.
Settings using t menu
The menu can be used to execut various f and define
diverse settings. All the set are conf by pressing the
Menu button [7] Sk back in the menu levels by pressing the
On/Off button [11]
Menu [7 Open the menu.
Setting the vol
┠Volum┨.
Top [6] or Right [8] Raise the volume.
Botto [9] o Left [5] Lower the volume.
Setting the brightness
┠Bright ness┨
Top [6] or Right [8] Increase the brightness.
Botto [9] o Left [5] Reduce the brightness.
Selecting the pi section
┠Z In┨.
Top [6] or Botto [9] Select the picture sec
Select the language
┠Language┨.
Top [6] or Botto [9] Select the language.
Registering/Deregistering transmitter units
┠Re Cam┨.
An icon indicat whether a transmit unit i s registered at positions
┠Cam 1 ┨ to ┠Ca 4 ┨.
Thumbs up. Transmit unit is registered.
Registering a transmitter unit
Registr is only poss at a free posit e. ┠Cam 2 ┨.
┠Re Cam┨┠Cam 2 ┨┠Ye┨
┠Reg Cam 2? ┨.
Press ON/OF [15] on the t unit.
Deregistering a transmitter unit
E.g. ┠Cam 2 ┨.
┠Re Cam┨┠Cam 2 ┨┠Ye┨
┠Cam 2 unregi┨.
Selecting a transmitter unit
If several transm units are regist a tr unit can be
select manually or t screen can swit units automatic at
preset intervals.
Select a tran smitter unit manually
Exam ┠Ca 2 ┨.
┠Ca Selection┨┠Manual Selection┨┠Came 2 ┨.
Chan tran u au
Exam every 20 sec
┠Ca Selection┨┠Auto Scan┨┠20 secon┨.
Deactivati ch an transmitter units automatically
┠Ca Selection┨┠Auto Scan┨┠Nev┨.
Setting the wake-up / feed time alarms
A wake-up alarm and up to four feed t alarms can be set .
Setting the time
Exam Wake-up alarm time.
┠Ala Clock┨┠Mo Ca┨┠Alar Time ┨.
Top [6] or Botto [9] Set the hour.
Top [6] or Botto [9] Set the minute.