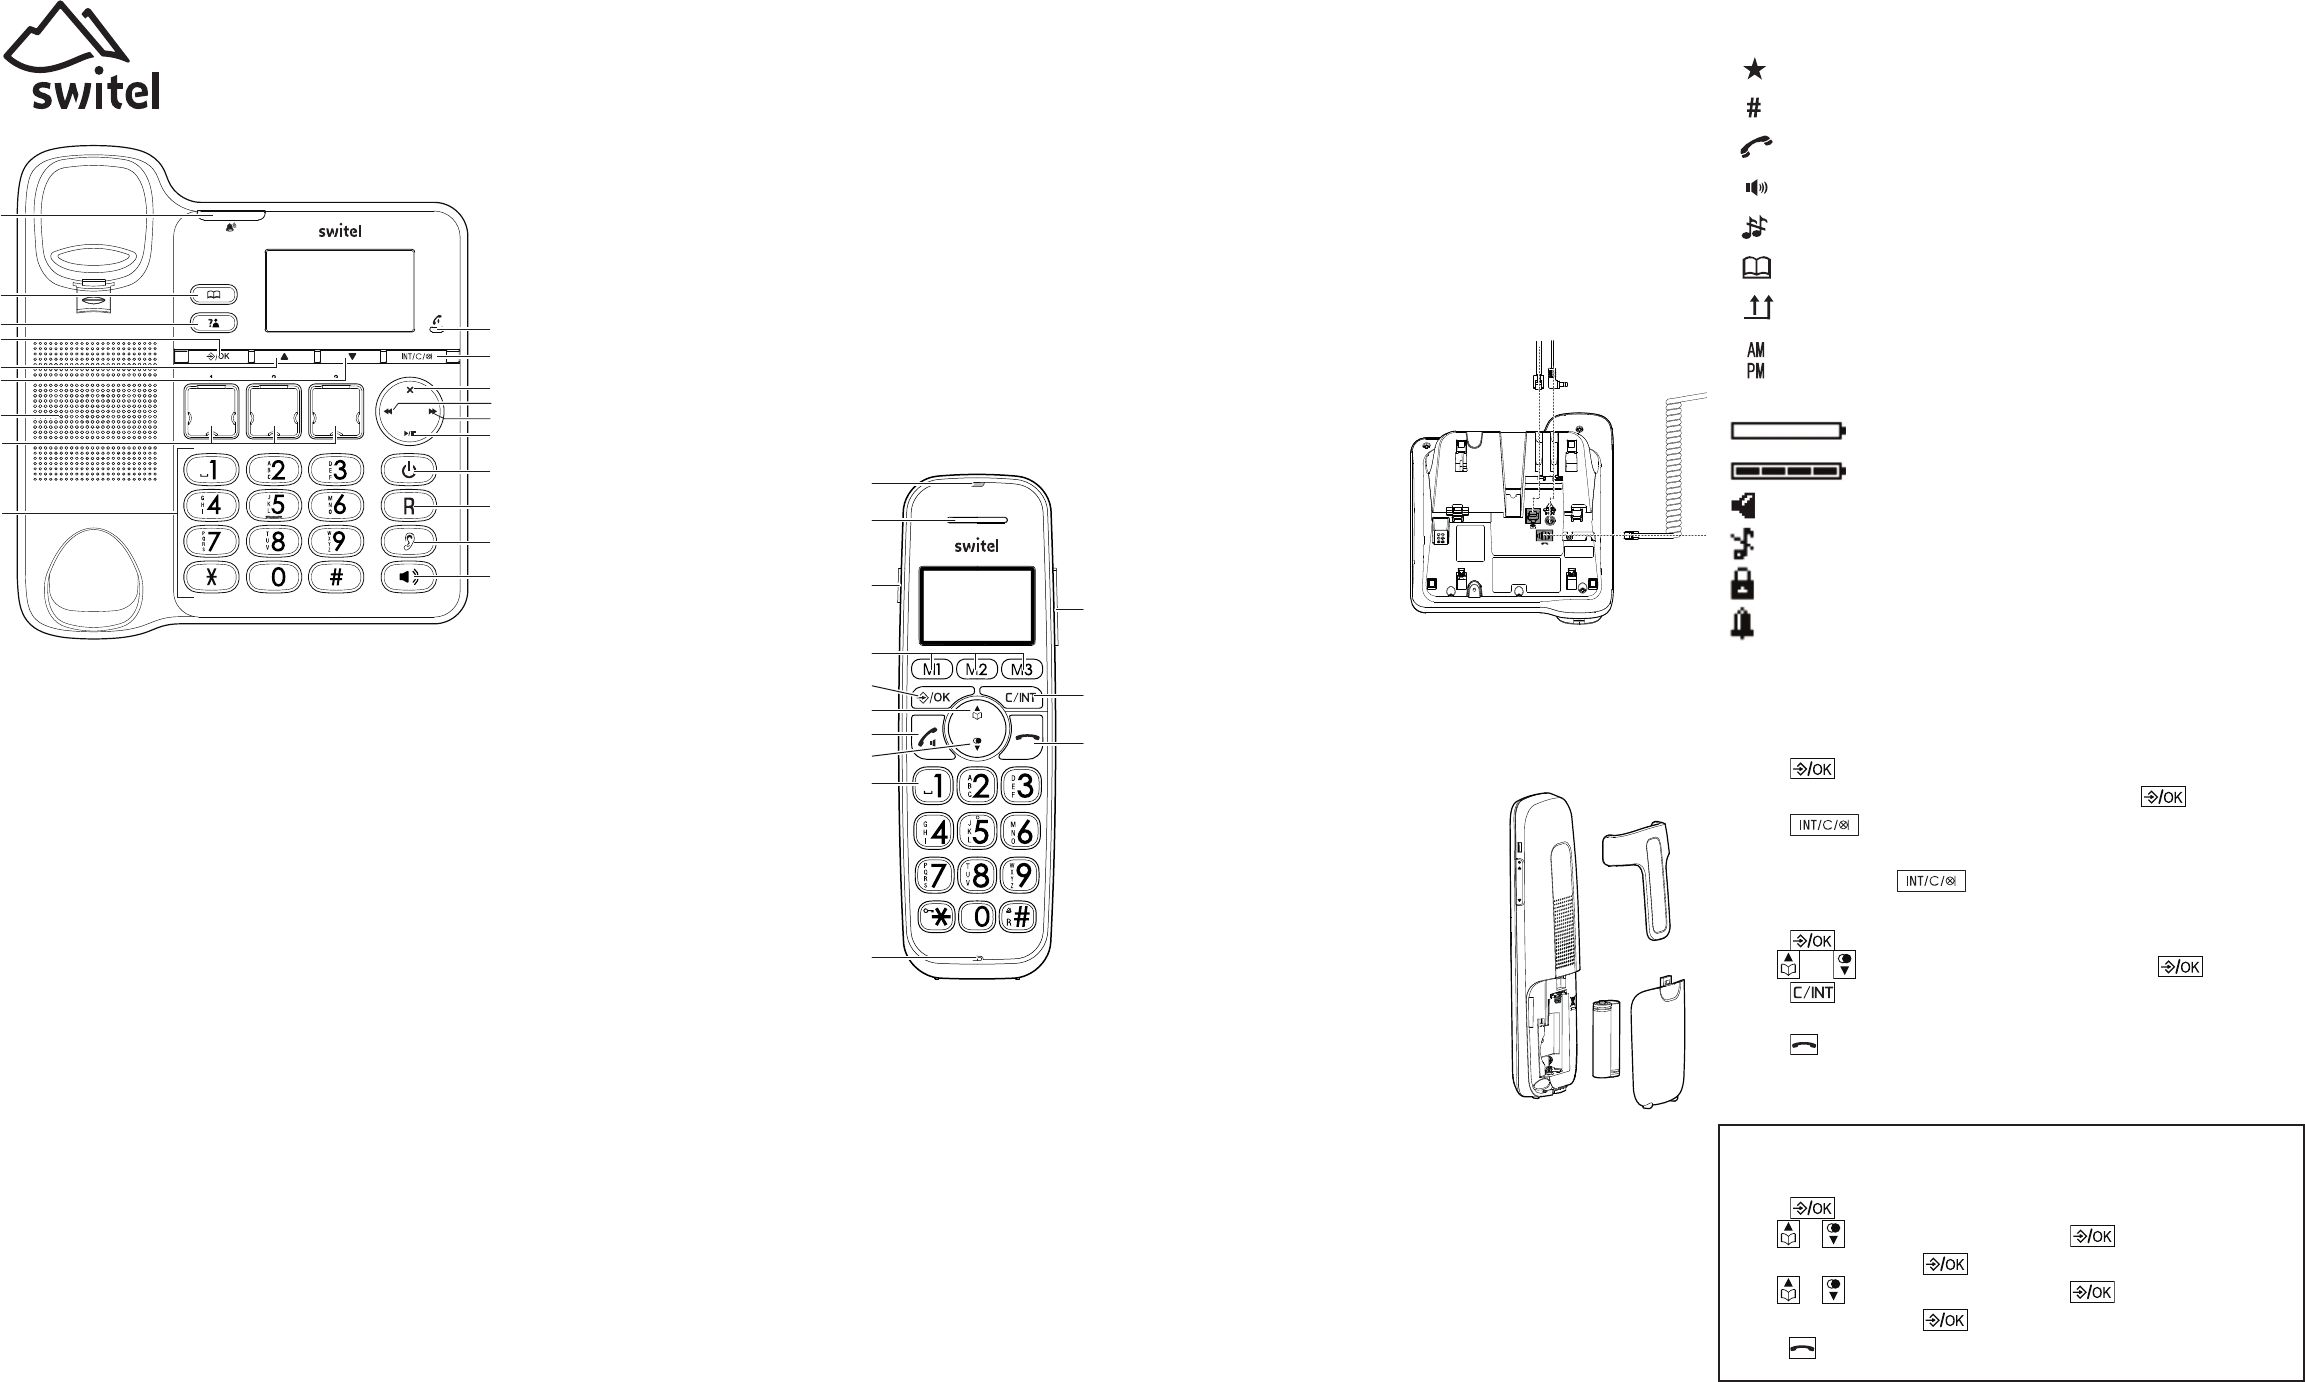
Display icons
Corded phone
New entry in the call log.
Indicate the sequence number of the calls list record.
You are in a call.
The speakerphone is in use.
Ringer off.
The phonebook is open.
Multiple call from the same phone number.
Indicate the time format (when set to 12h).
Handset
Battery is low; place handset in charger to recharge.
Full battery power level.
The handset speakerphone is in use.
Ringer off.
Keyboard locked.
Alarm activated.
Navigating the menu
Open main menu (corded phone)
1. Press .
2. Use L and M to select the desired menu item and press .
3. Press to cancel an operation, back to the previous menu, or exit
that menu.
4. Press and hold down to return to idle state.
Open main menu (handset)
1. Press .
2. Use and to select the desired menu item and press .
3. Press to cancel an operation, back up to the previous menu, or exit that
menu.
4. Press to return to idle state.
Note: If a key is not pressed within 30 seconds, the telephone
automatically returns to idle mode.
Initial setup
1. Pls set date/time appears in the handset’s display.
2. Press .
3. Use or
to select Enter time and press .
4. Enter the time and press .
5. Use or
to select Enter date and press .
6. Enter the date and press .
7. Press .
Corded phone
1 Incoming call light
- Flashes when there is an incoming call.
2 Phonebook
- Opens the phonebook.
3 Call log (missed calls)
- Opens the missed calls list.
4 MENU/OK
- Press to enter the menu.
5 Up
- Press to scroll up while in menus or lists.
- Press to move the cursor to the left while entering or modifying
names/numbers.
- Press to increase the listening volume during a call or message play-
back.
6 Down
- In idle mode, press to open the redial list.
- Press to scroll down while in menus or lists.
- Press to move the cursor to the right while entering or modifying names
or numbers.
- Press to decrease the listening volume during a call or message play-
back.
7 Loudspeaker
8 Direct call keys M1, M2, M3
- In predial mode, input a number, long press to store the number.
- In idle mode, press to dial the stored number.
9 Alphanumeric keypad
- Press to enter numbers or characters/*/#.
- Press and hold key “0“ to enter a dialling pause.
- Press and hold hash key to switch the ringer on/off.
10 Speaker
- Press to make, answer or end a call.
- Press to switch between the corded handset and the base speakerphone
during a call.
11 Boost key
- Press to increase the corded handset earpiece volume during a call.
12 Flash key
- Press to do a Flash function during a call.
- In predial, insert a 'F', it will do a flash function when press Call key.
13 Answering machine on/off
- Press to turn the built-in answering machine on/off.
- The incoming call light (1) will be on when answering machine is on.
- The incoming call light (1) will flash slowly when a new message is re-
ceived.
14 Play/Stop
- Press to start or stop message playback.
15 Skip
- Press to skip to the next message during message playback.
- In idle mode, long press to record a memo.
16 Repeat
- Press once to repeat the current message.
- Press twice to play the previous message.
- In idle mode: press briefly to playback current OGM.
- In idle mode: press and hold to record OGM.
17 Delete
- Press to delete the current message or announcement.
18 Back/Mute/Delete/Int
- Press to cancel an operation, or go back to the previous menu while in a
menu. Press and hold to return to idle mode while in a menu.
- Press to silence the base ringer temporarily while the phone is ringing
(the call can still be accepted if the caller hasn't hung up).
- Press to delete characters or numbers e. g. when creating a phone book
entry.
- In idle mode: press to intercom another system handset.
19 “In use“ light
- On when there is an incoming call or the phone is in use or the answering
system is answering an incoming call.
- On when another telephone (cordless handset) on the same line is in
use.
Handset
1 Incoming call light
- Flashes when there is an in-
coming call.
2 Earpiece
3 Boost key
- To increase the volume in the
handset. Press briefly during a
call to switch the amplifica-
tion on - pressing again
switches the amplification off
again.
If the amplifier function is ac-
tivated, "Boost on" appears on
the display and the incoming
call light (1) lights up.
4 Direct call keys M1/M2/M3
- In idle mode, press to dial the
stored number.
5 MENU/OK
- In idle mode: Press to access
the main menu
- In sub-menu mode: Press to
confirm the selection
- During a call: Press to access
Phonebook/ Redial List/ Call
List
6 Phonebook/Up
- In idle mode: Press to access the phonebook.
- In Menu/in lists: Press to scroll up.
- During a call: Press to increase the volume.
- In ringing: Press to increase the ringer volume.
7 Call/Hands-free
- In idle mode: Press to make or answer a call.
- In Redial list / Call List / Phonebook entry: Press to make a call to the
selected entry in the list.
- Whilst in a call: switch hands-free on/off.
8 Redial/Down
- In idle mode: press to open redial list.
- In Menu/in lists: Press to scroll down.
- During a call: Press to decrease the volume.
- In ringing: Press to decrease the ringer volume.
9 Alphanumeric keypad
- Press to enter numbers or characters/*/#.
- Key 0 during entering numbers: Long press to enter a dialling pause (P).
- Star key in idle mode: Long press to activate/deactivate key lock.
To switch between upper case and lower case while entering characters.
- Hash key in idle mode: Long press to switch handset ringer on/off.
Whilst in a call: Long press to enter flash function to use network fea-
tures. In calls list: Press to review caller’s number (if applicable).
10 Microphone
11 Volume keys
- Press to adjust the listening volume during a call.
12 CLEAR/BACK/MUTE/INT
- In Menu: Press to go back to previous level. Press and hold to go back to
idle screen.
- In editing / predialing mode: Press to clear a character / digit. Press and
hold to delete all the characters / digits.
- Press to mute the microphone during a call.
- In idle mode: Press to intercom another handset (only if more than one
handset is registered at the base station).
13 End call/Cancel
- Press to hang up during a call.
- Press to cancel an operation/return to idle mode while in a menu.
- Press and hold to switch off the handset when idle.
Location
Place the base unit (corded phone) near a mains socket and a telephone wall
jack to ensure that the connection cables are long enough. Keep the unit approx.
1 m away from other electronic devices to prevent interference. The corded
phone uses radio signals to connect with the cordless handset. Signal strength
depends on the base unit's location. The maximum range is 300 m based on an
unobstructed line of sight; the range is shorter inside buildings because of walls
and other obstacles.
Connect the corded phone
1. Plug the connector on the cable
end into the corresponding jack
on the underside of the base
and plug the power adaptor into
the wall socket.
2. Plug the small connector on
the end of the telephone line
cord into the corresponding jack
on the base and plug the other
end into the telephone jack.
3. Connect the receiver with the
telephone using the coiled re-
ceiver cord.
Note: Guide the connection cables through the strain-relief tabs on the base so
the unit sits flush with the desk.
Important: Use only the power adaptors, telephone line cord and bat-
teries supplied with your D200, otherwise your phone may not work.
Do not block access to the wall power supply with furniture or other
items.
Connect the cordless handset
1. Open the battery compartment and insert the
rechargeable batteries. Observe the correct
polarity.
2. Slide the battery compartment cover towards
the centre of the handset until it clicks into
place.
For a full charge, the handset must be left in the
charger for at least 16 hours (check the
charger’s power supply!).
Important: Use only the batteries supplied
with this product.
If the batteries need to be replaced later on
the same battery type must be used.
7
2
3
1
4
5
6
8
9
10
11
12
13
18
19
17
14
15
16
2
1
3
4
5
12
13
11
6
8
7
9
10
D200