A
B
C
D
E
F
G
H
I
J
K
L
M
N
O
B
C
D
E
F
G
A
H
Cor dless DE CT/G AP tel ephon e wi th
di gital an sw ering m achi n e
DET 197
Oper ating Instr uctions
Unpaci ng y our phoe
In the box y ou will find :
- the c o rdl ess hans et (two hs e ts with a T win system , thr ee wt h a
Trip le syst e m and f ou r with a Quad s te m).
- the bas e ui t
- two rec h rgeal e btt e ry cell s fo r ec h has et.
- a batt e ry co mpa rt ment c ov e r fo r eac h has et.
- a t el epli ne c abl e f o r the bas e uni t.
- a mai ns pow e r lead and adat e r fo r the bs e uni t.
- cha rge r pods, eac h wit h an attac hm ai ns pw er l ead ant er, for
mult i hans et sys t e m.
** Key our s al es r ec ei pt as it i s y our guar ant ee.
Char gi ng batt eries for th e first time
Bef or e y ou start t o us e y our t el ephm ak e s ur e t hat all batt eri es ar e
fully c hr ged for 15 hours .
Impo rtant not e:
This t el ephis not desi g f or E m er gency c alls w hen t he m ai ns
pow er f ails.
For E m er gec alls y ou s hl d hv e a basi c pt hat or at es
withou t ma ins po wer, conne c ted to y our li ne s o tha t you can m a ke call s
duri ng a pow er f ail ur e.
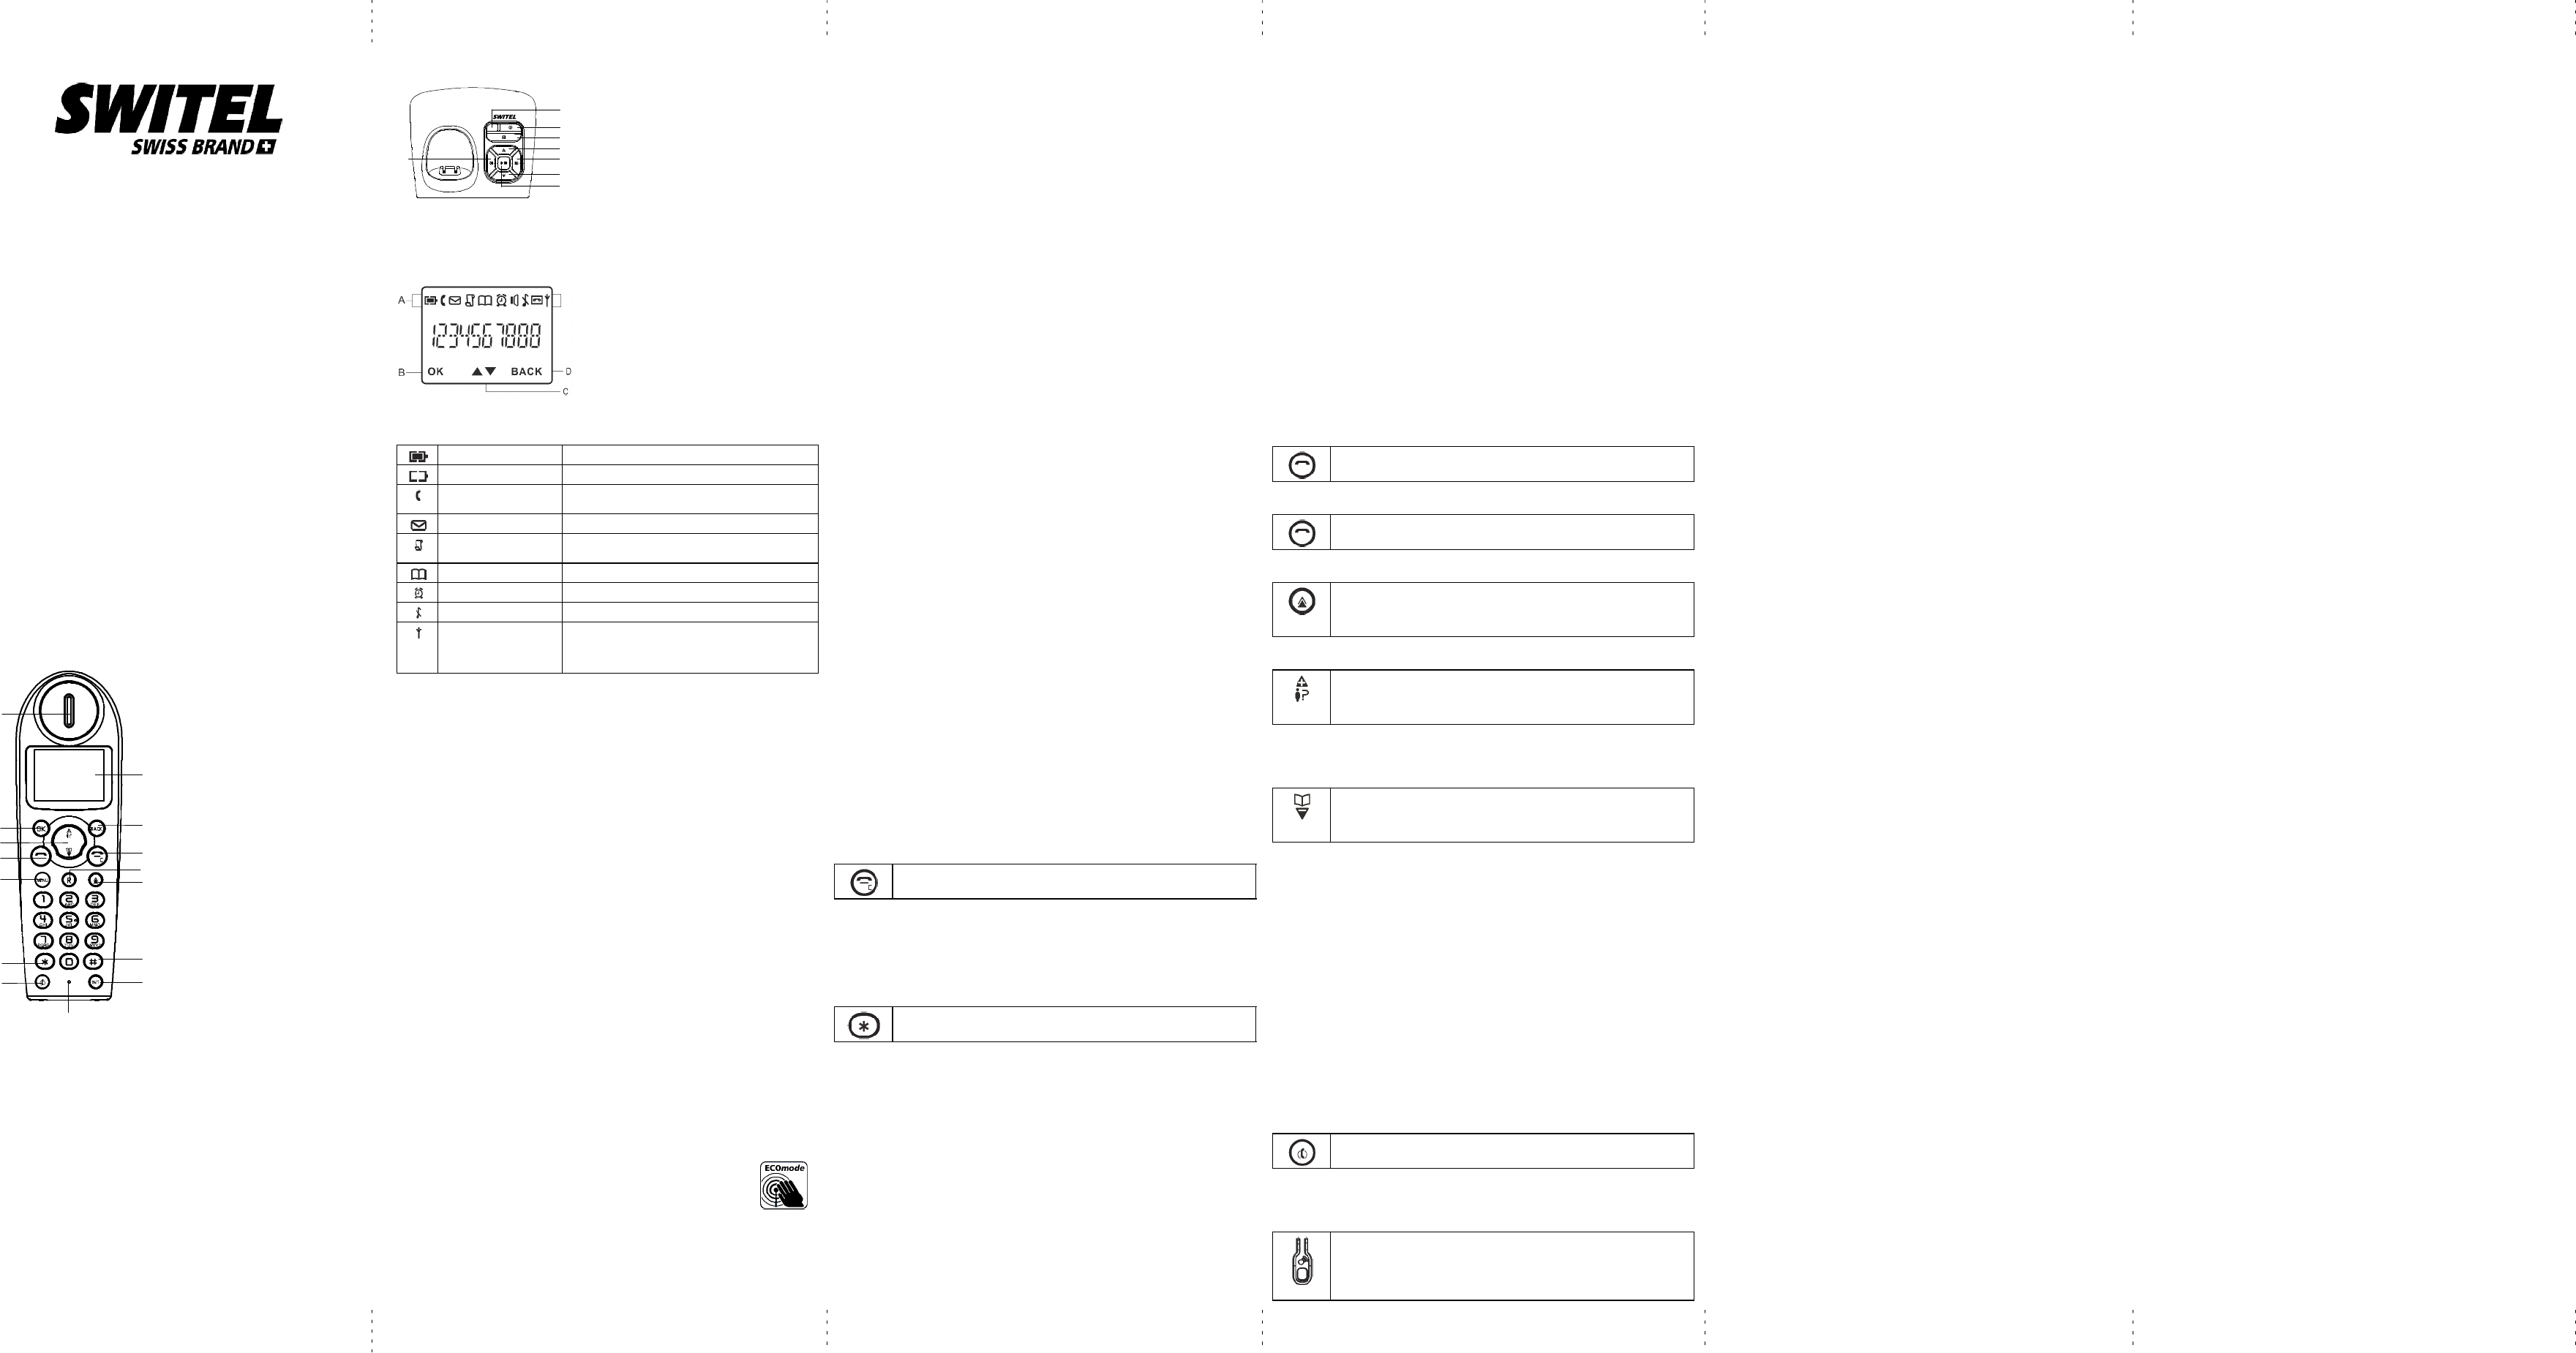
Phone Functi on Key
E Menu B utt on
- Acce ss to m ai n m enu
F [* ] B utt on
- Long p ress t o acti v at e o r deacti v at e t he k ey l ock
G Mute B utt on
- Mut e/ un mut e t he mic rophone
H Disp lay
I Back Butt on
- Canc el a m enu ent ry
- Backs pac e t he di git (s ) o r cha ract e r(s )
- P ress and hold t o t oggl e betw een hands et nam e
and dat e /tim e i n i dl e m ode
J EnB utt on
- End a c al
- P ress and hold t o t ur n t he hands et on/ off
- Exit the m enu /ope rati on
K R Butt on
- Flas h t he phone lne
L Re dia l B utt on
- Ent e r redial list and di al t he r ec ent num ber
A Earp eace M [ #] Butt o
- Ins e rt a paus e
- Long p ress t o t u rn t he ringe r on / off
B O K Butt o
- Sel ect a m enus ent ry
N I NT Butt on
- Mak e t he i nt e rcom call
- Mak e t he c onf e renc e c all
C Navig atio Butt on
- Up t o i nc reas e v ol um e and vi ew CI D
- Do wn t o dec reas e v ol um e and acc ess phonebook
O Microph e
D Tal k Butt on
- Mak e a c all
- Accept a call
Bastatio
A Answ eri ng m ac hi ne / i n us e i ndic at or
B Tur n t he answ eri ng m ac hi ne on/ off
C Del et e c urr ent m ess age, l ong pr ess t o del et e all
read m ess ages
D Incr eas e s peak er v ol um e
E Skip t o ne xt me ssage
F Decr eas e s peak er v ol um e
G Play/ Stop m ess age pl ay back
H Go back t o pr evi ous m ess age or r epl ay c urr ent
mess age
What’ s on t he dis play ?
A Disp lay I c ons
B Disp lays when i n m enu m ode t o c onfirm y our
sel e ction .
C Indic a tes tha t mor e op tions ar e av a ilab le .
Use t he UP / DOW N ke ys to scroll up/ do wn.
D Disp lays when i n m enu m ode.
Sel ect BAC K to r e tur n to the pr evi ous m enu l ev el .
Sel ect BAC K to del e te the l as t di gi t/char a c ter
ent er ed.
What t he i c ons m ea n?
Batt ery C har ge Lev el I ndic at es batt ery i s f ully c har ged.
Batt ery C har ge Lev el I ndic at es batt ery i s f ully disc har ged.
Ca ll Ind icat e s tha t an e xter na l ca ll is conne cted or he ld.
Icon bli n ks when r e cei ving an in comi ng call.
Mess age I ndic at es y ou hav e a new Voic e M ail m ess age.
Ca ller d isp lay I nd icat e s you ha ve ne w m issed ca lls, or the call log is
bei ng vi ew ed.
Phonebook Di s pl ays w hen t he phonebook i s ac es ed.
Alarm Disp lays when t he a larm c lock is a ct ivat ed.
Ringer Off Disp lays when r inger v o lum e is tur ned o ff.
Signa l Lev e l Ind icat e s tha t the hand set is reg ister ed and with in
range of t he bas e st ati on.
Icon bli n ks when the hands e t is ou t o f range o r is
sear chi ng f or a ba se.
Read First B ef ore Use
The bas e unit and c hr ger p(s ) s houl d be pl ac ed ol ev el s urf ac e, i n
a posit i on w her e:
- the mai ns adt e r pl ug will reac h an easil y ac esi bl e 23V
AC
swit chm ai n s supl y so cket - ne ver t r y to l et het he m ai ns pow er
cabl e.
- the bas e ui t’s tel epli ne c abl e will reac h y ou r tel ephli ne
so cet or e xten sion so cket (the c har ger pod dos n t hav e a tel ep
line c onnct ion).
- it is not c los e t o at he r tel e - t his c an c aus e r adi o i nt erf er enc e.
- it is not c los e t o a s ink, bat h o r show e r, or anyw her e els e w her e i t migh t
get w et.
- it is not c los e t o ot he r el ect rica l e ip ment - f ridges, was h in mac hi nes,
mic row av e ov es, fl uo resc ent li gts, tel e vi sion s et c.
- it is a way f ro m hot, hu mid c ond it ions ast rong s uli ght.
Radi o sign al s b etw een h and set and b asunit
To us e y our hans et and bs e unit t oget her, you m u s t be abl e to
mai nt ai n a radi o li nk btw eet he m. Be aw a re t hat ay l a rge met al
obj ect s, li k e a r efri ger at or, a mi rror, filing c ab ine t, e tc , be twe the
hans et and t he bs e unit m ay bl ock t he r adi o si gl. Ot her s oli d
stru ctur e s, li ke w all s, ma y red ce t he sig l streng th .
Inter fer e nce
If the s ounli ty ge ts wor se a s you m o ve ar ounw hil e on a call, t hi s
is pr ob ly cau se y int erf er enc e bt weet he hs et at he bas e
unit, per haps bc as e y or e t oo nr t o anot her phonr ot her
el ectri c al eqi pm et. M ov e t o a differ ent posit i on t o cl ear t he
int erf er enc e. Iyou do no t mov e , i t migh t cau se a shor t br eak or y our c all
may bc ut of
ECO Mode
Bot h i n C all m os w ell as i n Stany m od, the r adi ati on is
reduc ed c onsi de rably as c o mpa red t o stanr d, c or dl es
DE CT te leps.
Main s pw er co e tion
IMP ORTANT - The bs e un it and c har ger pod m us t be us ed wth the
mai ns adat e rs suli ed wt h t he unit. U sing an y ot he r adat e r will res ult
in no-com pli an ce wt h EN 6, and w n vali dat e an y ar o val gi ven
to this appar a tus .
Your p’s bs e st ati on is s uli ewit h ar gy- efic ie t swi tchi n
pow er s uply (I nput 1~ 24V
AC
, Ou tpu t 6 V
DC
, 500 mA ) . The a tor
input po wer wthou t lo is ar o x. x. xx W. The av er age e fic ienc is
appr ox. 69. 08 %.
The el ectri c al c os um pti on of the bs e is:
- in op rati on mo (id le/c a ll ): a rox. x. xx / x. xx W
- du ring c ha rgi ng of the hs et: ar ox. x. xx W
The c har gi ng stati on(s ) s upli ed wit h a t el eps et is (ar e) equi pp
with an ener gy-effic iet s witch in wer s upp ly (Inpu t 100~ 24V
AC
,
Ou tpu t 6 V
DC
, 500 mA ) . The z er o l oais apr ox . x .xx W. The av er ag
effic iency is appr o x. 69 .08 % . The char g ing stati on hs t he f oll owi n
pow er c ons um pti on l ev els:
- withou t a hands e t: Ap rox. x. xx W
- wh ile c ha rgi ng t he hans et: A pp rox. x. xx W
Batt er y saf et y - CTIO N
ONLY us e t he r ec hr geal e btt eri es s uli ewit h t he hs et. D O
NOT us e n-rec har gel e batt eri es - t hey m ay ex pl oc aus e
dam at o y our t el eph.
Inst a llation anS et-up
Fit the r ec har geab le batt er ies in eac h hs et
1) I nstall t he A btt eri es (B r and nm e: C ORU , C apacit y: Ni-H
1. 2V/ 55mA h, or B r and nm e: SN IK , C apacit y: Ni-M H 1. 2V/ 550mA h)
int o has et in acc or dac e with the po lar ity ma r ked in t he batt ery
com part m ent.
2) Cl os e t he batt ery c om part m ent c ov er, slid ing i t in to pl ac e a
pr essi ng firm ly t o m ak e s ur e it is s ec ur e.
Coneti ng AC (el ec trical) po w er
1. Pl ug t he bas e pow er adat or (Typ: IA 506G 10-240 V
AC
/ 6 V
DC
/
500 mA ) c or d i nt o t he pw er j ack or ear panel of t he bas e at he ot her
end i nt o a 1- 240 V
AC
50- 60 Hz el ectri c al otl et.
2. C onnct t el e li ne c or d i nt o t he pj ac on r ear pl of t he
bas e ant he ot her end i nt o a m ai n s ock et, Pl ug t he c har ger pow er
adat or i nt o a 10-24V
AC
50- 60 Hz el ectri c al otl et.
Bef or e y ou us e t he c or dl ess hs et f or the firs t time, it ’s impo rtant t o
char ge t he btt eri e s full y.
Leav e t he hans et on t he c hr gi ncr adl e f or 15 hours.
The batt ery c hr ge sm bol will bli nk w hy ou’r e c har gi n em pty
batt ery.
If yo thi nk tha t the sym bl is n’ t show ng the c orr ec t ba ttery c har ge l ev el ,
firs t ch c tha t the hans e t is corr e c tly po s i tione in the c har gi ng cr adl e .
If yo’r e sur e tha t i t is , re mov e and re fi t the b tteri es . Pleas e no te tha t
it ’s norm a l for the m a ins adat er t o bec om e warm this ds n’t i ndic at e a
faul t.
CAUTIO N:
Use on ly the po wer s u ly tha t cam e with th is u it. Us ing ot her po wer
supli e s ma y dm agt he uit.
Bas e adt or ty pis I A5G100-24V
AC
/ 6 V
DC
/ 500 mA .
Your Tel eph e Op er atios
Switch ing o /off
Press and hol d t he ENbutt on f or m or e t han 2 s ec onds t o
swit ch on/ off t he h set i n i dl e m o.
** Yoc aswt c h t he has et ofand s av e ba ttery c har ge .
Not es: W hen t he hs et is OFF, i t can t be us ed for m aki ng c alls
inc lu inm er genc a lls. Ther e wbe nr ing inr ing an inc om in
call. To asw er a c all, y ou w neet o swt c h it back o. It m ay tak e
som e tim e f or t he han set to r e-establis h a r adi o li nk wt h t he bas e uit.
Tl ock/ unl oct he ke pa d
Press and hol d t he STAR ke y for 1 se cont o lock/ un loc
the k ey pad i n i dl e m o .
Not e: I nc om inc a lls ca st ill be ans wer ed ev e if the k ey pad was
lock ed.
Set tim e and d at e
Not e: If y os usr ibe t o t he Ca ller Disp lay s erv ice, the tim e at e
will be s et aut om at ica lly whey ou r ec e ive a ca ll, bu t you m a y s t ill ne
to s e t the c orrect y ear.
1. Pr ess MENU k ey t o ent er m enu s el ecti on.
2. Pr ess t he N avi gati on k ey t o s el ect C LOCK LARM and t her es
OK ke y to s el ec t.
3. Pr ess OK k ey t o s el ect DATE/ TIME . The l ast st or ed dt e is dis pl ay ed.
Ent er t he c urr ent dat e ( YY-DD ), p ress OK , t hen ent e r the tim e
(HH -.
4. Pr ess t he N avi gati on k ey t o s el ect AM or P M (if the tim e is i n 12
HO URS form a t) and then pr ess O K ke y to conf irm. A con f irmat ion b
is p lay ed.
Cha nge y or ha ndset’s n am e
1. Pr ess MENU k ey t o ent er m enu s el ecti on.
2. Pr ess t he N avi gati on k ey t o s el ect PER S ONA L SET ant hen pr ess
OK ke y to s el ec t.
3. Pr ess t he N avi gati on k ey t o s el ect HA NDSET NAM E ant hen pr ess
OK ke y to s el ec t. The c urr en t hands e t nam e is dis pl ay ed .
4. Pr ess BC K k ey t o del et e t he c har act ers ony one.
Ent er t he new nam e (m axim um 10 c hr act ers ) ar ess O K ke y to
confirm . A confirm ati on bi s pl a yed.
Cha nge t he dis play la nga ge
1. Pr ess MENU k ey t o ent er m enu s el ecti on.
2. Pr ess t he N avi gati on k ey t o s el ect PER S ONA L SET ant hen pr ess
OK ke y to s el ec t.
3. Pr ess t he N avi gati on k ey t o s el ect LANG U AG E at her esOK
ke y to sel e ct.
4. Pr ess t he N avi gati on k ey t o y our dsir ed l anr ess OK k ey
to c on firm . A co firma tion bee is p lay e .
** Onc e the dis pl ay l anis s e t, the op tion m ens o the hs e t
will s wtch to d isp lay in t he s e lect ed lan imme iat e ly.
Make and an sw er call s
Make a call
Predi alling
Dia l the num br (m ax imu m 24 d ig its) a ther esTAL K
ke y.
Direct d ia lling
Press TAL K ke y to tak e t he li ne and t hen di al t he nm ber
(maxi mu m 24 di gits).
Call from re dia l list
Press R edi al k ey i n i dl e mod.
Press t he N avi gati on k ey t o an et ry in t he redi al list and
then pr ess TAL K ke y.
Call from t he call l og
Press C ALOG (U P) ke y in id le mode.
Press t he N avi gati on k ey t o an et ry in t he call li st and the
pr ess TAL K ke y.
Not e: You nt o s ubscri be t o C all er Li ne I denti fic ati on s ervi c e t o b
abl e t o s ee t he c all er’s num br or nam e i n t he c all l o.
Call from t he phe bok
Press PHO N EBOO K (DOW N ) ke y in id le mo.
Press t he N avi gati on k ey t o an et ry in t he ph k a
then pr ess TAL K ke y.
Answ er a nd e nd a call
1. W hen t he phori ngs, pr ess TAL K ke y.
2. To enc onv ers ati on, pr ess EN k ey.
War ni ng: When t he hans et rings dur ing an inc om ing c a ll, p leas e do nt
hol d t he has et t oo cl os e t o y or ear as t he v ol um e of the ri ngi ng t on
may d magy o r hea ring.
Impo rtant not e:
You c an sim ply pl ac e t he has et bac on its bas e st ati on or c har ger
pod t o end t he c all.
Mak e s u re t hat y ou hav e nt deacti v at ed t he aut o h -up f eat ur e.
Adj ust the er piec ol ume
Dur ing a c a ll, pr ess the Nav igt ion k ey t o s e lect fr om VO L UME 1 t o
VOLUM E 3.
Mu te/unm u te mi cropho e
When t he mic r opis m ut ed, the hans et dis pl ays MUTE O N, a
your call er cant hear you.
Dur ing a c a ll, pr ess the M UTE ke y to tur n on /o fhe mic r o-
pho.
Pagi ng
The pagi ng f eat ur e enl es y ot o l oc at e a miss i ng hs et i f t he
hans et is i n r ange and c ontai ns c har ged btt eri es.
Press H AN ST LOC ATOR ke y loc a ted a t the bc of t he
bas e st ati on. All t he r egist er ed has ets s tart t o ri ng.
Onc e r e triev ed , pr ess any k ey on the hans e t or the HA N-
SET LOC ATOR ke y aga in to en the pagi n .
Call w ait ing
If yo ve sub scribe to C all Wait i ng s ervi c e, the ear pi ec e w emit a
beet one t o i nf orm y ou t hat t her e is a s ec oni nc omi nc all. T he
num br or nam e of t he s ec ond c all er will als o bis pl ay ed oy or
phoif y ou hav e s usri bed t o C all er Li ne I deti fic ati on s ervi c e (C LI) .
Pleas e c ontact y our netw ork pr ovi der f or m or e i nf orm ati on on t his
ser vi ce.
Using your phon ebo k
Your pc an st or e up t o 50 pk m em ori es. E ac h pk
entry c av e a m axim um of 2i gits for the phom ber and 12
char a cter s for nam e .
Ho w to en ter c har ac ters ?
When y ou s el ect a fi el d i n w hic h y ou c an ent er t ext, y ou c an et er t he
lett ers t hat ar e pr int ed on t he k eys by pr ess ing t he r e lev at k ey oc e or
se ver al t im e s.
For ex am pl e, pr ess 2 onc e t o i ns ert t he l ett er A, pr ess 2 twic e t o i ns ert
the l e tter B , as o on ... Spac es a ther sy m bols c a en ter ed
usi nt he 1 or 0 k ey.
Store a c on tat in th e pho eb k
1. Pr ess MENU k ey t o ent er m enu s el ecti on.
2. Pr ess t he N avi gati on k ey t o s el ect PH ONE OOK at her esOK
ke y to sel e ct.
3. Pr ess OK k ey ai n t o ent er NEW E NT RY.
4. E nt er t he nam e of the c ontact (m axim um 12 c har act ers ). To edit,
pr ess BAC K k ey t o del et e t he l ast c har act er ent er ed. Pr ess OK k ey t o
confirm t he nm e etr y.
5. E nt er t he num br of the c ont act (m axim um 24 di gits) ant hen pr ess
OK ke y to c o firm . A con firma tion b is p lay ed .
** Yoc at s t or e a new phok entry w ht he m em ory i s f ull. I n
this c as e , you ha ve to del e te exi s ting e tries to m ak e s pac e for nw
entri es.
** Whest ori ng t he num ber, en ter the f ull nm ber i ncl udi ng t he STD
(a rea ) code if you su sc ribe t o c a lle r dis pl ay, o therwis e i t wno t dis pl ay
the nam e w h ther e is an i nc omi nc all .
Accph ebo k
1. Pr ess PHO N EOO K (DOW N ) k ey i n i dl e m odt o br ows e t he
phok entri es. Al t er nativ ely, you can pr e ss the MENU k ey, to
dis pl ay PHO N EBOO K and t hen pr ess OK k ey t o s el ect.
2. Pr ess t he N avi gati on k ey t o s el ect LIST ant hen pr ess OK k ey t o
confirm . T h k entri e s will be li sted i n al ph ti cal or der, and
you can pr e sNa vigat ion ke y to scroll t h rout he stor ed en trie s.
3. Pr ess OK k ey t o vi ew t he det ails of t he s el ect ed etry.
** Ins tea f pr essi ng the N avi ga tion k ey to br ows e the pk
entri es, y ou c an pr est he num eric k ey c orres poni nt o t he firs t l etter of
the en try you wi sh to l oc a te . For ex am pl e , pr essi ng 2 ws how the
entri es starti ng wit h A. Pr essi ng 2 agai n will s how t he entri es starti ng
with B , and s o o ...
Modi fy a p ebo k en try
1. Pr ess MENU k ey t o ent er m enu s el ecti on.
2. Pr ess t he N avi gati on k ey t o s el ect PH ONE OOK at her esOK
ke y to sel e ct.
3. Pr ess t he N avi gati on k ey t o s el ect ED IT EN TRY ant hen pr ess OK
ke y to sel e ct.
4. Pr ess t he N avi gati on k ey t o s el ect an entry to edi t and then pr e ss OK
ke y. The c urr en t nam e is dis pl ay ed . Edi t the nm e at her esOK
ke y to confirm .
5. E dit t he num br and t her esOK k ey t o c ofirm . A c onfirm ati on
beeis pl ay e.
Del et e a pho eb k entry
1. Pr ess MENU k ey t o ent er m enu s el ecti on.
2. Pr ess t he N avi gati on k ey t o s el ect PH ONE OOK at her esOK
ke y to sel e ct.
3. Pr ess t he N avi gati on k ey t o s el ect DE LET E at her esOK k ey t o
sel e ct.
4. Pr ess t he N avi gati on k ey t o s el ect an entry to del e te an then pr e ss
OK ke y.
5. Pr ess OK k ey ai n t o c onfirm . A c ofirm ati on beis pl ay ed.
Del et e all entries fro m th e ph ebo k li st
1. Pr ess MENU k ey t o ent er m enu s el ecti on.
2. Pr ess t he N avi gati on k ey t o s el ect PH ONE OOK at her esOK
ke y to sel e ct.
3. Pr ess t he N avi gati on k ey t o s el ect DE LET E A LL at her esOK
ke y to sel e ct.
4. Pr ess OK k ey ai n t o c onfirm . A c ofirm ati on beis pl ay ed.
Direct acce me mo ry
Ther e ar e 2 dir ect acc ess m em ori es (K eys 1 & 2) i n addit i on t o t he
phok m em ory. A long pr ess o the k eys i n i dl e m ow
aut om atic ally di al t he st or ed ph num br.
Add/e dit direct a m emo r y
1. Pr ess MENU k ey t o ent er m enu s el ecti on.
2. Pr ess t he N avi gati on k ey t o s el ect PH ONE OOK at her esOK
ke y to sel e ct.
3. Pr ess t he N avi gati on k ey t o s el ect D IRE CT ME M . and t her esOK
ke y to sel e ct.
4. Pr ess t he N avi gati on k ey t o s el ect KEY 1 or KEY 2 at her es
OK ke y. The s tor ed nam e is dis pl ay ed , or N O NUMBE R i f i t is em p ty. If
ther e is no num br s tor ed for the s el ec ted k ey or i f you w an t to c h
the nam e or num br c urr en tly s tor ed , pr ess MENU k ey to e ter dir ec t
me mo ry met o ad/ edit t he na me o r nu mbe r.
5. Pr ess t he N avi gati on k ey t o s el ect ED IT NUMBE R and t hen pr ess OK
ke y to sel e ct. The di spl a y show s the curr entl y stor ed nam e , or ENT ER
NAM E if ther e is nm ber st or ed. E dit or ent er the nm e y ou w ant a
then pr ess OK ke y. The dis pl ay s hows the c urr en tly s tor ed nm br, or
ENT ER NUM BR if ther e is no num br stor ed . Edit or ent er the nm br
you w ant and t hen pr e ss OK ke y to cofirm . A confirm ati on b i s
pl ay ed.
Del et e dir ect accesm emo r y
1. Pr ess MENU k ey t o ent er m enu s el ecti on.
2. Pr ess t he N avi gati on k ey t o s el ect PH ONE OOK at her esOK
ke y to sel e ct.
3. Pr ess t he N avi gati on k ey t o s el ect D IRE CT ME M . and t her esOK
ke y to sel e ct.
4. Pr ess t he N avi gati on k ey t o s el ect KEY 1 or KEY 2 at her es
OK ke y. The s tor ed nam e is dis pl ay ed ( or N O NUMB R i f i t is a lready
em pty) .
5. Pr ess MENU k ey t o ent er dir ect m em ory m enu.
6. Pr ess t he N avi gati on k ey t o s el ect DE LET E at her esOK k ey t o
sel e ct. Pre ss OK ke y ai n t o confir. A con fi rmati on beeis pl ay e.
Using t h e r edi al list
The r edi al list st or es t he l ast 5 num brs di al ed. A m axim um of 24 di gits
can be di spl a yef or ea ch etr y.
Accr edi al list
1. Pr ess R edi al butt on i n i dl e m or ess N avi gti on k ey t o br ows e
the r edi al lis t. The l as t num br di al ed will apr first in the r edi al list.
2. Pr ess OK k ey t o vi ew t he det ails of t he s el ect ed etry.
Savr edi al nm b er int o t he phoe bk
1. Pr ess R edi al k ey i n i dl e m ode t o go t o t he r edi al list.
2. Pr ess t he N avi gati on k ey t o s el ect an entry.
3. Pr ess MENU k ey t o dis pl ay SANUM BER, ther esOK k ey t o
dis pl ay ENT ER N AM E. E nt er t he nam e of t he c ontact (m axim um 12
char a cter s) and t he re sOK ke y to sa ve t he entr y, and r e tur n the
dis pl ay t o t he r edi al list.
Del et e a r edi al num b er
1. Pr ess R edi al k ey i n i dl e m ode t o go t o t he r edi al list.
2. Pr ess t he N avi gati on k ey t o s el ect an entry at her e sMENU
ke y.
3. Pr ess t he N avi gati on k ey t o s el ect DE LET E at her esOK k ey t o
sel e ct.
4. Pr ess OK k ey ai n t o c onfirm . A c ofirm ati on beis pl ay ed.
Del et e th e r edi al lst
1. Pr ess R edi al k ey i n i dl e m ode t o go t o t he r edi al list.
2. Pr ess t he MENU k ey.
3. Pr ess t he N avi gati on k ey t o s el ect DE LET E A LL at her esOK
ke y to sel e ct.
4. Pr ess OK k ey ai n t o c onfirm . A c ofirm ati on beis pl ay ed.
Using t h e call log
To r ec eiv e C all er ID you m a y net o cot a ct your t e lephs erv ice
pr ovi dr, and they w n form y ou als o o f ay c har ges for i tCa ller ID lets
you see t he ph num ber s of your call er s on t he ha set di spl a y,
bef or e y ou asw er and i n y our C all Lofterw ar ds.T he C all Lst or es
the l as t 10 ex ter nal c alls , whe ther or no t you an swer ed the c all , so yo
can call t hem ba clat er.
Only the m os t rec en t call i s sa vei f ther e ar e r epet c alls fr om t he s am e
num br. When the C all Log is full , the nxt nw c all will r epl ac e t he
ol dest entry. If you’ ve go t a new c all i n the C all L , the C all er Dis pl ay
icon will apr on t he has et d isp lay.
If the r ec eiv em ber is the s am e as oi n y our phonk , the nam e
fro m the pk will dis pl ay as w ell as t he num ber.
If a c all is fro m so me w ho wi thhel d their num br, the dis pl ay w
show WIT HO LD I D.
If the c all is fro m so me w hos e n mbe r is una va ila le , or i f yo ve
not s ubscri bed t o C all er ID but hav e s et t he dat e atim e, t he dis pl ay
will sh w CALI NG whe it is re ce ive UNAIL ABL E in t he Ca ll
Log.
Accll log
Press C ALOG(U P) ke y in id le mod resN avi gati on k ey t o
br ows e t he c all list. T he c alls ar e dis pl ay ei n c hr onol ogic al or der wit h
the m os t rec et c all at t he t op of t he list.
1. Pr ess OK k ey t o dis pl ay m or e dtails of the c all, i ncl ui ng t he dat e
and tim e.
Sav e c all list entry i nt o t he phk
2. Pr ess CA LL LOG(UP ) k ey i n i dl e m ode t o go t o t he c all list.
3. Pr ess t he N avi gati on k ey t o s el ect an entry at her e sMENU
ke y.
4. Pr ess t he N avi gati on k ey t o s el ect SANM BR at her es
OK ke y to s el ec t. ( En ter the nm e of t he c ontact (m axim um 12
char a cter s) and t he re sOK ke y to cofirm .
Del et e a Call Log entr y
1. Pr ess CA LL LOG(UP ) k ey i n i dl e m ode t o go t o t he c all list.
2. Pr ess t he N avi gati on k ey t o s el ect an entry at her e sMENU
ke y.
3. Pr ess t he N avi gati on k ey t o s el ect DE LET E at her esOK k ey t o
sel e ct. (PresO K ke y agi n t o confirm . A confirm ati on beei s pl a ye.)
Del et e all entries in t h e C all Log
1. Pr ess CA LL LOG (UP ) k ey i n i dl e m odt o go t o t he c all list.
2. Pr ess t he MENU k ey.
3. Pr ess t he N avi gati on k ey t o s el ect DE LET E A LL at her esOK
ke y to sel e ct. (Press O K ke y agi n t o confirm . A confirm ati on beei s
pl ay ed.
Answ eri ng mac hi ne oer ation by ha ndset
You c an us e t he answ er m ac hi ne m en t he has et t o acc ess a
chat he setti ng s for all the an swer ing m a chi ne f un ction s.
Tr n t he a nsw eri ng mac hi ne on or off
1. Pr ess MENU k ey t o ent er m enu s el ecti on.
2. Pr ess t he N avi gati on k ey t o s el ect AN SW M ACH INE and t hen pr ess
OK ke y to s el ec t.
3. Pr ess t he N avi gati on k ey t o s el ect AN SW. ON /OFF an then pr ess
OK ke y to s el ec t.
4. Pr ess t he N avi gati on k ey t o s el ect ON or OFF ant hen pr ess OK k ey
to c on firm .
5. A c onfirm ati on beeis pl ay e. Pr ess END k ey t o go bact o i dl e
mode.
* Yoc als o t ur n t he answ eri ng m ac hi ne on or ofby pr esi n the
ON /OFF ke y o the bas e .
** If the asw eri ng m ac hi ne is t ur neff ant he m ast er PIN is s till s et at
its def ault 0000, the asw eri ng m ac hi ne w not answ er t o any i nc omi n
ring ing, but if the mast e r PIN has b c h , i t wans we r afer 10
rings t o a llo w re mot e acc ess.
The out goi ng mes ge
The m odel is s uli ed wit h tw o pr edefi ned ot goi nm es as (OG M)
us ef or t he difer en t answ er m odes .
Ther e ar e 2 asw er m odes av ail abl e: A nsw er O nly anA nsw er &
Rec or d. By def au lt, the asw er m ode is A NSW.&R EC ORD , wh ich a llo ws
a c all er t o l eav e a m es ag t he answ eri ng m ac hi ne. T his c a
chat o AN SW ER O N LY mode, w hic h ds not all ow c all e rs to l ea ve
any m ess ags ot he answ eri ng m ac hi n.
Set th e an sw er mod e
1. Pr ess t he MENU k ey t o et er m enu s el ecti on.
2. Pr ess t he N avi gati on k ey t o s el ect AN SW M ACH INE and t hen pr ess
OK ke y to s el ec t.
3. Pr ess t he N avi gati on k ey t o s el ect AN SW ER M ODE ant hen pr ess
OK ke y to s el ec t.
4. Pr ess t he N avi gati on k ey t o s el ect AN SW ER ON LY or
AN SW.&R EC ORD a ther es OK ke y to c o firm .
Recor d a p er son ali sed ot goi ng m esg e
* Yoc ac hs e t o r epl ac e t he pr edefi neOGM wi t h y or ow n
pr e-ec o rded p rsonli sed mes as.
1. Pr ess t he MENU k ey t o et er m enu s el ecti on.
2. Pr ess t he N avi gati on k ey t o s el ect AN SW M ACH INE and t hen pr ess
OK ke y to s el ec t.
3. Pr ess t he N avi gati on k ey t o s el ect RE C OR OGM ant hen pr ess OK
ke y to sel e ct.
4. Pr ess t he N avi gati on k ey t o s el ect AN SW ER ON LY or
AN SW.&R EC ORD a ther es OK ke y to c o firm .
5. Pr ess t he N avi gati on k ey t o s el ect RE C OR OGM .
6. Pr ess OK k ey t o start r ec or di ny or new ot goi nm es a.
7. Pr ess OK k ey ai n t o end t he r ec or di ng.
* The m axim um l ent h of an out goi nm es agis 2 mi nt es.
* To hear y our out goi ng m ess a, s el ect P LAat s t ep 5.
* To del et e a pers onalis et goi ng m ess age and r et ur n t o t he
pr edefi ned o, s el ect DE LET E at s t ep 5.