Cat. no . 3 5.11 00
KSPO :1442- 09(TF A)
NIL DV928 MANUAL( EN G 2)
SIZE:W 105xH 148mm
BY C Y W U 16/03/10
Meteotime DUO
Instr uct ion manual
Radi o cont roll ed weather station
with professional weather
forecast vi a DCF 77 si gnal and
local measur ing values via indoor
sensors and wir eless outdoor
transmi tters
You can downlo ad th is m an ual
in several languages at
www. tfa-do stmann. de
Cha ra cte ri st ic s an d f unc ti ons:
The METOTIM E DUO r ad io we at he r s ta ti on u ni te s t he n ee d fo r a f ore ca st ing s ta tio n wi th
pr ofes si onal, mul ti - da y we at he r f ore ca st s a cr oss t he DC F si g nal a n d a c las si ca l rad i o wea t her
st ation wit h it s o wn lo c al sens o rs and ext e rnal tr ansmi tt e rs.
With its own b u il t- in me mo ry , 3 000 wea the r e n tr ies ca n be stor ed , wh ich c an b e s av ed o n a
PC b y usi n g a U SB gat eway , a nd can be di s play e d i n t he s oft war e s hi pped w it h del i very.
Prof es si ona l wea the r fo reca st vi a DCF 7 7 S ignal
• Pr of es sio na l we at her fo re ca st (d ay/ ni ght ) wit h ex pec te d h igh es t a nd lo we st te mpe ra tur es fo r
90 me te or olo gi ca l r eg ion s i n Eu rope
• Da il y t ra ns mi ss io n v ia DCF si gna l
• Tex t d is pl ay fo r c ri ti ca l we at he r s it ua tio ns
• Ra in p ro bab il ity
• Wi nd v el oci ty and di re ct ion
• Ti me f or sun ris ing and se tting
• Rad io con trol le d c lo ck with da te
Lo ca l mea sur ing va lue s v ia sen sors
• Wi re le ss tr ans mis si on (433 M Hz) of ou tdoo r te mp er atu re an d hu mid ity ( ran ge u p t o 1 00 m in
free fie ld) , qu an ti ty o f ra inf al l, wind ve lo ci ty and di re ct ion (u p t o 30 m in free fie ld) f ro m the
ex te ri or sen so rs to the di sp lay s ta ti on
• Cap ab le of ta kin g up to 5 o utd oo r t empe ra tu re /hu mid ity t ran smi tt er s, a lso f or th e c li mat e
con trol of re mot e r oo ms , e.g . ch il dr en’s roo m, win e- ce ll ar, gr ee nhou se
• I ndoo r te mp er atu re an d hu mid ity wi th co mf or t l ev el ind ic at or of in doo r c li mate
• Ab sol ut e an d r el at iv e a tmos phe ric p re ssu re wi th 2 4 ho ur s h is to ry
• Ba r g rap h i nd ica tion of at mo sph er ic pr es sur e, te mp er atu re or hu mi di ty fo r the la st 24 h ou rs
• I ndi ca ti on o f mo on p has e
• Wi ndch ill fa ct or and de w p oi nt
• Pr og ra mmab le a lar m fu nc tio ns fo r c er ta in wea the r c ond it io ns , li ke te mp er at ur e a la rm , s to rm
war ni ng
• M ax imu m a nd mini mum va lu es
• Da ta mem or y fo r 3 000 wea th er re cor ds
• PC - i nt er fac e wi th an aly si s sof twa re pac kag e
• LED Back li gh t wi th ligh t s ens or (i n c ont in uou s op er at ion wi th p owe r a dap te r)
• Fo r wa ll m oun ting or fr ee st and ing
In dex:
A: Sett i ng up
1. Sett i ng u p t he re m ote we ath er sen sors
1 .1 Se tt ing u p t he the rm o-h yg ro s ens or (s)
1 .2 Se tt ing u p t he r ai n s ensor
1 .3 Se tt ing u p t he a ne mo me te r ( wind sen so r – sol ar p owe red)
2. Sett i ng u p t he m ai n unit
3. Rec e pti on of t he out door tra ns mi tter s by t he m ai n unit
4. Sett i ng pre ss ure p aram et er s
5. Rec e pti on of RC tim e a nd METEOTI ME we at her f orec as t i nf orm ati on
B: Ope rat ion
1. M ETEOTIM E f ore c ast i nfo rm ati o n
1 .0 In trod uc tion
1 .1 Dis pl ay
1 .2 But tons
1 .3 Rec ept ion of t im e an d wea th er d ata
1.3 .1 Rec ep tio n o f t ime
1.3 .2 Rec ep tio n o f wea th er d ata
1.3 .3 Choo sing the in sta llat io n l oca ti on
1 .3 .3 .1 Rec ept ion te st
1 .3 .3 .2 Pos si bl e so urc es of in ter fe ren ce
1.3 .4 Se t ti me zon e, lang uag e and con tr ast
1.3 .5 Se le ct the cou nt ry a nd c it y/ ci ti es
1 .4 How t o op era te
1.4 .1 Swi tc h CI TY SUNRI SE & SUNSET TI ME TIME & DA TE
1.4 .2 Swi tc h DAY WEA THER I NFORMA TIO N NI GHT WEA THER
I NFORMA TI ON
1.4 .3 Di sp lay of mo re ci ti es
1.4 .4 Ho w to p ers ona li ze a c it y na me
1.4 .5 Cr it ic al weat he r in fo rm at ion
1 .5 Exc lus ion of war ran ty fo r METEOTIM E wea the r in fo rmat ion
1 .6 We ath er sy mbo ls
1.1 Setti ng up t he Ther mo- H ygr o Sen s or(s)
1. Ope n t h e l at ch at th e b a se o f t h e the rmo -hyg ro s en sor.
2. Set t he c han nel wit h a sl i de s wit c h.
3. I nse rt 2 x “AA” si ze 1. 5V bat te ri es.
4. R epl ac e the l at ch and mo unt un it at de si r ed l o cation.
Pl acemen t t i ps:
- The t her mo-h yg ro me te r s ens or sho ul d be in an ar ea wit h f re e a ir ci rc ul at ion an d sh el te re d
fro m d ir ec t su nl ig ht and ot her ex tr eme wea the r c ond it io ns . P la ce th e un it i n a sha ded ar ea ,
su ch a s u nde r a ro of.
- Us e t he wa ll mou nt hol e if mo un tin g t he uni t o n a ve rt ic al su rf ace.
- Avo id pl ac ing th e s ens or nea r sou rce s o f h ea t s uch as ch im ney s.
- Avo id any ar ea s wh ich co ll ec t a nd rad ia te hea t in the su n, s uch as met al , br ic k o r co nc re te
st ru ctu re s, p av ing , pa ti os and dec ks.
- I dea lly , p lac e t he sen so r ab ove na tu ra l s ur fac es su ch a s a gr as sy la wn.
- The i nt ern at ion al s tan da rd h ei ght fo r me asu re men ts o f a ir t empe ra tu re is at 1 .2 5m (4 f t) abo ve
gro und le ve l.
1.2 Setti ng up t he R ai n Sens or
1. U nlock t he f unnel -s hap e d t op of t he r ai n s e nsor b y t urni n g bot h kno bs o n t he s i des of t he ra i n
se nso r in an a nt i- cl ock wis e d ir ec ti on.
2. Li ft t he t op off t he bas e a n d i nser t 2 x “ AA” s iz e 1. 5V batt er ie s i nt o t he bat te r y h ol der.
3. Re m ove t he a dhes i ve t a pe f or tra nsp or t l ock.
4. Rep la ce t he l i d a nd se c ure i nto plac e by t ur ni ng t he kn obs c l oc kwi se.
5. Pl a ce t h e r ain sen so r in a loc at io n such th at p reci pi t ati on c an f all d i re ctly in to th e sens or,
id ea ll y 2 -3 ft abo ve the gr oun d.
I t may be se cur ed in to p la ce by u si ng the fo ur sc re ws pr ov ide d.
6. The se nso r m ust be acc ur at el y l e vel f or opti m um pe rf or ma nce . T o c hec k if t he s e nsor is le ve l,
r em ove th e lid and ch eck i f t he bal l bea ri ng ins id e i s a t the m id po int of th e lev el ler .
Add it io na lly , a bu bb le lev el or ca rpe nt er’s le ve l may be use d.
7. At ta c h t he pr ot ec ti ve s cr een ont o t he t op of t he li d. The s cr een w ill pr e vent a ny deb ris
en te ri ng the se nsor.
Plac emen t t ip s:
- The r ain se nso r shou ld be pl ace d i n an op en a re a a way fro m wal ls , f enc es , tree s a nd o th er
cov er ing s wh ich may ei th er red uc e t he am oun t o f r ai nf al l in to the sen sor , def le ct th e e nt ry of
wind -b lo wn ra in , or c rea te ex tr a p rec ip itat io n r uno ff . Tr ees an d ro of top s ma y a lso be sou rc es
of pol le n a nd d ebr is.
- To avo id ra in shad ow e ff ec ts , pl ac e t he sen sor a t a hor iz on ta l d is tan ce cor re spo nd ing to two to
fou r ti mes the he igh t o f a ny n ea rby ob st ruc tion.
- I t is impo rt an t t ha t r ai n ex ce ss can flo w f re el y a way fro m th e s ens or . M ake su re th at wat er
doe s no t col le ct a t t he b as e o f t he u ni t.
- The r ain fa ll mea su re me nt mech an is m u ti lize s a m agn et , he nce do not pl ac e an y mag ne ti c
obj ec ts ar ound t he p rox imity of th e s ens or.
1.3 Setti ng up t he Ane m ome te r ( wi nd se nsor - s ol ar p owe red)
1. Pl ug the win d whe el on th e p in at the bo tt om o f th e an emo meter . Pl e ase no t e th e sh ape o f the
pi n. W ith th e e nc los ed All en wren ch too l ti ght en th e s cre w th ro ugh th e s cre w ho le.
2. Ins ert 2 x 1.5 V AA ba tt e ri es (op ti ona l, n ot in cl ude d ) in to the ba tt e ry comp art m ent in th e b a se,
ob se rvi ng the co rr ec t po la rity . The ane mo met er is so la r- po we re d. The b at te ri es wil l o pe ra te as
a b ack up p owe r s our ce.
3. Ins ert th e ad apt er int o t h e j ack . Th e r echa rge ab l e b at t ery i s al re ady i n st all ed and n ow re ady t o
us e.
4. M o unt t he br ack et b y usi n g t he en cl ose d m ounti ng mat er ia l pre fe rab l y at a ma st or o n a
ve rt ic al su rf ace .
5. T o e nsu re t hat t he ma i n c ons ole uni t c a n dis pl a y t he co rr ec t wi n d direc ti on, t he wi n d va ne has
to be or ie nt ed with i ts hea d t o t he nor th , whi le th e c om pl et e wi nd v an e i s i n l in e wi th th e
an emo me ter’ s a rm ( fi n i s in lin e with th e a ne mo met er’s ar m, ti p s ho ws to th e o the r d irec tion ).
Use a c ompa ss if ne ce ssa ry.
No te : If it i s no t p oss ib le to pl ac e t he ane mo met er ‘s ar m to th e no rt h a s p rov ide d by de fa ul t, the
wind di rec tion ha s t o be ad ju ste d man ua lly.
i. I ns er t t he bac kup ba tt er ie s ( wh er e r equ ired ) a nd p lu g t he a dap te r in to the ja ck.
ii . Po int th e wind van e t owa rds th e no rth . Use a co mp as s i f n ec ess ary.
ii i. Us e a pi n t o p re ss the “S ET” k ey wh ic h i s i n the ba tt ery co mp ar tmen t of the win d s ens or.
Abo ve p ro ced ur e mus t b e r epe at ed fo r ch ang in g ba tte ry.
Pla ce me nt ti ps:
- Che ck tha t wind ca n t ra ve l f re ely ar oun d t he ane mo met er and is no t d is to rt ed b y n ear by
bu ild in gs , tree s o r o the r st ruc tu re s.
- The o ffic ia l moun ting lo ca tio n f or an em ome ter s is 10 m ( 33 ft ) a bov e g roun d l eve l in a c le ar
uno bs tru ct ed lo ca tio n.
2. Sett i ng u p t he m ai n unit
The c ons ol e un it mea su res in doo r te mp era tu re , hu mid ity , pr ess ur e an d r ec eiv es si gna ls f ro m a ll
re mo te sen so rs and th e DCF sig na l f or ra dio co nt ro ll ed ti me an d wea th er fo re cas ts.
1. Ope n t h e l at ch at th e b a ck o f th e m ain con sol e u ni t.
2. I nse rt 4 x A A s ize 1. 5V ba tt er ie s a cco r di ng t o t he pola ri ties sh ow n.
3. Rea ttac h t he la tch.
4. Yo u ar e hi ghl y re commend ed to conn e ct t h e AC/DC ad aptor . F o r th e fe atu re o f the au to m ati c
ba ck lig ht con trol fu nc ti on , the AC/ DC ada pt or mu st be us ed.
5. I f plac i ng t he c ons ole uni t on a tab le or hori z onta l s ur fa ce , f ol d out t he t a ble st a nd a nd a dj ust
to th e o pt ima l v ie wing ang le.
6. If mou nt ing th e cons ol e un it on a w all o r ve rt i cal su r fa ce, fold th e t abl e st and ba ck int o the
un it and us e t he wal l mou nt ho le.
3. R ecep tio n o f the out door t ran smi tt ers by the m ai n unit
On ce the m ai n un it i s p rop er ly po we re d, t he lo we r d is pl ay wil l sta rt s ho wi ng so me dat a a nd
we at he r pa ra met er s. Wa it f or a f ew mi nut es fo r the con so le to fi ni sh sel f-ca libr at io n an d f or th e
sen so r read ing s t o sho w u p.
If “ - -- ” is st il l d ispl aye d f or th e s ens or re ad ing (s ), c hec k t he wir el es s t ra ns miss io n pa th and th e
bat te ri es f or t he c orre s pon di ng sen s or. Y ou can t r y t o orien t t he a nten na f or a be tt er re cep ti o n.
Pl acemen t t i ps:
Mak e s ur e t ha t t he con sol e u ni t i s wit hin re ce iv ing ra nge of al l re mo te se nso rs . Id ea ll y s ens or s
shou ld b e wit hin t h e li n e o f sig ht o f th e con sol e un it . T rans mi ssi on r ang e m ay be af fect ed by
tr ees , me tal s tru ct ur es and el ec tr oni c a pp li anc es . T es t r ec ep tio n be fo re pe rman ent ly moun ti ng
yo ur w eat her st at i on.
Avoi d plac i ng t he c o nsol e unit i n t he f oll owi ng a re as:
- Di re ct sun ligh t a nd s ur fa ces w hi ch rad ia te and e mi t hea t.
- Nea r h ea ti ng and ven ti la tion dev ic es , suc h a s h ea tin g du ct s o r a ir co ndi tion er s.
- Ar eas wi th in te rf er enc e f ro m wir el ess de vi ces ( such as co rd le ss p hon es , ra dio he ads et s, b aby
li sten ing dev ic es ) a nd e le ct ro ni c ap pl ian ce s.
4. Sett i ng pre ss ure p aram et er s
Aft er b at te ries wer e ins er te d, t he HP a/ MBar fl ash es on the di sp lay.
In thi s p er iod you ca n s et th e p res su re par ame te rs (s ee 2 .5).
5. Rec e pti on of RC tim e a nd METEOTI ME we at her f orec as t i nf orm ati on
• Af te r ins ta ll in g t he b at te ries th e we at he r s ta ti on is sea rc hi ng a ut om at ic al ly fo r t he ti me s ign al
and Mete ot ime re cep tion si gna l (“S UCHE SI G./SEARCH SI G” ). If th e Me teo ti me s ig na l i s
re ce ive d su cc ess fu lly , i n t he in for mat ion win do w “ LAND EI NST . / i s s ho wn .
• Y ou c an make you r s et ti ng s no w or la te r (se e 1 .3.4 ).
B. Opera tion
1. M ETEOTIM E f ore c ast i nfo rm ati o n
1.0 I ntro ducti on
Me teo ti me DUO p ro vid es a p ro fes si ona l wea the r f or eca st fo r the cu rr en t an d t he nex t thr ee
days . The w eath e r fo r ec ast s are m ad e b y p ro fe ssi ona l m et eo rol ogi st s and ar e s ent out wi th the
rad io -t ime si gna l g ene ra to r DCF7 7 i n Ge rman y an d HBG in Sw it ze rl and and ca n be re ce ive d i n
almo st al l o f Eu ro p e. Th e r ec epti on ar ea fo r th e rad io -t im e sig n al g ene r ato r i s d iv ide d i nt o a to t al
of 90 me teo r ol ogic al re gi ons ( 60 r e gio ns wi t h 4 day f ore ca st , 30 reg i ons wit h 2 day f ore cas t).
Th e d es ir ed c ity is si mp ly se le ct ed a nd the r esp ec tiv el y c ur ren t we at he r f or eca st fo r the re gi on is
sho wn on the di sp l ay. Thi s g ive s y ou a qu i ck ov e rvi ew o f th e w eat h er sit u atio n fo r th e fol lo wing
da ys a t an y t ime . U pdati ng t he we at her data is d one e ve r y day.
This wea th er st at io n a ll ow s the re cep tion of wea the r d at a o f t he pr iva te pr ov ide r Me teo ti me v ia
DCF or HGB si gna l wit hou t ti me l imi t a nd a dd it ion al co st s.
Me teo tim e is re spon si bl e f or th e d isp at ch and th e co rr ec tn ess of th e tra ns mit te d da ta.
60 reg ion s wi th 4 da y s fo r eca st (390 cit i es)
30 r e gi ons wi t h 2 days f orec as t ( 80 ci ti es)
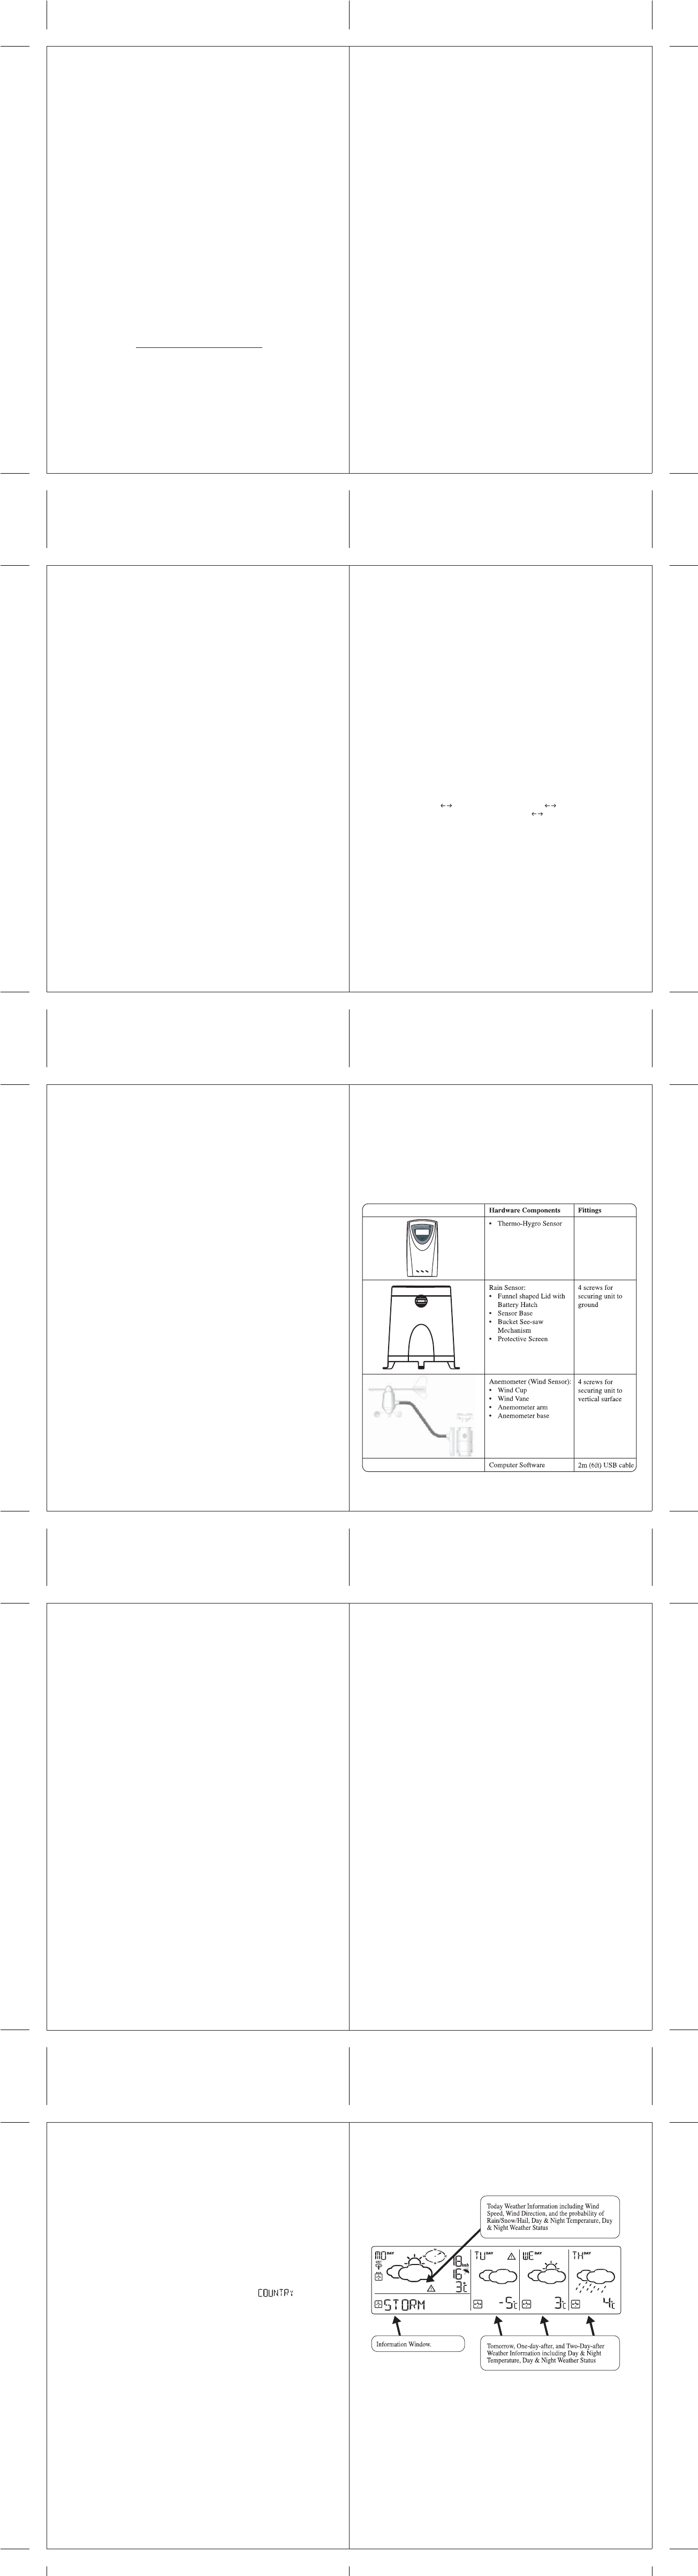
1.1 Di sp lay (upp er wind ow)
Th e Me teo tim e We at he r S ta tio n LCD d is pl ay sho ws:
• Tod ay W ea the r I nf or ma tion W ind ow
• To mo rrow , One -day -a fter , a nd T wo -d ay- af te r W ea the r I nf or ma tion
• In fo rma ti on Wi ndo w whi ch sho ws Ti me & Da te , Sun ri se & Sun se t, Ci ties , an d Cr iti cal
W ea the r Inf or ma tion Des cr ip tio n.
Con te nt:
Disp la y St at io n:
• Ba tt er ie s 4 x 1 ,5 V AA
• Pow er ada pt er 7.5 V AC/DC
Ther mo- Hy gro -S ens or:
• Ba tt er ie s 2 x 1 ,5 V AA
Wind S en sor (s o lar po we r s upp ly )
• Re cha rge ab le ba tt ery (inc lud ed)
• Ba ck- up Bat te ri es 2 x 1 ,5 V AA (no t inc lu ded)
• M oun ting mate rial
Ra in Sen sor
• Ba tt er ie s 2 x 1 ,5 V AA
PC Sof twa re
• CD- ROM (English /Ge rman)
• USB c ab le 2 m
• M anu al
P le as e r ead th e o per at in g i ns tr uc tio ns ca re ful ly and co mp le te ly be for e u si ng for th e f irs t t ime ,
to pr even t fun ct io n e rro rs an d i nco rr ec t op er at ion . Ke ep the in st ruc tion s h andy fo r c ons ul ting.
2. L ocal me asuri n g val ues vi a i nd oor and out door s e nso rs
2 .1 Dis pl ay
2 .2 But tons
2 .3 Nav iga tin g be twe en d if fe ren t mod es
2.3 .1 Pres su re m ode
2.3 .2 Te mp era tu re an d hu midi ty mo de
2.3 .3 Ra in mode
2.3 .4 Wind mode
2 .4 Se tt ing and v ie wing par amet er s
2.4 .1 Pres su re par ame ter s an d moon pha se
2.4 .2 Te mp era tu re an d hu midi ty para met ers
2.4 .3 Ra in pa ra me te rs
2.4 .4 Wind par am et ers
3. LED ba ckl ight
4. Li nki ng t he we at her st at i on t o a co m put er
5. M ai nten a nce
6. Tec h nic al s pec if ic at i ons
A: Se tt ing up
1 . Se ttin g up the re mo te wea the r s ens ors
Be fo re st ar ti ng u p the main co nso le un it , se tup a ll th e r emot e s en sor s fi rs t.
Whe n p lac in g t he sen so rs , make su re tha t the y a re withi n r ec eiv in g r ang e o f t he con sol e u ni t.
(th er mo-h ygr o s ens or : ran ge u p t o 10 0 m i n f re e f ie ld , r ain and wi nd s ens or : u p t o 30 m in f ree
fi eld ). Ide al ly th ey shou ld be wit hi n t he li ne o f si ght of th e c ons ol e un it . Tr an sm is si on ran ge
ma y be a ffe ct ed b y tre es , m et al s tru ct ur es and el ec tro ni c a ppl ia nc es . T es t r ec ept io n be fo re
pe rm an ently mo unt in g yo u r we athe r st ation.
Also make su re th at th e s ens or s a re eas ily a cc ess ib le fo r c le an ing and mai nt ena nce.
The re mo te sen so rs shou ld be cl ean ed o n a week ly ba si s, s in ce d irt and deb ris wil l a ffec t s en sor
ac cur acy.
36 37
38 39
40 41
42 43
44 45