1. 2 But tons
To e nter a nd edit the w eat her f orec ast ing se tt ing s, m ake use of t he foll owi ng keys:
SET
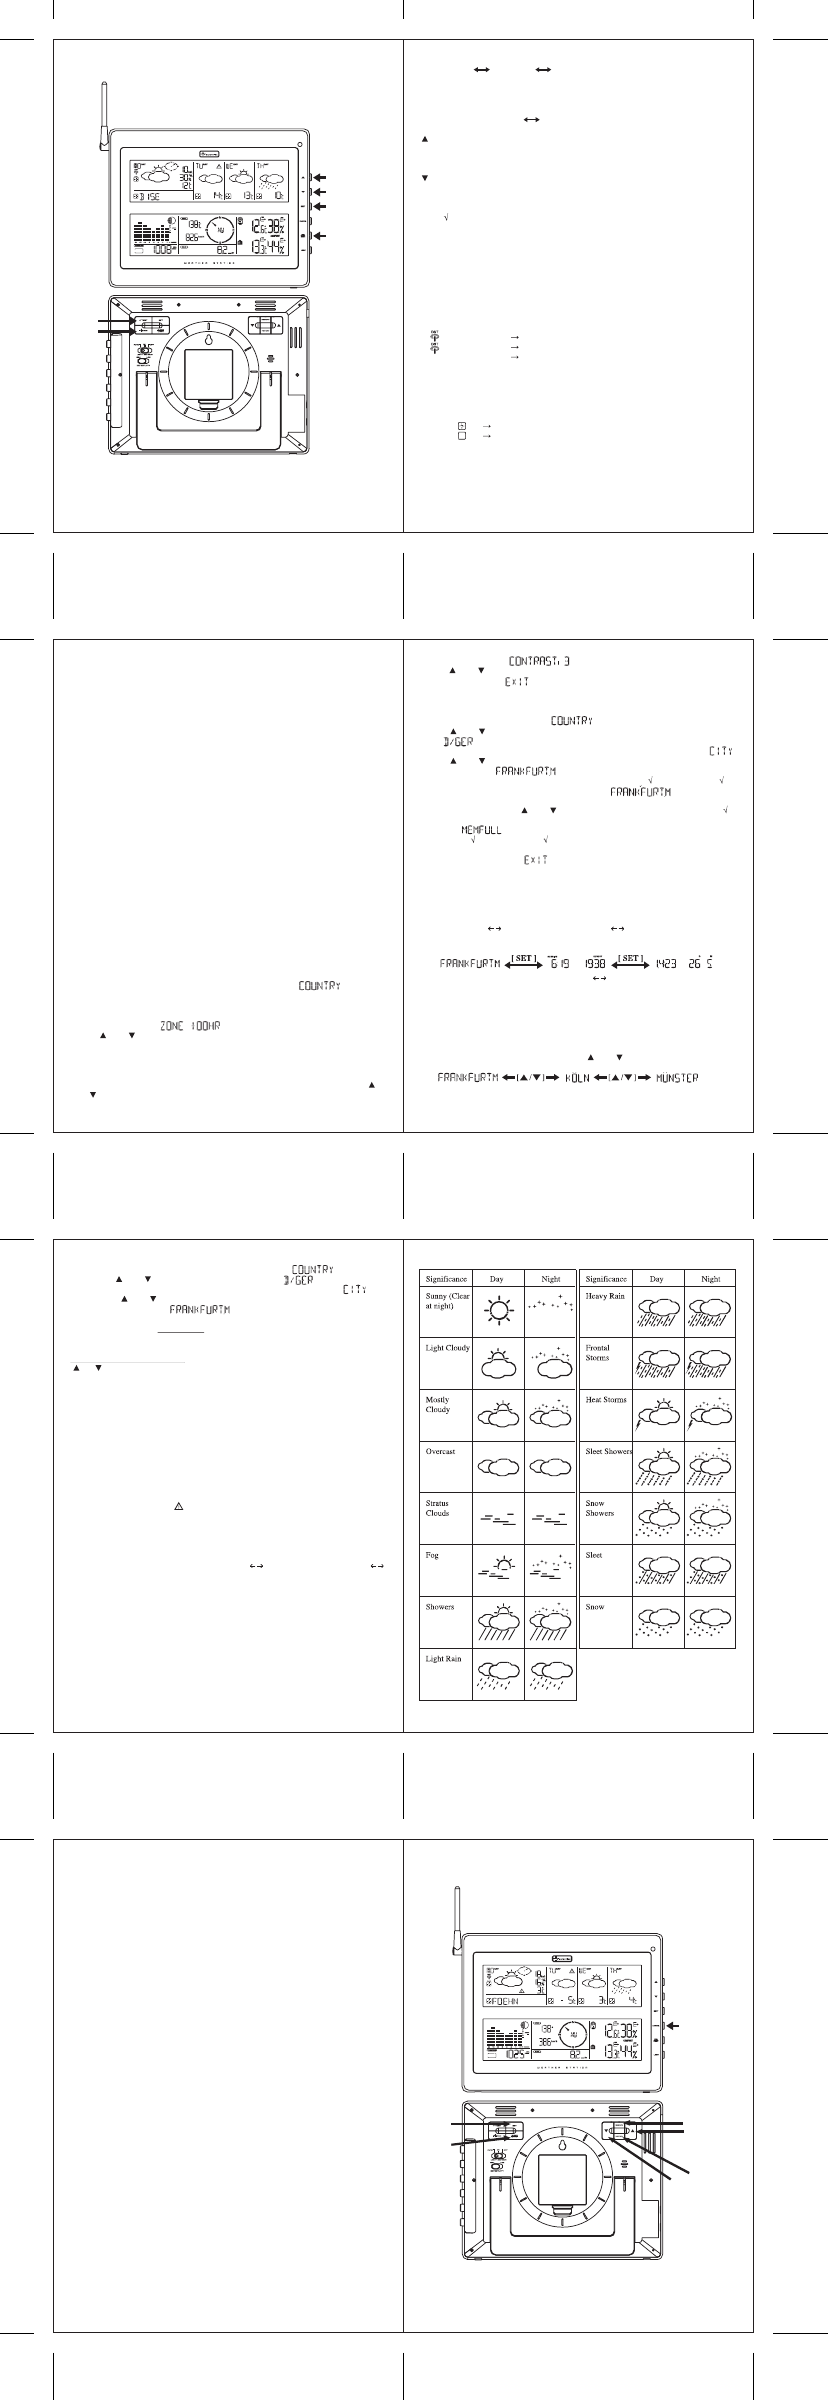
- Sel ect ed Ci ty Tim e + D at e Sunr ise + Sun set
- Pre ss and HO LD [SET] f or 3 seco nd t o sel ect yo ur <1> Coun try, <2> Ti me Zone ,
<3 > Languag e, <4> Con tra st of t he LCD di spl ay
DA Y/NI GHT
- Cri ti cal We ath er Inf orm at io n D ay /N ig ht W eat her St at us Ch ange
- In crea se the va lue dur in g s ett ing
- Choos e o ne of the pr e-s el ect ed c it ie s
- D ecr ease t he val ue duri ng set ti ng
- Choos e o ne of the pr e-s el ect ed c it ie s
TEST
- Fi nd t he pl ace for t he devi ce w hic h h as a good rec ept ion
- A dd the cit y t o the l ist of your des ir ed citi es or rem ove t he ci ty fr om t he li st of de sir ed ci ti es
- Edi t your hom e t own
MEM
- Per sona li zin g a ci ty name
1. 3. R ecep tio n of t im e and we ather data
1. 3.1 R ece pti on o f ti me
The tim e a nd date ap pear wi thi n a f ew m in ute s a ft er in ser ti ng b att er ies i n the m ain st at ion.
Rece pti on ind ica tor f or ra dio- tim e s ign al gene rat or:
Sym bol f la shi ng In it ial rece pti on of dat e and ti me
Sym bol o n Tim e and dat e are cur rent
Sym bol off Tim e and dat e have not be en updat ed
1. 3.2 R ece pti on o f we ather data
The tr ans fer of l arger qu antit ies of d ata f or the f orec ast t akes m uch l onger :
In or der to recei ve al l data , the st ati on req uires 24 hours af ter star t- up.
Rece pti on indi cat or f or we ath er data
Sy mbol W ea ther da ta co mple te ly rec eived
Sym bol W eat her dat a inc omp lete
1. 3.3 C hoos ing the i nst all ati on loc ati on
Sim il ar t o a m obi le t ele phone netw ork or r adio /TV rec ept ion , the re cept io n of t he ra dio- tim e
r ecei ver m ay not be pe rfe ct in al l locat ion s. Ju st a coupl e of not es to m ake su re tha t your
de vice wor ks wi th no pr oble ms.
1. 4.4 H ow t o p erso nali ze a cit y n ame
- Pre ss and H ol d [ SET ] f or 3 s econ d. In t he i nf orm at ion w ind ow, i s show n, an d
t hen pre ss [ ] or [ ] key to sel ect the cou ntry , for e xam ple for Ger ma ny.
- Pre ss [ SET ] key t o co nfi rm t he Count ry and t he i nf orm at ion w ind ow w il l sh ow .
- The n, pr ess [ ] or [ ] key to sel ect the ci ty, a nd the ci ty nam e w il l be show n in t he
i nform ati on wi ndo w such as , and you would l ike t o e nte r a n e w ci ty na me
whi ch is nea r the r egio n of F rankf ort -o n-M ain .
- Pre ss t he ! MEM" ke y ; a cur sor f las hes on t he fi rs t posi ti on of the Inf orm at ion wind ow
Use th e f oll o win g k ey f or dat a ent ry:
KEY Fun cti on
' ' or ' ' Sele cti on of a le tt er
SET < 1> A ccep t the s ele cted l et ter a nd j um ps to t he next pos it io n. OR
< 2> If yo u ha ve not ent er ed any let te r (i n o ther wor ds , i f onl y the
cu rsor i s fl ash ing at t he la st pos it ion ) , con fi rm t he ent ry wit h t hi s k ey
an d yo ur pla ce wi ll als o b e i ncl uded in t he me mo ry wi th i mm ed iat e
eff ect
TEST O ne pos it io n ba ck in th e d ata ent ry pr ocess
** The pl ace t hat you ha ve s el ect ed to ent er your o wn des cri pt ion w il l st il l exi st un der i ts ow n
nam e.
- Pre ss [ SET ] key t o co nfi rm a nd exit
1. 4.5 C ri ti cal w eat her i nfor mat ion
- The M et eotim e w ea the r sig nal con tai ns cr it ica l w eat her in for ma ti on s uch as gus t, f roz en rai n,
he avy snow, th under , str ong UV , den se fog et c . f or tod ay and the co mi ng thr ee days .
- A cri ti cal w ea ther a ler t si gnal w il l be tu rned on in ca se tha t day has cr it ic al w eat her t hat
the use r mus t know.
- Som et im es t here i s mor e tha n on e c ri ti cal w eat her i nfo rm ati on in t he 4-da ys. Pr ess
[ DA Y/ NIG HT ] key t o r ead the c ri ti cal weat her i nf orm at ion one by one . The spe cia l ico n of
t he day wil l fl ash when you rea d t he in for mati on.
- Pre ss [ SET ] key t o go ba ck t o the di spl ay of CITY SU NRISE & S UNSET TIME
TIM E & DATE .
- If n o ke y i s pre sse d, th e c ri ti cal w eat her i nfo rm ati on w il l tog gle t o m ake s ure you ar e a wa re
of t he cri ti cal we ath er det ails
1. 6 W ea ther sym bols
Swi tc h o n a ll pot ent ia l sour ces of i nt erf ere nce (e .g . t el evis ion ) in th e a rea you want t o ins tal l
t he st ati on duri ng the t est!
Pos it ion the dev ice in the lo ca tion, or ien ted as you pre fer, b ut a t leas t one me te r fro m the
pos si ble so urce of i nt erf ere nce.
Pres s the <TEST> bu tt on f or at l eas t 3 secon ds to act iv ate t he tes t for t he re cept ion of wea ther
da ta . The tex t # SCAN$ i s sho wn on the di spl ay . The r ece pti on ind ica tor f or the weat her d ata
sh o ws t he quali ty of re cept ion . The re cept ion i s good if t he in dica tor i s sho wn , othe r wis e a
ne w lo cat ion must be f ound for i nst al li ng the weat her s tat io n.
The re cept ion t est i s eit her e nded af ter a pprox . 1 mi nute au tom at ic all y or by act uati ng th e
<TEST> bu tt on.
1. 3.3 .2 Poss ibl e sources of i nte rference
In ter fer ence s as wit h a ra dio t rans mit ter c an occur an d c ould be ca used by th e f oll ow in g
inf luence s:
In bui ldi ngs wit h a l ot of c oncre te , me tal p art s and ele ctr ic al sy ste ms , rec ept ion pr oble ms ca n
oc cur (e .g . m al ls ).
Elec tri cal devi ces su ch a s tel evi si on , co mput er , h ouse- hol d d evi ces , e tc . or tr ansf orm er s , l and
l ine s , r adio t ransm it ter s and rai l way s are pos si ble di rec t sour ces of i nte rf eren ce.
Atm osphe ri c i nf luen ces and geo grap hica l fea tur es (m ount ai ns, e tc. ) can aff ect t he prop agat ion
of t he rad io waves.
The di sta nce fr om t he tr ansm itt er does al so i nfl uence t he rec ept ion. Ar eas su ch as Sout hern
I tal y or No rt hern Sca ndin avi a a re al so cri ti cal a rea s b ecaus e of the gr eat d ist anc es fr om th e
t ransm it ter.
In all regi ons , so- cal led # de ad spots$ can oc cur m ak ing recep t ion i mposs ib le.
W eak bat ter ie s in the de vic e d ecre ase t he q ual it y of r ece pti on.
1. 3.4 Set t im e zone, lang uage and contr ast
- A ft er i nst all in g t he bat ter ie s the w eat her s tat io n i s sear chi ng aut oma ti cal ly fo r the t im e sig nal
an d M e teot ime rece pt ion s igna l (# SUC HE SIG. /SEARC H S IG$ ). If the Me teo t ime s igna l is
r ecei ved suc cess ful ly , i n the i nform ati on wi ndo w # L AND EI NST . / is s ho wn.
Rem ar k: If yo u do not have any se lec ti on i nt o t he set up mode up to 60 seco nds , i t wil l
au tom at ica ll y e xit t he se tup mode .In th is cas e pres s and hol d [ SET] for 3 se conds t o e nte r the
se tup m ode .
- Pre ss [ SET ] aga in, t hen is s how n i n the I nfor ma ti on wi ndow,
pr ess [ ] or [ ] key to adj ust t he tim e z one.
- N ote!
- The t im e rec eiv ed fro m th e r adi o-t im e si gnal ge nera tor DC F or H BG is Cent ra l Europ ean
Ti me ( CET , CEST) . Sett in g t he tim e z one is t here for e o nly re qui red for o the r ti me zon es
( e.g . in Por tuga l or Grea t Brit ai n).
- Pre ss [ SET ] aga in, t hen t he l ang uage w il l be show n in t he Inf orm at ion w ind ow, p res s [ ]
or [ ] key to sel ect your des ir ed lan guage . Ther e are se ven lan guage s f or se lec ti on, nam el y
Ger man , Engl ish , Spani sh , Frenc h, It al ian , Du tch , Swe dish
1. 3.5 Sel ect t he count ry and cit y/c it ies
- Pre ss and H ol d [ SET ] f or 3 s econ ds, i s show n in t he Inf orm at ion w ind ow.
- Pre ss [ ] or [ ] key to sel ect the cou ntry . For exa mpl e, y ou h ave sel ect ed the co untr y
na me ( Germ an y).
- Pre ss [ SET ] key t o co nfi rm t he Count ry, an d t hen t he i nf orm at ion w ind ow w il l sh ow .
- Pre ss [ ] or [ ] key to sel ect the ci ty, a nd the ci ty nam e w il l be show n in t he inf orm at ion
win dow , for ex amp le ( Frank for t- on-M ai n) .
- If t he ci ty ! Fr ankf urt a m Ma in" is yo ur sel ect ion , the n p res s [ TEST ] key to conf irm . A
will be sh own on top o f your se lec ted ci ty , a nd it will be and
! Frank for t- on-M ain" w il l st ore i nt o yo ur pers onal m em or y l ist
- The n, you ar e a ble t o p res s [ ] or [ ] key to sel ect mor e cit ie s, an d t hen pr ess [ TEST ]
ke y t o confi rm. Y ou ar e abl e t o sel ect m axim um 5 citi es to di spl ay . If yo u wan t to add more
ci ti es , the n wil l be sho wn in t he inf orm at ion win dow.
- Pre ss [ TEST ] key to re mov e t he , and th is ci ty i s r em oved out o f your l ist of pref er ence
ci ti es you ha ve s el ect ed .
- Pre ss [ SET ] key t o qu it , and wi ll be s how n i n the i nfor ma ti on wi ndow.
REMARK : If yo u ha ven" t cho sen a cit y in t he f ir st t im e you pow er up t he unit , t he produ ct w il l
def aul t sel ect F rank furt am M ain as yo ur sel ect ed city.
1. 4 H ow t o op erat e
1. 4.1 Swi tch C ITY SUN RI SE & SUN SET TIM E TIM E & DA TE
- Pre ss [ SET ] to swi tc h f rom the di spl ay of th e Ci ty t o Sun ri se & Suns et t im e OR Tim e &
Dat e f or your s el ect ed city.
1. 4.2 Swi tch DA Y W EATH ER IN FOR MA TI ON N IGH T WEA TH ER
I NFOR MA TION
- The un it i s pres et t o s how DAY -W EA TH ER aft er sun ri se ti me , and N IGHT- WEA TH ER a fte r
S UNSET ti me . If t he NI GHT- WEA T HER is curr ent ly sho wn , the us er can pr ess the
[ DAY/N I GHT ] b utt on to se e t he DAY- Wea the r (fo r 10 s econ ds) , or vic e v ers e.
1. 4.3 D is pla y of m ore cit ies
- If y ou h ave sel ect ed mo re th an one city , fo r exam pl e Fr ankf urt a m Ma in, K öl n and Mün ste r in
you r desi red cit y l is t , t hen you ar e a ble t o p res s [ ] or [ ] key wh en the In for mati on
win do w s ho ws the CITY NAME (Pr ess [ SET ] unt il i t di spl ays th e c it y n ame ).
- W hen you sel ect anot her ci ty, t he sunr is e and suns et t im e and the w eat her i nfo rm ati on w il l be
of t hi s c ity.
2. Loc al me asuri ng val ues via i ndoor an d out door s enso rs
2. 1 Di spl ay (l owe r w indow)
Pressu re
- Curr ent or h is tor ica l pre ssur e (m Bar/ hP a, m mH g or in Hg)
- A lt it ude or s ea lev el pre ssu re
- Sea -le vel pr ess ure hi st ory for t he la st 24 days
- Sea -le vel pr ess ure hi st ory bar c hart
Mo on pha se
- 12 st eps of m oon sym bols
- Sca ns moo n ph ase fo r year 200 0 t o 2099
- Mo on phase hi st ory fo r the l ast or f ut ure 39 days
Rem ote te mper ate and relat iv e humi dity , wit h t re nd i ndi cati on
- In door and out door t em per atu re and re lat ive hu mi dit y dis pla y ( °C or °F)
- T em per atu re and re lat iv e hu mi di ty tr end in dica ti on
- D ew po int d isp lay
- Ma x a nd Mi n m em ory f or te mpe rat ure an d r ela ti ve hum idi ty
Comf ort l evel indi cat or
- A nal yzes c urr ent env iro nme nta l condi ti ons ( Comf ort , W et a nd Dr y)
Rain fal l me asureme nt
- Recor ds ra inf all am ount fo r the l ast ho ur, l ast 24 hou rs, l as t day, l ast w ee k an d l ast mon th
( inch or mm)
- D ai ly rai nf all a ler t if r ai nfall f or the cu rre nt day exc eed pre -spe cif ie d a mou nt
Wind
- T em per atu re at pl ace of an emo me ter
- T em per atu re adj ust ed to w ind chil l fac tor ( °C or ° F)
- Wi nd dir ect io n c omp ass di spl ay . Wi nd dir ect io n a ngle s a vai lab le as com pas s poi nts or be ari ngs
- A ve rage wi nd s peed an d gu st spe ed (m ph, m /s , knot s, a nd k m/ h)
- D ai ly Max im um wi nd s peed and gu st spe ed me mory
- Wi nd spe ed a ler t fo r aver age w ind spe ed and wi nd gus t speed
2. 2 But tons
To e nter a nd edit the l ocal i nte ri or and ext ern al se nsor s, m ake use of t he foll owi ng keys:
1. 3.3 .1 R ecept io n t est
The lo cat ion of t he we athe r st ati on is ve ry im por tan t. This i s the r easo n f or the ne w t est
func tion t hat a llo ws the qua li ty of rec ept ion to be che cked i n the su rroun ding a rea and to
pos it io n t he devi ce in a lo cat ion that has t he bes t poss ibl e condi ti ons.
- Pre ss [ SET ] aga in and wi ll s how n i n the i nform ati on wi ndow. A ft er 4 sec onds, it wi ll
go au to ma tica l ly to the Ci ty -Da te -T ime Mode
- Pre ss [ SET ] aga in, t hen is s how n i n the I nfor ma ti on wi ndow,
pr ess [ ] or [ ] key to adj ust t he LC D con tr ast Lev el.
1. 5 Exc lus ion of w arra nty for METEOTI ME w eat her i nfo rma tion
Thi s we athe r st ati on is i nte nded for p ri vate us age as an i ndic ator f or fu tur e we ather. The
for ecas ts of t hi s d evi ce are to be us ed as ori ent at ion val ues an d do not repr ese nt abs olut e ,
pre cis e f ore cast s.
The m anufa ctu rer or d ist ri but or of t his w eat her s tati on a ssum es no r espon sib il it y f or i ncor rect
va lues or any resu lts tha t may occ ur beca use of t hese va lues.
The w eat her st at ion i s n ot in tend ed for m edi cal pu rpos es or fo r the i nfor ma ti on to the pu bli c.
The m anufa ctu rer or d ist ri but or has no i nfl uence on t he tr ansf err ed w eat her dat a or for ecas ts.
The capa bil iti es of the w ea ther s ta ti on d epend on t he o pera ti onal f unct io nali ty of t he
tr ansmi ssi on me dia , wh ich t he man ufac tur er or di st ri buto r has no inf lu ence on . Fai lu res i n t he
tr ansmi ssi on me dia ca nnot be ru led out.
46 47
48 49
50 51
52 53