Operating Manual
Sensor module LUXOR 411 and
weather sensor system LUXOR 440
1.0 Designated use
2.0 Brief description
6.0 Description of input terminals
3.0. Safety notes
4.0 Key to symbols
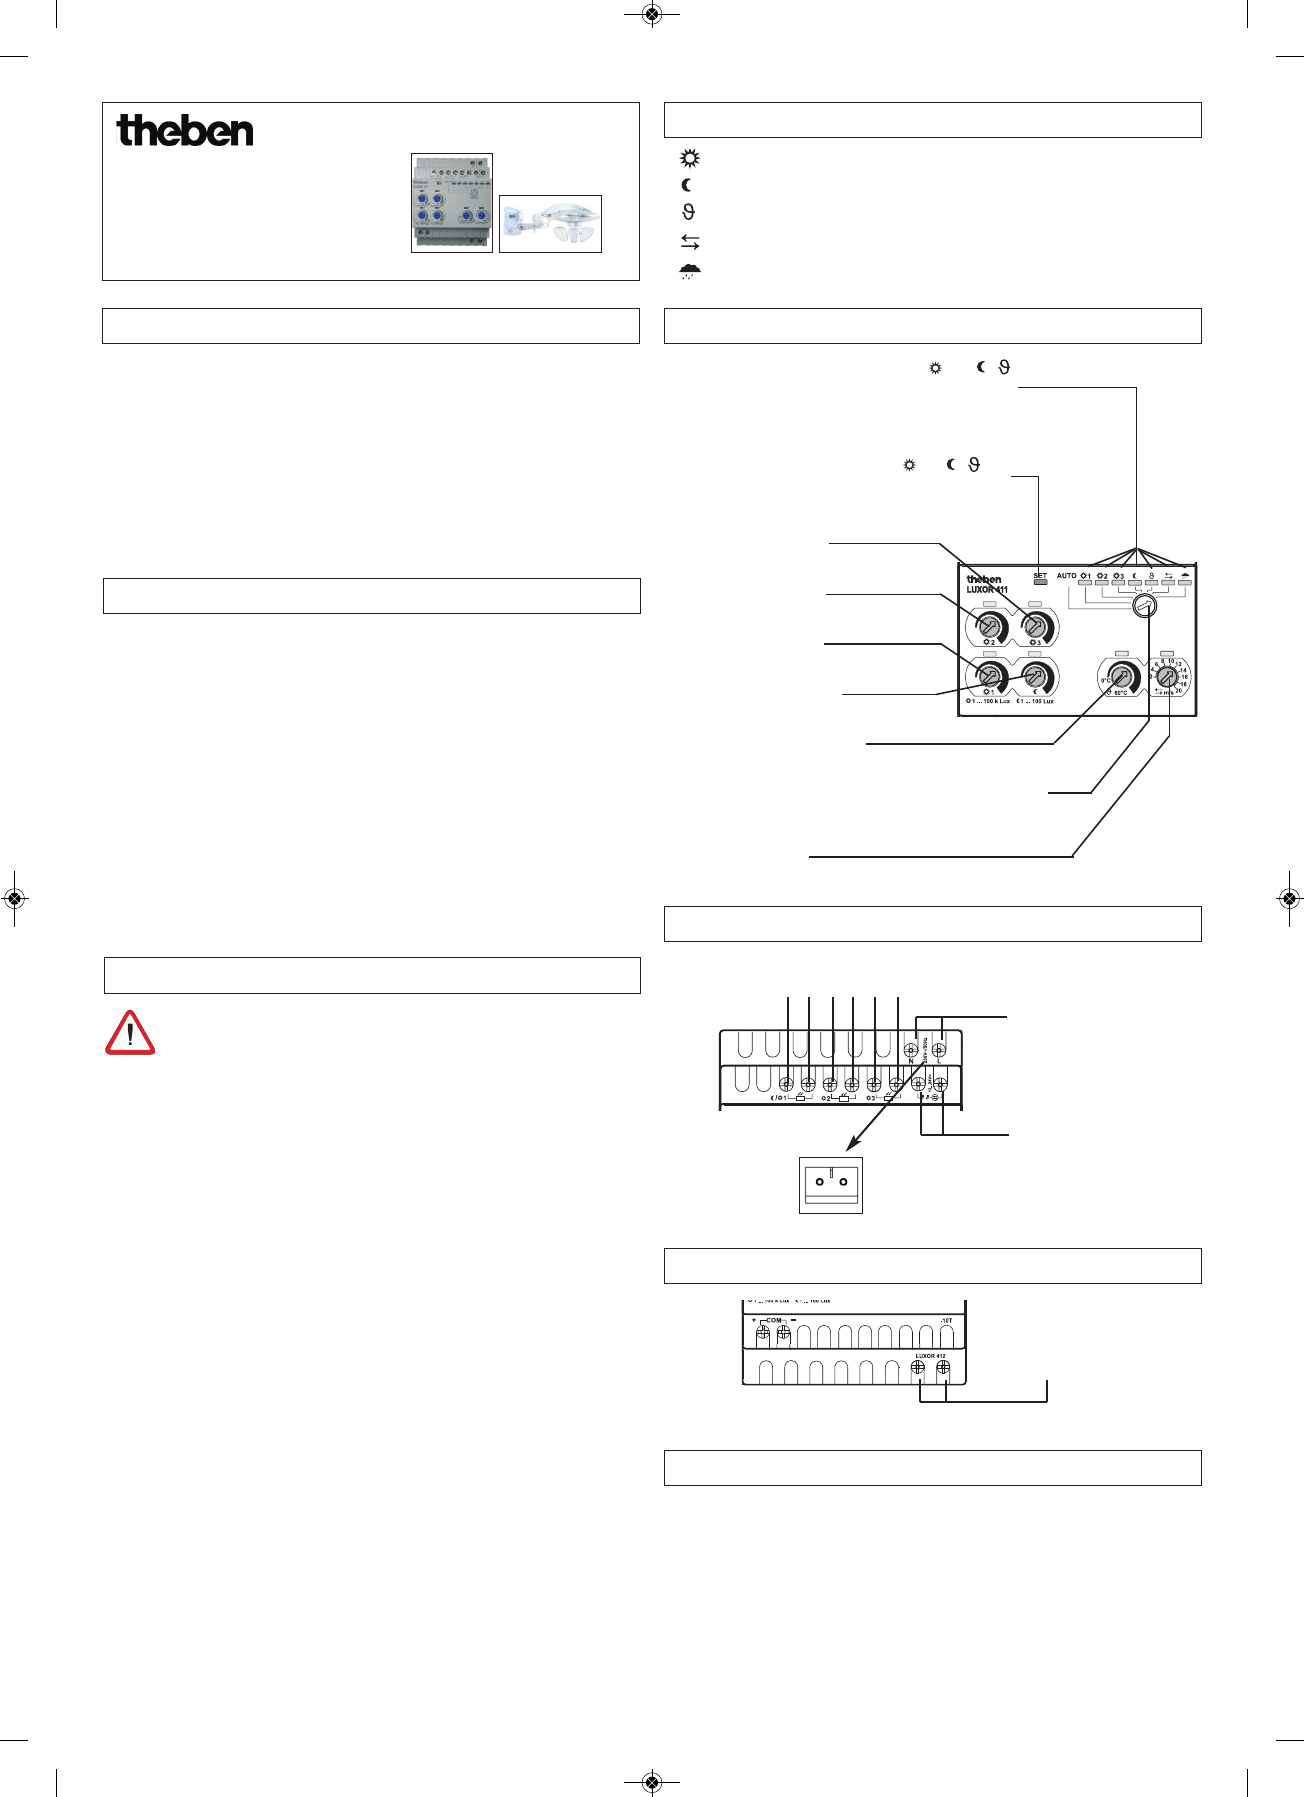
5.0 Description of control level
7.0 Description of output terminals
L
UXOR 411
L
UXOR 440
The sensor module is used for setting threshold values and measuring brightness
(twilight) and wind. The separate weather sensor system additionally measures tem-
perature and rainfall. The sensor module and the weather sensor system comple-
ment the existing series of LUXOR devices, and are suitable for in stalla tion in deta-
ched houses and blocks of flats, offices, etc.
The sensor module is designed for regulation installation in a co ntrol cabinet/distri-
bution cabinet, and is suitable for use in dry premises with normal levels of conta-
mination. The weather sensor system is intended for outdoor installation.
In order to prevent any danger of fire or risk of electric shock, the unit
may only be connected and installed by a qualified electrician, in compli-
ance with national regulations and safety requirements. Tampering with
or making modifications to the device will invalidate the guarantee.
Sensor module
• After connecting, cover the connection screws of the mains input terminals,
using the mains terminal cover (see Fig. 6), as the sensor connection lines
routed over this carry safety extra-low voltage (SELV).
• Use the supply voltage (SELV) for the weather sensor system for connecting
this weather sensor system only. Do not connect any other
consumers to this.
• Use only safety extra-low voltage (SELV) (12-24 V DC) for powering the
LUXOR 413 external wind sensor.
• All light sensor inputs carry safety extra-low voltage (SELV).
• Use the shortest possible lines for connecting the light sensors.
• Do not allow the cables of the light sensors or wind sensor to carry any AC voltage.
Weather sensor system
• Do not touch the rain sensor while the weather sensor system is in operation.
It can become very hot.
• Please note: When it is windy, awnings/blinds take some time to retract.
Therefore, define the wind thresholds at a level below the value specified by
the awning/blind manufacturer.
• At temperatures considerably below freezing, and when it is windy, the wind
sensor can freeze up.
• As the rain sensor only reacts when water droplets fall directly onto the sen-
sor rods, a certain time delay can occur between the rain beginning and the
sensor recognising this, during which time, for example, the awning may be-
come wet. To prevent this from occurring, add a further variable, such as wind.
The sensor module and the weather sensor system are connected to the LUXOR
system via the 2-wire COM interface.
Up to 3 light sensors (separately-mounted light sensors 907 0 008) and one
wind sensor (wind sensor LUXOR 413) can be connected to the inputs of the
sensor module.
The 6 threshold values for the various environmental influences (3 x Sun, 1 x
Twilight, 1 x Wind and 1 x Temperature) can be defined via the selector swit-
ches Sun 1, Sun 2, etc.
If the weather sensor system is connected, the brightness value obtained will
be compared with the Twilight and Sun 1 thresholds. The brightness value from
light sensor 1 will be ignored. If the weather sensor system is not connected,
the brightness value from light sensor 1 will be compared with the Twilight and
Sun 1 thresholds.
If the “Learn” selector switch is set to 1-3, , etc.,
the SET LED will signal “Learn mode”.
Selector switch for Sun 3
from 1000 - 100000 lux
Selector switch for Sun 2
from 1000 - 100000 lux
Selector switch for Sun 1
from 1000 - 100000 lux
Selector switch for Twilight
from 1 - 100 lux
Selector switch for Wind
from 2 - 20 m/s
“Learn” selector switch (Sun 1-3, Twilight, Temperature, Wind,
Rain), for assigning the channels of the other LUXOR devices
Selector switch for Temperature
from 0 - 60 °C
Connection for max. 3 exter-
nal light sensors (SELV)
Operating voltage
230 V~
+10 %/ -15 %.
Observe L and N.
Connection for the external
wind sensor LUXOR 413
with power unit (SELV)
Mains terminal
cover
309185 04
•
•
•
•
8.0 Connection to the LUXOR system
Ë Sun 1-3
Ë Twilight
Ë Temperature
Ë Wind
Ë Rain
Connection:
Supply voltage (SELV) for the
weather sensor system LUXOR 440
When the “Learn” selector switch is set to 1-3, ,
etc., the respective channels can then be assigned to the
other LUXOR devices.
• Use the following lines: EIB/KNX bus line type YCYM or Y(ST)Y or
telecommunication line J-Y(ST)Y.
• Connect both sides of the shielding to the minus bus terminal on the
COM bus.
• The COM line length may be up to 100 m.
• Always route the COM line separately from other lines (separate cable).
• Do not route the COM line parallel to 230 V lines.
• Upgrades to max. 16 devices inc. basic module.
• Ensure correct polarity!
-> If the COM connection fails, the SET LED flashes continuously.