77..00 OOvveerrvviieeww ooff iinnppuutt mmeennuu
88..00 SSttaarrtt--uupp
11..
Use the
++
or
√√
keys to set the desired language
(e.g.
EENNGGLLIISSHH
) and then the country (e.g.
UUKK
and the city (e.g.
LLOONNDDOONN
).
22..
Confirm with the
OO KK
key in each case.
33..
Then use the
++
or
√
√
keys to select the
YYEEAARR,, MMOONNTTHH,,
DDAAYY
and the
TTIIMMEE
.
44..
Confirm with the
OO KK
key in each case.
The timer is now ready for operation.
RReesseett rreessppoonnssee
Reset by simultaneously pressing the 3 keys
––,, ++
and
OO KK
. The saved switching
commands are retained as well as the language, the country and the city.
However, the time of day must be re-entered.
AAUUTTOO--OOFFFF mmooddee
Press both the
––
and
++
keys for about 2 sec. in Auto mode.
The clock switches to so-called
AAUUTTOO--OOFFFF mmooddee
.
The display shows
AAUUTTOO OOFFFF
. No more switching commands are sent via
the COM interface. If you press the
++
and
––
keys again, you can restart the
device.
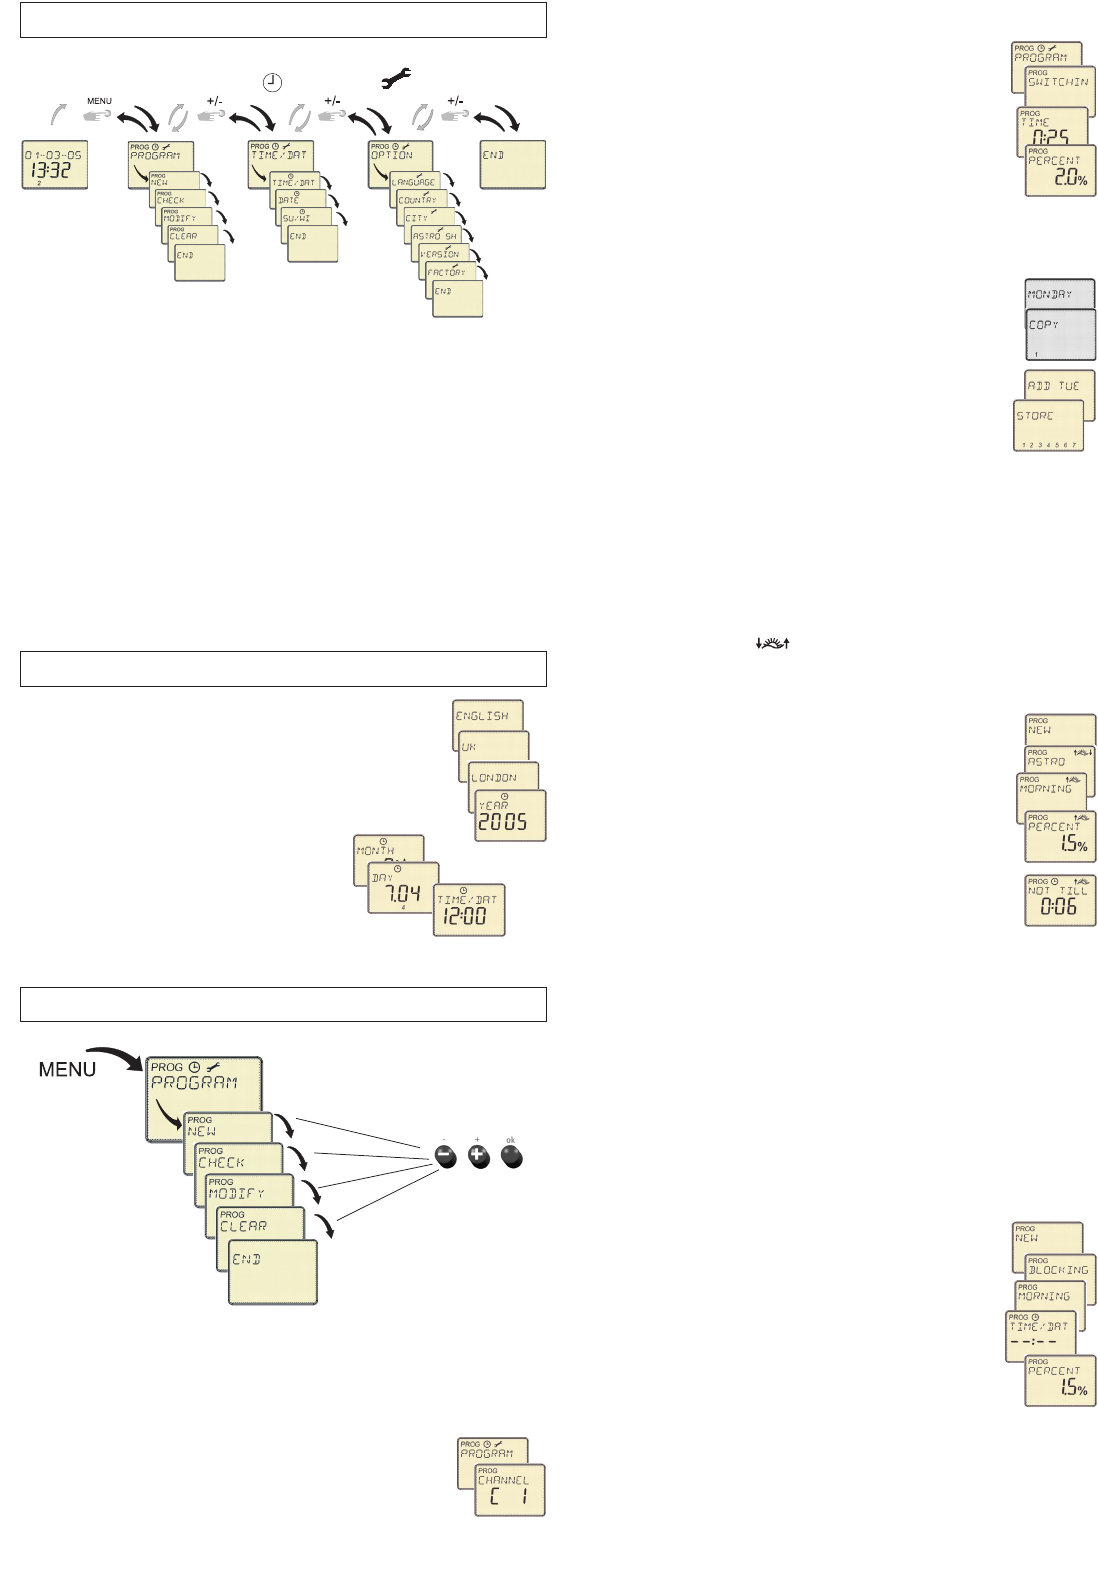
PPRROOGG
99..00 PPRROOGGRRAAMM PPRROOGG mmeennuu
NNEEWW ssuubb--mmeennuu
EEnntteerriinngg SSWWIITTCCHHIINNGG TTIIMMEE
11..
Use the
MMeennuu
key to select the
PPRROOGG
menu item.
22..
Confirm with the
OO KK
key. After selecting the channel, the
NNEEWW
submenu is displayed. Press the
OO KK
key again and the number of free memory locations is
displayed.
33..
Confirm with the
OO KK
key. The display shows
SSWWIITTCCHHIINNGG TTIIMMEE
.
44..
Confirm with the
OO KK
key. The display shows
TTIIMMEE
.
55..
Use the
++
or
––
keys to set the desired time and then the
percent value.
66..
Confirm with the
OO KK
key. The display shows
MMOONNDDAAYY
.
77..
Use the
++
or
––
key to select the day of the week.
88
..
Confirm with the
OO KK
key. The display shows
CCOOPPYY
.
99..
Use the
++
or
––
keys to select
SSAAVVEE
entries or
CCOOPPYY
to other days of the week.
1100..
Confirm with the
OO KK
key. The display shows
AADDDD TTUUEE
((AADDDD WWEEDD,, AADDDD TTHHUU eettcc..))
. Pressing the
OO KK
key
allows you to transfer the values to all the days of the week.
Use the
++
or
––
keys to skip days of the week.
The display shows
SSTTOORREE
.
1111..
Confirm with the
O
O KK
key. All the data have now been saved.
1122..
You can program another switching time or exit the program by pressing
the Menu key.
EEnntteerriinngg AASSTTRROO TTIIMMEE
If
AASSTTRROO
is selected, switching times are executed according to calculated
times for sunrise and sunset.
11..
Use the
MMeennuu
key to select the
PPRROOGG
menu item.
22..
Confirm with the
OO KK
key. After selecting the channel, the
NNEEWW
submenu appears.
33..
Confirm with the
OO KK
key.
Use the
++
or
––
keys to select
AASSTTRROO
.
44..
Confirm with the
OO KK
key. The display shows
MMOOR
RNNIINNGG
.
55..
Confirm with the
OO KK
key. The display shows
PPEERRCCEENNTT ----..--
.
66..
The
----..--
setting deactivates the astro function.
77..
Use the
++
or
––
keys to set the desired percent value.
88..
Confirm with the
OO KK
key. The display shows
NNOOTT TTIILLLL
(this means that a switching processes cannot take place before this time
because of the astro time).
99..
The
----..--
setting deactivates the NOT BEFORE function.
1100..
Use the
++
or
––
keys to set the desired time.
1111..
Confirm with the
OO KK
key. The display shows
MMOON
NDDAAYY
.
1122..
Carry out steps
77--1111
as shown above (enter switching times).
The display then shows
EEVVEENNIINNGG
.
1133..
Carry out steps
55--1122
again (enter astro times).
EEnntteerriinngg BBLLOOCCKKIINNGG TTIIMMEE
(to disable a brightness control or to execute nighttime inter-
ruption, for example)
11..
Use the
MMeennuu
key to select the
PPRROOGG
menu item.
22..
Confirm with the
OO KK
key. After selecting the channel, the
NNEEWW
submenu appears.
33..
Confirm with the
OO KK
key.
Use the
+
+
or
––
keys to select
BBLLOOCCKKIINNGG TTIIMMEE
.
44..
Confirm with the
OO KK
key. The display shows
MMOORRNNIINNGG
.
55..
Confirm with the
OO KK
key. The display shows
TTIIMMEE
.
66..
Use the
++
or
––
keys to set the desired time and then the
percent value.
77..
Confirm with the
OO KK
key in each case. The display shows
MMOONNDDAAYY
.
88..
Carry out steps
77--1111
as shown above (enter switching times).
99..
The display then shows
EEVVEENNIINNGG
.
1
100..
Carry out steps
55--88
again (enter blocking times).
In the
PPRROOGG
main menu, the switching commands are entered and viewed.
You can choose between
SSWWIITTCCHHIINNGG TTIIMMEE –– AASSTTRROO TTIIMMEE –– BBLLOOCCKKIINNGG
TTIIMMEE
SSeelleeccttiinngg aa cchhaannnneell
11..
Use the
MMeennuu
key to select the
PPRROOGG
menu item.
22..
Confirm with the
OO KK
key. The display shows
CCHHAANNNNEELL
.
33..
Use the
++
or
––
keys to set channel C (8 channels possible).