HD
EN
NL
FR
DE
ES
PT | Manual
IT | Man
SV | Bruksa
PL | Inst
CS
SK | Návod na použ
1
10
1
11
13
1 10
10
6 7
2 3 4 5
2
2
ONDERDELENBESCHRIJVING / DES
9
!
SE
T
5015
[WEEE L
ENInstructionmanual
SAFETY
• By ignoring the safety instructions the
manufacturer can not be hold responsible for
the damage.
• If the supply cord is damaged, it must be
replaced by the manufacturer, its service agent
or similarly qualified persons in order to avoid a
hazard.
• Never move the appliance by pulling the cord
and make sure the cord can not become
entangled.
• The appliance must be placed on a stable, level
surface.
• The user must not leave the device unattended
while it is connected to the supply.
• This appliance is only to be used for household
purposes and only for the purpose it is made
for.
• This appliance shall not be used by children
from 0 year to 8 years. This appliance can be
used by children aged from 8 years and above
if they are continuously supervised. This
appliance can be used by people with reduced
physical, sensory or mental capabilities or lack
of experience and knowledge if they have been
given supervision or instruction concerning use
of the appliance in a safe way and understand
the hazards involved. Children shall not play
with the appliance. Keep the appliance and its
cord out of reach of children aged less than 8
years. Cleaning and user maintenance shall not
be made by children unless older than 8 and
supervised.
• To protect yourself against an electric shock, do
not immerse the cord, plug or appliance in the
water or any other liquid.
• When the appliance is used in a bathroom,
unplug it after use since the proximity of water
presents a hazard even when the appliance is
switched off.
• For additional protection, we advise you to
install a residual current device (RCD) in the
electrical circuit that supplies the bathroom his
electricity. This RCD must have a rated residual
operating current no higher than 30mA. Ask
your installer for advice.
• After use the appliance should be cleaned to
avoid the accumulation of grease and other
residues.
•
WARNING: Do not use this appliance near
bathtubs, showers, basins or other vessels
containing water.
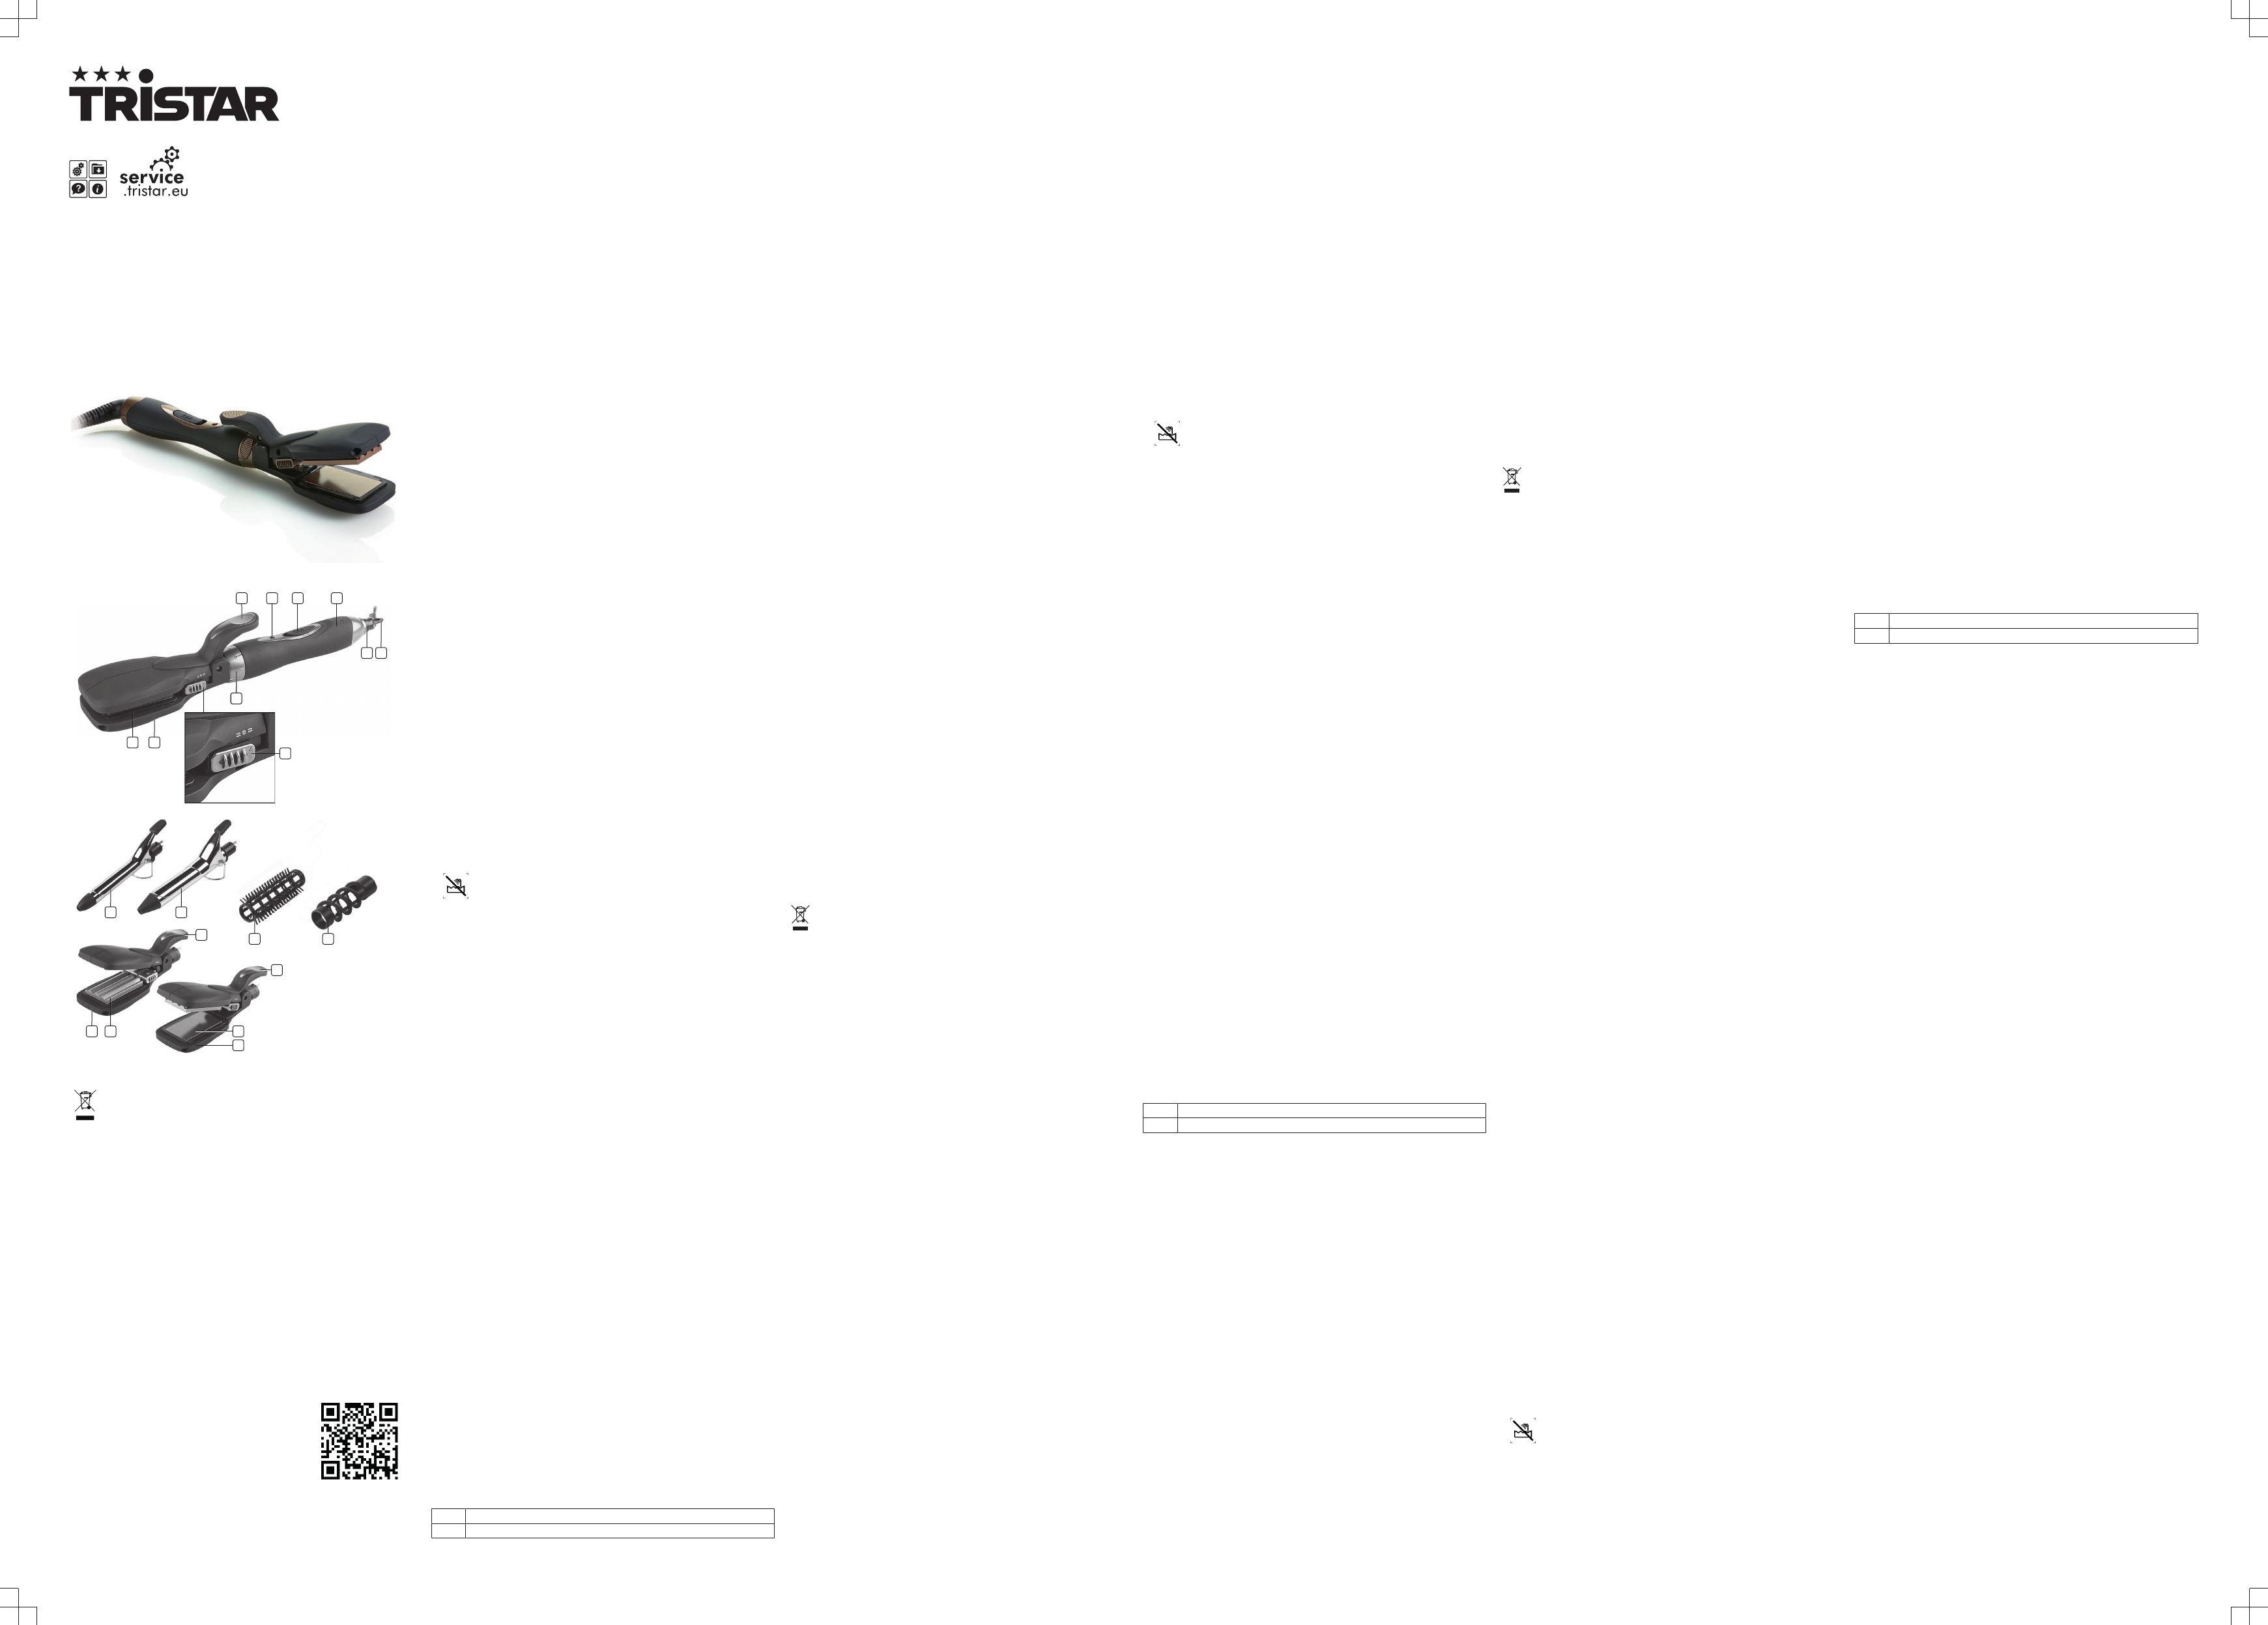
PARTSDESCRIPTION
1. Ceramic-coated heating plate.
2. Lever for opening the flap.
3. Power-indication light.
4. Slide switch for the heat levels.
5. Handle.
6. 360° swivel power cord.
7. Hanging eye.
8. Locking ring.
9. Selector switch for the function of the straightening/crimping iron.
10. Straightening/crimping attachment.
11. Large curling iron (25 mm).
12. Small curling iron (19 mm).
13. Spiral attachment.
14. Brush attachment.
BEFORETHEFIRSTUSE
• Take the appliance andaccessoriesoutthebox.Removethe
stickers,protective foilorplasticfrom thedevice.
• Clean before usetheappliance with a dampcloth.
• Place the device on the stand
• Put the power cable into the socket and turn on the appliance (Note:
Make sure the voltage which is indicated on the device matches the
local voltage before connecting the device.
• The power indicator turns red. After approximately 3 minutes the
temperature is reached and you can start using the appliance
• During first use there could be some smoke and a burning smell. This
happens because the appliance is new. It will disappear after a few
minutes. This does not mean there is a malfunction and it will not cause
one.
USE
Shaping hair
• Dry your hair completely before using te styler.
• Your hair should be clean and free of styling products.
• Comb your hair with a wide- toothed comb to untangle it.
Using the appliance
• Unwind the power cord and insert the plug into the socket.
• Choose which attachment you want to use
• Turn the locking ring clockwise until it stops and the triangle on the
locking ring opposite to the triangle on the handle. The attachment is
unlocked.
• Remove the attachment from the handle.
• Align the selected attachment as shown in the picture.
• Push the selected attachment carefully into the handle, without jamming
the two metal pins.
• Turn the lock ring anti-clockwise until it stops. The attachment is locked.
• Check whether the attachment is firmly connected with the handle.
• After using, switch off the appliance and unplug it from the power
source.
• Allow the appliance to cool down.
Adjusting the temperature
• You can set the temperature at two levels by using the slide switch. We
recommend the following temperature settings.
1 Low for fine, coloured or bleached hair.
2 High for normal hair.
Shaping curls/ waves
• Divide your hair into separate strands.
• Press the lever to open the curling tong.
• Place the hair strand ends between the barrel and the curling tong of the
curling iron.
• Close the curling tong to hold the hair strands in place.
• Wind the hair strand around the curling iron, starting at the tip of the hair
and moving closer to the head.
• Leave the curling iron in your hair for about 8 to 10 seconds. This way
you will get the best result without damaging your hair.
• Open the curling tong and smoothly pull the barrel out of the curl.
Shaping hair ends
• Place the hair strand ends between the barrel and the curling tong of the
curling iron.
• Close the curling tong to hold the hair strands in place.
• You can shape the ends by twisting the curling iron outward or inward
before you pull it out over the ends.
Using the brush attachments
• You can use the brush attachment with the curling iron.
• Check whether the curling iron as cooled down.
• Carefully push on the brush attachment, with the notch facing upward,
onto the cold curling iron as far as it will go.
• Divide your hair into individual strands. Hold the strands tight.
• Wind the hair strands onto the brush.
• Leave the curling iron in your hair for about 8 to 10 seconds.
Using the spiral attachment
• You can use the spiral attachment with the curling iron.
• Check whether the curling iron has cooled down.
• Push the spiral attachment with the grooves on the attachment upwards
to the centre onto the closed, cold curling tongs.
• Press the lever to open the curling tong.
• Carefully push on the spiral attachment onto the cold curling iron as far
as it will go.
• Close the curling tong.
• Divide your hair into individual strands. Hold the strands tight.
• Press the lever of the curling iron to open the curling tong.
• Place the hair strand ends between the barrel and the curling tong of the
curling iron.
• Close the curling tong to hold the hair strands in place.
• Wind the strands toward your head around the spiral attachment .
• Leave the curling iron in your hair for about 8 to 10 seconds.
• Open the curling tong and pull the hair strands out of the curling tong.
Using the straightening iron
• Attach the straightening/ crimping attachment to the styler.
• Close the appliance and slide the selector switch into the "Straighten"
position. Now the straightening iron can be used.
• Divide your hair into individual strands with a width of about 3 cm. Hold
the strands taut and place them between the straightening iron at the
roots.
• Move the straightener slowly and smoothly from the roots to the ends.
Do not keep the straightener at any one place for longer than 8 to 10
seconds. This way you will obtain the best results without overstraining
or damaging your hair
• You can shape the ends by twisting the straightener either outward or
inward before you pull it out over the ends.
Using the crimping iron.
• Attach the straightening/crimping attachment to the styler.
• Close the appliance and slide the selector switch into the "Crimp"
position. Now the crimping iron can be used.
• Divide your hair into individual strands. Hold the strands taut and place
them between the crimping iron at the roots.
• Close the crimping iron for about 10 seconds. This way you will obtain
the best results without or damaging your hair.
• After using, switch off the appliance and unplug it from the power
source.
• Allow the appliance to cool down.
CLEANINGANDMAINTENANCE
• Unplug the appliance and allow it to cool down. Use a soft, slightly damp
cloth to wipe appliance surfaces. Do not allow water or any other liquid
to get into the unit.
Storage
• Unplug the appliance, allow to cool, and store in its box or in a dry place.
Never store it while it is hot or still plugged in.
• Never wrap the cord tightly around the appliance.
• Never hang unit by the cord. Store the cord loosely coiled. Do not put
any stress on the cord where it enters the unit, as it could cause the cord
to fray and break.
ENVIRONMENT
This appliance should not be put into the domestic garbage at the
end of its durability, but must be offered at a central point for the recycling
of electric and electronic domestic appliances. This symbol on the
appliance, instruction manual and packaging puts your attention to this
important issue. The materials used in this appliance can be recycled. By
recycling of used domestic appliances you contribute an important push to
the protection of our environment. Ask your local authorities for
information regarding the point of recollection.
NLGebruiksaanwijzing
VEILIGHEID
• De fabrikant is niet aansprakelijk voor schade
voortvloeiend uit het niet opvolgen van de
veiligheidsinstructies.
• Als het netsnoer beschadigd is, moet het
worden vervangen door de fabrikant, de
onderhoudsmonteur van de fabrikant of door
personen met een soortgelijke kwalificatie om
gevaar te voorkomen.
• Verplaats het apparaat nooit door aan het
snoer te trekken. Zorg ervoor dat het snoer
nergens in verstrikt kan raken.
• Het apparaat moet op een stabiele, vlakke
ondergrond worden geplaatst.
• De gebruiker mag het apparaat niet onbeheerd
achterlaten wanneer de stekker zich in het
stopcontact bevindt.
• Dit apparaat is uitsluitend voor huishoudelijk
gebruik en voor het doel waar het voor bestemd
is.
• Dit apparaat mag niet worden gebruikt door
kinderen van 0 tot 8 jaar. Dit apparaat kan
worden gebruikt door kinderen van 8 jaar en
ouder, mits zij continu onder toezicht staan. Dit
apparaat kan worden gebruikt door personen
met verminderde geestelijke, zintuiglijke of
mentale vermogens of gebrek aan ervaring of
kennis, mits zij onder toezicht staan of
instructies krijgen over hoe het apparaat op een
veilige manier kan worden gebruikt alsook de
gevaren begrijpen die met het gebruik
samenhangen. Kinderen mogen niet met het
apparaat spelen. Houd het apparaat en het
netsnoer buiten bereik van kinderen jonger dan
8 jaar. Laat reiniging en onderhoud niet door
kinderen uitvoeren, tenzij ze ouder zijn dan 8
jaar en onder toezicht staan.
• Dompel het snoer, de stekker of het apparaat
niet onder in water of andere vloeistoffen om
elektrische schokken te voorkomen.
• Als het apparaat in een badkamer wordt
gebruikt, verwijder dan na gebruik de stekker
uit het stopcontact. De nabijheid van water
vormt een gevaar, zelfs als het apparaat is
uitgeschakeld.
• Voor extra veiligheid adviseren we u een
aardlekschakelaar te installeren in de
elektrische groep die de badkamer van stroom
voorziet. Deze aardlekschakelaar moet een
waarde hebben die niet hoger dan 30 mA is.
Raadpleeg uw installateur.
• Na gebruik moet het apparaat worden gereinigd
om opeenhoping van vet en andere resten te
voorkomen.
•
WAARSCHUWING: Gebruik het apparaat
niet in de buurt van badkuipen, douches,
wastafels of andere voorzieningen die water
bevatten.
ONDERDELENBESCHRIJVING
1. Verwarmingsplaat met keramische laag.
2. Hendel voor het openen van de klep.
3. Stroomindicatielamp.
4. Schuifschakelaar voor verwarmingsniveaus.
5. Handgreep.
6. 360° draaibare netsnoer.
7. Ophangoog.
8. Vergrendelingsring.
9. Keuzeschakelaar voor functie van stijltang/krimptang.
10. Opzetstuk voor stijlen/krimpen.
11. Grote krultang (25 mm).
12. Kleine krultang (19 mm).
13. Spiraalopzetstuk.
14. Borstelopzetstuk.
VOORHETEERSTEGEBRUIK
• Haal het apparaat en de accessoires uit de doos.Verwijder de stickers,
de beschermfolie of het plastic van het apparaat.
• Maak het apparaat voor het eerste gebruik schoon met een vochtige
doek
• Plaats het apparaat op de standaard.
• Steek het netsnoer in het stopcontact en schakel het apparaat in.
(Opmerking: Zorg er voor het aansluiten van het apparaat voor dat het
op het apparaat aangegeven voltage overeenkomt met de plaatselijke
netspanning.
• De stroomindicator wordt rood. Na ongeveer 3 minuten is de
temperatuur bereikt en kunt u het apparaat gebruiken.
• Tijdens het eerste gebruik kan er wat rook en een brandende lucht
ontstaan. Dit komt omdat het apparaat nieuw is. Het zal na een aantal
minuten verdwijnen. Dit wil dus niet zeggen dat het apparaat defect is.
GEBRUIK
Het haar vormen
• Droog uw haar voor gebruik volledig.
• Uw haar moet schoon zijn en vrij zijn van stylingproducten.
• Kam uw haar met een grove kam om het te ontwarren.
Het apparaat gebruiken
• Wikkel hetnetsnoer af en steek de stekker in het stopcontact.
• Kies welk opzetstuk u wilt gebruiken.
• Draai de vergrendelingsring rechtsom totdat hij stopt en de driehoek op
de vergrendelingsring naar de driehoek op de handgreep wijst. Het
opzetstuk is ontgrendeld.
• Verwijder het opzetstuk van het apparaat.
• Breng het geselecteerde opzetstuk op één lijn zoals afgebeeld op de
foto.
• Druk het geselecteerde opzetstuk voorzichtig in de handgreep zonder
de twee metalen pinnen te blokkeren.
• Draai de vergrendelingsring linksom totdat hij stopt. Het opzetstuk is
vergrendeld.
• Controleer of het opzetstuk stevig aan de handgreep zit.
• Schakel na gebruik het apparaat uit en verwijder de stekker uit het
stopcontact.
• Laat het apparaat afkoelen.
De temperatuur wijzigen
• U kunt de temperatuur op twee niveaus instellen met behulp van de
schuifschakelaar. Wij adviseren de volgende temperatuurniveaus:
1 Laag voor fijn, gekleurd of gebleekt haar.
2 Hoog voor normaal haar.
Krullen/golven maken
• Verdeel uw haar in afzonderlijke lokken.
• Druk op de hendel om de krultang te openen.
• Plaats de uiteinden van de haarlokken tussen de verwarmingsbuis en de
krultang.
• Sluit de krultang om de haarlokken op hun plaats te houden.
• Wikkel de haarlok rond de krultang, beginnend vanaf de punt van het
haar en steeds dichter naar het hoofd bewegend.
• Houd de krultang ongeveer 8 tot 10 seconden in uw haar. Zodoende
krijgt u het beste resultaat zonder uw haar te beschadigen.
• Open de krultang en trek de staaf voorzichtig uit de krul.
De uiteinden van het haar vormen
• Plaats de uiteinden van de haarlokken tussen de staaf en de krultang.
• Sluit de krultang om de haarlokken op hun plaats te houden.
• U kunt de uiteinden vormen door de krultang naar buiten of naar binnen
te draaien voordat u hem over de uiteinden uit het haar trekt.
De borstelopzetstukken gebruiken
• U kunt het borstelopzetstuk op de krultang gebruiken.
• Controleer of de krultang is afgekoeld.
• Duw het borstelopzetstuk, met de inkeping naar boven, voorzichtig zo
ver mogelijk op de koude krultang.
• Verdeel uw haar in afzonderlijke lokken. Houd de lokken strak.
• Wikkel de haarlokken op de borstel.
• Houd de krultang ongeveer 8 tot 10 seconden in uw haar.
Het spiraalopzetstuk gebruiken
• U kunt het spiraalopzetstuk op de krultang gebruiken.
• Controleer of de krultang is afgekoeld.
• Duw het spiraalopzetstuk, met de groeven op het opzetstuk naar boven,
op het midden van de gesloten, koude krultang.
• Druk op de hendel om de krultang te openen.
• Duw het spiraalopzetstuk voorzichtig zo ver mogelijk op de koude
krultang.
• Sluit de krultang.
• Verdeel uw haar in afzonderlijke lokken. Houd de lokken strak.
• Druk op de hendel om de krultang te openen.
• Plaats de uiteinden van de haarlokken tussen de staaf en de krultang.
• Sluit de krultang om de haarlokken op hun plaats te houden.
• Wikkel de lokken in de richting van uw hoofd op het spiraalopzetstuk.
• Houd de krultang ongeveer 8 tot 10 seconden in uw haar.
• Open de krultang en trek de haarlokken uit de krultang.
De stijltang gebruiken
• Bevestig het opzetstuk voor stijlen/krimpen op de styler.
• Sluit het apparaat en schuif de keuzeschakelaar naar de "Straighten"-
stand. De stijltang kan nu worden gebruikt.
• Verdeel uw haar in afzonderlijke lokken met een breedte van ongeveer 3
cm. Houd de lokken strak en plaats ze bij de wortels tussen de stijltang.
• Beweeg de stijltang langzaam en soepel van de wortels naar de
uiteinden. Houd de stijltang niet langer dan 8 tot 10 seconden op
dezelfde plaats. Zodoende krijgt u het beste resultaat zonder uw haar te
overbelasten of te beschadigen.
• U kunt de uiteinden vormen door de stijltang naar buiten of naar binnen
te draaien voordat u hem over de uiteinden uit het haar trekt.
De krimptang gebruiken
• Bevestig het opzetstuk voor stijlen/krimpen op de styler.
• Sluit het apparaat en schuif de keuzeschakelaar naar de "Crimp"-stand.
De krimptang kan nu worden gebruikt.
• Verdeel uw haar in afzonderlijke lokken. Houd de lokken strak en plaats
ze bij de wortels tussen de krimptang.
• Sluit de krimptang ongeveer 10 seconden. Zodoende krijgt u het beste
resultaat zonder uw haar te beschadigen.
• Schakel na gebruik het apparaat uit en verwijder de stekker uit het
stopcontact.
• Laat het apparaat afkoelen.
REINIGINGENONDERHOUD
• Verwijder de stekker uit het stopcontact en laat het apparaat afkoelen.
Gebruik een zachte, vochtige doek om het apparaat schoon te maken.
Dompel het apparaat nooit onder in water of een andere vloeistof.
Opslag
• Verwijder de stekker uit het stopcontact en laat het apparaat afkoelenen
bewaar ze inde doosof opeen drogeplaats.Berg het apparaat nooit op
terwijlhetheet isofnog aangeslotenis.
• Wikkelhet snoer nooitom het apparaat.
• Rol hetsnoerlosjesop. Zet geenspanning ophet snoerwaarhet in
hetapparaat gaat, omdat dit een kabelbreuk zou kunnen veroorzaken.
MILIEU
Dit apparaat mag aan het einde van de levensduur niet bij het
normale huisafval worden gedeponeerd, maar moet bij een speciaal
inzamelpunt voor hergebruik van elektrische en elektronische apparaten
worden aangeboden. Het symbool op het apparaat, in de
gebruiksaanwijzing en op de verpakking attendeert u hierop. De in het
apparaat gebruikte materialen kunnen worden gerecycled. Met het
recyclen van gebruikte huishoudelijke apparaten levert u een belangrijke
bijdrage aan de bescherming van ons milieu. Informeer bij uw lokale
overheid naar het inzamelpunt.
FRManueld'instructions
SÉCURITÉ
• Si vous ignorez les instructions de sécurité, le
fabricant ne saurait être tenu responsable des
dommages.
• Si le cordon d'alimentation est endommagé, il
doit être remplacé par le fabricant, son
réparateur ou des personnes qualifiées afin
d'éviter tout risque.
• Ne déplacez jamais l'appareil en tirant sur le
cordon et veillez à ce que ce dernier ne soit pas
entortillé.
• L'appareil doit être posé sur une surface stable
et nivelée.
• Ne laissez jamais le dispositif sans surveillance
s'il est connecté à l'alimentation.
• Cet appareil est uniquement destiné à des
utilisations domestiques et seulement dans le
but pour lequel il est fabriqué.
• L'appareil ne doit pas être utilisé par des
enfants de moins de 8 ans. Cet appareil peut
être utilisé par des enfants à partir de 8 ans
sous supervision continue. Cet appareil ne doit
pas être utilisé par des personnes dont les
capacités physiques, sensorielles ou mentales
sont réduites ou manquant d'expérience et de
connaissance, sauf si elles sont surveillées ou
si elles ont reçu des instructions pour utiliser
cet appareil en toute sécurité en étant
conscientes des dangers liés. Les enfants ne
doivent pas jouer avec l'appareil. Maintenez
l'appareil et son cordon d'alimentation hors de
portée des enfants de moins de 8 ans. Le
nettoyage et la maintenance utilisateur ne
doivent pas être confiés à des enfants sauf s'ils
ont 8 ans ou plus et sont sous surveillance.
• Afin de vous éviter un choc électrique,
n'immergez pas le cordon, la prise ou l'appareil
dans de l'eau ou autre liquide .
• Quand vous utilisez l'appareil dans la salle de
bain, débranchez-le après utilisation pour éviter
tout risque de contact avec l’eau même s’il est
éteint.
• Il est conseillé, pour une meilleure protection,
d’installer un dispositif différentiel à courant
résiduel (DDR) sur le réseau électrique
approvisionnant l'électricité à la salle de bain.
Ce DDR doit avoir un courant d’alimentation de
la tension résiduelle inférieur à 30mA.
Demandez conseil à votre installateur.
• Après usage, l'appareil devrait être nettoyé
pour éviter toute accumulation de graisse et
autres résidus.
•
AVERTISSEMENT: N'utilisez pas cet
appareil à proximité d'une baignoire, d'une
douche, d'un lavabo ou d'autres récipients
contenant de l'eau.
DESCRIPTIONDESPIÈCES
1. Plaque de chauffage revêtue de céramique.
2. Niveau d'ouverture de volet.
3. Indicateur d'alimentation.
4. Sélecteur de niveaux de chauffage.
5. Poignée.
6. Cordon d'alimentation pivotant à 360°.
7. Œillet de suspension.
8. Bague de blocage.
9. Sélecteur de fonction de fer à friser /défriser.
10. Accessoire à friser /défriser.
11. Grand fer à boucler (25 mm).
12. Petit fer à boucler (19 mm).
13. Accessoire en spirale.
14. Accessoire de brosse.
AVANTLAPREMIÈREUTILISATION
• Sortez l'appareil et les accessoires hors de la boîte.Retirez les
autocollants, le film protecteur ou le plastique de l'appareil.
• Avant l’utilisation, nettoyez l’appareil avec un chiffon humide.
• Placez l'appareil sur le support.
• Branchez le cordon d'alimentation dans la prise et mettez l'appareil en
marche (Note : Veillez à ce que la tension indiquée sur l’appareil
corresponde à celle du secteur local avant de connecter l'appareil.
• Le témoin d'alimentation s'allume en rouge. Après environ 3 minutes, la
température est atteinte et vous pouvez commencer à utiliser l'appareil.
• Un peu de fumée et une odeur de brûlé peuvent émaner lors de la
première utilisation. Tel est le cas parce que l’appareil est neuf. Cela se
dissipera après quelques minutes. Cela ne signifie pas un mauvais
fonctionnement et n’en provoquera pas un.
UTILISATION
Coiffure
• Séchez vos cheveux complètement avant d'utiliser la brosse coiffante.
• Vos cheveux doivent être propres et sans produit de coiffure.
• Peignez votre chevelure avec un peigne démêlant.
Utilisation de l'appareil
• Déroulez le cordon d’alimentation et insérez la fiche dans la prise.
• Choisissez l'accessoire à utiliser
• Tournez la bague de blocage dans le sens horaire pour qu'elle se
bloque et le triangle sur la bague de blocage dans le sens opposé à
celui du triangle sur la poignée. L'accessoire est débloqué.
• Retirez l'accessoire de la poignée.
• Alignez l'accessoire sélectionné comme illustré.
• Poussez doucement l'accessoire sélectionné dans la poignée, sans
bloquer les deux goupilles métalliques.
• Tournez la bague de blocage dans le sens antihoraire jusqu'à ce qu'elle
se bloque. L'accessoire est bloqué.
• Vérifiez si l'accessoire est fermement connecté avec la poignée.
• Après usage, éteignez l'appareil et débranchez-le de la source de
courant.
• Laissez refroidir les cheveux.
Réglage de la température
• Vous pouvez régler la température sur deux niveaux avec le sélecteur.
Nous vous recommandons les réglages de température suivants.
1 Bas pour les cheveux fins, colorés ou décolorés.
2 Haut pour les cheveux normaux.
Coiffure bouclée /ondulée
• Divisez votre chevelure en deux mèches.
• Appuyez sur le levier pour ouvrir la pince à boucler.
• Placez les bouts de la mèche de cheveux entre le cylindre et la pince à
boucler du fer à boucler.
• Fermez la pince à boucler pour maintenir la mèche de cheveux en
place.
• Enroulez la mèche de cheveux autour du fer à friser, en commençant
par la pointe de la chevelure puis en se rapprochant de la tête.
• Laissez le fer à boucler dans vos cheveux entre 8 et 10 secondes. De la
sorte, vous assurez le meilleur résultat sans endommager vos cheveux.
• Ouvrez la pince à boucler et tirez sans à-coups le cylindre hors de la
boucle.
Coiffure des pointes de cheveux
• Placez les bouts de la mèche de cheveux entre le cylindre et la pince à
boucler du fer à boucler.
• Fermez la pince à boucler pour maintenir la mèche de cheveux en
place.
• Vous pouvez coiffer les pointes en tordant le fer à boucler vers
l'extérieur ou l'intérieur avant de le tirer hors des pointes.
Usage des accessoires de brosse
• Vous pouvez utiliser l'accessoire de brosse avec le fer à boucler.
• Vérifiez si le fer à boucler a refroidi.
• Poussez doucement sur l'accessoire de brosse avec l'encoche dirigée
vers le haut sur le fer à boucler froid aussi loin que possible.
• Divisez votre chevelure en mèches individuelles. Maintenez bien les
mèches.
• Enroulez les mèches de cheveux sur la brosse.
• Laissez le fer à boucler dans vos cheveux entre 8 et 10 secondes.
Usage de l'accessoire en spirale
• Vous pouvez utiliser l'accessoire en spirale avec le fer à boucler.
• Vérifiez si le fer à boucler a refroidi.
• Poussez l'accessoire en spirale avec les rainures sur l'accessoire vers le
haut en direction du centre sur les pinces à boucler froides fermées.
• Appuyez sur le levier pour ouvrir la pince à boucler.
• Poussez doucement sur l'accessoire en spirale sur le fer à boucler froid
aussi loin que possible.
• Fermez le fer à boucler.
• Divisez votre chevelure en mèches individuelles. Maintenez bien les
mèches.
• Appuyez sur le levier du fer à boucler pour ouvrir la pince à boucler.
• Placez les bouts de la mèche de cheveux entre le cylindre et la pince à
boucler du fer à boucler.
• Fermez la pince à boucler pour maintenir la mèche de cheveux en
place.
• Enroulez les mèche vers vous autour de l'accessoire en spirale.
• Laissez le fer à boucler dans vos cheveux entre 8 et 10 secondes.
• Ouvrez la pince à boucler et tirez les mèches de cheveux hors du fer à
boucler.
Usage du fer à défriser
• Fixez l'accessoire à friser /défriser sur la brosse coiffante.
• Glissez le sélecteur sur la position "Straighten". Vous pouvez
maintenant utiliser le fer à défriser.
• Divisez vos cheveux en mèches individuelles d'une largeur d'environ 3
cm. Maintenez les mèches bien tendues et placez-les dans le fer à
défriser au niveau des racines.
• Déplacez lentement le fer à défriser sans à-coups des racines vers les
pointes. Ne maintenez pas le fer à défriser en un quelconque endroit
plus de 8 à 10 secondes. De la sorte, vous assurez le meilleur résultat
sans fatiguer ou endommager vos cheveux.
• Vous pouvez coiffer les pointes en tordant le fer à défriser vers
l'extérieur ou l'intérieur avant de le tirer hors des pointes.
Usage du fer à friser
• Fixez l'accessoire à friser /défriser sur la brosse coiffante.
• Glissez le sélecteur sur la position "Crimp". Vous pouvez maintenant
utiliser le fer à friser.
• Divisez votre chevelure en mèches individuelles. Maintenez les mèches
bien tendues et placez-les dans le fer à friser au niveau des racines.
• Fermez le fer à friser pendant environ 10 secondes. De la sorte, vous
assurez le meilleur résultat sans endommager vos cheveux.
• Après usage, éteignez l'appareil et débranchez-le de la source de
courant.
• Laissez refroidir les cheveux.
NETTOYAGEETENTRETIEN
• Débranchez l’appareil et laissez-le refroidir. Utilisez un chiffon doux un
peu humide pour essuyer les surfaces de l’appareil. Ne pas laisser de
l’eau ou autres liquides pénétrer dans l’appareil.
Rangement
• Débranchez l’appareil, laissez le refroidir, et rangez le dans sa boite ou
dans un lieu sec. Ne jamais le ranger tant qu’il est chaud ou encore
branché.
• Ne jamais enrouler étroitement le cordon autour de l’appareil.
• Ne jamais pendre l’appareil par le cordon. Rangez le cordon enroulé
sans trop serrer. Ne pas appliquer de pression au joint du cordon et de
l'appareil, car le cordon pourrait s'effilocher et se casser.