36
Zone 2 continued
DTS-HD speaker re-map
As there is no “official” speaker layout for discrete 7.1 channel audio it could
be possible that the original master track of a 7.1 soundtrack was mastered
with a different speaker layout than the one being used in your home. DTS
have addressed this issue for DTS-HD Master Audio and High Resolution
Audio by including in the bitstream flags to tell the receiving AV Receiver which
of a 7 nominal 7.1 speaker layouts was actually used. By using special DTS
Speaker Remap algorithms the 651R/751R is able to electronically
“reposition” the speakers (i.e. direct the audio propagation), so that the
playback matches the original encoded layout for the best possible sound
quality.
A second aim of this technology is that by re-purposing some of the 7.1
available channels it is possible to use some of them to do new things such
as adding a height element to the sound field.
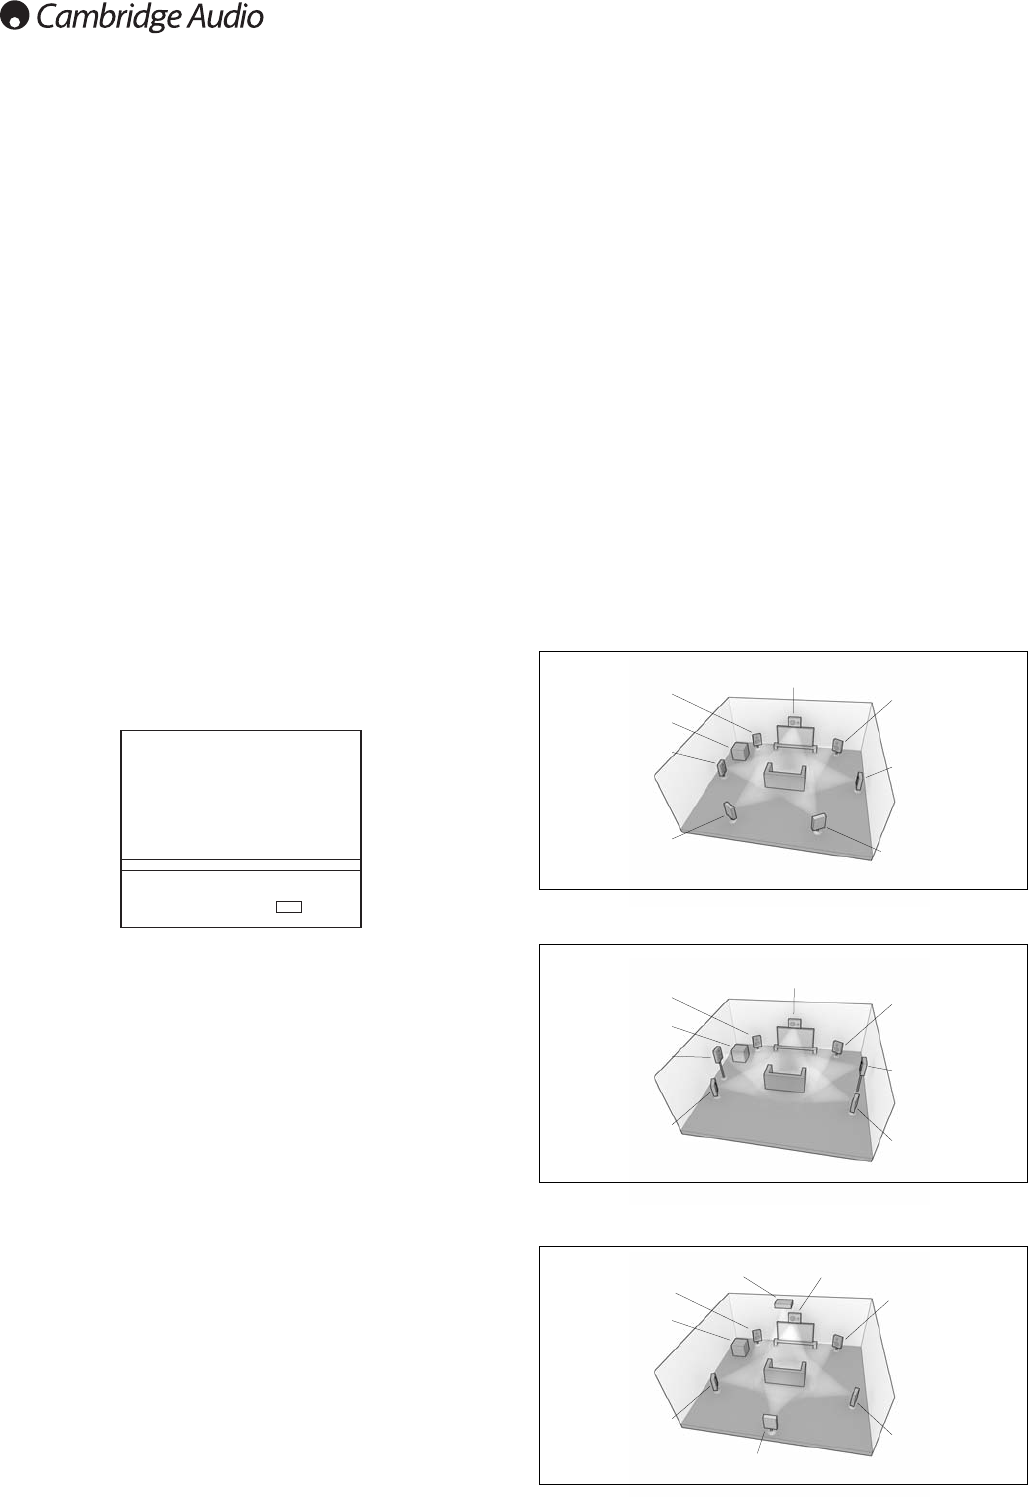
The following digrams show the 7 possible encoding schemes for reference.
The angles quoted refer to the angle from a nominal 0 degrees line through
the centre channel to each speaker either side right or left of that line.
Configurations 1 and 5 are variants of normal 7.1 setups whilst
Configuration 6 can increase the available panning of the front channels.
Configurations 2, 3, 4 and 7 are less conventional and re-purpose some of
the available 7.1 channels to provide an extra height dimension to the sound
field in different ways. Configuration 4 is the one the 651R/751R expects if
you choose to use a 5.1 + Height speaker setup. Please refer to the DTS
website for more details on this new technology.
Configuration 1 - 7.1 channel: L, C, R, LFE, Lss, Rss, Lsr, Rsr
Configuration 2 - 7.1 channel: L, C, R, LFE, Ls, Rs, Lhs, Rhs
Configuration 3 - 7.1 channel: L, C, R, LFE, Ls, Rs, Cs, Oh
Center
Right (30°)
Left (30°)
Left Height Side (90°)
Left Surround (110°)
Right Surround (110°)
Right Height Side (90°)
LFE
Center
Center Surround
Right (30°)
Left (30°)
Left Surround (110°)
Right Surround (110°)
LFE
Center Over-Head
Center
Right (30°)
Left (30°)
Left Surround Side (90°)
Left Surround Rear (150°)
Right Surround Rear (150°)
Right Surround Side (90°)
LFE
To select Tuner in Zone 2, press Zone 2 followed by the Tuner button.
Do this again to switch from AM to FM or vice versa.
To select other sources in Zone 2 press Zone 2 followed by the desired
source button.
To select the same source as the main room’s, press Follow Main.
To change the volume is Zone 2 press Zone 2 followed by the volume up or
down buttons (or volume knob).
To mute Zone 2 press Zone 2 followed by the Mute button.
You can also use the Zone 2 handset in the main room to control Zone 2.
In this case all the remote commands automatically control Zone 2, simply
point the Zone 2 handset at the main unit and use the Standby/On or source
buttons to always control Zone 2 operation.
Note: The Zone 2 handset has a couple of special features.
Using the |< or >| preset up down buttons for the Tuner will always
automatically put the tuner into Preset mode (as opposed to Manual or
Automatic modes).
Note: The Tuner will also only scroll through Presets that have actually been
set.
The Zone 2 remote has a Follow Main function. This forces Zone 2 to follow
the same source selection as the main zone. This can be useful in that Zone
2 can now receive any audio type including digital or HDMI audio that is being
decoded for the main zone. The Zone 2 outputs are created from Left +
Centre and Right + Centre so that centre channel dialogue can be heard in
Zone 2.
It is also possible to control Zone 2 via the On Screen Display.
From the main OSD screen select the Rec.2/Zone 2 Output Select menu and
then select the Zone 2 menu item.
Use the < and > buttons on the remote scroll to through the various sources
available, Follow Main and Off.
Controlling Zone 2 from Zone 2 itself
As previously described you will need an IR repeater system in order to do
this.
This allows commands received in Zone 2 to be relayed back to the Zone 2
IR Emitter Input on the back of the unit.
Via such a repeater you can use both the main and Zone 2 handsets in Zone
2. For both handsets all commands received will automatically affect Zone 2.
i.e. for the main zone handset when used in this way in Zone 2 you do not
need to press Zone 2 followed by another command. Simply select a source
or mute etc. and the unit will automatically do that function in Zone 2.
Tone/Sub/LFE Config.