GB/IE GB/IE GB/IE
GB/IE
GB/IE
LED Bik
Introduction
Congratulations on the pur
device. In doing so y
top-quality product. The instructions for use
are to be consider
important safet
Before using the pr
with all the safet
The product must only be used as described and for
the specified fields of application. If you pass the pr
uct on to any
documentation.
Intended use
This product is suitable for lighting the r
cycling. The LED Bicy
sive lighting for all bicy
be impaired b
product is intended for outdoor use. An
the aforementioned or an
hibited and can result in injuries and product damage.
The manufacturer is not liable for damages r
from impr
commercial use.
Parts Description
1
Headlight brack
2
Reducer rubber
3
Headlight brack
4
Headlight on/off switch
5
6
Headlight
7
Headlight angle adjustment scre
8
Headlight lock
9
T
10
T
11
T
12
T
13
T
14
T
15
T
16
T
17
USB cable
18
Charging sock
Scope of delivery
1 Headlight
1 T
1 Headlight brack
1 T
2 Batteries AAA
Reducer rubbers
1 USB cable
1 Instructions for assembly and use
T
Headlight
Model designation: XC-195A / LI-1
Rated output: 1
Protection type:
DIN EN 60529
Rechar
T
Model designation: XC-117D
Rated output: 0.2W
Protection type:
DIN EN 60529
Batteries: 2 x 1.5
Note: Only use rechargeable 1.2
comparable 1.5
Safet instructions
DANGER TO LIFE
AND RISK OF ACCIDENT FOR IN-
FANTS AND CHILDREN! Nev
children unsupervised with t
due to the suffocation hazard posed b
parts thereof. Children frequently under
dangers.
Het product is geen speelgoed!
kinderen) met beperkte fysiek
geestelijke capaciteiten of met een gebr
er
als ze door een persoon in de gaten w
houden, die voor hun v
is. Houd er rek
ondeskundig gebruik, het negeren v
aanwijzing of ingr
personen van de gar
kundige repar
voor de gebruik
uitvoer
wor
LEVENSGEV
Bij gebruik v
foutiev
6
beschadigd
rak
gev
V
de batterijen/accu‘s
VOORZICHTIG! EXPLOSIEGE -
VLaad batterijen in géén geval op!
gedurende een langere periode niet gebruikt.
polariteit! Deze wor
terijen zo nodig voor
het apparaat. Er is spr
op lekkage!
oplaadbare batterij.
oude.
gedeponeerd te w
accu‘s volgens de v
VOORZICHTIG! EXPLOSIEGE-
V Houd de batterijen/accu‘s uit de
buurt van kinderen, gooi de batterijen/
accu‘s niet in open vuur
neem ze niet uit elk
ov
dat gev
dient u deze direct te v
het apparaat te v
vloeistof uit de batterijen/accu‘s gelekt is. Spoel in
gev
de plekken af met v
raadpleeg onmiddellijk een arts.
Aanwijzing: Als het rode contr
accu/batterij
5
13
in de koplam
6
of in het
achterlicht
14
brandt, dient u de batterijen resp. de
accu‘s direct te v
de lampen niet meer met de regels v
ov
Montage
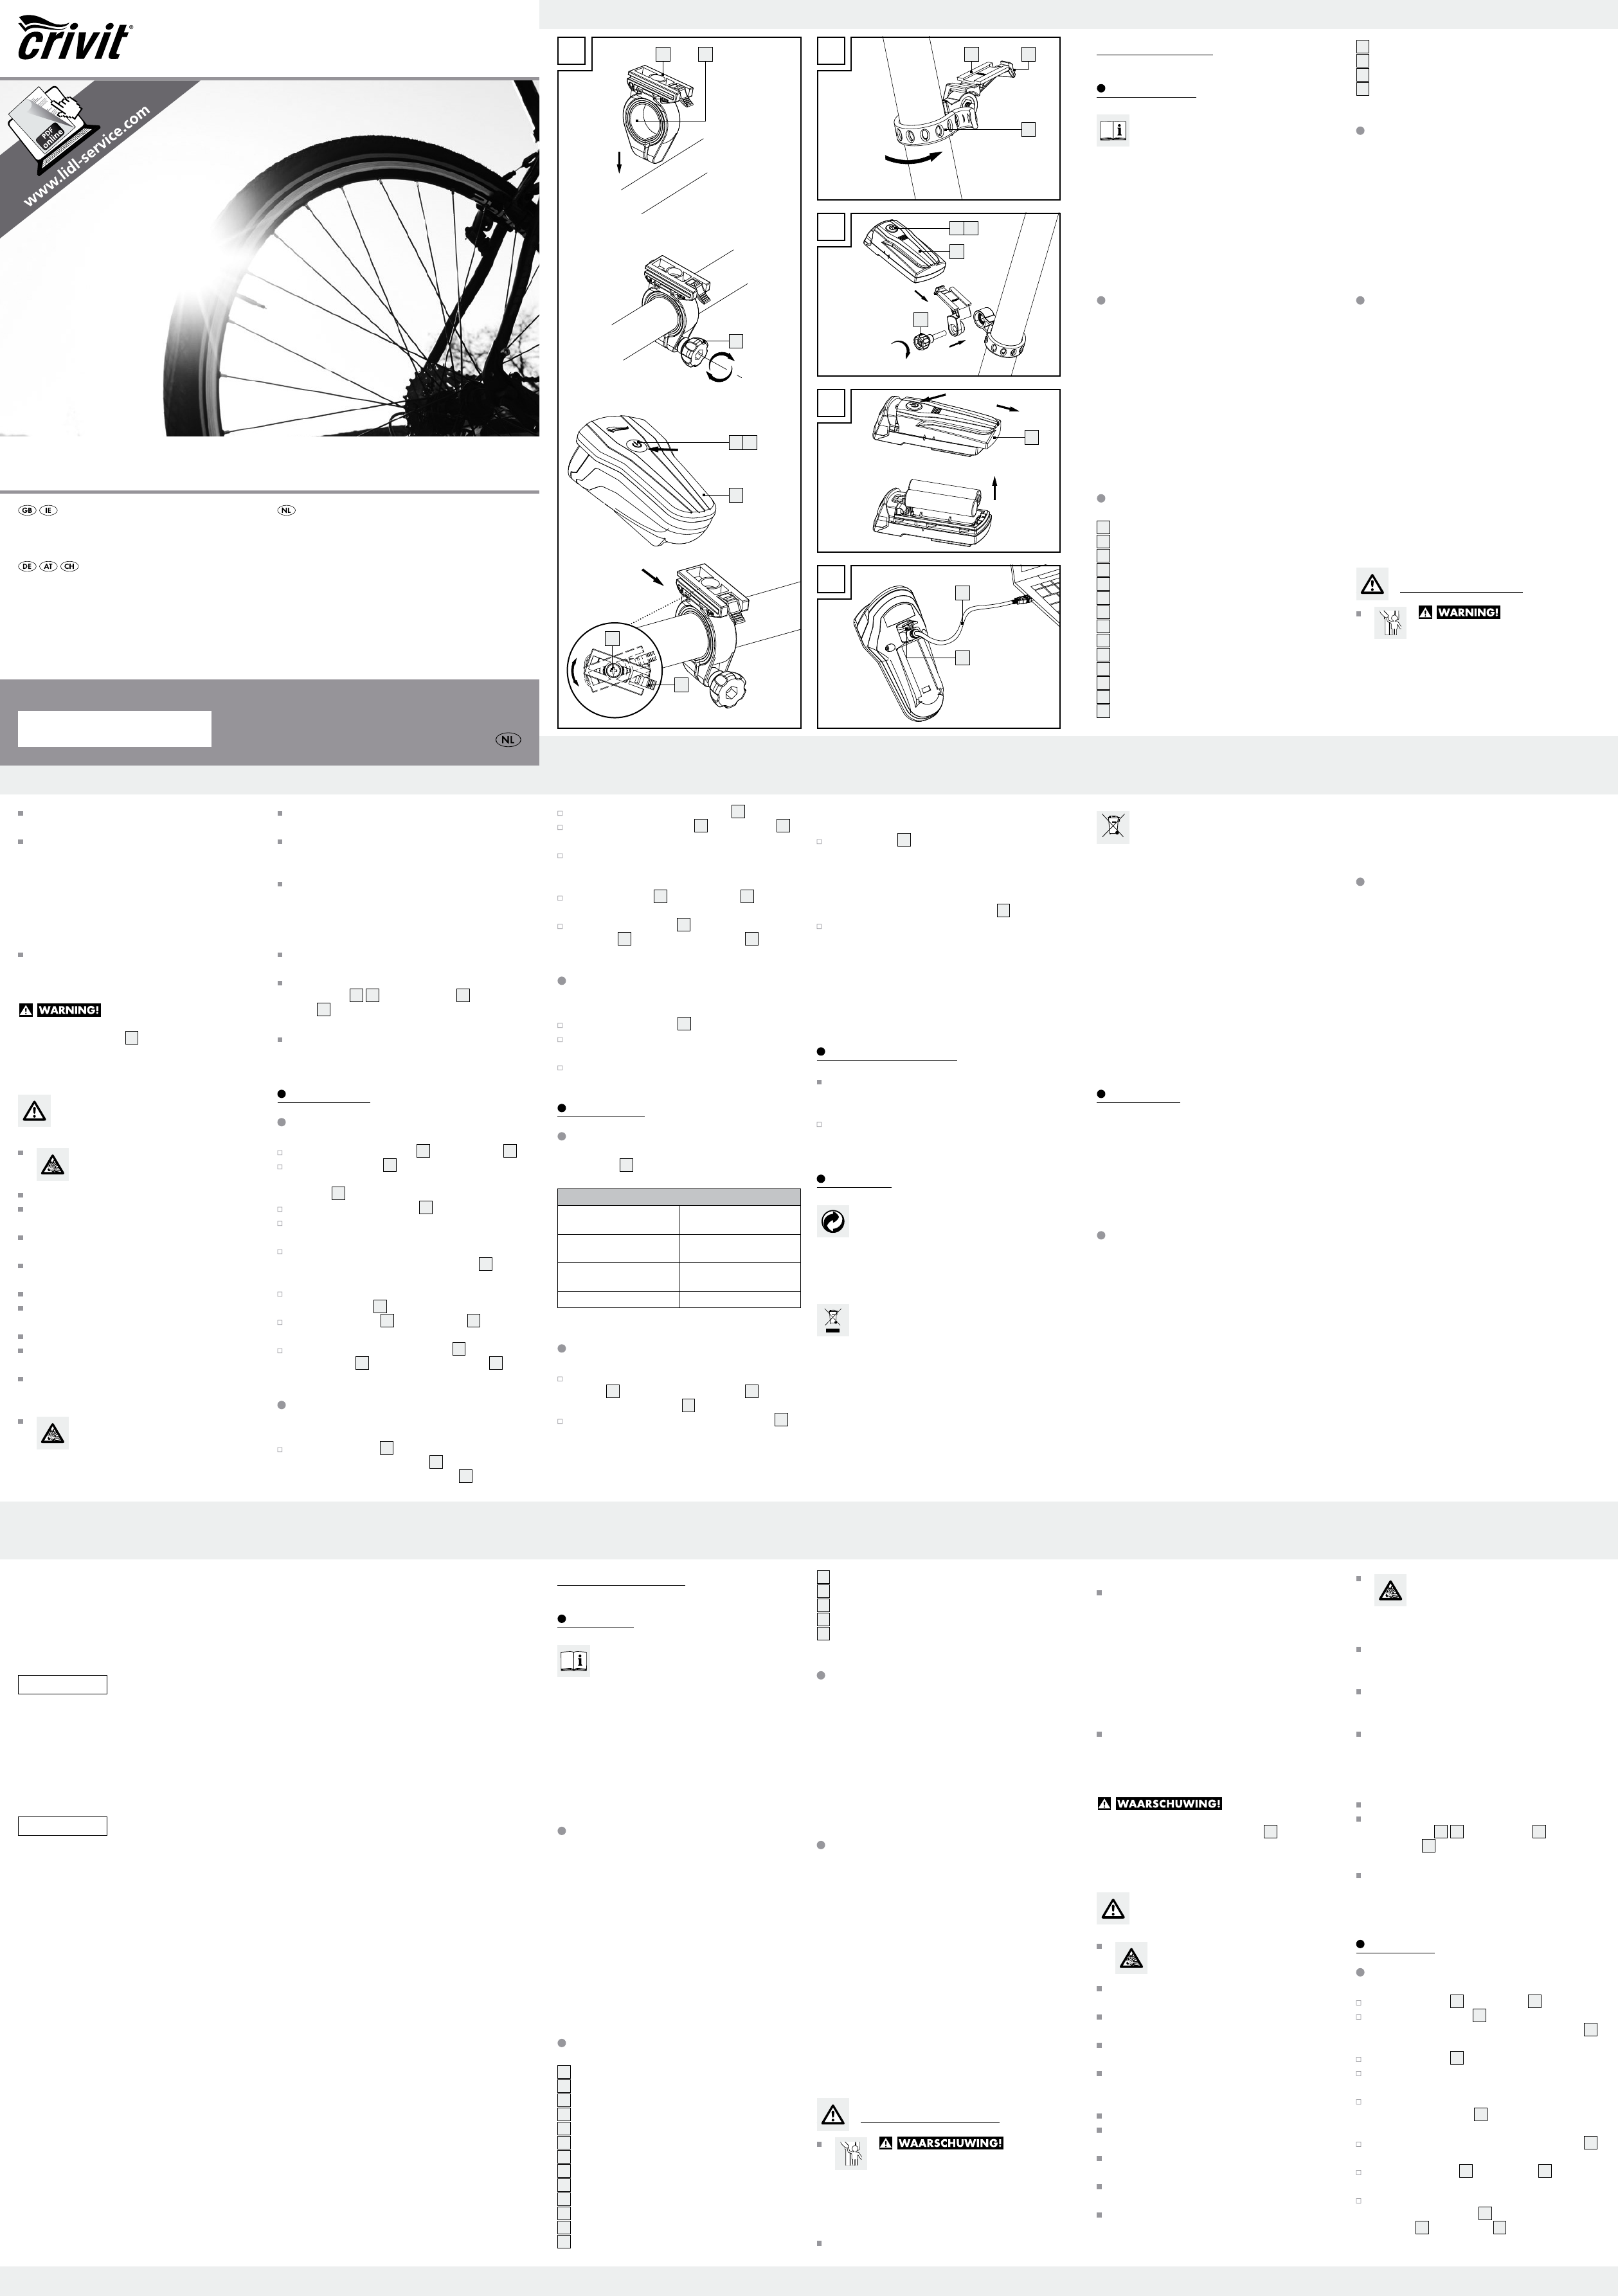
3
uit de houder
1
.
1
op de gew
het stuur
2
om een optimale pasvorm te kunnen w
3
weer terug.
geen werktuigen om beschadigingen te vermijden.
draait u de stelschr
7
met een kruisschroev
draaier 2-3 r
7
weer v
6
op de houder
1
, totdat
deze hoorbaar vastklikt.
deling van de k
8
en schuift u de
koplam
6
uit de houder
1
naar vor
LED-fietslampen-set
Inleiding
Hartelijk gefeliciteerd met de aankoop v
uw nieuwe appar
waar
zing maakt deel uit van dit pr
aanwijzingen v
verwijdering. Maak uzelf vóór gebruik van het pr
vertrouwd met alle bedienings- en veiligheidsins
Gebruik het product alleen z
de aangegev
u het product door
menten mee.
Correct gebruik
Dit product is geschikt v
tijdens het fietsen. Het LED fietsverlichting set is als
enkele v
mag niet door andere fietsonder
den gehinderd. Dit pr
buitenshuis. Een ander gebruik dan eerder beschre
of een ver
en kan to
De fabrikant is niet aanspr
volg v
voor commer
Beschri
1
Houder koplam
2
3
4
5
6
7
8
9
10
11
12
13
14
15
16
17
USB-kabel
18
Oplader batterij
Omv
1 K
1 Achterlicht
1 Houder koplam
1 Houder achterlicht
2 Batterijen AAA
Reduceerrubber
1 USB-kabel
1 Montage- en gebruiksaanwijzing
T
K
T XC-195A / LI-1
Nominaal vermogen: 1W
Beschermingsklasse: IP44 conform DIN EN 60529
Li-ion-batterij: 1300 mAh, 3,7 V
Achterlic
T XC-117D / D-LED 3
Nominaal vermogen: 0,2
Beschermingsklasse: IP44 conform DIN EN 60529
Batterijen: 2 x 1,5 V AAA LR03
Opmerking: Gebruikt bij het achterlicht uitsluitend
accu‘s met 1,2
met 1,5 V
V
LEVENS-
GEV
LEN BIJ KLEUTERS EN KINDEREN!
Laat kinderen nooit z
kingsmateriaal, er bestaat verstikkingsge
het inslikken v
onderschatten vaak de ge
GB
KLB GmbH
Diekbree 8
48157 Münster
T
E-Mail: gb@klb-ser
www
IAN 275453
IE
KLB GmbH
Diekbree 8
48157 Münster
T
E-Mail: ie@klb-ser
www
IAN 275453
Environmental damage due to
incorrect batter
batter
Never dis
household waste. The
and are subject to hazar
chemical symbols of the heavy metals are: Cd = cadmium,
Hg = mercury
batteries/rechargeable batteries through y
collection site.
Improper battery disposal destroy
and the hazardous substances in the batteries may pose
a significant danger to the health and envir
Separate collection/disposal of old batteries pre
dangers to the health and envir
resour
W
Dear customer
This device is co
date of purchase. In the ev
have legal rights against the retailer of this pr
Y
warranty detailed below
W
The warranty period begins on the date of purchase.
Please retain the original receipt safely
tation is requir
defect in material or manufacture occur within three
years fr
repair or replace - at our choice - it fr
warranty is conditional on the defective device and the
receipt of pur
year w
description of the nature of the defect and of the date it
arose. If the defect is co
receiv
or ex
ranty period. The warrant
by r
replaced and repair
present at the time of purchase must be r
diately after unpacking. Repairs made after the expira-
tion of the warranty period are subject to payment.
Extent of warrant
The device w
lines and diligently inspected prior to shipment. The
warranty applies to defects in material or manufacture.
This warranty does not apply to product parts subject
to regular w
damage to fragile parts, e.g. switches, rechargeable
batteries, or made from glass. This w
void if the de
used or maintained. Proper use of the pr
strictly obser
practices which the operating instructions w
advise against must be avoided without fail. This pr
uct is only intended for private, non-commer
Any incorr
force and changes not performed by our authorized
ser
instructions below to ensur
quickly:
·
ready as y
·
these instructions for the product number
·
please first contact the following service depar
ment by phone or e-mail.
·
returned to the specified service address free of
charge, including the proof of pur
and information about the defect and when it
occurred.
Please note, the ser
notified before r
This and many other manuals, pr
software are av
www
11
.
15
on the brack
9
and adjust to the desired angle.
tight. T
step.
14
into the brack
9
until you
hear it lock into place.
14
, pull down on the tail
light lock
10
and slide off the tail light
14
.
light (see Fig. D)
16
off to the back.
1.5
Operation
The headlight
6
has three brightnesses.
On/Of
press once P
riding in unlit areas
press twice Standard mode (20
for riding in lit area
press three times Eco mode (10
riding in well lit areas
press four times off
socket
18
and connect the USB cable
17
to the
batter
18
.
17
to
a computer/laptop/standard USB char
5
different specifications can damage the
rechargeable battery
will void the w
The headlight
6
has a batter
indicator lights up red, the rechar
are drained. The indicat
charging. When the rechar
ready to be used again, the indicator will e
guish and you can use the headlight
6
.
at full pow
than 10 hours the first time. Please do not stop char-
in
After this, a c
recommended for r
1300 mAh.
Cleaning and Care
or abrasiv
the lights.
lint-free cloth.
Disposal
The packaging is made of en
friendly materials, which may be disposed of
through y
Contact your local r
details on how to dispose of y
dispose of the product pr
household waste, when it has r
end of its useful life. Please contact your local
authorit
and their opening hours.
Defective or used batteries/rechar
be recy
amendments. Return batteries/rechar
and
pro
product is not a to
(including children) with impaired ph
or mental capacit
edge unless super
their safet
rect handling, non-compliance with the operating
instructions or interference with the device by
unauthorised individuals are ex
may result in considerable danger t
Repairs should only be carried out b
personnel. The LED lights are not r
RISK OF LOSS OF LIFE AND
ACCIDENT! Using the incorrect char
cause the headlight
6
to be damaged, ov
or ev
Safet
batteries/rec
batteries
CAUTION! EXPLOSION HAZARD!
Never r
correct! This is shown in the battery compar
before inserting the batter
device. Ther
batteries.
Never mix old and ne
in household waste!
batteries/rechargeable batteries in the proper
manner!
CAUTION! EXPLOSION HAZARD!
K
away fr
ies/rechargeable batteries into fir
circuit and do not tak
charging the batteries. This poses a risk of leaking.
please remo
uct damage!
branes if fluid has leak
chargeable battery
batter
clean water and seek immediate medical attention.
hazard!
Note: If the red rechargeable battery/batter
control light
5
13
on the headlight
6
or the tail
light
14
lights up, please replace the batteries or
recharge the r
the
Installation
3
from the brack
1
.
1
in the desired location on
the handlebar
rubbers
2
to ensure an optimal fit.
3
.
do not use tools for this step.
trav
7
2–3 turns using a cross-tip scre
adjustment scre
7
.
6
into the brack
1
until you
hear it lock into place.
8
and slide
the headlight
6
for
1
.
(see Fig. B and C)
9
to the seat post or the rear
cross-bar using the rubber tab
11
. Be sure there
are no objects in fr
14
.
A B
D
C
ESC
F1
~
`
!
1
F2
TAB
E
3
11
6
1 9 102
4 5
12 13
14
16
7
17
8
18
15
NL NL
LED-F
Model-No. 14123
IAN 275453
LED-FIETSL