752215
1
Zoom out
Zoom in
Vorherige Seite
1/2
Nächste Seite
4
5 6
3
1
2
How to use
Charge the headphones.
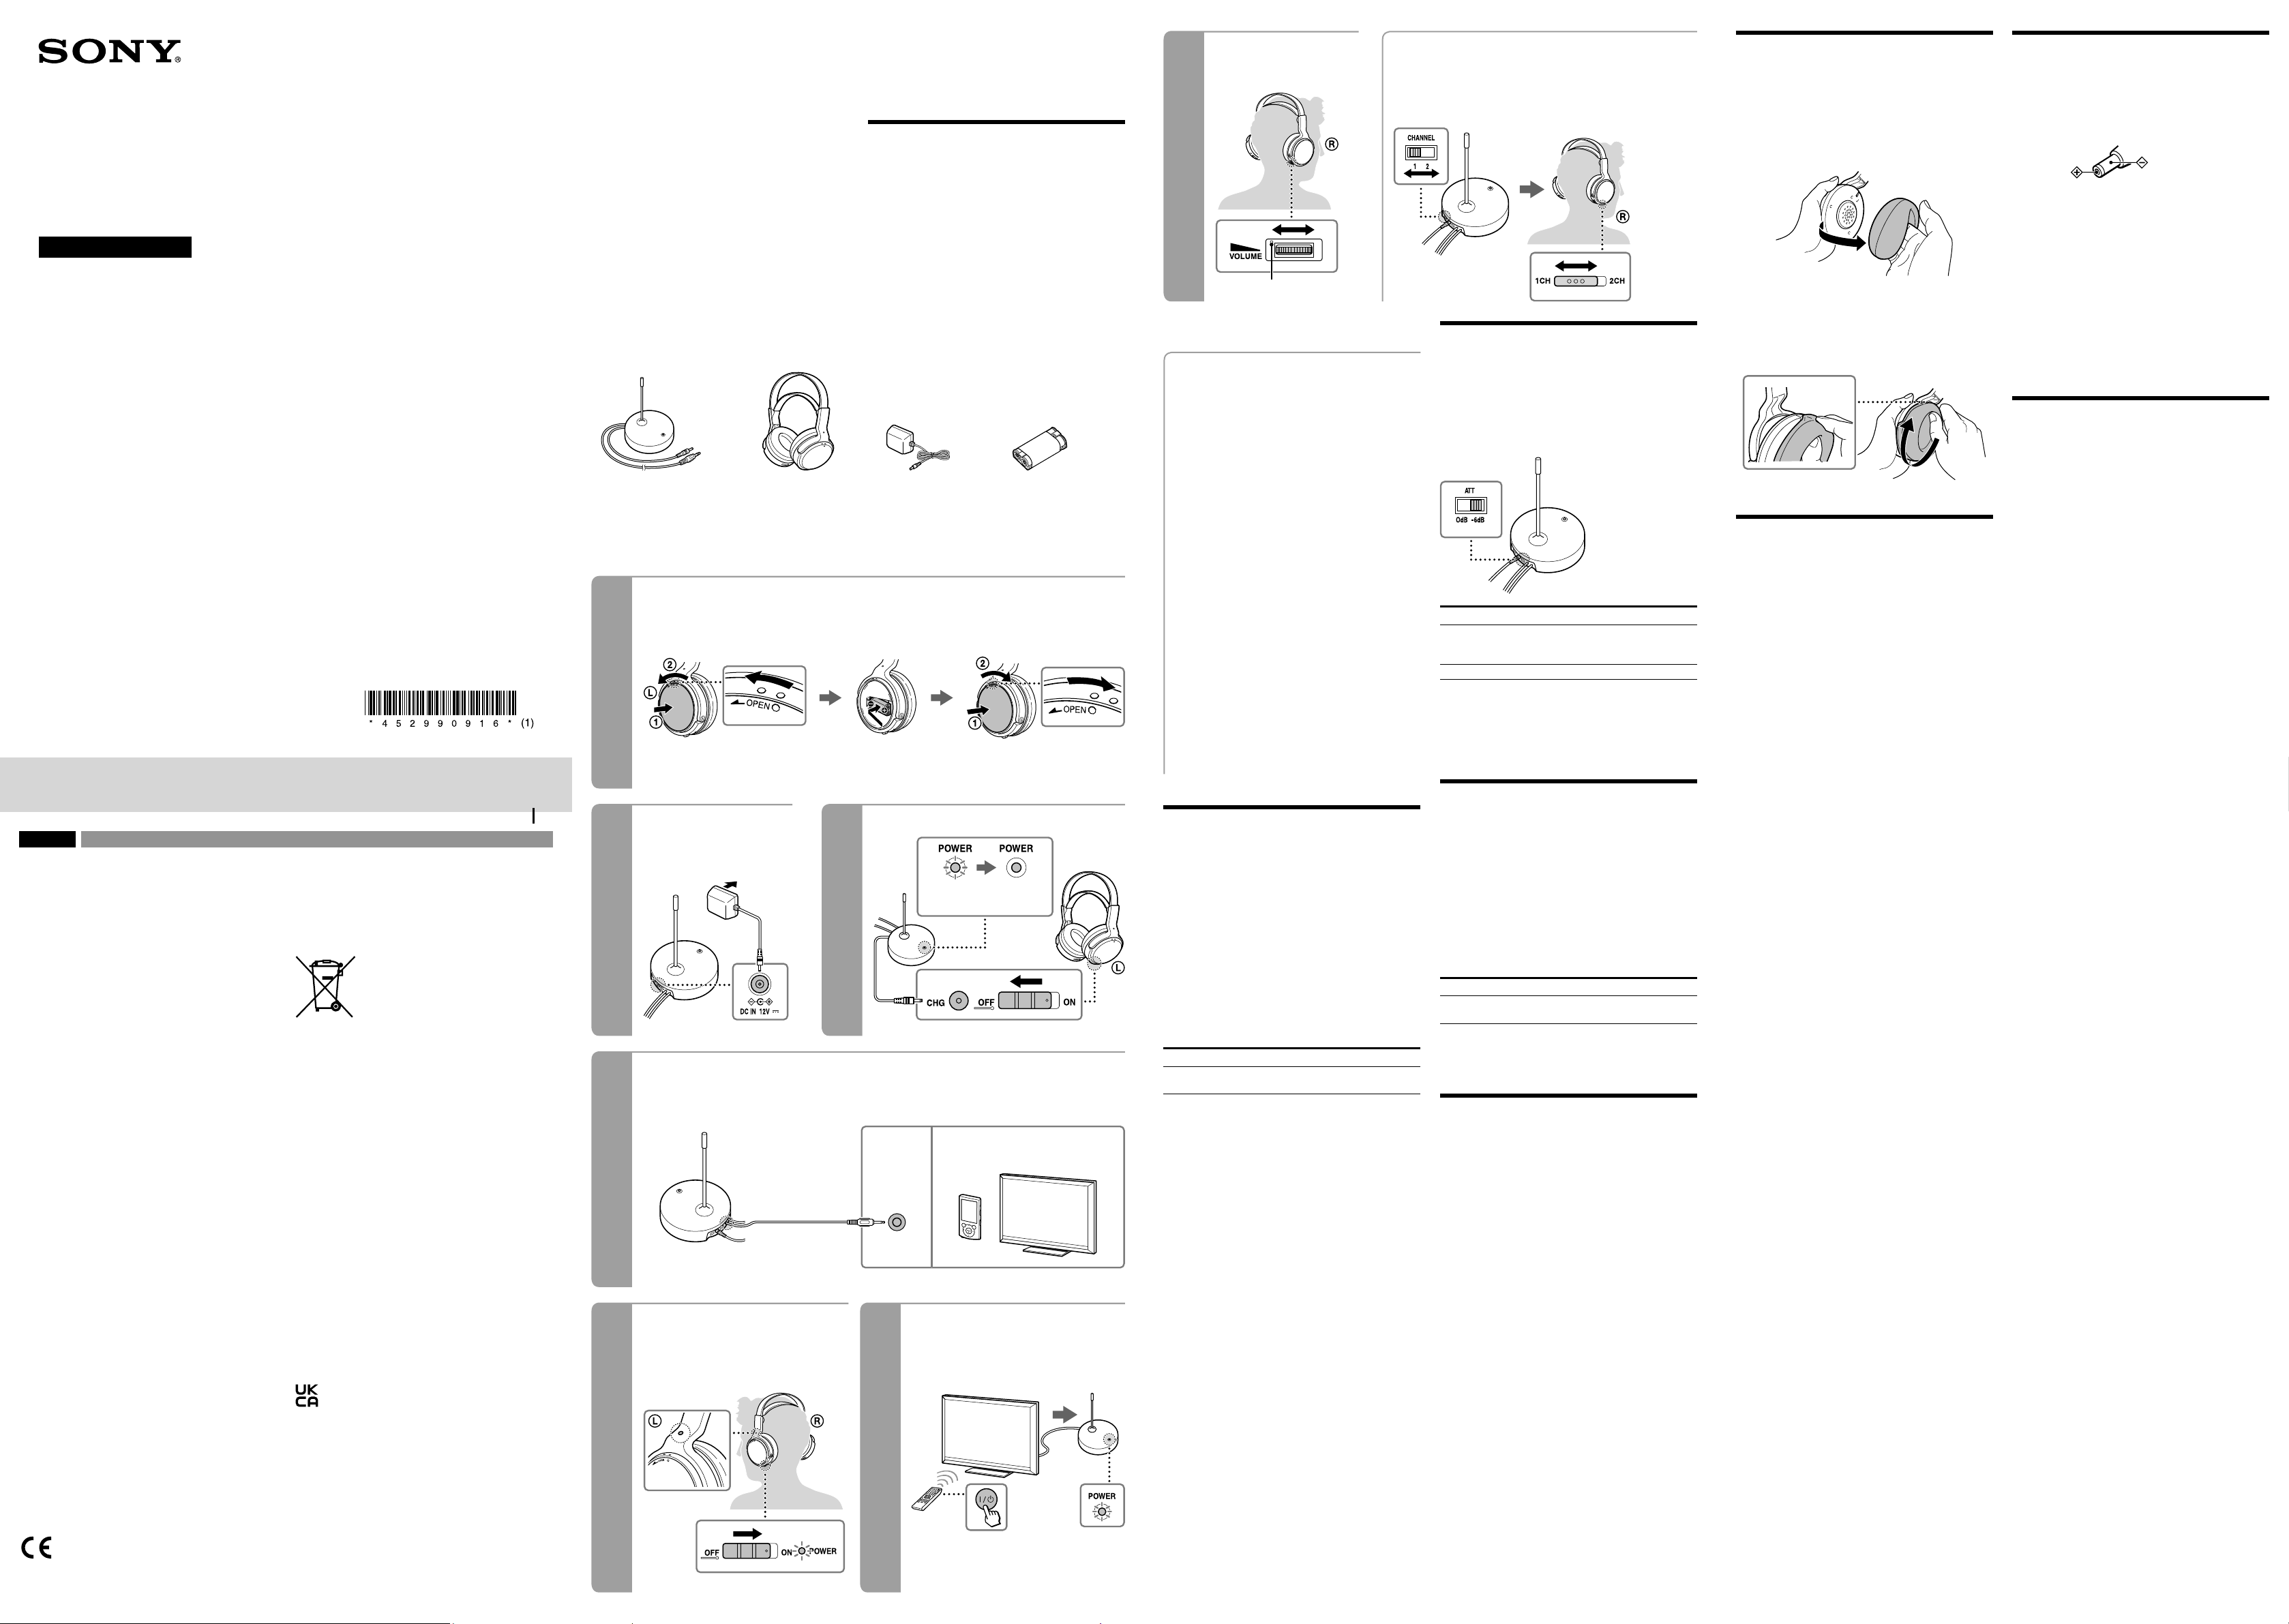
Insert the supplied rechargeable battery into the left housing of
the headphones.
Observe the correct polarity when installing battery.
Connect the A/V component using its headphone jack.
Set the volume of the A/V component as high as possible, but not so high that the audio signal becomes
distorted.
Headphone
jack (Stereo
mini jack)
TV, Digital music player, etc.
Turn on the A/V component.Wear the headphones.
Before listening
To reduce the risk of hearing damage, first
lower the volume.
Tactile dot
Checking the included items
Transmitter TMR-RF810R (1) Headphones MDR-RF811R (1) AC adaptor (1) Rechargeable nickel-metal
hydride battery BP-HP550-11 (1)
Card warranty (1)
Operating Instructions (this manual) (1)
English Wireless Stereo Headphone System
WARNING
To reduce the risk of fire or electric shock, do not
expose this apparatus to rain or moisture.
To reduce the risk of fire or electric shock, do not expose
this apparatus to dripping or splashing, and do not place
objects filled with liquids, such as vases, on the apparatus.
Do not install the appliance in a confined space, such as a
bookcase or built-in cabinet.
As the main plug of AC power adaptor is used to
disconnect the AC power adaptor from the mains, connect
it to an easily accessible AC outlet. Should you notice an
abnormality in it, disconnect it from the AC outlet
immediately.
CAUTION
Risk of explosion if the battery is replaced by an incorrect
type.
Do not expose the batteries (battery pack or batteries
installed) to excessive heat such as sunshine, fire or the
like for a long time.
Do not subject the batteries to extreme low temperature
conditions that may result in overheating and thermal
runaway.
Do not dismantle, open or shred secondary cells or
batteries.
Do not expose cells or batteries to heat or fire. Avoid
storage in direct sunlight.
In the event of a cell leaking, do not allow the liquid to
come in contact with the skin or eyes. If contact has been
made, wash the affected area with copious amounts of
water and seek medical advice.
Do not use any charger other than that specifically
provided for use with the equipment.
Secondary cells and batteries need to be charged before
use. Always use the correct charger and refer to the
manufacturer’s instructions or equipment manual for
proper charging instructions.
After extended periods of storage, it may be necessary to
charge and discharge the cells or batteries several times
to obtain maximum performance.
Dispose of properly.
High volume may affect your hearing.
The nameplate of transmitter is located on the bottom
exterior.
The validity of the CE marking is restricted to only those
countries where it is legally enforced, mainly in the
countries EEA (European Economic Area) and Switzerland.
Hereby, Sony Corporation declares that this equipment is
in compliance with Directive 2014/53/EU.
The full text of the EU declaration of conformity is
available at the following internet address:
http://www.compliance.sony.de/
Hereby, Sony Corporation declares that this equipment is
in compliance with the UK relevant statutory
requirements. The full text of the declaration of conformity
is available at the following internet address:
https://compliance.sony.co.uk
Disposal of waste batteries and
electrical and electronic equipment
(applicable in the European Union and
other countries with separate collection
systems)
This symbol on the product, the battery or
on the packaging indicates that the product and the
battery shall not be treated as household waste. On
certain batteries this symbol might be used in
combination with a chemical symbol. The chemical
symbol for lead (Pb) is added if the battery contains more
than 0.004% lead. By ensuring that these products and
batteries are disposed of correctly, you will help to prevent
potentially negative consequences for the environment
and human health which could be caused by
inappropriate waste handling. The recycling of the
materials will help to conserve natural resources. In case
of products that for safety, performance or data integrity
reasons require a permanent connection with an
incorporated battery, this battery should be replaced by
qualified service staff only. To ensure that the battery and
the electrical and electronic equipment will be treated
properly, hand over these products at end-of-life to the
appropriate collection point for the recycling of electrical
and electronic equipment. For all other batteries, please
view the section on how to remove the battery from the
product safely. Hand the battery over to the appropriate
collection point for the recycling of waste batteries. For
more detailed information about recycling of this product
or battery, please contact your local Civic Office, your
household waste disposal service or the shop where you
purchased the product or battery.
Notice for customers: the following information is only
applicable to equipment sold in countries applying EU
directives and/or UK applying relevant statutory
requirements
This product has been manufactured by or on behalf of
Sony Corporation.
EU and UK Importer: Sony Europe B.V.
Inquiries to the EU Importer or related to product
compliance in Europe should be sent to the
manufacturer’s authorized representative, Sony Belgium,
bijkantoor van Sony Europe B.V., Da Vincilaan 7-D1, 1930
Zaventem, Belgium.
Inquiries to the UK Importer or related to product
compliance in the UK should be sent to the manufacturer’s
authorized representative, Sony Europe B.V., The Heights,
Brooklands, Weybridge, Surrey KT13 0XW, United Kingdom.
This equipment has been tested and found to comply with
the limits set out in the EMC regulation using a connection
cable shorter than 3 meters.
(Red) (Off)
Complete when indicator
turns off.
After use
Take off the headphones, then turn off the power.
About sending RF signals
The transmitter starts sending RF signals automatically
when it detects an audio signal from the connected
component.
Notes
If hiss is heard, move closer to the transmitter.
You may hear some noise when you disconnect the
AC adaptor from the transmitter before turn off the
headphones.
If no signal or low signal is input
for about 4 minutes
If the transmitter does not detect an audio signal for
more than about 4 minutes, it will stop sending RF
signals, and the POWER indicator will blink for 1 minute,
and then turn off.
When the transmitter receives an audio signal again, it
starts sending the RF signals, and the POWER indicator
will light up green again.
You may not hear the beginning of the sound from the
headphones until the transmitter starts sending the RF
signals after detecting an audio signal.
RF signal transmission may stop when an extremely low
sound is input for about 4 minutes. If this happens,
raise the volume of the connected A/V component
within the range where the sound is not distorted, and
lower the volume of the headphones.
Tips for charging
Charge the headphones first
The supplied rechargeable nickel-metal hydride battery is
not charged from the first time you use them. Charge
them before use.
If the transmitter’s POWER indicator
does not light up red
Check if the switch on the left housing of the headphones
is set to OFF. If the switch is set to ON, the POWER
indicator does not light up.
You cannot charge any rechargeable battery or dry battery
other than the supplied battery.
Charging and usage time
Approx. charging time Approx. usage time1)
1 hour
16 hours2)
45 minutes3)
13 hours3)
1) at 1 kHz, 1 mW + 1 mW output
2) hours required to fully charge an empty battery
3) Time may vary, depending on the temperature or
conditions of use.
To recharge supplied battery after
use
Connect the headphones to the CHARGE plug of the
transmitter after use. The POWER indicator lights up red,
then charging starts.
When charging is complete, there is no need to remove
the headphones from the transmitter.
Remaining battery
To check the remaining battery charge of the headphones,
turn on the switch located on the left housing of the
headphone, and check the POWER indicator located on
the left housing. The battery is still serviceable when the
indicator lights up red.
Charge the headphones if the POWER indicator light dims,
flashes, or the sound becomes distorted or noisy.
Notes
Do not connect the CHARGE plug to anything other
than these headphones.
The transmitter automatically stops sending RF signals
while charging the battery.
This system is designed to charge only the supplied
rechargeable battery type BP-HP550-11 for safety. Note
that other types of rechargeable battery cannot be
charged with this system.
If dry batteries are installed, they cannot be charged.
Do not attempt to use the supplied BP-HP550-11
rechargeable battery for other components. They are
for use with this system only.
Charge in an environmental temperature of between
0°C and 40 °C.
Tips for volume setting
When watching videos, be careful not to raise the volume
too high in quiet scenes. You may hurt your ears when a
loud scene is played.
To set the input level
If the volume is high using the analogue input, set the ATT
(attenuator) switch to “–6 dB.
Setting Connected components
0 dB TV, portable components and other
components with a low output level (initial
settings)
-6 dB Other components
Notes
Be sure to lower the volume before setting the ATT
switch.
If audio input is distorted (sometimes, noise can be
heard at the same time), set the ATT switch to “–6 dB.
Using the headphones
with separately-sold dry
batteries
Commercially available (LR03 (size AAA)) dry batteries can
also be used to power the headphones. Install two
batteries in the same manner as described in step 1 of
“How to use.
When dry batteries are installed, the battery charge
function is not activated.
Battery life
Battery Approx. usage time1)
Sony alkaline battery LR03
(size AAA)
28 hours2)
1) at 1 kHz, 1 mW + 1 mW output
2) Time may vary, depending on the temperature or
conditions of use.
Tips for better reception
Receiving performance
This system utilizes very high frequency signals in the 800
MHz band so the receiving performance may deteriorate
due to the surroundings. The following examples illustrate
conditions that may reduce the reception range or cause
interference.
Inside a building with walls containing steel beams.
An area with many steel file cabinets, etc.
An area with many electrical appliances capable of
generating electromagnetic fields.
The transmitter is placed on a metal instrument.
An area facing a roadway.
Noise or interfering signals exist in the surroundings
due to radio transceivers in trucks, etc.
Noise or interfering signals exist in the surroundings
owing to wireless communication systems installed
along roadways.
Effective area of the transmitter
The optimum distance is up to approximately 100 m
without the system picking up some interference.
However, the distance may vary depending on the
surroundings and environment.
If the system picks up some noise within the above
mentioned distance, reduce the distance between the
transmitter and the headphones, or select another
channel.
When you use the headphones inside the effective area
of the transmitter, the transmitter can be placed in any
direction from the listener.
Even within the signal reception area, there are some
spots (dead spots) where the RF signal cannot be
received. This characteristic is inherent to RF signals,
and does not indicate malfunction. By slightly moving
the transmitter, location of the dead spot can be
changed.
Replacing the earpads
The earpads are replaceable. If the earpads become dirty
or worn out, replace them as illustrated below. The
earpads are not commercially available. You can order
replacements from the store where you purchased this
system, or at your nearest Sony dealer.
1 Remove the old earpad by pulling it out of the groove
on the housing.
2 Place the new earpad on the driver unit.
Hang the edge of the earpad on one side of the driver
unit’s groove edge, then turn the edge of earpad
around the driver unit as illustrated below.
When the earpad is securely inserted into the groove,
adjust the earpad to the vertical position.
Troubleshooting
If you run into any problems using this system, use the
following checklist. Should any problem persist, consult
your nearest Sony dealer.
No sound/Low sound
Turn on the headphones.
Check the connection of the transmitter and A/V
component, AC adaptor, and AC outlet.
Check that the A/V component is turned on.
If you connect the transmitter to the headphone jack of
an A/V component, raise the volume level on the
connected A/V component within the range where the
sound is not distorted.
Change the radio frequency with the CHANNEL selector
on the transmitter, then change the radio frequency to
that of the transmitter with the channel switch on the
headphones.
Charge the supplied rechargeable battery, or replace
dry batteries with new ones. If the POWER indicator is
still off after charging, take the headphones to a Sony
dealer.
Distorted or intermittent sound
(sometimes with noise)
Use the headphones near the transmitter, or change
the position of the transmitter.
If you connect the transmitter to an A/V component
using the headphone jack, lower the volume level on
the connected A/V component within the range where
the sound is not distorted.
Change the radio frequency with the CHANNEL selector
on the transmitter, then change the radio frequency to
that of the transmitter with the channel switch on the
headphones.
Charge the supplied rechargeable battery, or replace
dry batteries with new ones. If the POWER indicator is
still off after charging, take the headphones to a Sony
dealer.
Loud background noise
If you connect the transmitter to the headphone jack of
an A/V component, raise the volume level on the
connected A/V component within the range where the
sound is not distorted.
Charge the supplied rechargeable battery, or replace
dry batteries with new ones. If the POWER indicator is
still off after charging, take the headphones to a Sony
dealer.
Use the headphones near the transmitter.
The sound cuts off
The transmitter turns off if no signal or low signal is
input for 4 minutes. If you connect the transmitter to an
A/V component using the headphone jack, raise the
volume level on the connected A/V component within
the range where the sound is not distorted.
Battery cannot be charged/
POWER indicator does not light up
red
Install the supplied rechargeable nickel-metal hydride
battery. Dry batteries and rechargeable batteries other
than the supplied cannot be charged.
Check if the switch on the left housing of the
headphones is set to OFF. If the switch is set to ON, the
POWER indicator does not light up.
Precautions
Notes on the AC adaptor
Insert the AC adaptor plug firmly.
Be sure to use the supplied AC adaptor. Using AC
adaptors with different plug polarity or other
characteristics can cause product failure.
Unified
polarity plug
Be sure to always use the supplied AC adaptor. Even AC
adaptors having the same voltage and plug polarity can
damage this product due to the current capacity or
other factors.
On power sources and placement
When this system is not to be used for a long period of
time, disconnect the AC adaptor from the AC outlet
holding the plug, and remove the battery from the
headphones to avoid damage caused by battery
leakage and subsequent corrosion.
Do not leave this system in a location subject to direct
sunlight, heat or moisture.
Avoid exposure to temperature extremes, direct
sunlight, moisture, sand, dust or mechanical shock.
Specifications
Transmitter (TMR-RF810R)
Modulation FM stereo
Operating frequency
863.0 MHz – 865.0 MHz
Maximum output power
< 4 mW
Channel Ch1, Ch2
Power source DC 12 V: supplied AC adaptor
Audio input Stereo mini plug
Dimensions Approx. 108mm × 128mm × 108mm
(w/h/d)
Mass Approx. 137 g
Rated power consumption
3 W
Headphones (MDR-RF811R)
Frequency response
20Hz – 20,000Hz
Power source Supplied rechargeable nickel-metal
hydride battery BP-HP550-11 or
commercially available (size AAA)
dry-cell batteries
Mass Approx. 270 g (including the supplied
rechargeable nickel-metal hydride
battery)
Rated power consumption
2 W
Design and specifications are subject to change without
notice.
To AC outlet
Connect the AC
adaptor.
Insert the plug firmly.
Press and turn the lid counterclockwise. Match the terminals on
the battery to the marks
in the comportment.
Press and turn the lid clockwise.
7Adjust the volume.
Tactile dot
If you cannot receive a clear audio signal
First change the radio frequency with the CHANNEL selector switch
on the transmitter, then change the radio frequency to that of the
transmitter with the channel switch on the headphones.
The unit is not waterproof. If water or foreign objects enter
the unit, it may result in fire or electric shock. If water or a
foreign object enters the unit, stop use immediately and
consult your nearest Sony dealer. In particular, be careful
in the following cases.
When using the unit around a sink, etc.
Be careful that the unit does not fall into a sink or
container filled with water.
When using the unit in the rain or snow, or in humid
locations
When using the unit while you are sweaty
If you touch the unit with wet hands, or put the unit in
the pocket of a damp article of clothing, the unit may
get wet.
Note on static electricity
Static electricity accumulated in the body may cause mild
tingling in your ears. To reduce the effect, wear clothes
made from natural materials, which suppress the
generation of static electricity.
For details on the effect of contact to the human body
from the mobile phone or other wireless devices
connected to the unit, refer to the instruction manual of
the wireless device.
This product (including accessories) has magnet(s) which
may interfere with pacemakers, programmable shunt
valves for hydrocephalus treatment, or other medical
devices. Do not place this product close to persons who
use such medical devices. Consult your doctor before
using this product if you use any such medical device.
Features
Thank you for purchasing the Sony MDR-RF811RK Wireless
Stereo Headphone System. Before operating the unit,
please read this manual thoroughly and retain it for future
reference.
Some features are:
Wireless system that allows you to listen to a
programme free from the restriction of a cord.
High fidelity sound reproduction.
13 hours of continuous use with supplied rechargeable
battery.
Easy connection with TV and HiFi Audio system
equipment.
Up to 100 metres reception range.
Volume control function on the headphones.
Wireless Stereo
Headphone System
Operating Instructions
4-529-909-16(1)
MDR-RF811RK
©2014 Sony Corporation Printed in China
1

Brauchen Sie Hilfe? Stellen Sie Ihre Frage.

Forenregeln
1

Forum

sony-mdr-rf811rk

Suche zurücksetzen

  • Ich drücke auf die Seite des linken Kopfhörers...doch auch mit dem Drehen gg. den Uhrzeigersinn lässt es sich nicht öffnen bzw. Akku einlegen.
    Was mache ich falsch ? Eingereicht am 2-8-2022 17:45

    Antworten Frage melden

Missbrauch melden von Frage und/oder Antwort

Libble nimmt den Missbrauch seiner Dienste sehr ernst. Wir setzen uns dafür ein, derartige Missbrauchsfälle gemäß den Gesetzen Ihres Heimatlandes zu behandeln. Wenn Sie eine Meldung übermitteln, überprüfen wir Ihre Informationen und ergreifen entsprechende Maßnahmen. Wir melden uns nur dann wieder bei Ihnen, wenn wir weitere Einzelheiten wissen müssen oder weitere Informationen für Sie haben.

Art des Missbrauchs:

Zum Beispiel antisemitische Inhalte, rassistische Inhalte oder Material, das zu einer Gewalttat führen könnte.

Beispielsweise eine Kreditkartennummer, persönliche Identifikationsnummer oder unveröffentlichte Privatadresse. Beachten Sie, dass E-Mail-Adressen und der vollständige Name nicht als private Informationen angesehen werden.

Forenregeln

Um zu sinnvolle Fragen zu kommen halten Sie sich bitte an folgende Spielregeln:

Neu registrieren

Registrieren auf E - Mails für Sony MDR-RF811RK wenn:


Sie erhalten eine E-Mail, um sich für eine oder beide Optionen anzumelden.


Andere Handbücher von Sony MDR-RF811RK

Sony MDR-RF811RK Bedienungsanleitung - Deutsch - 2 seiten

Sony MDR-RF811RK Bedienungsanleitung - Holländisch, Italienisch - 2 seiten

Sony MDR-RF811RK Bedienungsanleitung - Spanisch - 2 seiten


Das Handbuch wird per E-Mail gesendet. Überprüfen Sie ihre E-Mail.

Wenn Sie innerhalb von 15 Minuten keine E-Mail mit dem Handbuch erhalten haben, kann es sein, dass Sie eine falsche E-Mail-Adresse eingegeben haben oder dass Ihr ISP eine maximale Größe eingestellt hat, um E-Mails zu erhalten, die kleiner als die Größe des Handbuchs sind.

Ihre Frage wurde zu diesem Forum hinzugefügt

Möchten Sie eine E-Mail erhalten, wenn neue Antworten und Fragen veröffentlicht werden? Geben Sie bitte Ihre Email-Adresse ein.


Info