18
The 651R/751R allows level calibration to match the acoustic level between
different types/sizes or even manufacturers of speaker that may be being
used for each channel. This is achieved by adjusting the relative level of each
speaker. This can be done manually through the ‘Level Calibration’ menu in
the OSD or automatically, see the following Audyssey auto setup section of
this manual.
The basic process for manual adjustment is to listen to or measure with a
Sound Pressure Level (SPL) meter (more accurate and recommended but
not essential) the level of sound produced by each speaker and set relative
levels for each speaker so that they all sound the same loudness at the
normal listening position. The 651R/751R incorporates a Test Signal
Generator (broad-band white noise) to facilitate this.
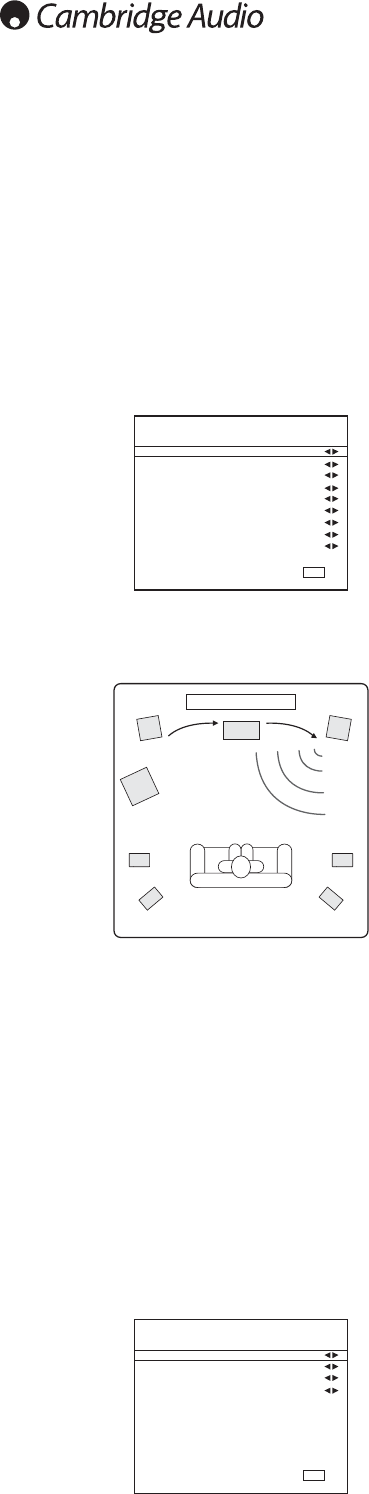
Press the OSD button on the remote control then select the ‘Level
Calibration’ menu. Now turn on the test signal by highlighting this item and
pressing the Left or Right arrows:
You can now move up and down the channels using Volume Up/Down on the
remote. Each time a new channel is selected the test signal will be heard to
move to that channel. Compare the loudness of all channels as heard at the
listening position.
A “rushing” or “hissy” sound should be heard.
Now adjust the channels so they all sound the same (in terms of loudness
only, channels of different frequency responses can sound different in terms
of the “tone” of the sound i.e. more or less hissy).
Pick the channel that sounds most different and select it to listen to the test
signal. Now adjust the relative level in dB (using Arrow left/right on the
remote) and continue comparing it to other channels until it is of equal
loudness. The level can be adjusted up to + or - 10dB in 1dB steps. Repeat
the process with the next most different channel. Once all channels sound
the same in terms of loudness, press the OSD button again to save the
settings and exit the menu.
Manually setting sub crossovers and
bass management
The 651R/751R performs bass management for any speaker that is set to
‘Small’ in the OSD. This means that bass for speakers that are unable to
reproduce bass effectively is instead routed to the subwoofer.
Manually setting level calibration
Surr. Back L :
Surr. Back R :
The crossover adjustments in the Speaker crossover menu are used to
determine the point as which this transition is made. In other words they set
the frequency below which bass is routed away from any ‘Small’ speakers
and into the Subwoofer channel. It should be understood that bass sent to
the subwoofer by bass management is different to bass encoded into the
surround-sound material as a dedicated Low Frequency Effects channel.
If the source material contains a separate LFE channel (i.e. DD or DTS
material) this is always routed to the subwoofer (if it is On) and is not affected
by the crossover setting. Some encoding types (Such as Dolby Pro Logic II/IIx
and Neo:6) do not actually have a LFE channel.
The default setting for all bass management crossovers is 80Hz and is a
good global starting point. If you do not wish to make any adjustments simply
leave all crossovers at this default setting.
Note: These settings are actually only used for speakers that have been set
to Small in the Speaker Configuration Menu.
For advanced users it is however possible to adjust the speaker crossovers
used for any speakers set as ‘Small’ independently to allow for the fact that
you may wish to direct bass away from front floorstanding speakers (and to
the Subwoofer) at perhaps 50Hz but away from Surround Left and Rights at
perhaps 100Hz. If you wish to make these adjustments it is best to consult
your loudspeaker manufacturers documentation or contact your dealer to
determine the frequency response of your system and where each speaker
types bass response starts to tail off (often called the 3dB or 6dB roll
off/cutoff point). This would be approximately the point the corresponding
crossover should be set to.
Alternatively, the Audyssey Autosetup procedure can measure and set
appropriate crossover points for your speakers.
Audyssey 2EQ
®
and Autosetup
Using the supplied calibrated microphone, the Audyssey 2EQ system can
perform ‘Autosetup’ by automatically determining the number of speakers
you have connected, their ‘size’ and crossover frequencies (for the purpose
of bass management) and their distances from the listening position.
Further to this Audyssey 2EQ can also remove difficiencies in playback
caused by sub optimal room acoustics.
It does this by capturing any acoustical problems at the listening area in both
the frequency and time domain and applying sophisticated corrective
equalisation.
The result being improved sound quality, clarity of dialogue, and a well-
balanced sound for more than one listening position.
Audyssey 2EQ can also be used with Audyssey Dynamic EQ® and Audyssey
Dynamic Volume® as described fully later in this section.
On the 651R/751R Audyssey 2EQ offers two ways of measuring: The simpler
Audyssey Autosetup method and Audyssey Autosetup + 2EQ.
Audyssey Autosetup uses the measurement from one position to perform
the speaker settings only.
Audyssey Autosetup + 2EQ uses the measurement from 3 positions to
correct room response in addition to the speaker settings.
Before using either function, make sure to connect and correctly position all
of your speakers.
If rather than a standard 5.1 or 7.1 setup you are bi-amping your front
speakers or using the SBL/SBR speakers for Zone 2 or wish to run a 5.1+
Height configuration be sure to make these settings first before then
running Autosetup.
This is important as the 651R/751R needs this information in order to test
the speakers correctly during the Autosetup process.
Performing Autosetup
The simplest Audyssey based autosetup system is a two stage process, firstly
it checks how many speakers you have connected and reports whether they
appear out of phase or not. This allows you to trap any errors in connection.
If all is well you can then progress to the second stage which makes further
measurements of each speaker in turn to automatically set the distance
(delay time), calibrated level and crossover point for each one.
Surr. L/R :
Surr. LB/RB :