E-16
2. Press
D
to move the fl
City Code DST
Illumination
Duration
Button Operation
Tone On/Off
Day Month
12/24-Hour
Format
Seconds Hour
Year
Minutes
• Th
3. When the timekeeping setting you want to change is fl ashing, use
E
and/or
B
to change it as
described below.
Screen To do this: Do this:
Change the city code Use
E
(East) and
B
(West).
Toggle between daylight saving time (
ON
) and
standard time (
OFF
).
Press
E
.
Toggle between 12-hour (
12H
) and 24-hour (
24H
)
timekeeping.
Press
E
.
Reset the seconds to
00
(If the current seconds count is between 30 and 59,
one is added to the minute count).
Press
E
.
Change the hour or minutes
Use
E
(+) and
B
(–).
Change the year, month, or day
E-17
4. After all of the settings are the way you want, press
A
to exit the setting screen.
Note
• For i
Ho
• Whi P (PM
no
timP (PM) indicator.
• The wa
year
watch’s bat
• The d
• Refe
- Button operation tone on/off: “To enable or disable the button operation tone” (page E-52)
- Illumination duration setting: “To change the illumination duration” (page E-48)
E-18
Hand Home Position Adjustment
Strong magnetism or impact can cause the hands of the watch to be off.
• Home position adjustment is not necessary when the analog time and digital time are the same time in
the Timekeeping Mode.
To adjust home positions
1. In the Timekeeping Mode, hold down
A
and keep it depressed for about fi
seconds until
H.SET
appears on the upper display.
• Wh
A
afH.SET appears, the second
to 12 o’
mode.
• ThougADJ will appe
hold down
A
, do noH.SET
appears.
• Use t
D
but
D
cycle
and t
o’clock a
below.
Lower display Selected hand
Flashing
00
Second hand
Flashing
0:00
Hour and minute hands
Flashing
Sub
Mode dial hand
• If th
E-19
• The watch will return to regular timekeeping automatically if you do not perform any operation for
about two or three minutes. Any changes you have made to settings up to that point will be saved.
2. Use
E
(+) and
B
(–) to adjust the position of the currently selected hand.
• Ho
hand m
pres
• The second hand and mode dial hand will automatically stop high-speed movement after they
complete one revolution. The minute hand will stop automatically after 12 revolutions.
3. Press
A
to exit home position correction and return to regular timekeeping.
Note
After performing home position adjustment, enter the Timekeeping Mode and check to make sure that the
analog hands and the lower display indicate the same time. If they do not, perform home position
adjustment again.
E-20
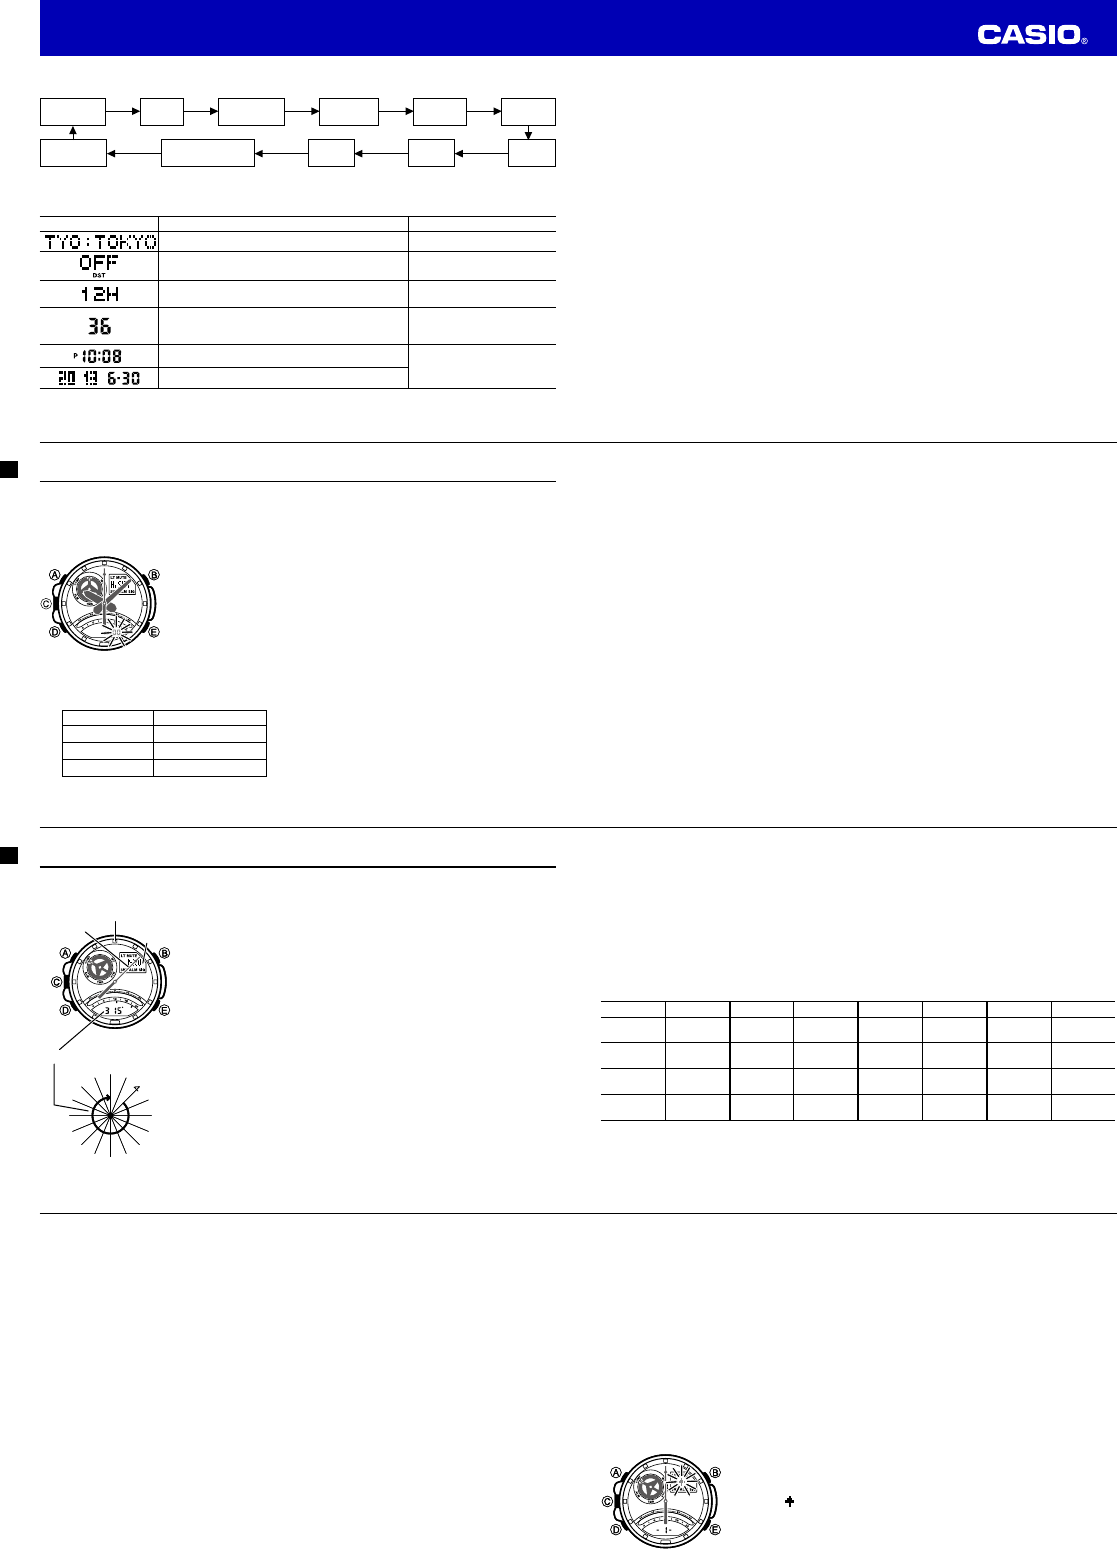
Using the Digital Compass
In the Digital Compass Mode, a built-in bearing sensor detects magnetic north at regular intervals and
indicates one of 16 directions on the upper display.
To perform a digital compass operation
1. Place the watch on a fl
sure that your wrist is horizontal (in relation to the horizon).
2. Point the 12 o’clock position of the watch in the direction you want to
check.
3. In any mode (except a setting mode), press
C
to perform a digital
compass operation.
• This will causeCOMP.
• COMP will appe
com
• Se
abo
Note
• If th
bea
press
E
to exit t
4. To return to the mode you were in immediately before entering the
Digital Compass Mode, press
D
. To enter the Timekeeping Mode,
hold down
D
for at least two seconds.
NW
0
WNW
W
WSW
SW
SSW
S
SSE
SE
ESE
E
ENE
NE
NNE
N
NNW
90
180
270
12 o’clock position
North pointer
Direction
indicator
Angle value (in degrees)
NW
0
WNW
W
WSW
SW
SSW
S
SSE
SE
ESE
E
ENE
NE
NNE
N
NNW
90
180
270
12 o’clock position
North pointer
Direction
indicator
Angle value (in degrees)
E-21
Digital Compass Readings
• When you press
C
to start a digital compass operation,
COMP
will initially appear on the upper
display. About two seconds after you start a digital compass operation, an indicator will appear in the
upper display to indicate what direction the 12 o’clock position of the watch is pointed. The second
hand will point to magnetic north.
• After the fi
each second for up to 20 seconds. After that, the digital compass operation will stop automatically.
• The direction indicator and angle value will show
- - -
to indicate that the digital compass operation is
complete.
• The auto light switch is disabled during the 20 seconds that digital compass readings are being taken.
• The following table shows the meanings of each of the direction abbreviations that appear on the upper
display.
Direction Meaning Direction Meaning Direction Meaning Direction Meaning
N
North
NNE
North-
northeast
NE
Northeast
ENE
East-
northeast
E
East
ESE
East-
southeast
SE
Southeast
SSE
South-
southeast
S
South
SSW
South-
southwest
SW
Southwest
WSW
West-
southwest
W
West
WNW
West-
northwest
NW
Northwest
NNW
North-
northwest
• The margin of error for the angle value and the direction indicator is ±15 degrees while the watch is
horizontal (in relation to the horizon). If the indicated direction is northwest (
NW
) and 315 degrees, for
example, the actual direction can be anywhere from 300 to 330 degrees.
E-22
• Note that performing a digital compass operation while the watch is not horizontal (in relation to the
horizon) can result in large error.
• You can calibrate the bearing sensor if you suspect the direction reading is incorrect.
• Any ongoing digital compass operation is paused temporarily while the watch is performing an alert
operation (daily alarm, Hourly Time Signal, countdown timer alarm) or while illumination is turned on (by
pressing
B
). The digital compass operation resumes for its remaining duration after the operation that
caused it to pause is fi
• See “Digital Compass Precautions” (page E-33) for important information about taking direction readings.
Calibrating the Bearing Sensor
You should calibrate the bearing sensor whenever you feel that the direction readings being produced by
the watch are off. You can use any one of two different bearing sensor calibration methods: bidirectional
calibration or magnetic declination correction.
•
Bidirectional Calibration
Bidirectional calibration calibrates the bearing sensor in relation to magnetic north. Use bidirectional
calibration when you want to take readings within an area exposed to magnetic force. This type of
calibration should be used if the watch becomes magnetized for any reason.
Important!
The more correctly you perform bidirectional calibration, the better the accuracy of the readings
produced by the bearing sensor. You should perform bidirectional calibration whenever you change
environments where you use the bearing sensor, and whenever you feel that the bearing sensor is
producing incorrect readings.
E-23
•
Magnetic Declination Correction
With magnetic declination correction, you input a magnetic declination angle (difference between
magnetic north and true north), which allows the watch to indicate true north. You can perform this
procedure when the magnetic declination angle is indicated on the map you are using. Note that you can
input the declination angle in whole degree units only, so you may need to round off the value specifi
on the map. If your map indicates the declination angle as 7.4°, you should input 7°. In the case of 7.6°
input 8°, for 7.5° you can input 7° or 8°.
Precautions about bidirectional calibration
• You can use any two opposing directions for bidirectional calibration. You must, however, make sure
that they are 180 degrees opposite each other. Remember that if you perform the procedure
incorrectly, you will get wrong bearing sensor readings.
• Do not move the watch while calibration of either direction is in progress.
• You should perform bidirectional calibration in an environment that is the same as that where you plan
to be taking direction readings. If you plan to take direction readings in an open fi
calibrate in an open fi
To perform bidirectional calibration
1. In the Digital Compass Mode, hold down
A
.
• The s
bidirectional calibration
• At thi
(
) and t-1 . T
watch is re
Operation Guide 5302