E-48
Illumination
The display of the watch is illuminated for easy reading in the dark. The
watch’s auto light switch turns on illumination automatically when you
angle the watch towards your face.
• The auto light switch must be enabled (page E-50) for it to operate.
To illuminate the display manually
Press
B
in any mode (except when a fl
displayed) to illuminate the display.
• You can use the procedure below to select either 1.5 seconds or three
seconds as the illumination duration. When you press
B
, the display
will remain illuminated for about 1.5 seconds or three seconds,
depending on the current illumination duration setting.
• The above operation illuminates the display regardless of whether the
auto light switch is enabled or disabled.
• Illumination is disabled while confi
settings, and during bearing sensor calibration.
To change the illumination duration
1. In the Timekeeping Mode, hold down
A
until
ADJ
appears in the upper display.
• Wh
A
(afADJ appears)SET will b
set
2. Use
D
to cycle through the settings on the upper display until the current illumination duration (
LT1
or
LT3
) is shown.
• See t
set
E-49
3. Press
E
to toggle the illumination duration between three seconds (
LT3
displayed) and 1.5 seconds
(
LT1
displayed).
4. After all of the settings are the way you want, press
A
to exit the setting screen.
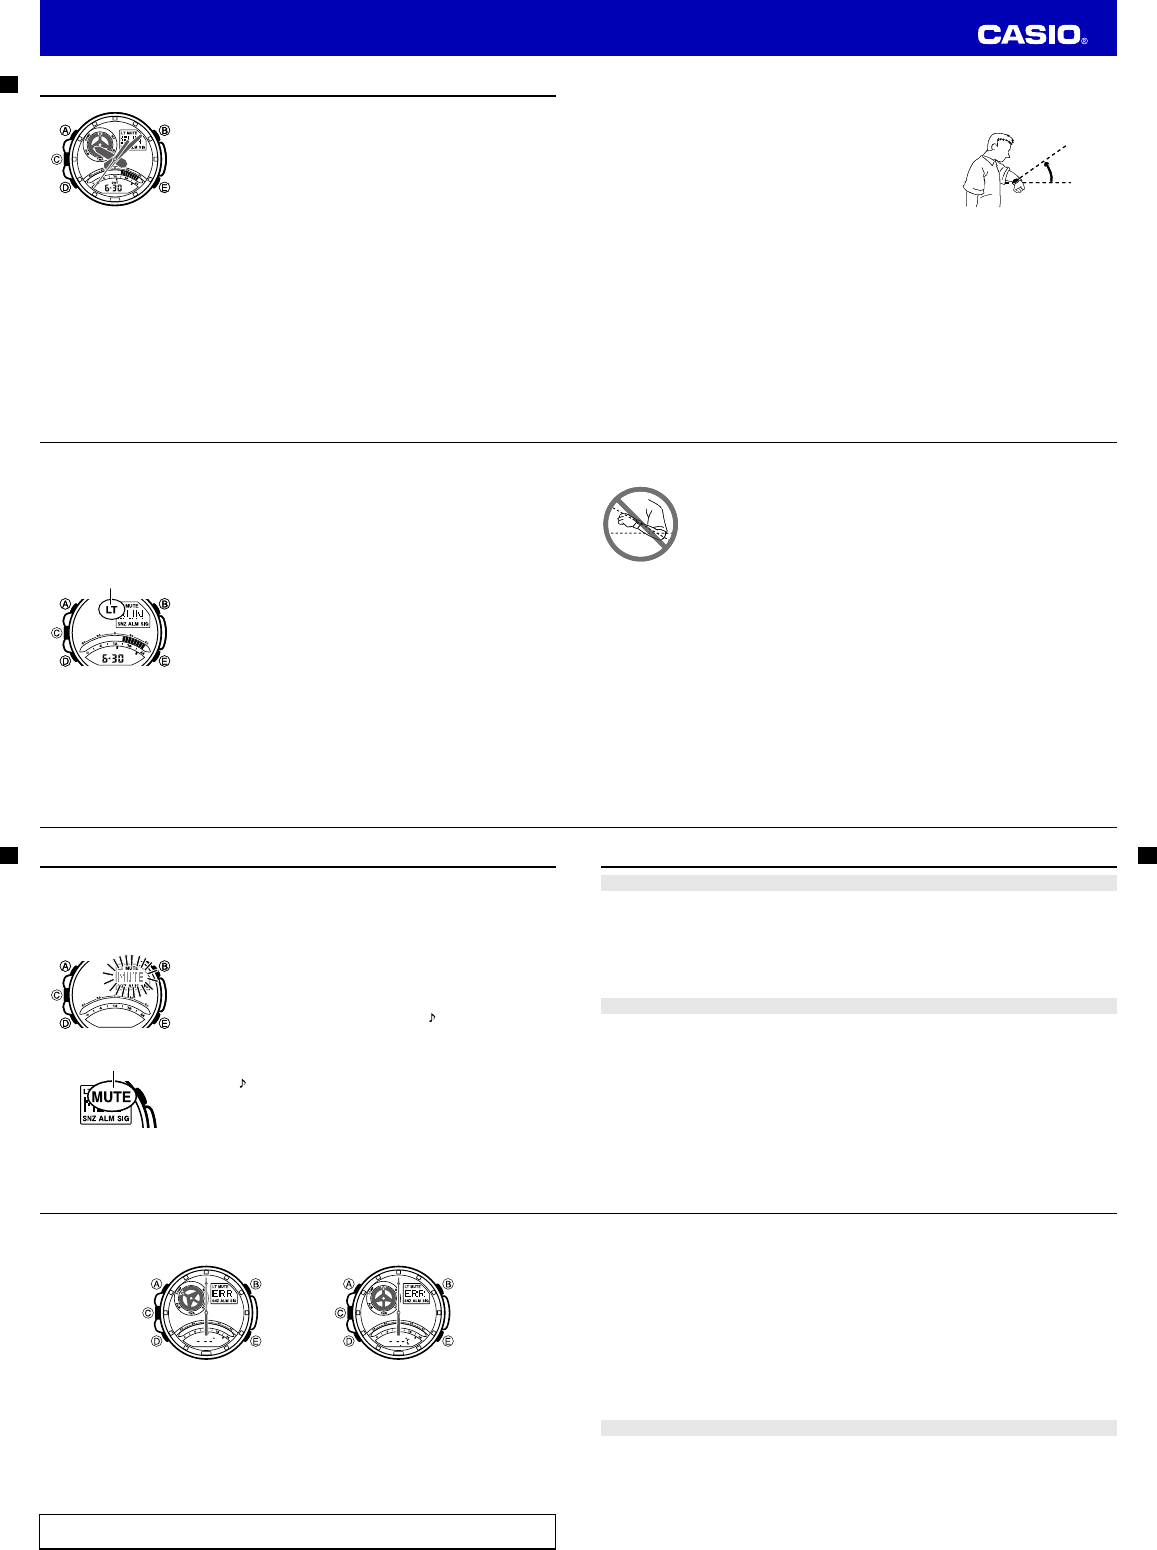
About the Auto Light Switch
While the Auto Light Switch is enabled, illumination will turn on
whenever you position your wrist as described below in any mode.
Moving the watch to a position that is parallel to the ground and
then tilting it towards you more than 40 degrees causes
illumination to turn on.
Warning!
•
Always make sure you are in a safe place whenever you are reading the display of the watch
using the auto light switch. Be especially careful when running or engaged in any other activity
that can result in accident or injury. Also take care that sudden illumination by the auto light
switch does not startle or distract others around you.
•
When you are wearing the watch, make sure that its auto light switch is turned off before riding
on a bicycle or operating a motorcycle or any other motor vehicle. Sudden and unintended
operation of the auto light switch can create a distraction, which can result in a traffi c accident
and serious personal injury.
More than
40°
Wear the watch on the
outside of your wrist
More than
40°
Wear the watch on the
outside of your wrist
E-50
Note
• The auto light switch is always disabled, regardless of its enabled/disabled setting, when any one of
the following conditions exists.
While an alarm is sounding
During sensor measurement
While a bearing sensor calibration operation is being performed in the Digital Compass Mode
To enable or disable the auto light switch
In the Timekeeping Mode, hold down
B
for about three seconds to
toggle the auto light switch between enabled (
LT
shown in the upper
display) and disabled (
LT
not displayed).
• The auto light switch enabled indicator (
LT
) is on the upper display in
all modes while the auto light switch is turned enabled.
• The auto light switch remains enabled for about six hours. After that
disables automatically.
Illumination Precautions
• Do not look directly at the ultraviolet LED light source located at 6 o’clock.
• Never try to remove the ultraviolet LED from the watch and use it as a light source.
• Do not use a lens or other object to concentrate the ultraviolet LED light.
• Illumination may be hard to see when viewed under direct sunlight.
• Illumination turns off automatically whenever an alarm sounds.
• Frequent use of illumination runs down the battery.
Auto light switch
enabled indicator
Auto light switch
enabled indicator
E-51
Auto light switch precautions
• Illumination may not turn on if the face of the watch is more than 15 degrees above
or below parallel. Make sure that the back of your hand is parallel to the ground.
• Illumination turns off after the preset illumination duration (page E-48), even if you
keep the watch pointed towards your face.
• Static electricity or magnetic force can interfere with proper operation of the auto
light switch. If illumination does not turn on, try moving the watch back to the
starting position (parallel with the ground) and then tilt it back towards your face
again. If this does not work, drop your arm all the way down so it hangs at your
side, and then bring it back up again.
• You may notice a very faint clicking sound coming from the watch when it is shaken
back and forth. This sound is caused by mechanical operation of the auto light
switch, and does not indicate a problem with the watch.
E-52
Button Operation Tone
When enabled, the button operation tone sounds any time you press one of the watch's buttons. You can
enable or disable the button operation tone as desired.
• Even if you disable the button operation tone, the alarm, Hourly Time Signal, and Countdown Timer
Mode alarm all operate normally.
To enable or disable the button operation tone
1. In the Timekeeping Mode, hold down
A
until
ADJ
appears in the
upper display.
• Wh
A
(afADJ appears)SET will b
the lower di
2. Use
D
to cycle through settings on the upper display until the current
button operation tone setting (
MUTE
or
KEY
) is shown.
• Se
curre
how to sc
3. Press
E
to toggle the button operation tone setting between enabled
(
KEY
) and disabled (
MUTE
).
4. After the setting is the way you want, press
A
to exit the setting
screen.
Note
• The m
operation tone
Mute indicator
E-53
Troubleshooting
Time Setting
■
Why is the current time setting off by a couple of hours?
Your Home City setting may be wrong (page E-13). Check your Home City setting and correct it, if
necessary.
■
Why is the current time setting off by one hour?
You may need to change your Home City’s standard time/daylight saving time (DST) setting. Use the
procedure under “To change the current time and date settings” (page E-15) to change the standard time/
daylight saving time (DST) setting.
Sensor modes
■
Why can’t I change the temperature unit setting?
The temperature unit setting is always Celsius (
°C
) whenever
TOKYO
is selected as the Home City. In
this case, the setting cannot be changed.
■
Why does “ERR” appear while a sensor operation is in progress?
Subjecting the watch to strong impact can cause sensor malfunction or improper contact of internal
circuitry. When this happens,
ERR
(error) will appear on the upper display and sensor operations will be
disabled.
E-54
Digital Compass
Operation
Temperature
Measurement
•
If
ERR
appears while a measurement operation is being performed in a sensor mode, restart the
measurement. If
ERR
appears on the upper display again, it can mean there is something wrong with
the sensor.
• If
ERR
keeps appearing during measurement, it could mean there is a problem with the applicable
sensor.
■
Why does “ERR” appear on the upper display following bidirectional calibration?
If
- - -
appears and then changes to
ERR
(error) on the calibration screen, it means that there is something
wrong with the sensor.
• If
ERR
disappears after about one second, try performing the calibration again.
• If
ERR
keeps appearing, contact your original dealer or nearest authorized CASIO distributor to have
the watch checked.
Whenever you have a sensor malfunction, take the watch to your original dealer or nearest authorized
CASIO distributor as soon as possible.
E-55
■
What causes incorrect direction readings?
• Incorrect bidirectional calibration. Perform bidirectional calibration (page E-23).
• Nearby source of strong magnetism, such as a household appliance, a large steel bridge, a steel
beam, overhead wires, etc., or an attempt to perform direction measurement on a train, boat, etc. Move
away from large metal objects and try again.
■
What causes different direction readings to produce different results at the same location?
Magnetism generated by nearby high-tension wires is interfering with detection of terrestrial magnetism.
Move away from the high-tension wires and try again.
■
Why am I having problems taking direction readings indoors?
A TV, personal computer, speakers, or some other object is interfering with terrestrial magnetism
readings. Move away from the object causing the interference or take the direction reading outdoors.
Indoor direction readings are particularly diffi
Remember that you will not be able to take direction readings inside of trains, airplanes, etc.
World Time Mode
■
The time for my World Time City is off in the World Time Mode.
This could be due to incorrect switching between standard time and daylight saving time.
See “To specify standard time or daylight saving time (DST) for a city” (page E-39) for more information.
Operation Guide 5302